Convertir le fichier MPROST PROJECT en PDF
Le format de document PDF ou portable est un format de fichier développé par Adobe en 1992 pour présenter des documents, y compris la mise en forme du texte et les images. Microsoft Project permet à l’utilisateur d’exporter les données du projet au format PDF.
Ce sont des étapes pour exporter les données du projet au format PDF:
Supposons que votre projet soit ouvert dans le projet Microsoft.
- Sélectionnez “File \ Enregistrer sous” Élément de menu
- Sélectionnez l’emplacement (par exemple “ce PC”)
- Dans le format “Enregistrer sous” la boîte de dialogue “Sélectionnez les fichiers PDF (*. PDF) dans la liste déroulante” Enregistrer sous le type “.
- Cliquez sur le bouton “Enregistrer”
- Dans la boîte de dialogue Options d’exportation de documents Sélectionnez la plage de publication et cliquez sur “OK”.
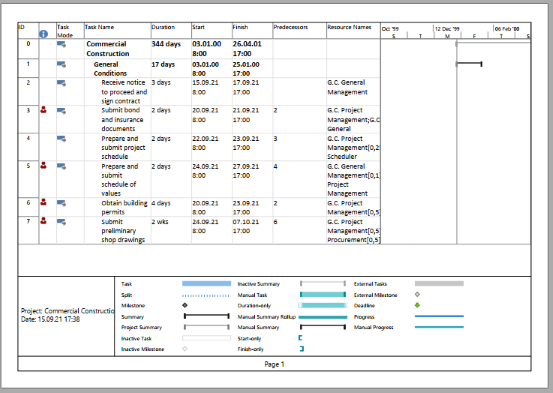
La vue actuellement sélectionnée sera rendue dans le fichier PDF. Voici un exemple de fichier de sortie:
Aspose.tasks pour .NET offre également la capacité de rendre la vue du projet au format PDF par programme. Dans ce cas, vous n’avez pas besoin de faire installer le projet Microsoft sur votre machine. Cet article donne un aperçu détaillé de la variété des options disponibles dans Aspose. Tasks pour l’exportation de projets vers PDF.
Enregistrer un fichier MS Project MPP en tant que PDF
La classe Project expose la méthode de sauvegarde qui est utilisée pour enregistrer un projet dans divers formats. La méthode Save vous permet de rendre des données de projet à PDF à l’aide du type d’énumération SaveFileFormat.
Pour enregistrer un projet sur PDF:
- Chargez un fichier Microsoft Project MPP.
- Facultativement, apporter des modifications au projet chargé.
- Enregistrez le projet sur PDF à l’aide de l’une des surcharges de méthode Project.Save. Vous pouvez utiliser SaveFileFormat.pdf pour enregistrer le projet avec des paramètres par défaut ou PDFSaveOptions pour personnaliser les options d’exportation.
- Veuillez noter que vous ne pouvez pas définir des valeurs par rapport aux champs application et producteur, en raison d’Aspose Ltd. et Aspose.tasks pour .net x.x.x sera affiché sur ces champs.
Les lignes de code suivantes montrent comment y parvenir en utilisant C #.
1Project project = new Project("New Project.mpp");
2project.Save("SaveProjectAsPDF_out.pdf", SaveFileFormat.PDF);Specifying a View to save to PDF
Microsoft Project supports different view such as ‘Gantt Chart’, ‘Task Usage’, ‘Resource Usage’, etc. Each view can be customized and these settings are stored in MPP file. Aspose.Tasks for .NET allows the user to examine and change these settings using Project.Views collection.
There are 3 ways to specify the View which will be exported to PDF:
- Do not specify a View explicitly. In this case Project.DefaultView will be rendered. If default view is missing, Gantt Chart view will be rendered.
- Use SaveOptions.PresentationFormat to specify value of PresentationFormat enumeration. In this case the view with the correspondent Screen property will be selected from Project.Views collection. If View is missing, the default settings are used.
- Use SaveOptions.ViewSettings property to explicitly specify the View object to render. If View object is specified, the value of SaveOptions.PresentationFormat is ignored.
Fitting Contents to Cell Size
Commonly, a task (or resource) name is so long that it is truncated when project views are rendered. Aspose.Tasks for .NET provides the FitContent property in the SaveOptions class to avoid truncation of task and resource names. The code example below renders a project to PDF format with the FitContent property set to true.
1Project project = new Project("New Project.mpp");
2SaveOptions options = new PdfSaveOptions();
3
4// Set option fit content to true
5options.FitContent = true;
6options.Timescale = Timescale.Months;
7options.PresentationFormat = PresentationFormat.TaskUsage;
8project.Save("FitContentsToCellSize_out.pdf", options);Printing or Hiding Legends when Rendering
To let you print or hide the legends on each page, the SaveOptions class provides the LegendOnEachPage property. If this flag is set to true, legends are printed on each page in the output file.
1SaveOptions options = new PdfSaveOptions();
2
3// Set the LegendOnEachPage property to false to hide legends
4options.LegendOnEachPage = false;Supported Graphical Column Indicators
Aspose.Tasks draws graphical column indicators when rendering project data to output PDF. The following graphical indicators are supported by Aspose.Tasks:
| Indicator Type | Graphical Indicator |
|---|---|
| Task Indicators |  |
| Resource Indicators | 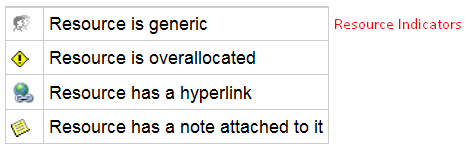 |
| Assignment Indicators | 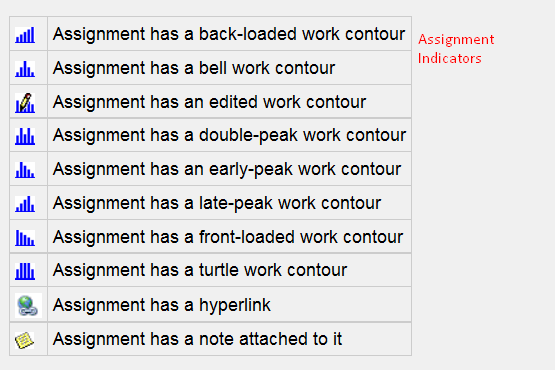 |
Saving to Multiple PDF Files
To save project data to multiple PDF files, set the SaveToSeparateFiles flag to true.
1Project project = new Project("New Project.mpp");
2PdfSaveOptions options = new PdfSaveOptions();
3options.SaveToSeparateFiles = true;
4options.Pages = new List<int>();
5options.Pages.Add(1);
6options.Pages.Add(4);
7project.Save("SaveToMultiplePDFFiles_out.pdf", (SaveOptions)options);Customizing TextStyle for Project Data
Aspose.Tasks for .NET API allows developers to customize the text style for over-allocated resources. By default, the style used for overallocated resources is similar to Microsoft Project (MSP), that is, red and bold. TextItemType.OverallocatedResources makes it possible to customize the color and style for the overallocated resources.
 1Project project = new Project("New Project.mpp");
 2SaveOptions options = new PdfSaveOptions();
 3options.PresentationFormat = PresentationFormat.ResourceSheet;
 4
 5TextStyle style = new TextStyle();
 6style.Color = Color.OrangeRed;
 7style.FontStyle = FontStyle.Bold;
 8style.FontStyle |= FontStyle.Italic;
 9style.ItemType = TextItemType.OverallocatedResources;
10
11options.TextStyles = new List<TextStyle>();
12options.TextStyles.Add(style);
13project.Save("CustomizeTextStyle_out.pdf", options);Customizing Date Formats
Aspose.Tasks for .NET API allows developers to customize the date format using the DateFormat enumerator when rendering project data.
 1Project project = new Project("New Project.mpp");
 2project.Set(Prj.StartDate, new DateTime(2014, 9, 22));
 3
 4// By default project.DateFormat == DateFormat.Date_ddd_mm_dd_yy (Mon 09/22/14) customize DateFormat (September 22, 2014)
 5project.Set(Prj.DateFormat, DateFormat.DateMmmmDdYyyy);
 6project.Save("CustomizeDateFormats1_out.pdf", SaveFileFormat.PDF);
 7
 8// Export to date format 19/07/2016
 9project.Set(Prj.DateFormat, DateFormat.DateDdMmYyyy);
10project.Save("CustomizeDateFormats2_out.pdf", SaveFileFormat.PDF);Setting Default Font
Setting default font during rending of documents helps when a font is not found. In such a case, the default font replaces the missing font and output is not affected. Aspose.Tasks for .NET API lets you specify the default font using the DefaultFontName property of the PdfSaveOptions as shown in the following code sample.
 1Project project = new Project("New Project.mpp");
 2
 3PdfSaveOptions options = new PdfSaveOptions
 4{
 5    PresentationFormat = PresentationFormat.GanttChart,
 6    FitContent = true,
 7    UseProjectDefaultFont = false,
 8    DefaultFontName = "Segoe UI Black"
 9};
10project.Save("CreateProject2_out.pdf", (SaveOptions)options);