Travailler avec les propriétés du projet
Travailler avec les propriétés générales du projet
Microsoft Project enregistre les propriétés et les métadonnées du projet pour chaque projet. Les propriétés incluent les dates de début et de fin du projet, la date actuelle et la date d’état, le type de calendrier utilisé et quand un projet est prévu. Vous pouvez également définir vos propres propriétés de projet personnalisées. Aspose.Tasks pour .net vous permet de lire et de définir les propriétés du projet intégrées et personnalisées.
Veuillez noter que vous ne pouvez pas définir des valeurs par rapport aux champs application et producteur, car Aspose Ltd. et Aspose.Tasks pour .net x.x.x seront affichés par rapport à ces champs.
Informations sur le projet de lecture
La classe Project possède un certain nombre de propriétés qui traitent des propriétés du projet:
- startDate: la date de début du projet, du type de données DateTime.
- FinishDate: La date de fin du projet, du type de données DateTime.
- CurrentDate: la date actuelle, du type de données DateTime.
- StatusDate: La date à laquelle les progrès du projet seront signalés du type de données DateTime.
- ISSCHEDULEFROMSTART: Définit si le projet est planifié à partir des données de début ou de fin et prend une valeur booléenne.
- Calendrier: Le type de calendrier utilisé par le projet, géré via la classe Aspose.Tasks.calendar.
Pour lire les propriétés du projet dans Microsoft Project, cliquez sur Informations sur le projet Dans le menu Projet.

Les échantillons de programmation ci-dessous montrent comment lire et sortir la date de début et de fin du projet, que le projet soit planifié dès le début ou la fin, l’auteur, le dernier auteur, la révision, les mots clés et les commentaires.
 1// Create a project reader instance
 2Project project = new Project("New Project.mpp");
 3
 4// Display project information
 5if (project.Get(Prj.ScheduleFromStart))
 6    Console.WriteLine("Project Finish Date : " + project.Get(Prj.StartDate).ToShortDateString());
 7else
 8    Console.WriteLine("Project Finish Date : " + project.Get(Prj.FinishDate).ToShortDateString());
 9Console.WriteLine(project.Get(Prj.Author));
10Console.WriteLine(project.Get(Prj.LastAuthor));
11Console.WriteLine(project.Get(Prj.Revision));
12Console.WriteLine(project.Get(Prj.Keywords));
13Console.WriteLine(project.Get(Prj.Comments));
14Console.WriteLine("The program has run successfully");Writing Project Information
Aspose.Tasks for .NET can write as well as read project information. The code samples below show how to set author, last author, revision, keywords and comments.
1// Create project from template file
2Project project = new Project("New Project.mpp");
3// Set project information
4project.Set(Prj.Author, "Author");
5project.Set(Prj.LastAuthor, "Last Author");
6project.Set(Prj.Revision, 15);
7project.Set(Prj.Keywords, "MSP Aspose");
8project.Set(Prj.Comments, "Comments");
9project.Save("WriteProjectInfo_out.mpp", SaveFileFormat.MPP);Determining Project Version
Aspose.Tasks for .NET API provides the capability to retrieve project file information with simple API calls. The Project class’s Get method facilitates users to retrieve Project related information using the static class Prj. The Prj class exposes a number of properties related to the Project. This topic shows how to retrieve version information.
The SaveVersion and LastSaved properties exposed by the Prj class are used to determine the project version and the date when the project was last saved. SaveVersion supports the Integer data type, whereas LastSaved supports the DateTime data type.
1Project project = new Project("New Project.mpp");
2
3// Display project version
4Console.WriteLine("Project Version : " + project.Get(Prj.SaveVersion).ToString());
5Console.WriteLine("Last Saved : " + project.Get(Prj.LastSaved).ToShortDateString());Default Project Properties
Microsoft Project lets users set default project properties that speed up the process of setting up a project. The default properties define when a new task starts and finishes, sets the default overtime and standard pay rates and more. Aspose.Tasks for .NET supports these features.
The Prj exposes a number of properties for managing a project’s default properties:
- DefaultStartTime: a new tasks’ default start time, takes a DateTime value.
- DefaultFinishTime: a new tasks’ default finishing time, takes a DateTime value.
- DefaultFixedCostAccrual: an assignment’s default fixed cost accrual, takes one of the values defined by the CostAccrualType enumeration.
- DefaultStandardRate: the default standard pay rate, takes a double.
- DefaultOvertimeRate: the default overtime pay rate, takes a double.
- DefaultTaskEVMethod: the default task earned value method, takes one of the values defined by the EarnedValueMethodType enumeration.
- DefaultTaskType: the project’s default task type, takes one of the values defined by the TaskType enumeration.
To see the default project information in Microsoft Project:
- Open a project.
- On the Tools menu, click Options.
- Go to the General tab. Here, you can see the settings for the default standard and overtime rates.
- Go to the Schedule tab. Here, you can see the settings for the default task type and default task start time.
Default project information in Microsoft Project, as written by Aspose.Tasks

Reading Default Properties
The following example reads a project’s default properties and writes them to a console window.
 1// Create project
 2Project project = new Project("New Project.mpp");
 3
 4// Display default properties
 5Console.WriteLine("New Task Default Start: " + project.Get(Prj.DefaultStartTime).ToShortDateString());
 6Console.WriteLine("New Task Default Type: " + project.Get(Prj.DefaultTaskType));
 7Console.WriteLine("Resource Default Standard Rate: " + project.Get(Prj.DefaultStandardRate).ToString());
 8Console.WriteLine("Resource Default Overtime Rate: " + project.Get(Prj.DefaultOvertimeRate).ToString());
 9Console.WriteLine("Default Task EV Method: " + project.Get(Prj.DefaultTaskEVMethod).ToString());
10Console.WriteLine("Default Cost Accrual: " + project.Get(Prj.DefaultFixedCostAccrual).ToString());Writing Default Properties
The following lines of code set a project’s default properties.
 1// Create a project instance and Set default properties
 2Project project = new Project();
 3project.Set(Prj.ScheduleFromStart, true);
 4project.Set(Prj.StartDate, DateTime.Now);
 5project.Set(Prj.DefaultStartTime, project.Get(Prj.StartDate));
 6project.Set(Prj.DefaultTaskType, TaskType.FixedDuration);
 7project.Set(Prj.DefaultStandardRate, 15);
 8project.Set(Prj.DefaultOvertimeRate, 12);
 9project.Set(Prj.DefaultTaskEVMethod, EarnedValueMethodType.PercentComplete);
10project.Set(Prj.DefaultFixedCostAccrual, CostAccrualType.Prorated);
11project.Save("WriteDefaultProperties_out.xml", SaveFileFormat.XML);Writing Project Summary Information
Most programs save summary information with the files they save. Microsoft Project is no different. As well as the name of the author, the date the project was created and the last time it was edited and saved, it saves keywords, subject, comments and more. Aspose.Tasks for .NET lets you both read and write this type of information.
The Project’s class Set method can be used to write and Get method can be used to read Project summary information using the Prj class’s members. The file can be saved back after updating the summary information. To update the project summary information of an existing MPP file:
- Create an instance of Project class
- Set the various properties exposed by the Prj class to define summary information.
- Save the Project using the Save method of Project class
To see the file’s summary information:
- Find the file in a file browser.
- Right-click the file and select Properties.
- Go to the Details tab.
The code sample below writes project summary information to MPP file.
 1// Instantiate Project class
 2Project project = new Project("New Project.mpp");
 3
 4// Set project summary
 5project.Set(Prj.Author, "Author");
 6project.Set(Prj.LastAuthor, "Last Author");
 7project.Set(Prj.Revision, 15);
 8project.Set(Prj.Keywords, "MSP Aspose");
 9project.Set(Prj.Comments, "Comments");
10project.Save("WriteMPPProjectSummary_out.mpp", SaveFileFormat.MPP);Fiscal Year Properties
The fiscal year is the same as a financial year or budget year. It is the dates between which a country, an organization or an individual calculate budgets and taxes. Microsoft Project lets users define a fiscal year for projects. Aspose.Tasks for .NET supports this functionality with properties that allow developers to both read fiscal year properties from existing projects, and set fiscal year properties when creating or working with projects.
The Prj class exposes the FyStartDate and FiscalYearStart properties used to manage fiscal year for a project:
- FyStartDate: define the fiscal year start month and supports one of the values defined by the Month enumeration.
- FiscalYearStart: determines whether the fiscal year numbering has been used in the project. Boolean.
Reading Fiscal Year Properties
The FyStartDate and FiscalYearStart properties make it easy to find out what the current fiscal year start date is, and whether fiscal year numbering is used, with Aspose.Tasks.
The following code reads a project’s fiscal year properties and displays them in a console window.
1// Create a project instance
2Project project = new Project("New Project.mpp");
3
4// Display fiscal year properties
5Console.WriteLine("Fiscal Year Start Date : " + project.Get(Prj.FyStartDate).ToString());
6Console.WriteLine("Fiscal Year Numbering : " + project.Get(Prj.FiscalYearStart).ToString());Writing Fiscal Year Properties
To see fiscal year properties in Microsoft Project:
- Open a project file.
- On the Tools menu, click Options.
- Click the Calendar tab. It will look like the one shown below.
Checking that the fiscal year properties have been set in Microsoft Project.
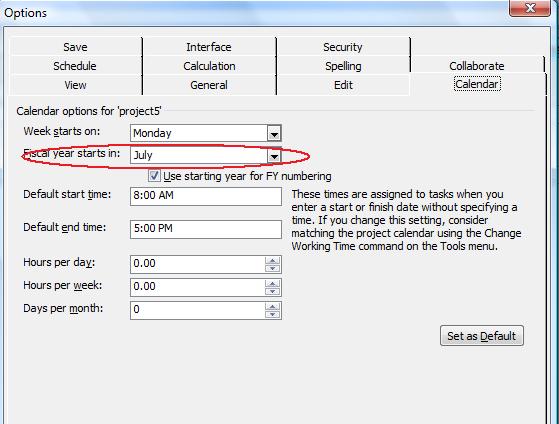
The following example writes the fiscal year properties of the project.
1// Create a project instance
2Project project = new Project("New Project.mpp");
3
4// Set fiscal year properties
5project.Set(Prj.FyStartDate, Month.July);
6project.Set(Prj.FiscalYearStart, true);
7project.Save("WriteFiscalYearProperties_out.mpp", SaveFileFormat.MPP);Weekday Properties
Microsoft Project lets users set a number of different weekday properties. For example, what day a week starts on and how many working days are in a month. Aspose.Tasks support these features through a number of properties that can be used both to read weekday properties and to write them to a project.
Aspose.Tasks has a series of properties, exposed by the Project class, specifically for managing a project’s weekday properties:
- WeekStartDay: the first day of the week. This property takes values defined by the DayType enumeration.
- DaysPerMonth: the number of working days in a month, passed as an integer.
- MinutesPerDay: the number of working minutes in a working day, passed as an integer.
- MinutesPerWeek: the number of working minutes in a working week, passed as an integer.
Reading Weekday Properties
The following code reads a project’s weekday properties and writes them to a console window.
1Project project = new Project("New Project.mpp");
2
3// Display week days properties
4Console.WriteLine("Week Start Date : " + project.Get(Prj.WeekStartDay).ToString());
5Console.WriteLine("Days Per Month : " + project.Get(Prj.DaysPerMonth).ToString());
6Console.WriteLine("Minutes Per Day : " + project.Get(Prj.MinutesPerDay).ToString());
7Console.WriteLine("Minutes Per Week : " + project.Get(Prj.MinutesPerWeek).ToString());Writing Weekday Properties
To see weekday properties in Microsoft Project:
- Open a file.
- On the Tools menu, click Options.
- Select the Calendar tab. It will look something like the example below.
Viewing weekday properties in Microsoft Project
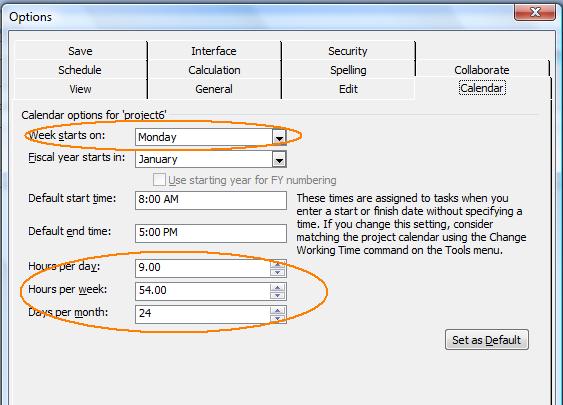
The following code writes weekday properties, as shown in the screenshot above, to a project.
1// Create a project instance
2Project project = new Project("New Project.mpp");
3
4// Set week days properties
5project.Set(Prj.WeekStartDay, DayType.Monday);
6project.Set(Prj.DaysPerMonth, 24);
7project.Set(Prj.MinutesPerDay, 540);
8project.Set(Prj.MinutesPerWeek, 3240);
9project.Save("WriteWeekdayProperties_out.xml", SaveFileFormat.XML);Currency Properties
Microsoft Project lets users set which currency costs are shown in, in a project. They can define set the currency code, numbers after the decimal point and currency symbol so that costs show in an easy to read and intuitive way. Aspose.Tasks for .NET supports these features and provides a series of properties that help developers set and control currency properties. This topic explains both how to read currency properties, and how to set them.
Aspose.Tasks for .NET provides properties exposed by the Prj class, for managing currency properties:
- CurrencyCode: the three-letter currency code, for example, USD, GBP or AUD, passed as a string.
- CurrencyDigits: the number of numbers after the decimal point, for example, 2 (100.00) or 3 (100.000), passed as an integer.
- CurrencySymbol: the currency symbol, for example, $ or £, passed as a string.
- CurrencySymbolPosition: the position of the currency symbol, for example before ($100) or after (100$). CurrencySymbolPosition takes a value from the CurrencySymbolPositionType enumeration.
Reading Currency Properties
The following piece of code reads a project’s currency properties.
1Project project = new Project("New Project.mpp");
2
3// Display currency properties
4Console.WriteLine("Currency Code : " + project.Get(Prj.CurrencyCode).ToString());
5Console.WriteLine("<br>Currency Digits : " + project.Get(Prj.CurrencyDigits).ToString());
6Console.WriteLine("<br>Currency Symbol : " + project.Get(Prj.CurrencySymbol).ToString());
7Console.WriteLine("Currency Symbol Position" + project.Get(Prj.CurrencySymbolPosition).ToString());Writing Currency Properties
To see the currency properties in Microsoft Project:
- Open the project file.
- On the Tools menu, select Options.
- Click the View tab. It will look like the one shown below.
Reading currency properties in Microsoft Project
The following example writes currency properties to the project.
 1// Create a project instance
 2Project project = new Project("New Project.mpp");
 3
 4// Set currency properties
 5project.Set(Prj.CurrencyCode, "AUD");
 6project.Set(Prj.CurrencyDigits, 2);
 7project.Set(Prj.CurrencySymbol, "$");
 8project.Set(Prj.CurrencySymbolPosition, CurrencySymbolPositionType.After);
 9
10project.Save("WriteCurrencyProperties_out.xml", SaveFileFormat.XML);Setting Attributes for New Tasks
Microsoft Project allows to set default properties for new tasks added. This topic explains how to set the default start date for new tasks using Aspose.Tasks for .NET API.
The Prj class exposes the NewTaskStartDate property that defines the start date for a new task. This property supports the values defined by the TaskStartDateType enumeration type.
To see the task attributes:
- Open the file with Microsoft Project.
- On the Tools menu, select Options.
- Select the Schedule tab. The tab looks like the one shown below.
New tasks set to start on the current date

The following lines of code set the new task start date.
1// Create a project instance Set new task property and Save the project as XML project file
2Project project = new Project();
3project.Set(Prj.NewTaskStartDate, TaskStartDateType.CurrentDate);
4project.Save("SetAttributesForNewTasks_out.xml", SaveFileFormat.XML);
5
6// Display Status.
7Console.WriteLine("New Task created with start date successfully.");Reading Custom and Built-in Properties
In Aspose.Tasks for .NET the custom properties are available through the typed collection whereas the built-in properties are available directly.
The following code example demonstrates how to read custom and built-in properties.
 1// Create a project reader instance
 2Project project = new Project("New Project.mpp");
 3
 4// custom properties are available through the typed collection
 5foreach (var property in project.CustomProps)
 6{
 7    Console.WriteLine(property.Type);
 8    Console.WriteLine(property.Name);
 9    Console.WriteLine(property.Value);
10}
11
12// built-in properties are available directly
13Console.WriteLine(project.BuiltInProps.Author);
14Console.WriteLine(project.BuiltInProps.Title);
15
16
17// or as an item of built-in property collection
18foreach (var property in project.BuiltInProps)
19{
20    Console.WriteLine(property.Name);
21    Console.WriteLine(property.Value);
22}