Convert Microsoft Project MPP File to PDF
PDF or Portable Document Format is a file format developed by Adobe in 1992 to present documents, including text formatting and images. Microsoft Project allows the user to export project’s data to PDF format.
These are steps to export project data to PDF format:
Suppose you have your project opened in Microsoft Project.
- Select “File\Save As” menu item
- Select location (e.g. “This PC”)
- In “Save As” dialog select ‘PDF Files(*.pdf) format in “Save as type” drop down.
- Click “Save” button
- In Document Export Options dialog select Publish Range, and click “OK”.
The currently selected View will be rendered to PDF file. Here is an example of output file:

Aspose.Tasks for .NET also provides the capability to render project’s view in PDF format programmatically. In this case you don’t need to have Microsoft Project installed on your machine. This article gives a detailed overview of the variety of options available in Aspose.Tasks for exporting projects to PDF.
Saving a MS Project MPP file as a PDF
The Project class exposes the Save method which is used to save a project in various formats. The Save method allows you to render project data to PDF using the SaveFileFormat enumeration type.
To save a project to PDF:
- Load a Microsoft Project MPP file.
- Optionally make changes to the loaded project.
- Save the project to PDF using one of Project.Save method overloads. Your can use either SaveFileFormat.PDF to save project with default settings or PdfSaveOptions to customize export options.
- Please note that you cannot set values against the Application and Producer fields, because of Aspose Ltd. and Aspose.Tasks for .NET x.x.x will be displayed against these fields.
The following lines of code demonstrate how to achieve this using C#.
1Project project = new Project("New Project.mpp");
2project.Save("SaveProjectAsPDF_out.pdf", SaveFileFormat.PDF);Specifying a View to save to PDF
Microsoft Project supports different view such as ‘Gantt Chart’, ‘Task Usage’, ‘Resource Usage’, etc. Each view can be customized and these settings are stored in MPP file. Aspose.Tasks for .NET allows the user to examine and change these settings using Project.Views collection.
There are 3 ways to specify the View which will be exported to PDF:
- Do not specify a View explicitly. In this case Project.DefaultView will be rendered. If default view is missing, Gantt Chart view will be rendered.
- Use SaveOptions.PresentationFormat to specify value of PresentationFormat enumeration. In this case the view with the correspondent Screen property will be selected from Project.Views collection. If View is missing, the default settings are used.
- Use SaveOptions.ViewSettings property to explicitly specify the View object to render. If View object is specified, the value of SaveOptions.PresentationFormat is ignored.
Fitting Contents to Cell Size
Commonly, a task (or resource) name is so long that it is truncated when project views are rendered. Aspose.Tasks for .NET provides the FitContent property in the SaveOptions class to avoid truncation of task and resource names. The code example below renders a project to PDF format with the FitContent property set to true.
1Project project = new Project("New Project.mpp");
2SaveOptions options = new PdfSaveOptions();
3
4// Set option fit content to true
5options.FitContent = true;
6options.Timescale = Timescale.Months;
7options.PresentationFormat = PresentationFormat.TaskUsage;
8project.Save("FitContentsToCellSize_out.pdf", options);Printing or Hiding Legends when Rendering
To let you print or hide the legends on each page, the SaveOptions class provides the LegendOnEachPage property. If this flag is set to true, legends are printed on each page in the output file.
1SaveOptions options = new PdfSaveOptions();
2
3// Set the LegendOnEachPage property to false to hide legends
4options.LegendOnEachPage = false;Supported Graphical Column Indicators
Aspose.Tasks draws graphical column indicators when rendering project data to output PDF. The following graphical indicators are supported by Aspose.Tasks:
| Indicator Type | Graphical Indicator |
|---|---|
| Task Indicators | 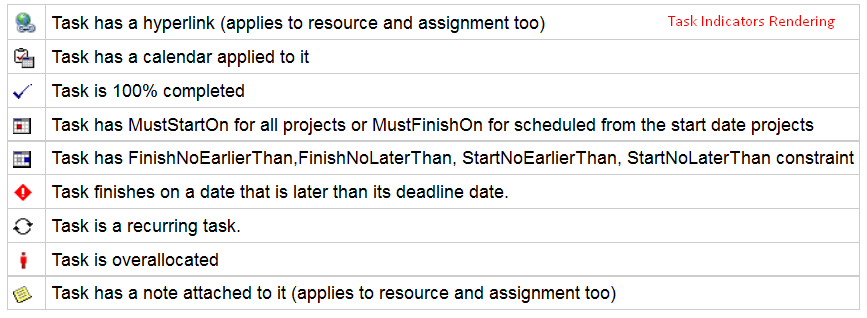 |
| Resource Indicators | 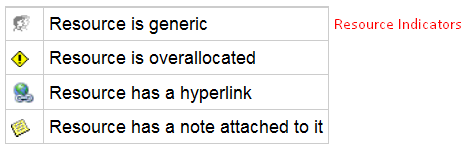 |
| Assignment Indicators | 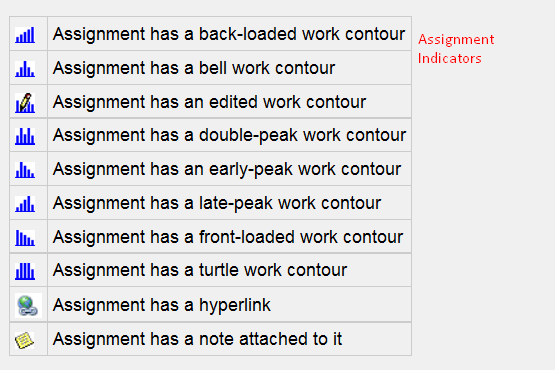 |
Saving to Multiple PDF Files
To save project data to multiple PDF files, set the SaveToSeparateFiles flag to true.
1Project project = new Project("New Project.mpp");
2PdfSaveOptions options = new PdfSaveOptions();
3options.SaveToSeparateFiles = true;
4options.Pages = new List<int>();
5options.Pages.Add(1);
6options.Pages.Add(4);
7project.Save("SaveToMultiplePDFFiles_out.pdf", (SaveOptions)options);Customizing TextStyle for Project Data
Aspose.Tasks for .NET API allows developers to customize the text style for over-allocated resources. By default, the style used for overallocated resources is similar to Microsoft Project (MSP), that is, red and bold. TextItemType.OverallocatedResources makes it possible to customize the color and style for the overallocated resources.
 1Project project = new Project("New Project.mpp");
 2SaveOptions options = new PdfSaveOptions();
 3options.PresentationFormat = PresentationFormat.ResourceSheet;
 4
 5TextStyle style = new TextStyle();
 6style.Color = Color.OrangeRed;
 7style.FontStyle = FontStyle.Bold;
 8style.FontStyle |= FontStyle.Italic;
 9style.ItemType = TextItemType.OverallocatedResources;
10
11options.TextStyles = new List<TextStyle>();
12options.TextStyles.Add(style);
13project.Save("CustomizeTextStyle_out.pdf", options);Customizing Date Formats
Aspose.Tasks for .NET API allows developers to customize the date format using the DateFormat enumerator when rendering project data.
 1Project project = new Project("New Project.mpp");
 2project.Set(Prj.StartDate, new DateTime(2014, 9, 22));
 3
 4// By default project.DateFormat == DateFormat.Date_ddd_mm_dd_yy (Mon 09/22/14) customize DateFormat (September 22, 2014)
 5project.Set(Prj.DateFormat, DateFormat.DateMmmmDdYyyy);
 6project.Save("CustomizeDateFormats1_out.pdf", SaveFileFormat.PDF);
 7
 8// Export to date format 19/07/2016
 9project.Set(Prj.DateFormat, DateFormat.DateDdMmYyyy);
10project.Save("CustomizeDateFormats2_out.pdf", SaveFileFormat.PDF);Setting Default Font
Setting default font during rending of documents helps when a font is not found. In such a case, the default font replaces the missing font and output is not affected. Aspose.Tasks for .NET API lets you specify the default font using the DefaultFontName property of the PdfSaveOptions as shown in the following code sample.
 1Project project = new Project("New Project.mpp");
 2
 3PdfSaveOptions options = new PdfSaveOptions
 4{
 5    PresentationFormat = PresentationFormat.GanttChart,
 6    FitContent = true,
 7    UseProjectDefaultFont = false,
 8    DefaultFontName = "Segoe UI Black"
 9};
10project.Save("CreateProject2_out.pdf", (SaveOptions)options);