Working with Calendars
Creating a Calendar
Calendars in Microsoft Project define working and non-working time, directly impacting task scheduling and resource availability. In Aspose.Tasks for .NET, calendars can be created using the
Calendar class, which provides three constructor overloads:
Calendar()– Initializes a default calendar.Calendar(int id)– Initializes a calendar with a specific ID.Calendar(string name)– Initializes a calendar with a specified name.
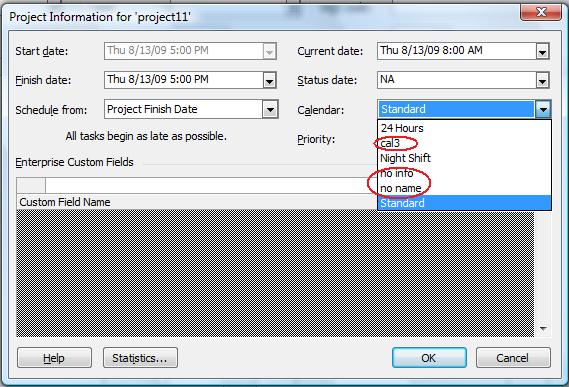
The following code sample demonstrates how to instantiate calendars using each constructor. Once generated, calendars can be viewed in Microsoft Project by navigating to Project > Project Information.
Project information showing the calendars
1// Create a project instance
2Project project = new Project();
3
4// New calendar can be added to a project's calendar collection using the collection's Add method.
5Calendar cal1 = project.Calendars.Add("New Info");
6Calendar cal2 = project.Calendars.Add("no name");
7Calendar cal3 = project.Calendars.Add("cal3");
8
9project.Save("CreatingCalendar_out.Xml", SaveFileFormat.XML);Defining Weekdays for a Calendar
The
Days collection of the Calendar class represents working days and their associated time ranges. Weekday definitions are modeled through the
WeekDay and
WorkingTime classes.
Developers can use CreateDefaultWorkingDay() to initialize standard hours for a given weekday, or set custom working intervals via the FromTime and ToTime properties.
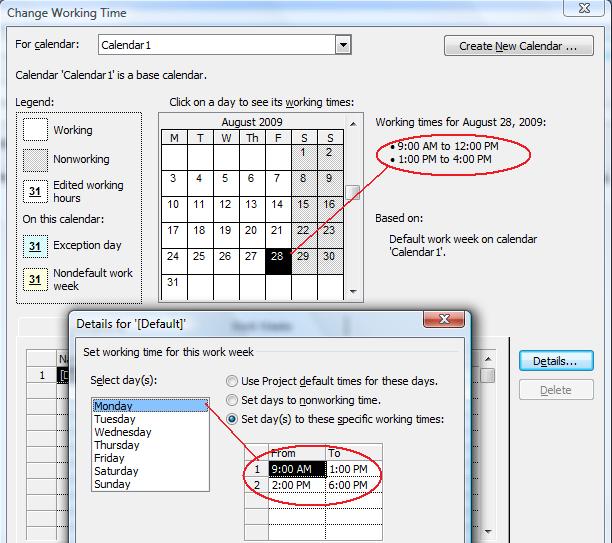
The sample below defines Monday to Thursday as default working days, and Friday with custom working hours. To verify the result in Microsoft Project, go to Tools > Change Working Time.
Defining weekdays in Microsoft Project
 1// This example shows how Aspose.Tasks API can be used to define a new Calendar, add week days to it and define working times for days
 2// Create a project instance
 3Project project = new Project();
 4
 5// Define Calendar
 6Calendar cal = project.Calendars.Add("Calendar1");
 7
 8// Add working days monday through thursday with default timings
 9cal.WeekDays.Add(WeekDay.CreateDefaultWorkingDay(DayType.Monday));
10cal.WeekDays.Add(WeekDay.CreateDefaultWorkingDay(DayType.Tuesday));
11cal.WeekDays.Add(WeekDay.CreateDefaultWorkingDay(DayType.Wednesday));
12cal.WeekDays.Add(WeekDay.CreateDefaultWorkingDay(DayType.Thursday));
13cal.WeekDays.Add(new WeekDay(DayType.Saturday));
14cal.WeekDays.Add(new WeekDay(DayType.Sunday));
15
16// Set friday as short working day
17WeekDay myWeekDay = new WeekDay(DayType.Friday);
18
19// Sets working time. Only time part of DateTime is important
20WorkingTime wt1 = new WorkingTime();
21wt1.FromTime = new DateTime(1, 1, 1, 9, 0, 0, 0);
22wt1.ToTime = new DateTime(1, 1, 1, 12, 0, 0, 0);
23WorkingTime wt2 = new WorkingTime();
24wt2.FromTime = new DateTime(1, 1, 1, 13, 0, 0, 0);
25wt2.ToTime = new DateTime(1, 1, 1, 16, 0, 0, 0);
26myWeekDay.WorkingTimes.Add(wt1);
27myWeekDay.WorkingTimes.Add(wt2);
28myWeekDay.DayWorking = true;
29cal.WeekDays.Add(myWeekDay);
30
31project.Save("Project_DefineCalendarWeekdays_out.xml", SaveFileFormat.XML);Replacing a Calendar
Base calendars serve as templates for resource and task scheduling. Aspose.Tasks allows replacing an existing calendar by accessing the
CalendarCollection via the
Project object.
Supported base calendar types include:
- Standard: Monday–Friday, 08:00–17:00.
- 24-Hours: Used for continuous work schedules.
- Night Shift: Monday night to Saturday morning, 23:00–08:00.
The code below demonstrates how to remove an existing calendar and add a new standard calendar to the collection.
 1// Create project
 2Project project = new Project("New Project.mpp");
 3
 4// Access project calendars
 5CalendarCollection calColl = project.Calendars;
 6foreach (Calendar myCalendar in calColl)
 7{
 8    if (myCalendar.Name == "TestCalendar")
 9    {
10        // Remove calendar
11        calColl.Remove(myCalendar);
12    }
13}
14
15// Add new calendar
16Calendar newCalendar = calColl.Add("TestCalendar");
17project.Save("ReplaceCalendar_out.mpp", SaveFileFormat.MPP);Creating a Standard Calendar
A standard calendar defines default working days and hours commonly used in project schedules. Aspose.Tasks provides two static methods to facilitate this:
MakeStandardCalendar()– Creates a new calendar with standard configuration.MakeStandardCalendar(Calendar cal)– Converts an existing calendar to standard.
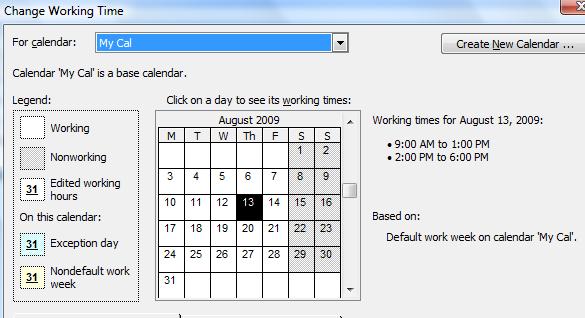
To inspect the result in Microsoft Project, use Tools > Change Working Time.
The Change Working Times Information dialogue shows the standard calendar used by the project
1// Create a project instance
2Project project = new Project();
3
4// Define Calendar and make it standard
5Calendar cal1 = project.Calendars.Add("My Cal");
6Calendar.MakeStandardCalendar(cal1);
7
8project.Save("Project_MakeStandardCalendar_out.xml", SaveFileFormat.XML);Writing Updated Calendar Data to MPP
Aspose.Tasks allows updating calendar definitions and saving them back into an MPP file. The process involves:
- Loading the existing MPP file.
- Modifying the calendar collection (add, update).
- Saving the updated project back to disk.
The following example demonstrates adding a new calendar and writing it back to the source MPP file.
 1Project project = new Project("New Project.mpp");
 2Calendar cal = project.Calendars.GetByUid(3);
 3
 4// Update the calendar information
 5Calendar.MakeStandardCalendar(cal);
 6cal.Name = "Test calendar";
 7CalendarException exc = new CalendarException();
 8exc.FromDate = DateTime.Now;
 9exc.ToDate = DateTime.Now.AddDays(2);
10exc.DayWorking = true;
11
12WorkingTime wt1 = new WorkingTime();
13wt1.FromTime = new DateTime(10, 1, 1, 9, 0, 0);
14wt1.ToTime = new DateTime(10, 1, 1, 13, 0, 0);
15
16WorkingTime wt2 = new WorkingTime();
17wt2.FromTime = new DateTime(10, 1, 1, 14, 0, 0);
18wt2.ToTime = new DateTime(10, 1, 1, 19, 0, 0);
19
20WorkingTime wt3 = new WorkingTime();
21wt3.FromTime = new DateTime(10, 1, 1, 20, 0, 0);
22wt3.ToTime = new DateTime(10, 1, 1, 21, 0, 0);
23
24exc.WorkingTimes.Add(wt1);
25exc.WorkingTimes.Add(wt2);
26exc.WorkingTimes.Add(wt3);
27cal.Exceptions.Add(exc);
28
29CalendarException exc2 = new CalendarException();
30exc2.FromDate = DateTime.Now.AddDays(7);
31exc2.ToDate = exc2.FromDate;
32exc2.DayWorking = false;
33cal.Exceptions.Add(exc2);
34
35project.Set(Prj.Calendar, cal);
36
37project.Save("WriteUpdatedCalendarDataToMPP_out.mpp", SaveFileFormat.MPP);