LaTeX 図のレンダリング | Aspose.TeX for Java
LaTeX ファイルからコンテンツ(図形、文章、プロット等)を別々にレンダリングされたパーツ、つまり 「図」 として抽出したい場合があります。たとえば、インターネット上で公開する出版物のイラストの場合です。弊社の API がこのタスクを支援します。利用できる出力形式は PNG と SVG の 2 種類です。LaTeX 数式のレンダリングと同様です。また、LaTeX 図のレンダリングは LaTeX 数式のレンダリング の一般化であることに留意してください。
LaTeX 図を PNG にレンダリングする方法
数式レンダリングと同様に、例から始めます。以下がその例です。
1// Create rendering options setting the image resolution to 150 dpi.
2PngFigureRendererOptions options = new PngFigureRendererOptions();
3options.setResolution(150);
4// Specify the preamble.
5options.setPreamble("\\usepackage{pict2e}");
6// Specify the scaling factor 300%.
7options.setScale(3000);
8// Specify the background color.
9options.setBackgroundColor(Color.WHITE);
10// Specify the output stream for the log file.
11options.setLogStream(new ByteArrayOutputStream());
12// Specify whether to show the terminal output on the console or not.
13options.showTerminal(true);
14
15// Create the output stream for the figure image.
16final OutputStream stream = new FileOutputStream(Utils.getOutputDirectory() + "text-and-formula.png");
17try {
18 // Run rendering.
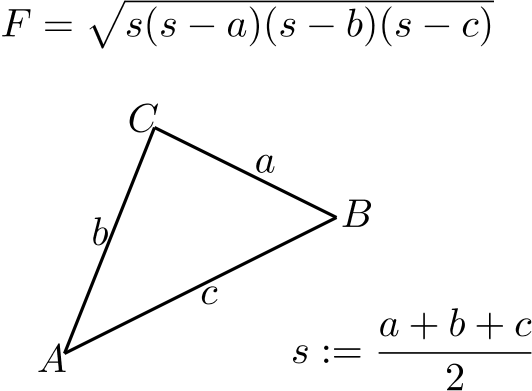
19 com.aspose.tex.Size2D size = new PngFigureRenderer().render("\\setlength{\\unitlength}{0.8cm}\r\n" +
20 "\\begin{picture}(6,5)\r\n" +
21 "\\thicklines\r\n" +
22 "\\put(1,0.5){\\line(2,1){3}} \\put(4,2){\\line(-2,1){2}} \\put(2,3){\\line(-2,-5){1}} \\put(0.7,0.3){$A$} \\put(4.05,1.9){$B$} \\put(1.7,2.95){$C$}\r\n" +
23 "\\put(3.1,2.5){$a$} \\put(1.3,1.7){$b$} \\put(2.5,1.05){$c$} \\put(0.3,4){$F=\\sqrt{s(s-a)(s-b)(s-c)}$} \\put(3.5,0.4){$\\displaystyle s:=\\frac{a+b+c}{2}$}\r\n" +
24 "\\end{picture}", stream, options);
25
26 // Show other results.
27 System.out.println(options.getErrorReport());
28 System.out.println();
29 System.out.println("Size: " + size.getWidth() + "x" + size.getHeight()); // Dimensions of the resulting image.
30} finally {
31 if (stream != null)
32 stream.close();
33}まず、 レンダリング オプション インスタンスを作成します。ここで出力画像の解像度も指定します。
次に、前文(preamble)を指定します。LaTeX 図のレンダリングにはデフォルトの前文がありません。そのため、たとえば pict2e パッケージを使用したグラフを描画したい場合は、前文に以下のように記述する必要があります。
1\usepackage{pict2e}その後、レンダラに出力を 300% に拡大するよう指示します。
次のオプションは背景色を定義します。数式レンダリングとは異なり、前景色は指定しません。なぜなら、色はすべて LaTeX のコードで制御されていると想定しているからです。背景色も同様に LaTeX が管理するため、これは便利なオプションにすぎません。
例の次の行はあまり意味がありませんが、ログ出力を任意のストリームにリダイレクトできることを示しています。
最後のオプション ShowTerminal は、ターミナル出力をコンソールに表示するかどうかを切り替えるものです。
実際にレンダリングを実行するメソッドは FigureRenderer.render() です。このメソッドは図のサイズ(ポイント単位)を返します。
画像を書き込むストリームは、メソッドの第2引数として受け取ります。次にそのストリームを作成します。
最後に、FigureRenderer.render() メソッドを呼び出し、3 番目の引数にオプションを渡します。図の LaTeX コードは最初の引数として渡します。
例の最後の行では、図のサイズとエラーレポート(エラーがある場合)という二つの情報を出力しています。
以下がレンダリング結果です。
これは LaTeX 図のレンダリング 機能の最も一般的な使用例です。
LaTeX 図を SVG にレンダリングする方法
ほぼ同様の手順で、LaTeX 図を SVG 形式にレンダリングできます。
 1// Create rendering options.
 2SvgFigureRendererOptions options = new SvgFigureRendererOptions();
 3// Specify the preamble.
 4options.setPreamble("\\usepackage{pict2e}");
 5// Specify the scaling factor 300%.
 6options.setScale(3000);
 7// Specify the background color.
 8options.setBackgroundColor(Color.WHITE);
 9// Specify the output stream for the log file.
10options.setLogStream(new ByteArrayOutputStream());
11// Specify whether to show the terminal output on the console or not.
12options.showTerminal(true);
13
14// Create the output stream for the figure image.
15final OutputStream stream = new FileOutputStream(Utils.getOutputDirectory() + "text-and-formula.svg");
16try {
17    // Run rendering.
18    com.aspose.tex.Size2D size = new SvgFigureRenderer().render("\\setlength{\\unitlength}{0.8cm}\r\n" +
19    "\\begin{picture}(6,5)\r\n" +
20    "\\thicklines\r\n" +
21    "\\put(1,0.5){\\line(2,1){3}} \\put(4,2){\\line(-2,1){2}} \\put(2,3){\\line(-2,-5){1}} \\put(0.7,0.3){$A$} \\put(4.05,1.9){$B$} \\put(1.7,2.95){$C$}\r\n" +
22    "\\put(3.1,2.5){$a$} \\put(1.3,1.7){$b$} \\put(2.5,1.05){$c$} \\put(0.3,4){$F=\\sqrt{s(s-a)(s-b)(s-c)}$} \\put(3.5,0.4){$\\displaystyle s:=\\frac{a+b+c}{2}$}\r\n" +
23    "\\end{picture}", stream, options);
24
25    // Show other results.
26    System.out.println(options.getErrorReport());
27    System.out.println();
28    System.out.println("Size: " + size.getWidth() + "x" + size.getHeight()); // Dimensions of the resulting image.
29} finally {
30    if (stream != null)
31        stream.close();
32}相違点は次のとおりです。
- SvgFigureRendererOptions クラスを、 PngFigureRendererOptions の代わりに使用します。
- 解像度を指定しません。
- SvgFigureRenderer クラスを、 PngFigureRenderer の代わりに使用します。
結果は以下の通りです。
