6. How to set up new fonts
To set up new fonts for use with LaTeX, you basically need to fill the internal font selection tables with information necessary for later associating a font request in a document with the external .tfm file containing character information used by LaTeX. Therefore, the tables are responsible for associating the external file cmdunh10.tfm with the following request:
1\fontencoding{OT1}\fontfamily{cmdh}\fontseries{m}\fontshape{n}%
2\fontsize{10}{12pt}\selectfont
To add new fonts, you have to reverse the process. For every new external font, you have to answer five questions:
- What is the font encoding - that is, which characters are in which positions?
- What is its family name?
- What is its series (weight and width)?
- What is its shape?
- What is its size?
The answers to these questions will provide the information necessary to classify your external fonts according to the LaTeX conventions. In the next few sections, we will discuss how to enter new fonts into the NFSS tables so that they can be used in the main text. You normally need this information if you want to make use of new fonts, such as creating a short package file for accessing a new font family. In later sections, we will discuss more complicated concepts that are important if you want to use, for example, special fonts for math instead of the standard ones.
6.1. The naming convention for external fonts
A de facto standard font naming scheme in the TeX world classifies all font file names using eight alphanumeric characters, where case is not significant. This eight-character limit guarantees that the same file names can be used across all computer platforms. The principle of the scheme is described in the table below, where the parts in brackets can be omitted if they correspond to a default. For example, a design size is given only if the font is not linearly scaled.

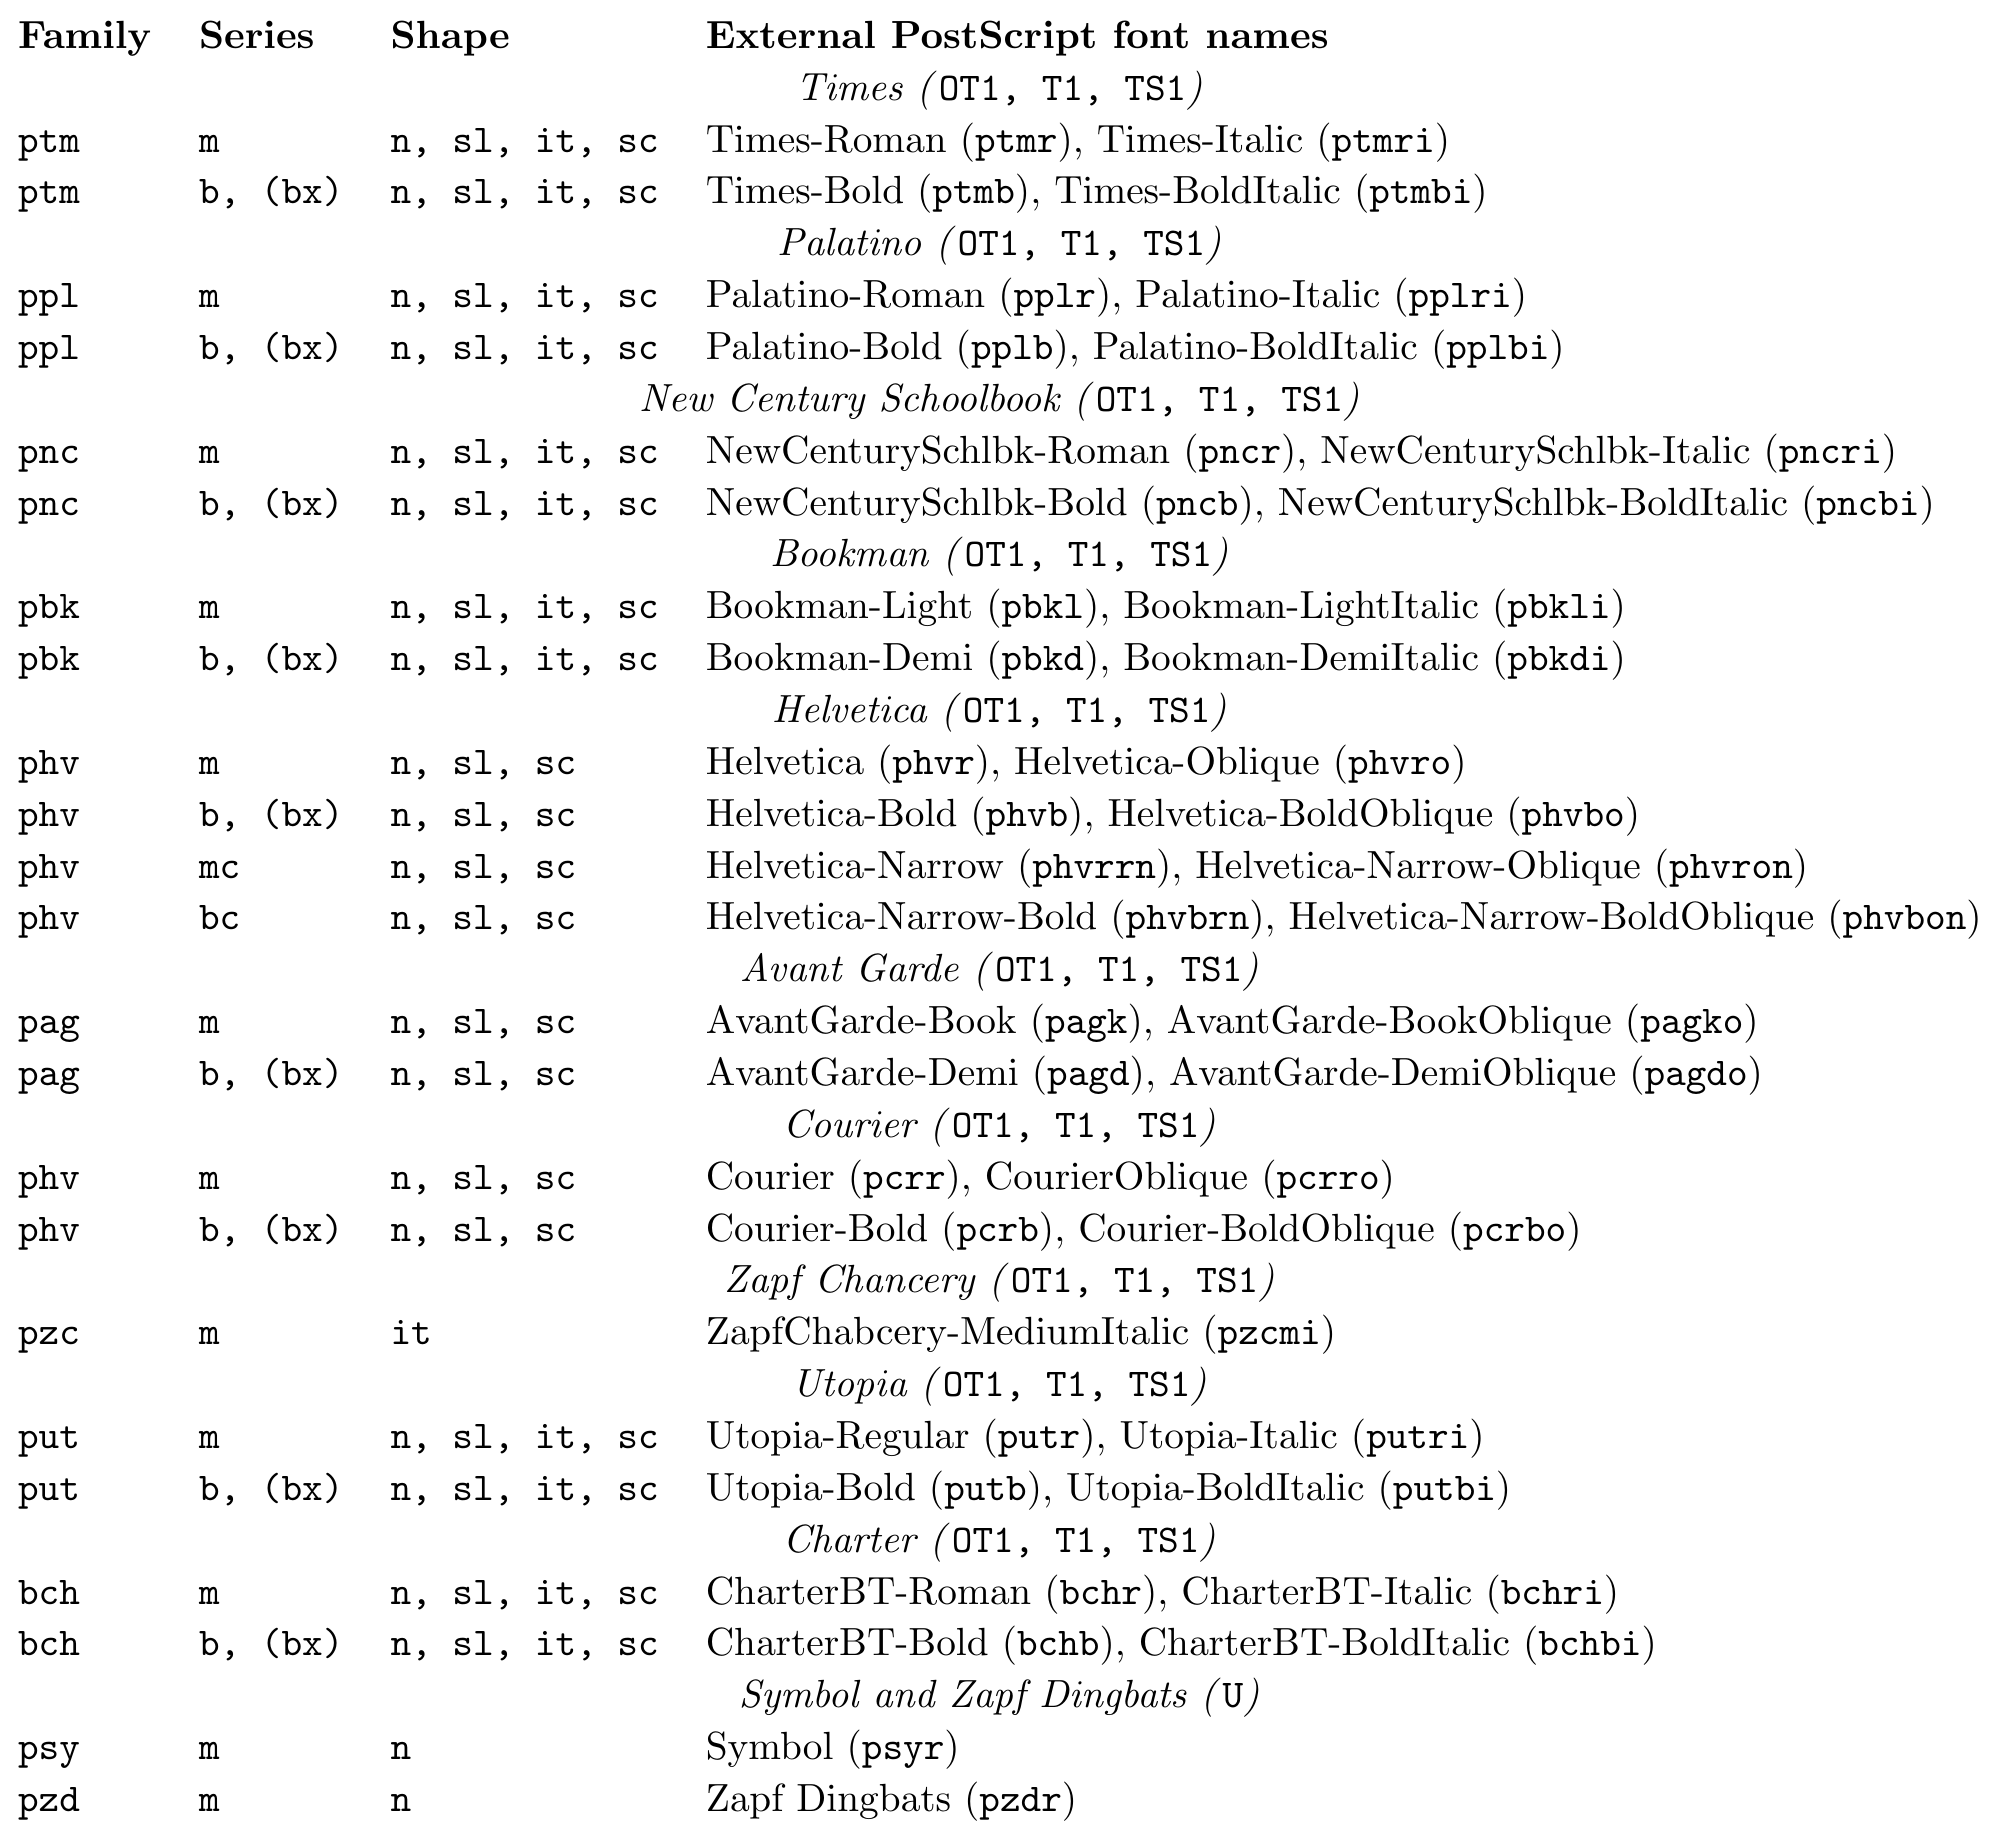
Below is the classification of the 35 “basic” PostScript fonts according to LaTeX’s font interface. For each font, the full Adobe name and the corresponding short file name (in the classification currently being discussed) is given. For OT1, T1, or TS1, one would need to append 7t, 8t, or 8c, respectively, to obtain the full file name. For example, putr8t for Utopia Regular in T1 encoding. This will be useful in further discussion.
The naming convention covers internal TeX names for fonts (i.e., those used in \DeclareFontShape declarations as described in the next section), names for virtual fonts and their components (e.g., particular reencodings of physical fonts), and the names of physical fonts. In the case of PostScript fonts, the physical font names are often different from those used internally by TeX.
In the latter case, internal font names have to be mapped to corresponding external fonts when the result of a LaTeX run is viewed or printed. For example, the PostScript driver dvips uses mapping files (default extension .map) that contain lines such as
1putr8r Utopia-Regular "TeXBase1Encoding ReEncodeFont " <8r.enc <putr8a.pfbtelling it that the font putr8r can be obtained from the external font putr8a.pfb by reencoding it via a special encoding vector (8r.enc). However, you will not find any reference to that putr8r in the t1put.fd file, which contains the \DeclareFontShape declarations for the Utopia family in the T1 encoding. The reason is that putr8t is a virtual font (built with the help of the fontinst utility) that references putr8r. The latter link can only be found in the sources of the virtual fonts.
6.2. How to declare new font families and font shape groups
Each family/encoding combination must be introduced to LaTeX with the help of the command \DeclareFontFamily, which takes three arguments. The first two are the encoding scheme and the family name. The third is usually empty, but it may contain special options for font loading and is explained further in this article. So, if you want to declare a new family - say, Computer Modern Dunhill with the old TeX encoding - you would write
1\DeclareFontFamily{OT1}{cmdh}{}Normally, there are many individual fonts in a font family. To reduce the number of declarations, you have to combine fonts that differ only in size and declare them as a group instead of announcing each family member individually.
Such a group is entered into LaTeX’s internal tables with the command \DeclareFontShape, which takes six arguments. The first four arguments are the encoding scheme, the family name, the series name, and the shape name under which you want to access these fonts. The fifth argument is a list of sizes and external font names, given in a special format that is discussed below. The sixth argument is usually empty, and its use is explained further in this article.
For example, an NFSS table entry for Computer Modern Dunhill medium upright in the old TeX encoding scheme could be entered as
1\DeclareFontShape{OT1}{cmdh}{m}{n}{ <10> cmdunh10 }{}assuming that only one external font for the size 10pt is available. If you also have this font available at 12pt (scaled from 10pt), the declaration would be
1\DeclareFontShape{OT1}{cmdh}{m}{n}{ <10> <12>cmdunh10 }{}If the external file is available in all possible sizes, the declaration becomes very simple. This is the case for Type 1 PostScript (outline) fonts, or when the driver program is able to generate fonts on demand by calling METAFONT.
For example, Times Roman bold upright in the LaTeX T1 encoding scheme could be introduced as follows
1\DeclareFontShape{T1}{ptm}{b}{n}{ <-> ptm8t }{}This example declares a size range with two open ends. As a result, the same external ptmb8t.tfm file is used for all sizes and is scaled to the desired size. If you have more than one .tfm file for a font - for example, emtt10 for text sizes and emtt12 for display sizes (European Modern Typewriter) - the declaration could be
1\DeclareFontShape{T1}{emtt}{m}{n}{<-12> emtt10 <12-> emtt12}{}In this case, the emtt10.tfm file would be used for sizes smaller than 12pt, and emtt12.tfm for all sizes larger than or equal to 12pt.
The examples above demonstrate that the fifth argument of the \DeclareFontShape command consists of size specifications surrounded by angle brackets intermixed with loading information for the individual sizes (e.g., font names). The part inside the angle brackets is called the size info, and the part following the closing angle bracket is called the font info. The font info is further structured into a size function (often empty) and its arguments. Within the arguments of \DeclareFontShape, whitespaces are ignored to make entries more readable. Under unusual circumstances, when a real space has to be entered, you can use the \space command.
Simple sizes and size ranges
The size infos can be divided into simple sizes and size ranges. A simple size is given by a single (decimal) number, like <10> or <17.28>, and can have any positive value. However, you probably will not find values less than 4 or greater than 120 because the number represents a font size measured in points. A size range is given by two simple sizes separated by a hyphen, to indicate a range of font sizes that share the same font info. The lower boundary is included in the range, while the upper boundary is excluded. For example, <5-10> stands for sizes greater than or equal to 5pt and less than 10pt. It is possible to omit the number on either size of the hyphen in a size range: <-> stands for all possible sizes, <-10> stands for all sizes less than 10pt, and <12-> stands for all sizes greater than or equal to 12pt.
Several simple sizes have often the same font info. In that case, a convenient shorthand is to omit all but the last info:
1\DeclareFontShape{OT1}{panr}{m}{n}{ <5> <6> <7> <8> <9> <10>
2    <10.95> <12> <14.4> <17.28> <20.74> <24.88> pan10 }{}
This declares the font Pandora medium Roman as being available in several sizes, all of them produced by scaling from the same design size.
Size functions
As mentioned above, the font info is further structured into a size function and its argument. If an * appears in the font info string, everything to the left of it forms the function name, and everything to the right is the argument. If there is no asterisk, as in all the examples so far, the whole string is regarded as the argument, and the function name is empty.
Size functions produce the specification necessary for LaTeX to find the external font and load it at the desired size. This process is based on the size requested by the user and the information in the \DeclareFontShape command. Size functions are also responsible for notifying the user about special events. For example, some functions differ only in whether they issue warnings. This capability allows the system maintainer to set up LaTeX in the way best suited for the particular site.
The name of a size function consists of zero or more letters. Some of the size functions can take two arguments: one optional and one mandatory. An optional parameter has to be enclosed in square brackets. For example, the following specification would select, for all possible sizes, the size function s with the optional argument 0.9 and the mandatory argument cmfbi10:
1<-> s * [0.9] cmfib8The size specifications in \DeclareFontShape are inspected in the order in which they are given. When a size info matches the requested size, the corresponding size function is executed. If this process yields a valid font, no further entries are inspected. Otherwise, the search continues with the next entry. The standard size functions are listed below.
The “empty” function The empty function loads the font info exactly at the requested size if it is a simple size. If there is a size range and the size requested by the user falls within that range, it loads the font exactly at the user size.
For example, if the user requested 14.4, then the specification
1<-> panr10would load the panr10.tfm file at 14.4pt. All the values in the .tfm file are scaled by 1.44 because this font was designed for 10pt.
You may sometimes want to load a font at a slightly different size than the one requested by the user. Such adjustment may be necessary when fonts from one family appear to be too large compared to fonts from other families used in the same document. For this purpose, the empty size function allows an optional argument to specify a scale factor that is multiplied by the requested size to yield the actual size to be loaded.
Thus,
1<-> [0.95] phvr8twould always load the phvr8t.tfm file (Helvetica in the T1 encoding) at 95% of the requested size. If the optional argument is used, the empty size function will issue a warning to notify the user that the font is not being loaded at the intended size.
The “s” function The s function does the same as the empty function, except that no message will be generated on the terminal. Messages will still be written to the transcript file, so you can find out which fonts were used if something goes wrong.
The “gen” function External font names are often built by appending the font size to a string that represents the typeface. For example, cmtt8, cmtt9, and cmtt10 are the external names for the fonts Computer Modern Typewriter at 8, 9, and 10pt, respectively. With font names organized according to such a scheme, you can use the gen function to shorten the entry. This function combines the font info and the requested size to generate the external font names. Thus, if you write
1<8> <9> <10> gen * cmttthis would be a shorthand for
1<8> cmtt8 <9> cmtt9 <10> cmtt10which saves eight characters in the internal NFSS tables. This function combines both parts literally, so you should not use it with decimal sizes like 14.4. You must also make sure that the digits in the external font name really represent the design size (for example, cmr17 is actually Computer Modern Roman at 17.28pt).
In all other respects, the gen function behaves like the empty function. That is, the optional argument, if specified, represents a scale factor and, if used, generates an information message.
The “sgen” function The sgen function is the silent version of the gen function. It writes any message only to the transcript file.
The “genb” function This size function is similar to gen, but is intended for fonts in which the size is encoded in the font name in centipoints, such as the EC fonts. As a consequence, a line such as
1<9> <10> <10.95> <12> genb * ecrmacts as a shorthand
1<9> ecrm0900 <10> ecrm1000 <10.95> ecrm1095 <12> ecrm1200An optional argument, if present, will have the same effect as it would with the empty function.
The “sgenb” function The sgenb function is the silent version of the genb function. It writes any message only to the transcript file.
The “sub” function The sub function is used to substitute a different font shape group if no external font exists for the current font shape group. In this case, the argument is not an external font name but rather a different family, series, and shape combination separated by slashes. For example, the Computer Modern Sans has no italic shape, only a slanted shape. Therefore, it is reasonable to declare the slanted shape as a substitute for the italic one:
1\DeclareFontShape{OT1}{cmss}{m}{it}{ <-> sub * cmss/m/sl }{}Without this declaration, LaTeX’s automatic substitution mechanism would substitute the default shape, Computer Modern Sans upright.
There are other good uses for the sub function. Look at the following code:
1\DeclareFontShape{OT1}{cmss}{m}{sl}{ <-8> sub * cmss/m/n
2   <8> cmssi8 <9> cmssi9 <10><10.95> cmssi10 <12><14.4> cmssi12
3   <17.28><20.74><24.88> cmssi17 }{}
This declaration states that for sizes smaller than 8pt, LaTeX should look in the font shape declaration for OT1/cmss/m/n. Such substitutions can be chained. For example, there is no Computer Modern Sans font smaller than 8pt, so the substituted font shape group will probably contain another substitution entry. However, using this method has the advantage that when you get an additional font, you have to change only one font shape group declaration - other declarations that use this font will benefit automatically.
The “ssub” function The ssub function has the same functionality as the sub function but does not produce on-screen warnings (the first ’s’ means “silent”).
The “subf” function The subf function loads fonts in the same way as the empty function but produces a warning that this operation was done as a substitution because the requested font shape is not available. This function can be used to substitute some external fonts without the need to declare a separate font shape group for them, as in the case of the sub function. For example,
1\DeclareFontShape{OT1}{ptm}{bx}{n}{ <-> subf * ptmb7t }{}would warn the user that the requested combination is not available and, therefore, that the font ptmb7t was loaded instead. Since this is less informative than using the sub function, the latter should be preferred.
The “ssubf” function The silent version of subf, this function writes its messages only to the transcript file.
The “fixed” function This function ignores the requested size and instead loads the external font given as an argument. If present, the optional argument denotes the size (in points) at which the font will be loaded. Thus, this function allows you to specify size ranges for which one font in some fixed size will be loaded.
The “sfixed” function The silent version of fixed, this function is used, for example, to load the font containing the large math symbols, which is often available only in one size.
Font-loading options
As mentioned above, each font family needs to be declared using the \DeclareFontFamily command. The argument to this command, as well as the sixth argument to \DeclareFontShape, can be used to specify special operations that are carried out when a font is loaded. In this way, you can change parameters that are associated with a font as a whole.
Besides the information about each character, TeX maintains for every external font a set of global dimensions and other values associated with the font. For example, every font has its own “hyphen character”, the character that is inserted when TeX hyphenates a word. Another example is the normal width and the stretchability of blank space between words; a value is maintained for every font and changed every time TeX switches to a new font. By changing these values at the moment the font is loaded, special effects can be achieved.
Normally, changes apply to a whole family; for example, you may want to prohibit hyphenation for all words typeset in the typewriter family. In this case, the third argument of \DeclareFontFamily should be used. If the changes should apply only to a specific font shape group, you must use the sixth argument of \DeclareFontShape. In other words, when a font is loaded, NFSS first applies the argument of \DeclareFontFamily and then the sixth argument of \DeclareFontShape, so that it can override the load options specified for the whole family if necessary.
With \hyphenchar\font=<number>, TeX specifies the character used for hyphenation. The <number> represents the position of this character within the encoding scheme. The default is the value of \defaulthyphenchar, which is 45, representing the position of the ‘-’ character in most encoding schemes. If you set this number to -1, hyphenation is suppressed. Therefore, by declaring
1\DeclareFontFamily{0T1}{cmtt}{\hyphenchar\font=-1}you can suppress hyphenation for all fonts in the cmtt family with the encoding scheme OT1. Fonts with the T1 encoding have an alternate hyphen character in position 127, so that you can set, for example,
1\DeclareFontFamily{T1}{cmr}{\hyphenchar\font=127}which makes the hyphen character different from the compound-word dash entered in words like “so-called”. TeX does not hyphenate words that already contain explicit hyphen characters (except just after the hyphen), which can be a problem in languages in which the average word length is much larger than in English. With the above settings, this problem can be solved.
Every TeX font has an associated set of dimensions, which are changed by assignments of the form \fontdimen<number>\font=<dimen>, where <number> is the reference number for the dimension and <dimen> is the value to be assigned. The default values are retrieved from the .tfm file when the font is loaded. Every font has at least seven such dimensions:
\fontdimen1Specifies the slant per point of the characters. If the value is zero, the font is upright.\fontdimen2Specifies the normal width of a space used between words (interword space).\fontdimen3Specifies the additional stretchability of the interword space, which is the extra amount of white space that TeX is allowed to add to the space between words to produce justified lines in a paragraph. In an emergency, TeX may add more space than this allowed value; in that case an underfull box will be reported.\fontdimen4Specifies the allowed shrinkability of the interword space, which is the amount of space that TeX is allowed to subtract from the normal interword space (\fontdimen2) to produce justified lines in a paragraph. TeX will never shrink the interword space to less than this minimum.\fontdimen5Specifies the x-height. It defines the font-oriented dimension1ex.\fontdimen6Specified the quad width. It defines the font-oriented dimension1em.\fontdimen7Specifies the amount intended as extra space to be added after certain end-of-sentence punctuation characters when\nonfrenchspacingis in force. It is always ignored or rather replaced by the value\xspaceskipwhen that value is nonzero.
When you change the interword spacing associated with a font, you cannot use an absolute value because such a value must be usable for all sizes within one shape group. Therefore, you must define the value by using some other parameter that depends on the font. You could say, for example,
1\DeclareFontShape{0T1}{cmr}{m}{n}{...}
2   {\fontdimen2\font=.7\fontdimen2\font}
This declaration reduces the normal interword space to 70% of its original value. Similarly, the stretchability and shrinkability could be changed.
Some fonts in formulas need more than seven font dimensions. Namely, the symbol fonts called symbols and largesymbols. TeX will not be able to typeset a formula if these fonts have fewer than 22 and 13 \fontdimen parameters, respectively. The values of these parameters are used to position the characters in a math formula.
There is one unfortunate optimization in the TeX system: TeX loads every .tfm file only once for a given size. Therefore, it is impossible to define one font shape group (with the \DeclareFontShape command) to load some external font - say, cmtt10 - and to use another \DeclareFontShape command to load the same external font, this time changing some of the \fontdimen parameters or some other parameter associated with the font. An attempt to do so changes the values for both font shape groups.
For example, suppose that you try to define a font shape with tight spacing by making the interword space smaller:
1\DeclareFontShape{T1}{ptm}{m}{n}{ <-> ptmr8t }{}
2\DeclareFontShape{T1}{ptm}{c}{n}{ <-> ptmr8t }
3                     {\fontdimen2\font=.7\fontdimen2\font}
This declaration will not work. The interword spacing for the medium shape will change when the tight shape is loaded to the values specified there, and this is not what is expected. The best way to handle this situation is to define a virtual font that contains the same characters as the original font but differs in the settings of the font dimensions. Another possible solution is to load the font at a slightly different size, as in the following declaration:
1\DeclareFontShape{T1}{ptm}{c}{n}{ <-> [0.9999] ptmr8t }
2                 {\fontdimen2\font=.7\fontdimen2\font}
This method makes them different fonts for TeX with separate \fontdimen parameters, Alternatively, in this particular case, you can control the interword space by setting \spaceskip, thereby overriding the font values.
6.3. How to modify font families and font shape groups
If a nonstandard font shape declaration is needed for a particular document, this private declaration should be placed in a package or the document preamble. It will overwrite any existing declaration for the font shape combination. However, it is important that the use of \DeclareFontFamily prevents a later loading of the corresponding .fd file (discussed later in this article). Also, this new declaration has no effect on fonts that are already loaded.
6.4. How to declare a new font encoding scheme
Font changes that involve alterations in the encoding scheme require certain precautions. In the T1 encoding, for example, most accented letters have their own glyphs, whereas in the traditional TeX text encoding (OT1), accented letters must be generated from letters and accents using the \accent primitive. If the two approaches have to be mixed, perhaps because a font is available only in one of the encodings, the definition of a command such as \" must behave differently depending on the current font encoding.
This is why each font encoding has to be formally introduced to LaTeX with a \DeclareFontEcnoding command, which takes three arguments. The first argument is the name of the encoding, which will later be used to access the encoding with the \fontencoding command. The list of
standard encoding schemes and their internal names is provided in the table in section 5.1.
The second argument contains any code (such as definitions) to be executed whenever LaTeX switches from one encoding to another using the \fontencoding command. The last argument contains code to be used every time the font is accessed as a mathematical alphabet. Thus, these three arguments can be used to redefine commands that depend on the positions of characters in the encoding.
The LaTeX3e project reserves the use of encodings starting with the following letters:
T- standard text encodings with 256 characters.TS- symbols designed to extend the correspondingTencoding.X- text encodings that do not conform to the strict requirements forTencodings.M- standard math encodings with 256 characters.S- other symbol encodings.A- other special applications.OT- standard text encodings with 128 characters.OM- standard math encodings with 128 characters.
The letter O emphasizes that the 128-character encodings are old and obsolete. Ideally, these encodings will be superseded by standards defined by the TeX user group so that in the future a change of encoding will be necessary only if one is switching from one language to another.
When declaring your own private encodings, you should choose names starting with L for “local” or E for “experimental”. Encodings starting with U are for “Unknown” or “Unclassified” encodings - that is, for fonts that do not fit a common encoding pattern. The introduced naming convention guarantees that files using official encodings are portable.
The \DeclareFontEncoding command stores the name of the newly declared encoding in the command \LastDeclaredEncoding. This is sometimes useful when you are declaring other related encoding information and is, for example, used in the encoding declaration files for the Cyrillic languages.
Also, as we mentioned in the discussion of font substitution in the preceding article, the default values of the family, series, and shape may need to be different for different encodings. For such a case, NFSS provides the command \DeclareFontSubstitution, which takes the encoding as the first argument. The next three arguments are the default values (associated with this encoding) for the family, series, and shape for use in the automatic substitution process. It is important that these three arguments must form a valid font shape. In other words, a \DeclareFontShape declaration exists for them. Otherwise, an error message will be issued when NFSS checks its internal tables at \begin{document}.
6.5. Internal file organization
Font families can be declared when a format file is generated, declared in the document preamble, or loaded on demand when a font-changing command in the document requests a combination that has not yet been used. The first way leads to consuming internal memory in every LaTeX run, even if the font is not used. The last two options take a little more time during document formatting because the font definitions have to be read at runtime. Nevertheless, the latter solutions are preferrable for most shape groups because they allow you to typeset a wide variety of documents with a single LaTeX format.
When the format file is being generated, LaTeX reads a file named fonttext.ltx, which contains the standard set of font family definitions and some other declarations related to text fonts.
All other font family definitions should be declared in external files loaded on demand: either package files or font definition (.fd) files. If font family definitions are placed in a package file, you must explicitly load this package after the \documentclass command. However, there is a third possibility: whenever NFSS gets a request for a font family foo in an encoding scheme BAR, and it knows nothing about this combination, it will try to load a file called barfoo.fd. If this file exists, it is supposed to contain font shape group definitions for the family foo in the encoding scheme BAR - that is, declarations of the form
1\DeclareFontFamily{BAR}{foo}{...}
2\DeclareFontShape{BAR}{foo}{...}{...}{...}{...}
3...
4\endinput
This is how it becomes possible to declare a huge number of font families for LaTeX without filling valuable memory with information that is likely almost never used.
Each .fd file should contain all font definitions for one font family in one encoding scheme. In the file, there must be one or more \DeclareFontShape declarations and exactly one \DeclareFontFamily declaration. No other definitions should appear in the file, except perhaps a \ProvidesFile declaration or some \typeout statements informing the user about the font loading. Instead of the \typeout command, you can use the plain TeX command \wlog, which writes its argument only to the transcript file. Detailed information in the transcript file should be generated by all .fd files that are used in production because looking at this transcript will help to spot errors by providing information about the files and their versions used in a particular job. If \typeout or \wlog commands are used, it is important to remember that spaces and empty lines in a .fd file are ignored. Therefore, it is necessary to use the command \space in the argument to \typeout or \wlog to obtain a blank space on the screen and the transcript file.
New encoding schemes cannot be introduced via the .fd mechanism. NFSS will reject any request to switch to an encoding scheme that was not explicitly declared in the LaTeX format (i.e., fonttext.ltx), in a package file, or in the preamble of the document.
6.6. How to declare new fonts for use in math
How to specify font sizes
For every text size, NFSS maintains
three sizes that are used to typeset math formulas: the size in which to typeset most of the symbols (selected by \textstyle or \displaystyle); the size for first-order subscripts and superscripts (\scriptstyle); and the size for higher-order subscripts and superscripts (\scriptscriptstyle). If you switch to a new text size for which the corresponding math sizes are not yet known, NFSS tries to calculate them as fractions of the text size. If you do not want NFSS to calculate these sizes, you may specify the correct values yourself via \DeclareMathSizes. This declaration takes four arguments: the outer text size and the three math sizes for this text size. For example, the following declaration defines the math sizes for the 14pt (heading) size to be 14pt, 10pt, and 7pt, respectively:
1\DeclareMathSizes{14}{14}{10}{7}Another declaration below (for headings of a higher level) informs NFSS that no math sizes are necessary for 36pt text size. This may help avoid the unnecessary loading of many fonts.
1\DeclareMathSizes{36}{}{}{}How to add new symbols
We have already discussed how to use math alphabet commands to produce letters with special shapes in a formula. Here, we will show how to add fonts containing special symbols, called symbol fonts, and how to make such symbols accessible in formulas.
Adding new symbol fonts is similar to the declaration of a new math alphabet identifier: \DeclareSymbolFont defines the defaults for all math versions, \SetSymbolFont overrides the defaults for a particular version.
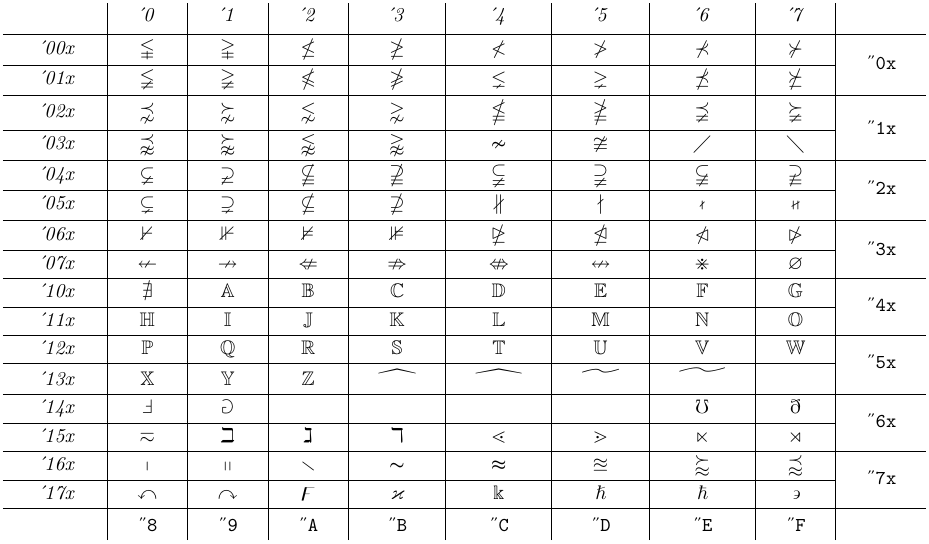
The math symbol fonts are accessible via a symbolic name. For example, if you want to install the AMS font msbm10 (see the glyph chart below), you first have to make the typeface known to NFSS using the declarations described in the previous sections.
These instructions would look like
1\DeclareFontFamily{U}{msb}{}
2\DeclareFontShape{U}{msb}{m}{n}{ <5> <6> <7> <8> <9> gen * msbm
3        <10> <10.95> <12> <14.4> <17.28> <20.74> <24.88> msbm10}{}
and are usually placed in an .fd file. Then, you have to declare that symbol font for all math versions by the following command:
1\DeclareSymbolFont{AMSb}{U}{msb}{m}{n}It makes the font shape group U/msb/m/n available as a symbol font under the name AMSb. If there was a bold series in this font family (in fact, there is not), you could subsequently change the set-up for the bold math version by saying
1\SetSymbolFont{AMSb}{bold}{U}{msb}{b}{n}After taking care of the font declarations, you can use this symbol font in math mode. But how to tell NFSS that, for example the \lessdot command in math mode should produce the corresponding symbol in the output? To do so, you need to introduce your own symbol names to NFSS by using \DeclareMathSymbol:
1\DeclareMathSymbol{cmd}{type}{symbol-font}{slot}The first argument is the command name that you choose. The second argument is one of the commands shown in the table below and determines the nature of the symbol, which, in turn, determines the amount of space that LaTeX puts around the symbol when it occurs in a formula.

Incidentally, except for \mathalpha, these commands can be used in math formulas as functions with one argument, in which case they space their (possible complex) argument as if it was of the corresponding type.
The third argument identifies the symbol font from which the symbol should be fetched - that is, the symbolic name defined by the \DeclareSymbolFont command. The fourth argument gives the symbol’s position in the font encoding, either as decimal, octal, or hexadecimal value. You can easily find out the positions of all glyphs in this font from the glyph chart above. For example, \lessdot can be declared as
1\DeclareMathSymbol{\lessdot}{\mathbin}{AMSb}{"6c}Instead of a command name, you can use a single character as the first argument. For example, the eulervm package has several declarations of the form
1\DeclareMathSymbol{0}{\mathalpha}{letters}{"30}to specify where to fetch the digits from.
The \DeclareMathSymbol command specifies a position in some symbol font. Therefore, it is important that all external fonts associated with this symbol font via the \DeclareSymbolFont and \SetSymbolFont commands have the same character in that position. The simplest way to ensure this is to use only fonts with the same encoding (unless it is the U, or unknown, encoding, as two fonts in this encoding are not required to contain the same characters).
In the glyph chart above, you can also find “blackboard bold” letters (ABC… starting from the position '101). If you want to use these letters as a math alphabet, you can define them using \DeclareMathAlphabet. However, if this symbol font is already loaded, it is better to use a shortcut to access individual symbols:
1\DeclareSymbolFontAlphabet{\mathbb}{AMSb}That is, you provide the name of your math alphabet identifier and the symbolic name of the previously declared symbol font.
An important reason for not unnecessarily loading fonts twice is that there is an upper limit of 16 math fonts that can be active at any given time in TeX. In calculating this limit, each symbol font counts; math alphabets count only if they are actually used in the document, and they count locally in each math version. Therefore, if eight symbol fonts are declared, you can use at most eight (possibly different) math alphabet identifiers within every version.
As a brief summary: to introduce new symbol fonts, you need to issue a small number of \DeclareSymbolFont and \SetSymbolFont declarations and a potentially large number of \DeclareMathSymbol declarations. Therefore, adding such fonts is best done in a package file.
How to introduce new math versions
We have already
mentioned that the standard set-up automatically declares two math versions: normal and bold. To introduce additional versions, you can use the \DeclareMathVersion declaration, which takes one argument - the name of the new math version. All symbol fonts and all math alphabets previously declared are automatically available in this math version; the default fonts are assigned to them - that is, the fonts you have specified with \DeclareMathAlphabet or \DeclareSymbolFont.
You can then change the set-up for your new version by issuing appropriate \SetMathAlphabet and \SetSymbolFont commands for the bold math version, as shown earlier in this section and in the article on
fonts in math. Again, the introduction of a new math version is normally done in a package file.
How to change the symbol font set-up
We have seen how to add new symbol fonts to access more symbols. The same commands can be used to modify an existing set-up. This capability might be interesting if you decide to use special fonts in some or all math versions.
Below are the default LaTeX settings:
1\DeclareMathVersion{normal} \DeclareMathVersion{bold}
2\DeclareSymbolFont{operators} {OT1}{cmr}{m} {n}
3\DeclareSymbolFont{letters} {OML}{cmm}{m}{it}
4\DeclareSymbolFont{symbols} {OMS}{cmsy}{m}{n}
5\DeclareSymbolFont{largesymbols} {OMX}{cmex}{m}{n}
6
7% Special bold fonts only for these:
8\SetSymbolFont {operators}{bold}{OT1}{cmr}{bx}{n}
9\SetSymbolFont {letters} {bold}{OML}{cmm}{b}{it}
In the standard set-up, digits and text produced by operators such as \log and \max are taken from the symbol font called operators. To change this so that these elements blend well with the main text font - say, Computer Modern Sans rather than Computer Modern Roman - you can issue the following commands:
1\SetSymbolFont{operators}{normal}{0T1}{cmss}{m} {n}
2\SetSymbolFont{operators}{bold} {0T1}{cmss}{bx}{n}
Symbol fonts with names symbols and largesymbols play a unique role in TeX. That is why they require a special number of \fontdimen parameters associated with them. Therefore, only specially prepared fonts can be used as these two symbol fonts. In principle, one can add such parameters to any font at load time by using the third parameter of \DeclareFontFamily or the sixth parameter of \DeclareFontShape.
6.7. How to define your own .fd file (example)
If you want to set up (PostScript) fonts and create the required .fd file, you should follow the procedure discussed earlier in this article. If fontinst is used to generate the required font metric files, then the corresponding .fd files are automatically generated as well. However, it is easy to write an .fd file for a single font family by hand, provided that you know which font encoding is used. As an example, let’s study the t1bch.fd declaration file for Bitstream Charter in the T1 encoding:
 1\ProvidesFile{t1bch.fd}[2001/06/04 font definitions for T1/bch.]
 2% Primary declarations
 3\DeclareFontFamily{T1}{bch}{}
 4\DeclareFontShape{T1}{bch}{m}{n}{<-> bchr8t}{}
 5\DeclareFontShape{T1}{bch}{m}{sc}{<-> bchrc8t}{}
 6\DeclareFontShape{T1}{bch}{m}{sl}{<-> bchro8t}{}
 7\DeclareFontShape{T1}{bch}{m}{it}{<-> bchri8t}{}
 8\DeclareFontShape{T1}{bch}{b}{n}{<-> bchb8t}{}
 9\DeclareFontShape{T1}{bch}{b}{sc}{<-> bchbc8t}{}
10\DeclareFontShape{T1}{bch}{b}{sl}{<-> bchbo8t}{}
11\DeclareFontShape{T1}{bch}{b}{it}{<-> bchbi8t}{}
12% Substitutions
13\DeclareFontShape{T1}{bch}{bx}{n}{<->ssub * bch/b/n}{}
14\DeclareFontShape{T1}{bch}{bx}{sc}{<->ssub * bch/b/sc}{}
15\DeclareFontShape{T1}{bch}{bx}{sl}{<->ssub * bch/b/sl}{}
16\DeclareFontShape{T1}{bch}{bx}{it}{<->ssub * bch/b/it}{}
17\endinput
The first line is an identification line. Then follows the declaration of the font family and encoding (bch and T1) using \DeclareFontFamily. The argument of this command should correspond to the name of the .fd file, except that the encoding in the file name is lowercase. Next, each combination of series and shape is mapped to the name of a .tfm file. These fonts will be scaled to any desired size (notice <->). The second part of the file sets up some substitutions for combinations for which no font is available (i.e., replacing the bold extended series with the bold series).
Assuming that you have the additional Charter fonts (Black and BlackItalic), you may then want to add the corresponding definitions to the .fd file. You would first need to provide the appropriate virtual fonts, of course, to emulate the T1 character set. Fortunately, for many fonts, these can be downloaded from the Internet.
Another possible reason to create your own .fd files might arise from the need to combine fonts from different families and introduce them to LaTeX as a single new font family. For example, there is the Aldus font family designed as a companion to the Palatino typeface (which was originally designed as a display typeface). As Aldus has no bold series, Palatino is a natural choice to use as a bold substitute. In the example below, we combine Aldus in its medium series with Palatino bold, calling the composite font family zasj. Only a fragment of a complete .fd file is presented, which is enough to illustrate the idea.
 1\ProvidesFile{t1zasj.fd}
 2   [2003/10/12 font definitions for T1 Aldus/Palatino mix.]
 3\DeclareFontFamily{T1}{zasj}{}
 4% Medium series
 5\DeclareFontShape{T1}{zasj}{m}{n} {<->pasr9d}{}
 6\DeclareFontShape{T1}{zasj}{m}{sc}{<->pasrc9d}{}
 7\DeclareFontShape{T1}{zasj}{m}{it}{<->pasri9d}{}
 8\DeclareFontShape{T1}{zasj}{m}{sl}{<->ssub * pasj/m/it}{}
 9% Bold series
10\DeclareFontShape{T1}{zasj}{b}{n}{<-> pplb8t}{}
11\DeclareFontShape{T1}{zasj}{b}{sc}{<->pplbc8t}{}
12\DeclareFontShape{T1}{zasj}{b}{sl}{<->pplbo8t}{}
13\DeclareFontShape{T1}{zasj}{b}{it}{<->pplbi8t}{}
To access this “pseudo-family”, we have to select zasj in the T1 encoding. We also have to ensure that \textbf switches to bold, not to bold extended, since our .fd file does not provide any substitutions. All this can be automatically provided by a small package like this:
1\ProvidesPackage{fontmix}[2003/10/12 T1 Aldus/Palatino mix.]
2\RequirePackage[T1]{fontenc}
3\renewcommand\rmdefault{zasj} \renewcommand\bfdefault{b}
So, by loading the fontmix package, we get Aldus and Palatino Bold for headlines. Such a font mix may not often enhance your text, so this example does not suggest creating random combinations.
6.8. The order of declarations
NFSS requires you to provide all declarations in a specific order, so that it can check whether you have specified all the necessary information. If you declare objects in the wrong order, it will complain. Here are the dependencies that you must honor:
\DeclareFontFamilychecks that the encoding scheme was previously declared with\DeclareFontEncoding.\DeclareFontShapechecks that the font family was declared to be available in the requested encoding (\DeclareFontFamily).\DeclareSymbolFontmakes sure that the encoding scheme is valid.\SetSymbolFontadditionally ensures that the requested math version was declared (\DeclareMathVersion) and that the requested symbol font was declared (\DeclareSymbolFont).\DeclareSymbolFontAlphabetchecks that the command name for the alphabet identifier can be used and that the symbol font was declared.\DeclareMathAlphabetchecks that the chosen command name can be used and that the encoding scheme was declared.\SetMathAlphabetchecks that the alphabet identifier was previously declared with\DeclareMathAlphabetor\DeclareSymbolFontAlphabetand that the math version and the encoding scheme are known.\DeclareMathSymbolmakes sure that the command name can be used (i.e., is undefined or was previously declared to be a math symbol) and that the symbol font was previously declared.- When the
\begin{document}command is reached, NFSS makes some additional checks. For example, it verifies that substitution defaults for every encoding scheme point to known font shape group declarations.