Installation and Quick Start Tutorial
Installation
To use Aspose.BarCode for JasperReports from your application, copy the Aspose.BarCode.JasperReport.jar file from the \lib folder in the aspose.barcode.jasperreports.zip file to the JasperReports\lib directory, or to a library folder in your application.
Quick Start Guide
Below is an easy tutorial that demonstrates how to use Aspose.BarCode for JasperReports to generate barcodes for reports.
What follows is a step by step guide to create a simple demo application.
Step 1: Create the .jrxml file
.jrxml files contain the report definition for JasperReports. These are XML formatted text files. Either create these manually in a text editor or design them using one of the several plugins available for popular IDEs like Netbeans and Eclipse.
This tutorial uses a simple .jrxml file that contains text and barcode images. The complete jrxml file follows.
Copy the contents below and create a new file called BarCodeReport.jrxml.
XML
<?xml version="1.0" encoding="UTF-8"?>
<jasperReport
xmlns="http://jasperreports.sourceforge.net/jasperreports"
xmlns:xsi="http://www.w3.org/2001/XMLSchema-instance"
xsi:schemaLocation="http://jasperreports.sourceforge.net/jasperreports http://jasperreports.sourceforge.net/xsd/jasperreport.xsd"
name="BarcodeReport3" pageWidth="595" pageHeight="1842" columnWidth="515" leftMargin="40" rightMargin="40" topMargin="50" bottomMargin="50">
<title>
<band height="1742">
<line>
<reportElement x="0" y="0" width="515" height="1"/>
<graphicElement/>
</line>
<textField>
<reportElement x="0" y="10" width="515" height="20"/>
<textElement textAlignment="Center">
<font size="12"/>
</textElement>
<textFieldExpression class="java.lang.String"><![CDATA["This sample uses Aspose.BarCode for Jasper Report\n" + ""]]></textFieldExpression>
</textField>
<textField>
<reportElement x="0" y="50" width="515" height="20"/>
<textElement textAlignment="Center">
<font size="12"/>
</textElement>
<textFieldExpression class="java.lang.String"><![CDATA["Printing BarCodes\n" + ""]]></textFieldExpression>
</textField>
<image hAlign="Center">
<reportElement x="0" y="100" width="500" height="250" />
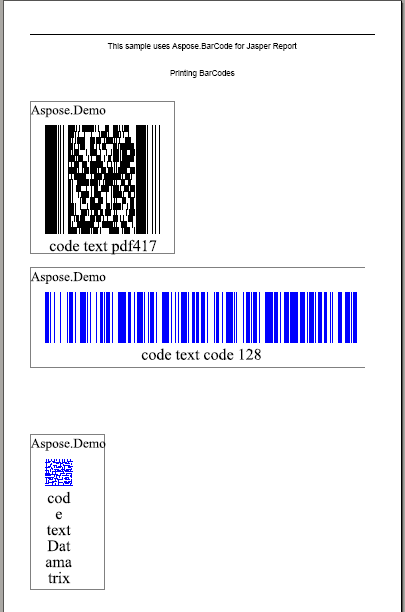
<imageExpression class="net.sf.jasperreports.engine.JRRenderable"><![CDATA[new com.aspose.barcode.jr.BarCodeRenderer(com.aspose.barcode.jr.BarCodeAttributesFactory.Create("code text pdf417","Pdf417",java.awt.Color.BLACK))]]></imageExpression>
</image>
<image>
<reportElement x="0" y="350" width="500" height="250" />
<imageExpression class="net.sf.jasperreports.engine.JRRenderable"><![CDATA[new com.aspose.barcode.jr.BarCodeRenderer(com.aspose.barcode.jr.BarCodeAttributesFactory.Create("code text code 128","Code128",java.awt.Color.BLUE))]]></imageExpression>
</image>
<image>
<reportElement x="0" y="600" width="500" height="250" />
<imageExpression class="net.sf.jasperreports.engine.JRRenderable"><![CDATA[new com.aspose.barcode.jr.BarCodeRenderer(com.aspose.barcode.jr.BarCodeAttributesFactory.Create("code text Datamatrix","Datamatrix",java.awt.Color.BLUE))]]></imageExpression>
</image>
</band>
</title>
</jasperReport>
The imageExpression tags are used in the above JRXML file for barcode image rendering. Aspose.BarCode for JasperReports includes the com.aspose.barcode.jr package, which contains a BarCodeRenderer class for rendering barcode images in reports. To render barcodes of specific symbologies and codetexts, the BarCodeRenderer class uses the BarCodeAttributes class. The BarCodeAttributes class specifies the symbology, codetext and color of the barcode to be generated. For example, in the above JRXML file, the following line renders a Data Matrix barcode, where the color is blue and the barcode text is “code text Datamatrix”:
 <imageExpression class="net.sf.jasperreports.engine.JRRenderable">

<![CDATA[new com.aspose.barcode.jr.BarCodeRenderer(com.aspose.barcode.jr.BarCodeAttributesFactory.Create("code text Datamatrix","Datamatrix",java.awt.Color.BLUE))]]>

</imageExpression>
Step 2: Create the .java file
After creating the .jrxml file, the next step is to create the .java file. The .java file compile the .jrxml file. After compilation, a .jasper file is created.
A .jasper file is a binary file that JasperReports reads. The JasperCompileManager.compileReportToFile() method compiles the .jrxml file. After the file is compiled, export the report to PDF format using the net.sf.jasperreports.engine.export.JRPdfExporter class. The complete code from the .java file is given below.
Java
package barcode1;

// import the required packages

import java.io.File;

import net.sf.jasperreports.engine.JREmptyDataSource;

import net.sf.jasperreports.engine.JRExporterParameter;

import net.sf.jasperreports.engine.JasperCompileManager;

import net.sf.jasperreports.engine.JasperFillManager;

import net.sf.jasperreports.engine.JasperPrint;

import net.sf.jasperreports.engine.export.JRPdfExporter;

public class Main

{

    public static void main(String[] args)

    {

		// path of the folder where .jrxml file is present

        final String PATH = "C:\\jasperreports-3.5.2\\demo\\samples\\barcode1\\";

        String jrxmlFileName = PATH + "BarcodeReport.jrxml";

	String fillFileName =PATH + "BarcodeReport.jasper";

	try

        {

        // compile the .jrxml file to create .jasper file

			JasperCompileManager.compileReportToFile(jrxmlFileName,fillFileName);

	System.out.println(jrxmlFileName + " - File compiled successfully.");

	File reportFile = new File(fillFileName);

        JasperPrint jasperPrint =

		JasperFillManager.fillReport(

			fillFileName,

			null,

			new JREmptyDataSource()

			);

	// export the report in pdf format

        JRPdfExporter exporter = new JRPdfExporter();

        File destFile = new File(reportFile.getParent() , jasperPrint.getName() + ".pdf");

        exporter.setParameter(JRExporterParameter.JASPER_PRINT, jasperPrint);

	exporter.setParameter(JRExporterParameter.OUTPUT_FILE_NAME, destFile.toString());

	exporter.exportReport();

        System.out.println("Report exported to " + destFile.getAbsolutePath() );

	System.out.println("Finished.");

	}

        catch(Exception e)

        {

		e.printStackTrace();

	}

    }

}
Step 3: Compile the .java file to create the report
To successfully compile the .java file, you need to include the following required .jar files (libraries).
- <JasperReports_Install_Folder>/lib – required .jar files.
- <JasperReports_Install_Folder>/dist/jasperreports-3.5.2.jar – file name may differ depending on the version installed.
- <Aspose.BarCode for JasperReports Installation Folder>/Aspose.BarCode.JasperReports.jar
You also need to copy the following files in the output folder (build/classes) to successful compile the above Java file:
- <Aspose.BarCode for JasperReports Installation Folder>/asposebarcode_beans.xml
- <Aspose.BarCode for JasperReports Installation Folder>/jasperreports_extension.properties
If you are using an IDE, for example, Netbeans or Eclipse, you need to modify the project settings to include the JARs listed above. If you are using the javac command for compilation, set the –sourcepath to include the required libraries.
Output
Below is a screenshot of the report generated by JasperReports that uses Aspose.BarCode for JasperReports for rendering barcode images: