
C# で SMTP クライアントを使用してメール送信、メッセージ転送、メール マージを実行する
メール送信
SmtpClient クラスでメール送信
この SmtpClient このクラスは、アプリケーションがシンプルメール転送プロトコル(SMTP)を介してメールを送信できるようにします。
主な機能のひとつは、~する能力です 大量にメッセージを送信すること.
完全にサポートしています 同期 および 非同期 プログラミングモデルです。操作が完了するまでメインスレッドをブロックしてメールを送信するには、開発者は同期的なもののいずれかを使用できます。 送信 メソッドです。あるいは、メール送信中にメインスレッドが実行を続けられるようにするには、開発者は以下を使用できます。 SendAsync メソッド。
さらに、 SmtpClient メッセージの送信をサポートします。 Transport Neutral Encapsulation Format(TNEF).
メールを同期的に送信
メールメッセージは、次のものを使用して同期的に送信できます。 送信 メソッド( SmtpClient このクラスは、指定されたメールメッセージを SMTP サーバーを通じて配信します。メールメッセージを同期的に送信するには、以下の手順に従ってください:
- インスタンスを作成する MailMessage クラスを使用し、そのプロパティを設定します。
- インスタンスを作成する SmtpClient クラスにホスト、ポート、ユーザー名、パスワードを指定します。
- 以下を使用してメッセージを送信する 送信 メソッド( SmtpClient クラスに渡す MailMessage インスタンス。
以下の C# コードスニペットは、Outlook のメールを同期的に送信する方法を示しています。
// For complete examples and data files, please go to https://github.com/aspose-email/Aspose.Email-for-.NET
// Declare msg as MailMessage instance
MailMessage msg = new MailMessage();

// Create an instance of SmtpClient class
SmtpClient client = new SmtpClient();

// Specify your mailing host server, Username, Password, Port # and Security option
client.Host = "mail.server.com";
client.Username = "username";
client.Password = "password";
client.Port = 587;
client.SecurityOptions = SecurityOptions.SSLExplicit;

try
{
    // Client.Send will send this message
    client.Send(msg);
    Console.WriteLine("Message sent");
}
catch (Exception ex)
{
    Trace.WriteLine(ex.ToString());
}
メールを非同期で送信
時々、メールを非同期で送信して、メールの送信中にプログラムが他の操作を続行できるようにしたい場合があります。.NET Framework 4.5 からは、次のように実装された非同期メソッドを使用できます。 TAP モデルです。以下の C# コードスニペットは、タスクベースの非同期パターンメソッドを使用して Outlook のメールメッセージを送信する方法を示します:
-
SendAsync 指定されたメッセージを送信します。
-
IAsyncSmtpClient - アプリケーションがシンプルメール転送プロトコル (SMTP) を使用してメッセージを送信できるようにします。
-
SmtpClient.CreateAsync - Aspose.Email.Clients.Smtp.SmtpClient クラスの新しいインスタンスを作成します
-
SmtpSend - Aspose.Email.Clients.Smtp.IAsyncSmtpClient.SendAsync(Aspose.Email.Clients.Smtp.Models.SmtpSend) メソッドのパラメータ設定。
-
SmtpForward - Aspose.Email.Clients.Smtp.IAsyncSmtpClient.ForwardAsync(Aspose.Email.Clients.Smtp.Models.SmtpForward) の引数。
// Authenticate the client to obtain necessary permissions
static readonly string tenantId = "YOU_TENANT_ID";
static readonly string clientId = "YOU_CLIENT_ID";
static readonly string redirectUri = "http://localhost";
static readonly string username = "username";
static readonly string[] scopes = { "https://outlook.office.com/SMTP.Send" };

// Use the SmtpAsync method for asynchronous operations
static async Task Main(string[] args)
{
    await SmtpAsync();
    Console.ReadLine();
}

static async Task SmtpAsync()
{
    // Create token provider and get access token
    var tokenProvider = new TokenProvider(clientId, tenantId, redirectUri, scopes);
    var client = SmtpClient.CreateAsync("outlook.office365.com", username, tokenProvider, 587).GetAwaiter().GetResult();

    // Create a message to send
    var eml = new MailMessage("from@domain.com", "to@domain.com", "test subj async", "test body async");

    // send message
    var sendOptions = SmtpSend.Create();
    sendOptions.AddMessage(eml);
    await client.SendAsync(sendOptions);
    Console.WriteLine("message was sent");

    // forward message
    var fwdOptions = SmtpForward.Create();
    fwdOptions.SetMessage(eml);
    fwdOptions.AddRecipient("rec@domain.com");
    await client.ForwardAsync(fwdOptions);
    Console.WriteLine("message was forwarded");
}

// Token provider implementation
public class TokenProvider : IAsyncTokenProvider
{
    private readonly PublicClientApplicationOptions _pcaOptions;
    private readonly string[] _scopes;

    public TokenProvider(string clientId, string tenantId, string redirectUri, string[] scopes)
    {
        _pcaOptions = new PublicClientApplicationOptions
        {
            ClientId = clientId,
            TenantId = tenantId,
            RedirectUri = redirectUri
        };

        _scopes = scopes;
    }

    public async Task<OAuthToken> GetAccessTokenAsync(bool ignoreExistingToken = false, CancellationToken cancellationToken = default)
    {

        var pca = PublicClientApplicationBuilder
            .CreateWithApplicationOptions(_pcaOptions).Build();

        try
        {
            var result = await pca.AcquireTokenInteractive(_scopes)
                .WithUseEmbeddedWebView(false)
                .ExecuteAsync(cancellationToken);

            return new OAuthToken(result.AccessToken);
        }
        catch (MsalException ex)
        {
            Console.WriteLine($"Error acquiring access token: {ex}");
        }
        catch (Exception ex)
        {
            Console.WriteLine($"Error: {ex}");
        }

        return null;
    }

    public void Dispose()
    {

    }
}
ディスクからメッセージ送信
EML ファイルにはヘッダー、メッセージ本文、添付ファイルが含まれます。Aspose.Email を使用すると、開発者はさまざまな方法で EML ファイルを扱えます。このセクションでは、ディスクから EML ファイルをロードし、SMTP でメールとして送信する方法を示します。.eml ファイルはディスクまたはストリームからロードできます。 MailMessage クラスと、次を使用してメールメッセージを送信します SmtpClient クラス。 MailMessage このクラスは、新しいメールメッセージの作成、ディスクまたはストリームからメールメッセージファイルの読み込み、メッセージの保存を行う主要なクラスです。以下の C# コードスニペットは、ディスク上の保存されたメッセージを送信する方法を示しています。
// For complete examples and data files, please go to https://github.com/aspose-email/Aspose.Email-for-.NET
// Load an EML file in MailMessage class
var message = MailMessage.Load(dataDir + "test.eml");

// Send this message using SmtpClient
var client = new SmtpClient("host", "username", "password");

try
{
    client.Send(message);
}
catch (Exception ex)
{
    Console.WriteLine(ex.Message);
}
テキスト形式でメール送信
この 本文 プロパティ、クラスのプロパティです。 MailMessage クラスはメッセージ本文のプレーンテキストコンテンツを指定するために使用されます。プレーンテキストメールメッセージを送信するには、以下の手順に従ってください:
- インスタンスを作成します MailMessage クラス。
- 送信者と受信者のメールアドレスを指定してください MailMessage インスタンス。
- 指定してください: 本文 プレーンテキストメッセージに使用されるコンテンツです。
- インスタンスを作成します SmtpClient クラスとメールを送信します。
次のコードスニペットは、プレーンテキストメールを送信する方法を示しています。
// For complete examples and data files, please go to https://github.com/aspose-email/Aspose.Email-for-.NET
//Create an instance of the MailMessage class
var message = new MailMessage();

// Set From field, To field and Plain text body
message.From = "sender@sender.com";
message.To.Add("receiver@receiver.com");
message.Body = "This is Plain Text Body";

// Create an instance of the SmtpClient class
var client = new SmtpClient();

// And Specify your mailing host server, Username, Password and Port
client.Host = "smtp.server.com";
client.Username = "Username";
client.Password = "Password";
client.Port = 25;

try
{
    //Client.Send will send this message
    client.Send(message);
    Console.WriteLine("Message sent");
}
catch (Exception ex)
{
    System.Diagnostics.Trace.WriteLine(ex.ToString());
}
HTML 本文でメール送信
以下のプログラミングサンプルは、シンプルなHTMLメールメッセージを送信する方法を示しています。その HtmlBody、クラスのプロパティ MailMessage クラスはメッセージ本文のHTMLコンテンツを指定するために使用されます。シンプルなHTMLメールを送信するには、以下の手順に従ってください:
- インスタンスを作成します MailMessage クラス。
- 送信者と受信者のメールアドレスを指定します MailMessage インスタンス。
- 指定してください: HtmlBody コンテンツ。
- インスタンスを作成します SmtpClient クラスと、次を使用してメールを送信します 送信 メソッド。
本記事の目的上、メールの HTML コンテンツは簡易的なものです:
This is the HTML body 実際の HTML メールはもっと複雑になります。以下のコードスニペットは、HTML 本文を持つメールの送信方法を示しています。// For complete examples and data files, please go to https://github.com/aspose-email/Aspose.Email-for-.NET
public static void Run()
{
// Declare msg as MailMessage instance
var msg = new MailMessage();
// Use MailMessage properties like specify sender, recipient, message and HtmlBody
msg.From = "newcustomeronnet@gmail.com";
msg.To = "asposetest123@gmail.com";
msg.Subject = "Test subject";
msg.HtmlBody = "<html><body>This is the HTML body</body></html>";
var client = GetSmtpClient();
try
{
// Client will send this message
client.Send(msg);
Console.WriteLine("Message sent");
}
catch (Exception ex)
{
Trace.WriteLine(ex.ToString());
}
Console.WriteLine(Environment.NewLine + "Email sent with HTML body.");
}
private static SmtpClient GetSmtpClient()
{
var client = new SmtpClient("smtp.gmail.com", 587, "your.email@gmail.com", "your.password");
client.SecurityOptions = SecurityOptions.Auto;
return client;
}
代替テキスト付き HTML メールを送信
使用する AlternateView クラスは、メールメッセージのコピーをさまざまな形式で指定するために使用します。たとえば、HTMLでメッセージを送信する場合、HTMLを表示できないメールリーダーを使用する受信者のためにプレーンテキストバージョンも提供したいことがあります。また、ニュースレターを送信する場合、プレーンテキスト版を希望する受信者のためにテキストのプレーンコピーを提供したいことがあります。代替テキスト付きのメールを送信するには、以下の手順に従います:
- インスタンスを作成します MailMessage クラス。
- 送信者と受信者のメールアドレスを指定します MailMessage インスタンス。
- インスタンスを作成します AlternateView クラス。
これは、文字列で指定された内容を使用してメールメッセージに代替ビューを作成します。
- インスタンスを追加します AlternateView クラスを MailMessage オブジェクト。
- インスタンスを作成します SmtpClient クラスと、次を使用してメールを送信します 送信 メソッド。
次のコードスニペットは、代替テキスト付きのメールを送信する方法を示しています。
// For complete examples and data files, please go to https://github.com/aspose-email/Aspose.Email-for-.NET
// Declare message as MailMessage instance
var message = new MailMessage();

// Creates AlternateView to view an email message using the content specified in the //string
var alternate = AlternateView.CreateAlternateViewFromString("Alternate Text");

// Adding alternate text
message.AlternateViews.Add(alternate);
大量メール送信
次のものを使用してメールのバッチを送信できます。 SmtpClient クラスの 送信 受け入れるメソッドのオーバーロード MailMessageCollection:
- インスタンスを作成する SmtpClient クラス。
- 指定してください: SmtpClient クラスのプロパティです。
- インスタンスを作成します MailMessage クラス。
- インスタンス内で送信者、受信者、件名、メッセージを指定します MailMessage クラス。
- 別の相手にメールを送信したい場合は、上記の2ステップを再度繰り返してください。
- インスタンスを作成する MailMessageCollection クラス。
- インスタンスを追加します MailMessage クラスをオブジェクトの MailMessageCollection クラス。
- これで、次のものを使用してメールを送信してください SmtpClient クラス 送信 インスタンスを渡すことで呼び出すメソッド MailMessageCollection それに含まれるクラス。
次のコードスニペットは、一括メールを送信する方法を示しています。
// For complete examples and data files, please go to https://github.com/aspose-email/Aspose.Email-for-.NET
// Create SmtpClient as client and specify server, port, user name and password
var client = new SmtpClient("mail.server.com", 25, "Username", "Password");

// Create instances of MailMessage class and Specify To, From, Subject and Message
var message1 = new MailMessage("msg1@from.com", "msg1@to.com", "Subject1", "message1, how are you?");
var message2 = new MailMessage("msg1@from.com", "msg2@to.com", "Subject2", "message2, how are you?");
var message3 = new MailMessage("msg1@from.com", "msg3@to.com", "Subject3", "message3, how are you?");

// Create an instance of MailMessageCollection class
var manyMsg = new MailMessageCollection();
manyMsg.Add(message1);
manyMsg.Add(message2);
manyMsg.Add(message3);

try
{
    // Send Messages using Send method
    client.Send(manyMsg);
    Console.WriteLine("Message sent");
}
catch (Exception ex)
{
    Trace.WriteLine(ex.ToString());
}
大量メールの成功を追跡
大量にメッセージを送信する際、送信に成功したメッセージ数の情報や、これらのメッセージのリストを取得できます。 SucceededSending この目的のためのイベントです。
コードサンプル:
using (var client = new SmtpClient(host, SecurityOptions.Auto))
{
    int messageCount = 0;

    client.SucceededSending += (sender, eventArgs) =>
    {
        Console.WriteLine("The message '{0}' was successfully sent.", eventArgs.Message.Subject);
        messageCount++;
    };

    client.Send(messages);

    Console.WriteLine("{0} messages were successfully sent.", messageCount);
}
マルチ接続でメール送信
この UseMultiConnection このプロパティは、重い操作のために複数の接続を作成する際に使用できます。マルチ接続モードで使用する接続数は、次のように設定できます。 SmtpClient.ConnectionsQuantity. 次のコードスニペットは、複数メッセージを送信するためのマルチコネクションモードの使用例を示しています。
var smtpClient = new SmtpClient();
smtpClient.Host = "<HOST>";
smtpClient.Username = "<USERNAME>";
smtpClient.Password = "<PASSWORD>";
smtpClient.Port = 587;
smtpClient.SupportedEncryption = EncryptionProtocols.Tls;
smtpClient.SecurityOptions = SecurityOptions.SSLExplicit;

var messages = new List<MailMessage>();
for (int i = 0; i < 20; i++)
{
    MailMessage message = new MailMessage(
        "<EMAIL ADDRESS>",
        "<EMAIL ADDRESS>",
        "Test Message - " + Guid.NewGuid().ToString(),
        "SMTP Send Messages with MultiConnection");
    messages.Add(message);
}

smtpClient.ConnectionsQuantity = 5;
smtpClient.UseMultiConnection = MultiConnectionMode.Enable;
smtpClient.Send(messages);
TNEF 形式でメッセージ送信
TNEF メールは特殊なフォーマットを持ち、標準 API で送信すると失われる可能性があります。 SmtpClient クラス UseTnef このプロパティを設定すると、メールを TNEF として送信できます。以下のコードスニペットは、メッセージを TNEF として送信する方法を示しています。
var emlFileName = RunExamples.GetDataDir_Email() + "Message.eml";     // A TNEF Email

// Load from eml
var eml1 = MailMessage.Load(emlFileName, new EmlLoadOptions());
eml1.From = "somename@gmail.com";
eml1.To.Clear();
eml1.To.Add(new MailAddress("first.last@test.com"));
eml1.Subject = "With PreserveTnef flag during loading";
eml1.Date = DateTime.Now;

var client = new SmtpClient("smtp.gmail.com", 587, "somename", "password");
client.SecurityOptions = SecurityOptions.Auto;
client.UseTnef = true;     // Use this flag to send as TNEF
client.Send(eml1);
会議リクエストの送信
Aspose.Email を使用すると、開発者はメールにカレンダー機能を追加できます。
メールでリクエスト送信
メールで会議リクエストを送信するには、以下の手順に従ってください:
- インスタンスを作成します MailMessage クラス。
- 送信者と受信者のアドレスを、次のインスタンスで指定します MailMessage クラス。
- 次のクラスのインスタンスを初期化します Appointment クラスに値を渡します。
- サマリーと説明を指定します Calendar インスタンス。
- 追加する Calendar へ MailMessage インスタンスに渡す Appointment インスタンス。
|メールで送信された iCalendar 会議リクエスト| | :- | |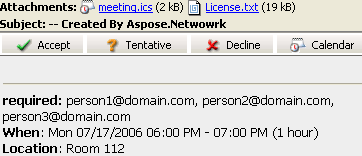 | 以下のコードスニペットは、メールでリクエストを送信する方法を示しています。
// Create an instance of the MailMessage class
var msg = new MailMessage();

// Set the sender, recipient, who will receive the meeting request. Basically, the recipient is the same as the meeting attendees
msg.From = "newcustomeronnet@gmail.com";
msg.To = "person1@domain.com, person2@domain.com, person3@domain.com, asposetest123@gmail.com";

// Create Appointment instance
var app = new Appointment("Room 112", new DateTime(2015, 7, 17, 13, 0, 0), new DateTime(2015, 7, 17, 14, 0, 0), msg.From, msg.To);
app.Summary = "Release Meetting";
app.Description = "Discuss for the next release";

// Add appointment to the message and Create an instance of SmtpClient class
msg.AddAlternateView(app.RequestApointment());
var client = GetSmtpClient();

try
{
    // Client.Send will send this message
    client.Send(msg);
    Console.WriteLine("Message sent");
}
catch (Exception ex)
{
    Trace.WriteLine(ex.ToString());
}
メッセージ転送
SMTP クライアントでメッセージ転送
メールの転送は一般的な操作です。受信したメールは特定の受信者へ転送できます。 転送 このメソッドは、受信または保存されたメールを目的の受信者へ転送するために使用できます。以下のコードスニペットは、SMTP クライアントを使用してメールを転送する方法を示します。
//Create an instance of SmtpClient class
var client = new SmtpClient();

// Specify your mailing host server, Username, Password, Port and SecurityOptions
client.Host = "mail.server.com";
client.Username = "username";
client.Password = "password";
client.Port = 587;
client.SecurityOptions = SecurityOptions.SSLExplicit;
var message = MailMessage.Load(dataDir + "Message.eml");
client.Forward("Recipient1@domain.com", "Recipient2@domain.com", message);
MailMessage なしでメッセージ転送
APIは、EMLメッセージを事前に読み込まずに転送することもサポートしています。 MailMessage。これは、システムメモリが制限されている場合に有用です。
using (var client = new SmtpClient(host, smtpPort, username, password, SecurityOptions.Auto))
{
    using (var fs = File.OpenRead(@"test.eml"))
    {
        client.Forward(sender, recipients, fs);
    }
}
MailMessage なしでメッセージを非同期転送
using (var client = new SmtpClient(host, smtpPort, username, password))
{
    using (var fs = File.OpenRead(@"test.eml"))
    {
        await client.ForwardAsync(sender, recipients, fs);
    }
}
メールマージ
メールをマージする方法
メールマージは、類似したメールメッセージのバッチを作成・送信するのに役立ちます。メールの基本部分は同じですが、内容は個別化できます。通常、受信者の連絡先情報(名、姓、会社など)を使用してメールをパーソナライズします。
|メールマージの動作イラスト:| | :- | | | Aspose.Emailは、さまざまなデータソースからのデータを含むメールマージを設定できるようにします。
Aspose.Email でメールマージを実行するには、次の手順を実行します:
- 名前シグネチャを持つ関数を作成します
- インスタンスを作成します MailMessage クラス。
- 送信者、受信者、件名、本文を指定します。
- メールの末尾用の署名を作成します。
- インスタンスを作成します TemplateEngine クラスに渡します MailMessage インスタンス。
- 署名を取得します: TemplateEngine インスタンス。
- DataTable クラスのインスタンスを作成します。
- DataTable クラスにデータソースとして Receipt、FirstName、LastName の列を追加します。
- DataRow クラスのインスタンスを作成します。
- DataRow オブジェクトに受取人の住所、名字、名前を指定します。
- インスタンスを作成します MailMessageCollection クラス
- 指定してください: TemplateEngine および DataTable インスタンスを MailMessageCollection インスタンス。
- インスタンスを作成します SmtpClient クラスにサーバー、ポート、ユーザー名、パスワードを指定します。
- 以下を使用してメールを送信します: SmtpClient クラス 送信 メソッド。
以下のサンプルでは、#FirstName# は DataTable の列を示し、その値はユーザーが設定します。次のコードスニペットは、メールマージを実行する方法を示しています。
// For complete examples and data files, please go to https://github.com/aspose-email/Aspose.Email-for-.NET
public static void Run()
{
    // The path to the File directory.
    string dataDir = RunExamples.GetDataDir_SMTP();
    string dstEmail = dataDir + "EmbeddedImage.msg";

    // Create a new MailMessage instance
    MailMessage msg = new MailMessage();

    // Add subject and from address
    msg.Subject = "Hello, #FirstName#";
    msg.From = "sender@sender.com";

    // Add email address to send email also Add mesage field to HTML body
    msg.To.Add("your.email@gmail.com");
    msg.HtmlBody = "Your message here";
    msg.HtmlBody += "Thank you for your interest in <STRONG>Aspose.Email</STRONG>.";

    // Use GetSignment as the template routine, which will provide the same signature
    msg.HtmlBody += "<br><br>Have fun with it.<br><br>#GetSignature()#";

    // Create a new TemplateEngine with the MSG message,  Register GetSignature routine. It will be used in MSG.
    TemplateEngine engine = new TemplateEngine(msg);
    engine.RegisterRoutine("GetSignature", GetSignature);

    // Create an instance of DataTable and Fill a DataTable as data source
    DataTable dt = new DataTable();
    dt.Columns.Add("Receipt", typeof(string));
    dt.Columns.Add("FirstName", typeof(string));
    dt.Columns.Add("LastName", typeof(string));

    DataRow dr = dt.NewRow();
    dr["Receipt"] = "abc<asposetest123@gmail.com>";
    dr["FirstName"] = "a";
    dr["LastName"] = "bc";
    dt.Rows.Add(dr);
    dr = dt.NewRow();
    dr["Receipt"] = "John<email.2@gmail.com>";
    dr["FirstName"] = "John";
    dr["LastName"] = "Doe";
    dt.Rows.Add(dr);
    dr = dt.NewRow();
    dr["Receipt"] = "Third Recipient<email.3@gmail.com>";
    dr["FirstName"] = "Third";
    dr["LastName"] = "Recipient";
    dt.Rows.Add(dr);

    MailMessageCollection messages;
    try
    {
        // Create messages from the message and datasource.
        messages = engine.Instantiate(dt);

        // Create an instance of SmtpClient and specify server, port, username and password
        SmtpClient client = new SmtpClient("smtp.gmail.com", 587, "your.email@gmail.com", "your.password");
        client.SecurityOptions = SecurityOptions.Auto;

        // Send messages in bulk
        client.Send(messages);
    }
    catch (MailException ex)
    {
        Debug.WriteLine(ex.ToString());
    }

    catch (SmtpException ex)
    {
        Debug.WriteLine(ex.ToString());
    }

    Console.WriteLine(Environment.NewLine + "Message sent after performing mail merge.");
}

// Template routine to provide signature
static object GetSignature(object[] args)
{
    return "Aspose.Email Team<br>Aspose Ltd.<br>" + DateTime.Now.ToShortDateString();
}
行単位のメールマージの実行方法
ユーザーは個々のデータ行をマージしたり、完全で準備されたものを取得したりできます。 MailMessage オブジェクト。 TemplateEngine.Merge このメソッドは、行単位のメールマージを実行するために使用できます。
// For complete examples and data files, please go to https://github.com/aspose-email/Aspose.Email-for-.NET
// Create message from the data in current row.
message = engine.Merge(currentRow);