
Azure AD Setup and Microsoft Graph Authentication
Aspose.Email for Java provides full integration with Microsoft Graph, allowing developers to manage messages, contacts, calendars, and tasks from Microsoft 365 accounts. This guide walks you through creating an Azure AD application and configuring authentication to start coding with Aspose.Email GraphClient.
Before using Microsoft Graph APIs with Aspose.Email, you need to register an application in Azure Active Directory (Azure AD) and configure authentication. This page covers:
-
Creating an Azure AD application (project).
-
Assigning the necessary Microsoft Graph permissions.
-
Generating credentials (client ID, client secret, tenant ID).
-
Authenticating in Java using Aspose.Email token providers.
Once complete, you’ll be ready to interact with Microsoft Graph from your Java application.
1. Create an Azure AD Application
Follow these steps to register your application in the Azure portal:
- Sign in to the Azure portal.
- Navigate to Azure Active Directory → App Registrations → New Registration.
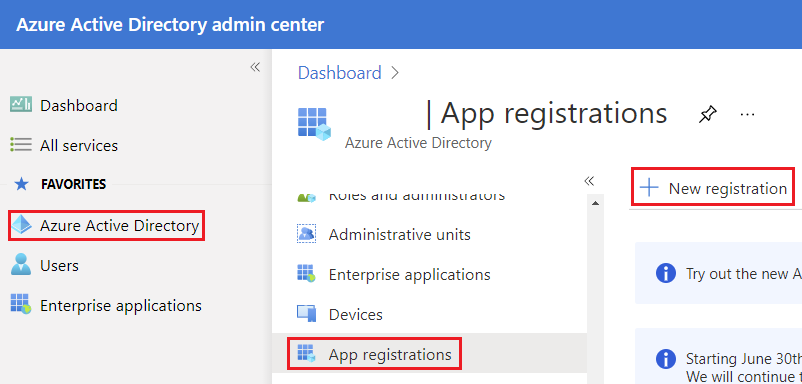
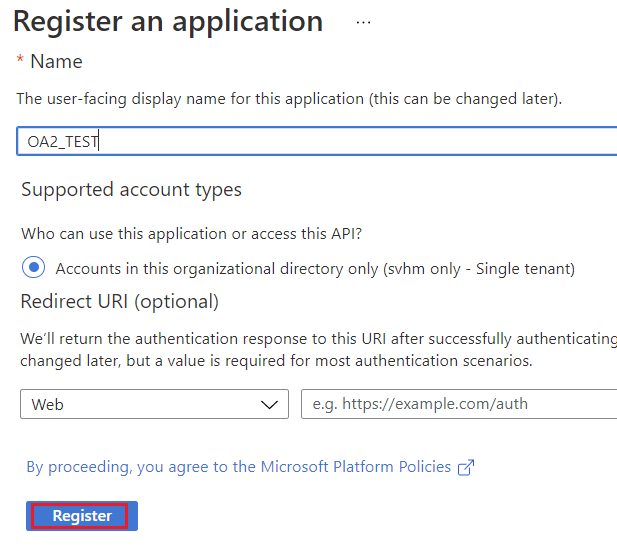
- Enter a Name for your application (e.g., AsposeEmailGraphApp).
- Choose supported account types:
- Single tenant (if only your organization will use it)
- Multitenant (if multiple organizations need access)
- Optionally, set a Redirect URI (needed for interactive or web authentication).
- Click Register.
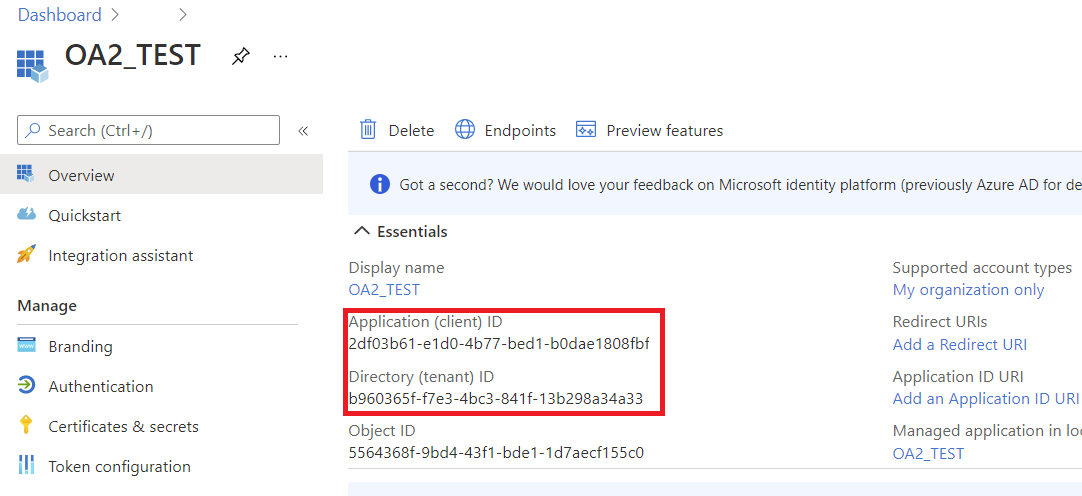
2. Create Client Secret
- After registration, go to Certificates & Secrets → New Client Secret.
- Add a description and expiration period.

- Copy the generated secret value - you will not see it again.
Keep the client secret secure; it is required for confidential client authentication.
You should see the newly registered applications blade.
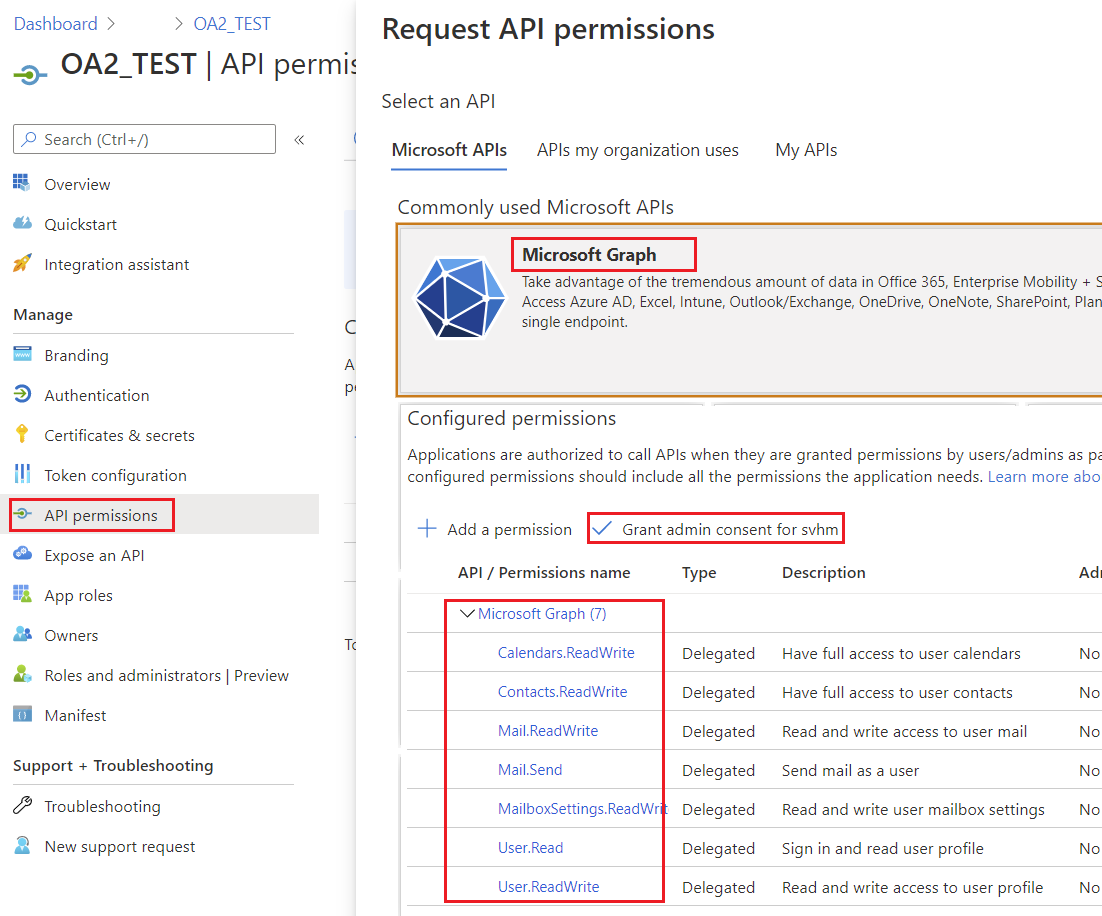
3. Configure Microsoft Graph Permissions
- Navigate to API Permissions → Add a Permission → Microsoft Graph.
- Choose the type of permissions: Delegated or Application, depending on your scenario.
- Add permissions required for Aspose.Email operations:
- Contacts.ReadWrite – to manage contacts
- Calendars.ReadWrite – to manage calendars
- Mail.ReadWrite – to read and send messages
- Tasks.ReadWrite – to manage tasks
- Click Grant Admin Consent if needed.
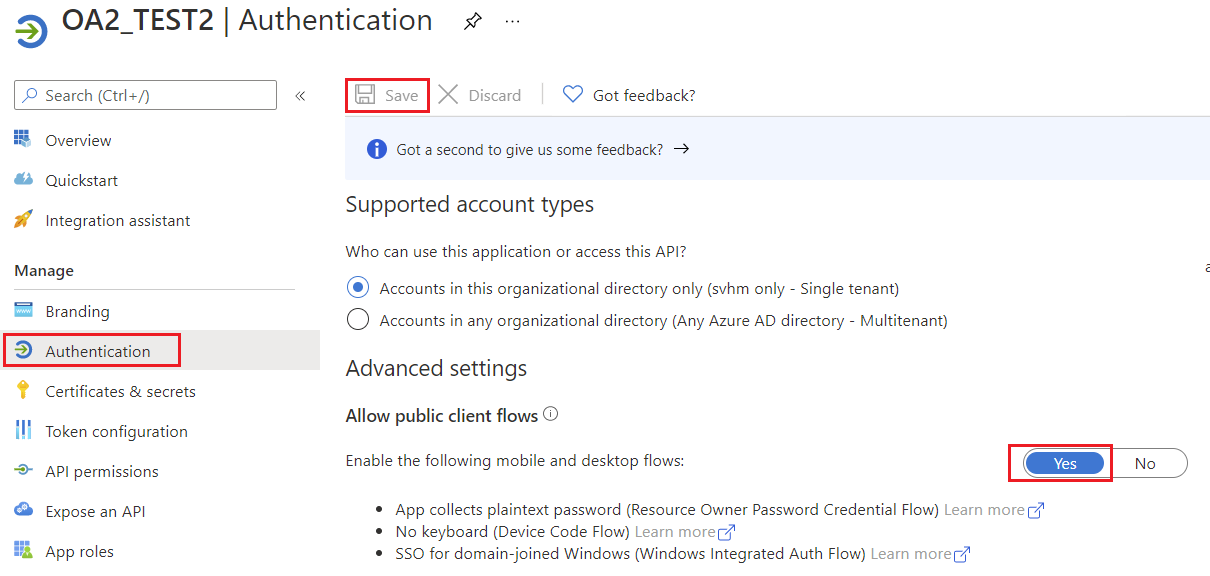
4. Allow public client flows
Specify whether the application is a public client. Appropriate for apps using token grant flows that don’t use a redirect URI.
5. Microsoft Graph Authentication
Supported Authentication Methods in Aspose.Email
| Token Provider | Use Case |
|---|---|
AzureConfidentialTokenProvider |
Confidential client (client ID + secret) for server-side apps |
AzureROPCConfiguration |
Resource Owner Password Credentials (username + password) for non-interactive scenarios |
AzurePublicTokenProvider |
Public client (interactive login) |
AzureTokenProviderBase |
Base class for custom authentication implementations |
Authenticate Using a Confidential Client
Use the AzureConfidentialTokenProvider to authenticate when you have client ID, client secret, and tenant ID:
AzureConfidentialTokenProvider provider = new AzureConfidentialTokenProvider(
    tenantId,
    clientId,
    clientSecret
);

IGraphClient client = GraphClient.getClient(provider, tenantId);
client.setResource(ResourceType.Users);
client.setResourceId(username);
client.setEndpoint("https://graph.microsoft.com");
This sets up a fully authenticated IGraphClient ready to interact with Microsoft Graph.
Authenticate Using ROPC (Username & Password)
For scenarios where you have a username and password, use AzureROPCConfiguration:
AzureROPCConfiguration ropcConfig = new AzureROPCConfiguration(
    tenantId,
    clientId,
    clientSecret,
    username,
    password
);

IGraphClient client = GraphClient.getClient(ropcConfig, tenantId);
client.setResource(ResourceType.Users);
client.setResourceId(username);
client.setEndpoint("https://graph.microsoft.com");
Custom Token Providers for Microsoft Graph
Aspose.Email for Java integrates with Microsoft Graph through the IGraphClient interface. To authenticate requests, an implementation of the ITokenProvider is required. While most developers will use built-in authentication providers, there are scenarios where you may want to create your own provider, for example, when working with the Resource Owner Password Credentials (ROPC) flow.
1. Implement ITokenProvider using AzureROPCTokenProvider
This class provides an implementation of ITokenProvider using the Azure Resource Owner Password Credentials (ROPC) flow. The following example is for demonstration purposes only. In production, we recommend using more secure flows such as client credentials or authorization code with PKCE.
import java.io.BufferedReader;
import java.io.IOException;
import java.io.InputStream;
import java.io.InputStreamReader;
import java.io.OutputStream;
import java.io.UnsupportedEncodingException;
import java.net.HttpURLConnection;
import java.net.URL;
import java.net.URLDecoder;
import java.net.URLEncoder;
import java.nio.charset.StandardCharsets;
import java.util.HashMap;
import java.util.Map;

/**
 * <p>
 * Azure resource owner password credential (ROPC) token provider
 * https://docs.microsoft.com/en-us/azure/active-directory/develop/v2-oauth-ropc
 * https://docs.microsoft.com/en-us/exchange/client-developer/exchange-web-services/how-to-authenticate-an-ews-application-by-using-oauth
 * https://portal.azure.com
 * https://developer.microsoft.com/en-us/graph/graph-explorer/#
 * token parser https://jwt.io
 * </p>
 */
class AzureROPCTokenProvider implements ITokenProvider {

    private static final String GRANT_TYPE = "password";

    private final String clientId;
    private final String clientSecret;
    private final String userName;
    private final String password;
    private final String tenant;
    private final String scope;

    private OAuthToken token;

    public AzureROPCTokenProvider(String tenant, String clientId, String clientSecret,
                                  String userName, String password, String[] scopeAr) {
        this.tenant = tenant;
        this.clientId = clientId;
        this.clientSecret = clientSecret;
        this.userName = userName;
        this.password = password;
        this.scope = joinToStr(scopeAr, " ");
    }

    public synchronized OAuthToken getAccessToken(boolean ignoreExistingToken) {
        if (this.token != null && !this.token.getExpired() && !ignoreExistingToken)
            return this.token;
        token = null;

        Map<String, String> tokenArgs = getToken();

        java.util.Calendar c = java.util.Calendar.getInstance();
        c.add(java.util.Calendar.SECOND, Integer.parseInt(tokenArgs.get("expires_in")));
        token = new OAuthToken(tokenArgs.get("access_token"), TokenType.AccessToken, c.getTime());
        return token;
    }

    public final OAuthToken getAccessToken() {
        return getAccessToken(false);
    }

    public void dispose() {
    }

    private String getEncodedParameters() {
        return "client_id=" + urlEncode(clientId) + "&scope=" + urlEncode(scope) + "&username=" + urlEncode(userName)
                + "&password=" + urlEncode(password) + "&grant_type="
                + urlEncode(GRANT_TYPE);
    }

    private String getUri() {
        if (tenant == null || tenant.trim().isEmpty())
            return "https://login.microsoftonline.com/common/oauth2/v2.0/token";
        else
            return "https://login.microsoftonline.com/" + tenant + "/oauth2/v2.0/token";
    }

    private Map<String, String> getToken() {
        try {
            HttpURLConnection connection = (HttpURLConnection) new URL(getUri()).openConnection();
            connection.setRequestMethod("POST");

            byte[] requestData = getEncodedParameters().getBytes(StandardCharsets.UTF_8);

            connection.setUseCaches(false);
            connection.setDoInput(true);
            connection.setDoOutput(true);
            connection.setRequestProperty("Content-Type", "application/x-www-form-urlencoded");
            connection.setRequestProperty("Content-Length", "" + requestData.length);

            final OutputStream st = connection.getOutputStream();
            try {
                st.write(requestData, 0, requestData.length);
            } finally {
                st.flush();
                st.close();
            }

            connection.connect();

            if (connection.getResponseCode() >= HttpURLConnection.HTTP_BAD_REQUEST) {
                throw new IllegalAccessError("Operation failed: " + connection.getResponseCode() + "/" +
                        connection.getResponseMessage() + "\r\nDetails:\r\n{2}"
                        + readInputStream(connection.getErrorStream()));
            }

            String responseText = readInputStream(connection.getInputStream());

            Map<String, String> result = new HashMap<>();
            String[] fromJsonToKeyValue = responseText.replace("{", "").replace("}", "")
                    .replace("\"", "").replace("\r", "")
                    .replace("\n", "").split(",");
            for (String keyValue : fromJsonToKeyValue) {
                String[] pair = keyValue.split(":");
                String name = pair[0].trim().toLowerCase();
                String value = urlDecode(pair[1].trim());
                result.put(name, value);
            }

            return result;
        } catch (IOException e) {
            throw new IllegalAccessError(e.getMessage());
        }
    }

    static String urlEncode(String value) {
        try {
            return URLEncoder.encode(value, StandardCharsets.UTF_8.toString());
        } catch (UnsupportedEncodingException e) {
            throw new IllegalAccessError(e.getMessage());
        }
    }

    static String urlDecode(String value) {
        try {
            return URLDecoder.decode(value, StandardCharsets.UTF_8.toString());
        } catch (UnsupportedEncodingException e) {
            throw new IllegalAccessError(e.getMessage());
        }
    }

    static String readInputStream(InputStream is) {
        if (is == null)
            return "";

        BufferedReader reader = new BufferedReader(new InputStreamReader(is));
        StringBuilder result = new StringBuilder();
        String line;
        try {
            while ((line = reader.readLine()) != null) {
                result.append(line);
            }
        } catch (IOException e) {
            // ignore
        }
        return result.toString();
    }

    static String joinToStr(String[] arr, String sep) {
        StringBuilder sb = new StringBuilder();
        for (int i = 0; i < arr.length; i++) {
            if (i > 0)
                sb.append(sep);
            sb.append(arr[i]);
        }
        return sb.toString();
    }
}
2. Create an ITokenProvider Object
The IGraphClient interface is responsible for building requests, sending them to Microsoft Graph, and handling the responses. To create an instance of IGraphClient, you must provide an implementation of ITokenProvider. The token provider authenticates requests by supplying a valid OAuth access token.
The following code sample demonstrates how to create a basic inline implementation of the ITokenProvider interface, which is required for authenticating Microsoft Graph requests:
ITokenProvider tokenProvider = new ITokenProvider() {
    Date expirationDate = null;

    @Override
    public void dispose() {
        // Clean up resources if necessary
    }

    @Override
    public OAuthToken getAccessToken(boolean ignoreExistingToken) {
        // Retrieve an OAuth access token.
        // If ignoreExistingToken is true, always request a new token.
        // Otherwise, return the existing token if it is valid, or request a new one.
        return null;
    }

    @Override
    public OAuthToken getAccessToken() {
        // Return a valid OAuth token.
        // If no valid token exists, request a new one.
        return new OAuthToken("token", expirationDate);
    }
};
3. Using the Custom Token Provider
Once the ITokenProvider is set up, you can create a GraphClient instance. This client will use the provided token provider for authentication when calling Microsoft Graph.
ITokenProvider provider = new AzureROPCTokenProvider(
        tenantId,
        clientId,
        clientSecret,
        userName,
        password,
        new String[] {"https://graph.microsoft.com/.default"}
);

IGraphClient client = GraphClient.getClient(provider, tenantId);
client.setResource(ResourceType.Users);
client.setResourceId(userName);
client.setEndpoint("https://graph.microsoft.com");

// Now you can call Microsoft Graph APIs
var folders = client.listFolders(null);
for (GraphFolderInfo folder : folders) {
    System.out.println(folder.getDisplayName());
}
After the client is created and authenticated, you can start making requests to Microsoft Graph services.