使用字体库的文本渲染| .NET
概述
如果您想将文本渲染到图像中的功能,则此处的文章将教您如何使用任何格式的字体进行操作,并在字体库中使用Aspose.font API解决方案支持。该库允许您轻松地将文本转换为图像,并将文本添加到任何图像中。
渲染文字
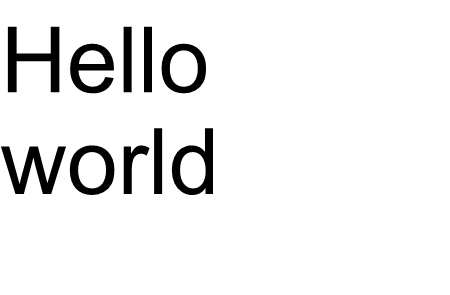
要将文本插入图像中,您需要使用 drawText renderingutils类的方法。下面的代码显示了如何添加用Arial字体编写的文本“ Hello World”到名为“ Arial.png”的图像。
 1    var datadir = @“ c:\ temp \”;
 2    var filename = datadir +“ arial.ttf”; //带有完整路径的字体文件名
 3    var outfile = datadir +“ arial.png”;
 4    var fontdefinition = new fontdefinition(fonttype.ttf,new fontfiledefinition(“ ttf”,new filesystemstreamsource(filename)));
 5    var ttffont = font.open(fontDefinition)作为ttffont;
 6
 7    var stream = Aspose.Font.Renderers.RenderingUtils.DrawText(ttfFont, "Hello world", 18);
 8
 9    var bitmap = new Bitmap(stream);
10    bitmap.Save(outFile);
实现结果:

drawText方法允许您设置线间距并执行自动逐字文本包装。
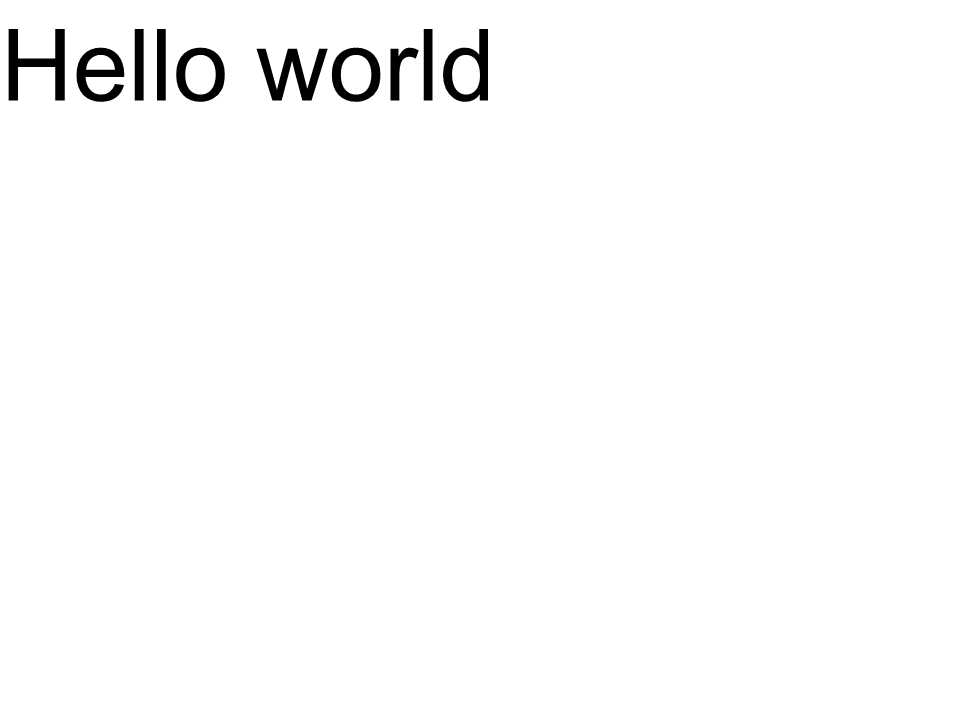
在下面的代码示例中,我们指定了线间距类型 lines -pacingtype.pixels并将其设置为10,然后将图像的最大宽度设置为450。
在给定范围内无法正确显示的所有文本(在我们的情况下为450)将包裹在新线路上。
剪切的代码显示了如何在Arial字体中渲染“ Hello World”文本,并包裹到下一行:
 1    var datadir = @“ c:\ temp \”;
 2    var filename = datadir +“ arial.ttf”; //带有完整路径的字体文件名
 3    var outfile = datadir +“ arial.png”;
 4    var fontdefinition = new fontdefinition(fonttype.ttf,new fontfiledefinition(“ ttf”,new filesystemstreamsource(filename)));
 5    var ttffont = font.open(fontDefinition)作为ttffont;
 6    var linesPacingType = linesPacingType.pixels;
 7
 8    var stream = DrawText(ttfFont, "Hello world", 22, lineSpacingType, 10, 450);
 9
10    var bitmap = new Bitmap(stream);
11
12    bitmap.Save(outFile);
实现结果:
在此示例中,您看到了如何仅使用一行代码将文本变成图像。
drawText()方法的函数家族涵盖标准文本或多行文本输出。但是,在某些情况下,您可能需要文本的自定义输出,例如,当您想以角度或其他方式压缩,伸展,旋转文本时。在这种情况下,您需要根据需要自定义输出。
自定义文本渲染
下一个示例显示了一种更高级的(自定义)将文本转换为图像的方法。
在aspose.font中绘制 glyphs使用 glyphoutlinererer类的方法之一。所有这些超载方法均在 iglyphrenderer接口中声明。
我们必须将字体的引用、字形ID或字形索引以及字形输出坐标作为参数传递给这些方法。为了传输最后一个参数,我们使用了一个由 Aspose.Font
TransformationMatrix 对象表示的特殊矩阵。
下面我们将展示如何使用
TransformationMatrix 类型的对象将字形输出坐标传递给 RenderGlyph() 系列方法。
因此,要绘制字形,我们需要创建一个 GlyphOutlineRenderer 类型的对象。但此类对象无法自行绘制字形。它需要外部功能,该功能由 IGlyphOutlinePainter 接口描述。要使用 GlyphOutlineRenderer 对象,需要提供 IGlyphOutlinePainter 接口的实现。
下面您可以看到此接口的一个简单实现。 让我们创建 GlyphOutlinePainter 类,它需要一个 System.Drawing.Drawing2D.GraphicsPath 类型的对象来实现图形绘制目标。
实现如下所示。
 1    public class GlyphOutlinePainter : IGlyphOutlinePainter
 2    {
 3        private GraphicsPath _path;
 4        private PointF _currentPoint;
 5
 6        public GlyphOutlinePainter(GraphicsPath path)
 7        {
 8            _path = path;
 9        }
10
11        public void MoveTo(MoveTo moveTo)
12        {
13            _path.CloseFigure();
14            _currentPoint.X = (float)moveTo.X;
15            _currentPoint.Y = (float)moveTo.Y;
16        }
17
18        public void LineTo(LineTo lineTo)
19        {
20            float x = (float)lineTo.X;
21            float y = (float)lineTo.Y;
22            _path.AddLine(_currentPoint.X, _currentPoint.Y, x, y);
23            _currentPoint.X = x;
24            _currentPoint.Y = y;
25        }
26
27        public void CurveTo(CurveTo curveTo)
28        {
29            float x3 = (float)curveTo.X3;
30            float y3 = (float)curveTo.Y3;
31
32            _path.AddBezier(
33                _currentPoint.X,
34                _currentPoint.Y,
35                (float)curveTo.X1,
36                (float)curveTo.Y1,
37                (float)curveTo.X2,
38                (float)curveTo.Y2,
39                x3,
40                y3);
41
42            _currentPoint.X = x3;
43            _currentPoint.Y = y3;
44        }
45
46        public void ClosePath()
47        {
48            _path.CloseFigure();
49        }
50    }
在
IGlyphOutlinePainter 实现之后,我们可以使用其类型的对象来渲染单个字形,方法是将它们传递给
GlyphOutlineRenderer 并调用 RenderGlyph() 系列的相应重载方法。
为了渲染一串文本,我们需要获取每个字符的 glyphId,然后使用
GlyphOutlineRenderer 类型的对象调用 RenderGlyph() 系列中的某个方法,并传递相应字形的坐标。
让我们来看一个使用 Aspose.Font 库输出一行文本的示例。它将以 CustomDrawText() 方法的形式构建,该方法接受以下参数:CustomDrawText(string text, IFont font, double fontSize, Brush backgroundBrush, Brush textBrush, string outFile)。
创建customDrawText()方法,该方法将指定的文本绘制到
system.drawing.bitmap对象中,并保存在光盘上的结果位图。
这将包括以下步骤:
- 迭代文本字符串中的所有符号。
- 获取每个已处理符号的字形标识符 - gid。
- 创建一个 GlyphOutlinePainter 类型的对象,该对象是渲染子系统绘制当前字形所必需的。
- 创建一个 Aspose.Font.Renderers.GlyphOutlineRenderer 类型的对象,并将刚刚创建的 GlyphOutlinePainter 类型的对象传递给 GlyphOutlineRenderer 的构造函数。此 GlyphOutlineRenderer 对象用于渲染指定的字形。
- 使用 GlyphOutlineRenderer.RenderGlyph() 方法渲染当前处理的字形。Aspose.Fonts.Matrix 对象用于指定字形坐标。要渲染的字形由 gid 参数指定。
此策略的辅助步骤
- 在本代码段中,字形的“Y”轴坐标为常量。
- 每次处理完一个字形后,都会计算“X”轴坐标。
- “X”和“Y”坐标均会传入 GlyphOutlineRenderer 使用的 Aspose.Fonts.Matrix 对象,用于绘制字形。
- 每次迭代都会计算刚刚处理的字形与之前处理的字形之间的距离。这会影响每个字形的“X”坐标。
- GlyphOutlineRenderer 类型的对象借助 GlyphOutlinePainter 绘制字形,而不是直接绘制到 Bitmap 中,而是绘制到传递给 GlyphOutlinePainter 构造函数的 GraphicsPath 对象中,因此我们使用 System.Drawing.Graphics 类型的对象来绘制 GraphicsPath 到位图中。
- FontWidthToImageWith() 方法计算位图坐标系的字形宽度。
- customDrawText() *方法的实现如下所示。
 1    public static void CustomDrawText(string text, IFont font, double fontSize, Brush backgroundBrush, Brush textBrush, string outFile)
 2    {
 3        //Get glyph identifiers for every symbol in the text line
 4        GlyphId[] gids = new GlyphId[text.Length];
 5
 6        for (int i = 0; i < text.Length; i++)
 7            gids[i] = font.Encoding.DecodeToGid(text[i]);
 8
 9        // Set common drawing settings
10        double dpi = 300;
11        double resolutionCorrection = dpi / 72; // 72 is font's internal dpi
12
13        // Prepare output bitmap
14        Bitmap outBitmap = new Bitmap(960, 720);
15
16
17        outBitmap.SetResolution((float)dpi, (float)dpi);
18
19        Graphics outGraphics = Graphics.FromImage(outBitmap);
20        outGraphics.FillRectangle(backgroundBrush, 0, 0, outBitmap.Width, outBitmap.Height);
21        outGraphics.SmoothingMode = SmoothingMode.HighQuality;
22
23        //Declare coordinate variables and a previous gid
24        GlyphId previousGid = null;
25        double glyphXCoordinate = 0;
26        double glyphYCoordinate = fontSize * resolutionCorrection;
27
28        // The loop paints every glyph in gids
29        foreach (GlyphId gid in gids)
30        {
31            // if the font contains the gid
32            if (gid != null)
33            {
34                Glyph glyph = font.GlyphAccessor.GetGlyphById(gid);
35                if (glyph == null)
36                    continue;
37
38                // The path that accepts drawing instructions
39                GraphicsPath path = new GraphicsPath();
40
41                // Create IGlyphOutlinePainter implementation
42                GlyphOutlinePainter outlinePainter = new GlyphOutlinePainter(path);
43
44                // Create the renderer
45                Aspose.Font.Renderers.IGlyphRenderer renderer = new Aspose.Font.Renderers.GlyphOutlineRenderer(outlinePainter);
46
47                // Get common glyph properties
48                double kerning = 0;
49
50                // Get kerning value
51
52                if (previousGid != null)
53                {
54                    kerning = (font.Metrics.GetKerningValue(previousGid, gid) / glyph.SourceResolution) * fontSize * resolutionCorrection;
55                    kerning += FontWidthToImageWith(font.Metrics.GetGlyphWidth(previousGid), glyph.SourceResolution, fontSize);
56                }
57
58                // Glyph positioning - increase glyph X coordinate according to kerning distance
59                glyphXCoordinate += kerning;
60
61                // Glyph placement matrix
62                TransformationMatrix glyphMatrix = new TransformationMatrix(
63                        new double[]
64                                { fontSize * resolutionCorrection,
65                            0,
66                            0,
67                        // negative because of the bitmap coordinate system begins from the top
68                            - fontSize*resolutionCorrection,
69                            glyphXCoordinate,
70                            glyphYCoordinate
71                                });
72
73                // Render the current glyph
74                renderer.RenderGlyph(font, gid, glyphMatrix);
75
76                // Fill the path
77                path.FillMode = FillMode.Winding;
78
79                outGraphics.FillPath(textBrush, path);
80            }
81
82            //Set current gid as previous to get correct kerning for next glyph
83            previousGid = gid;
84        }
85
86        //Save the results
87        outBitmap.Save(outFile);
88    }
将字体宽度转换为图像宽度的实用方法
1 static double FontWidthToImageWith(double width, int fontSourceResulution, double fontSize, double dpi = 300)
2 {
3 double resolutionCorrection = dpi / 72; // 72 is font's internal dpi
4
5 return (width / fontSourceResulution) * fontSize * resolutionCorrection;
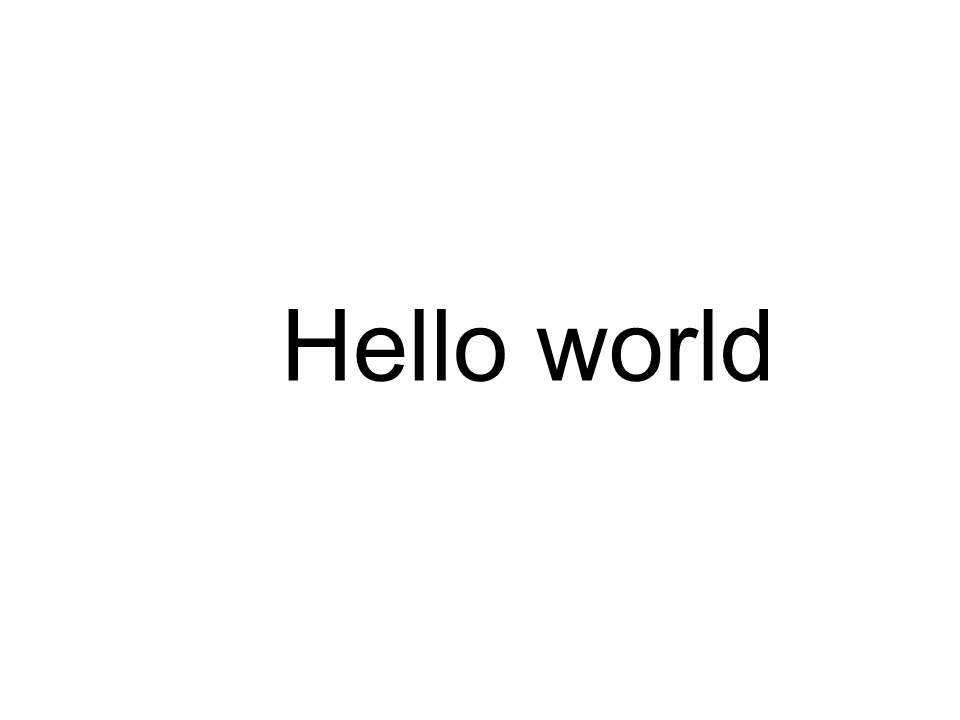
6 }下一个代码段显示了如何使用customDrawText()`方法来渲染文本“ Hello World”。
1 var dataDir = @"C:\Temp\";
2 var fileName1 = dataDir + "arial.ttf"; //Font file name with full path
3 var fileName2 = dataDir + "calibrii.ttf"; //Font file name with full path
4
5 var fontDefinition1 = new FontDefinition(FontType.TTF, new FontFileDefinition("ttf", new FileSystemStreamSource(fileName1)));
6 var ttfFont1 = Font.Open(fontDefinition1) as TtfFont;
7
8 var fontDefinition2 = new FontDefinition(FontType.TTF, new FontFileDefinition("ttf", new FileSystemStreamSource(fileName2)));
9 var ttfFont2 = Font.Open(fontDefinition2) as TtfFont;
10
11 GlyphOutlinePainter.CustomDrawText("Hello world", ttfFont1, 24, Brushes.White, Brushes.Black, dataDir + "Hello_Arial_out.png");
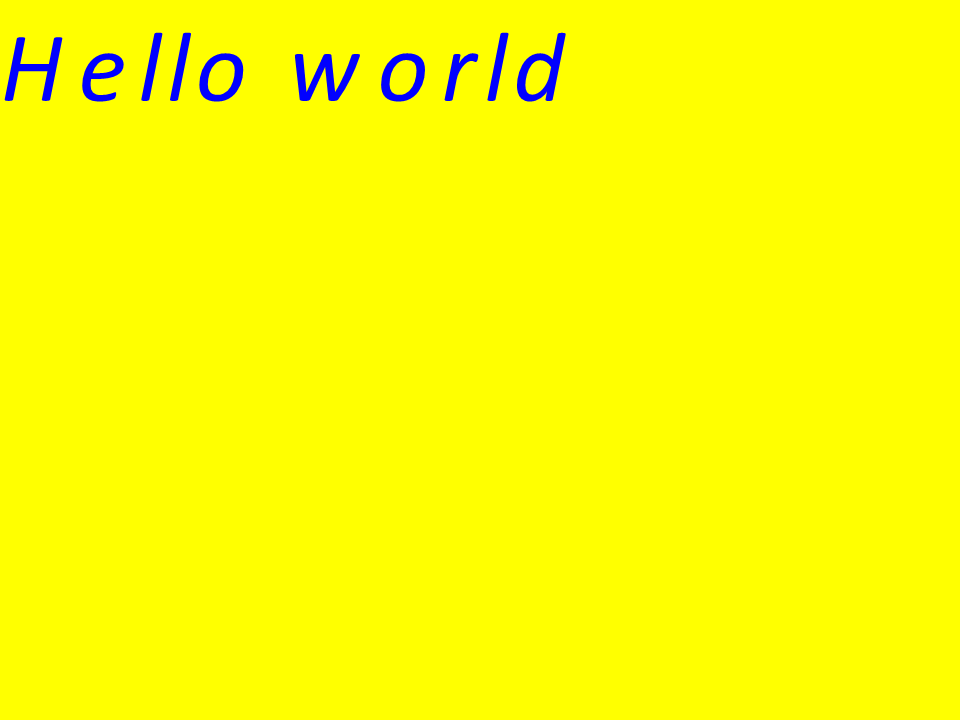
12 GlyphOutlinePainter.CustomDrawText("Hello world", ttfFont2, 24, Brushes.Yellow, Brushes.Blue, dataDir + "Hello_Calibri_out.png");实施代码,我们将获得以下结果:
实现结果:
 Arial
Arial
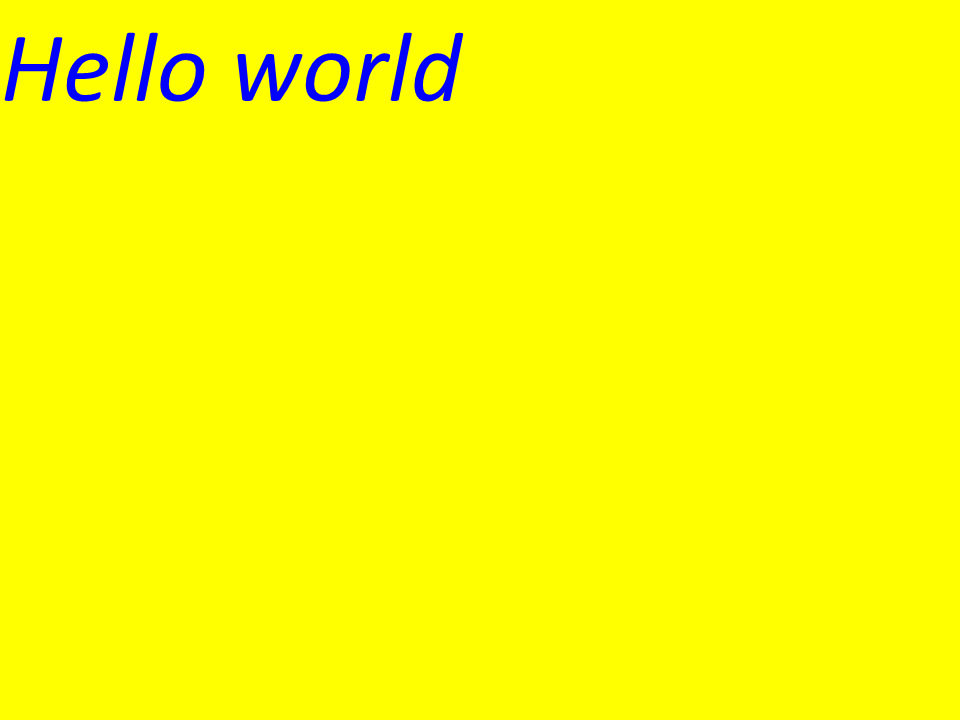 Calibri
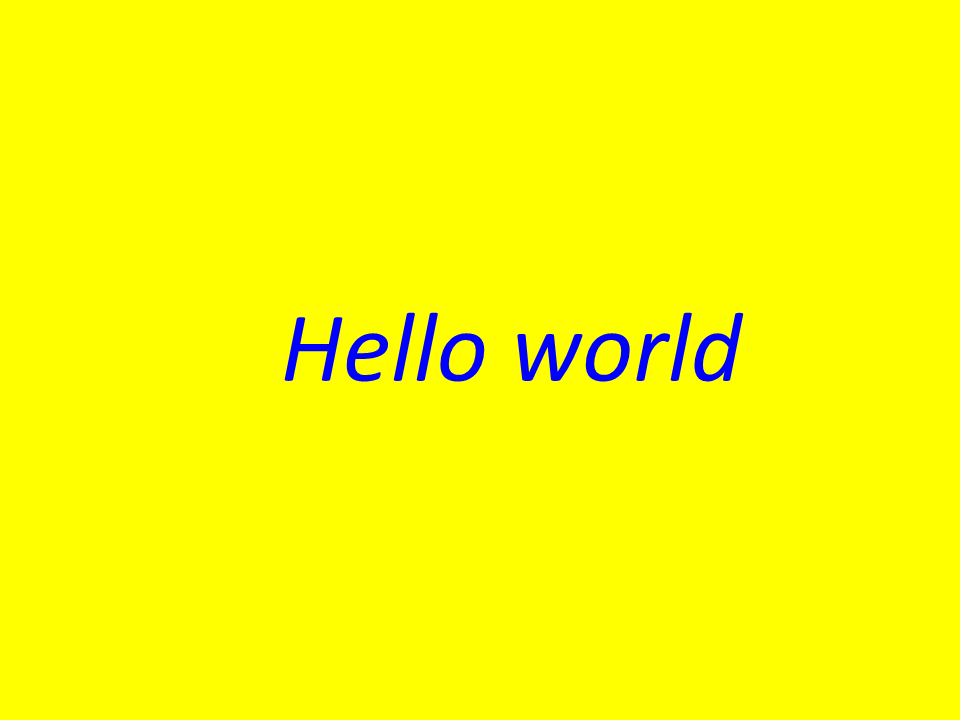
凯宁
使用 kerning变量的值,您可以更改字形之间的距离。现在,让我们下一步重写代码:
1
2    //Glyph positioning - increase glyph X coordinate according to the kerning distance
3    kerning *= 1.25;
4    glyphXCoordinate += kerning;
下一个结果将得到:
实现结果:
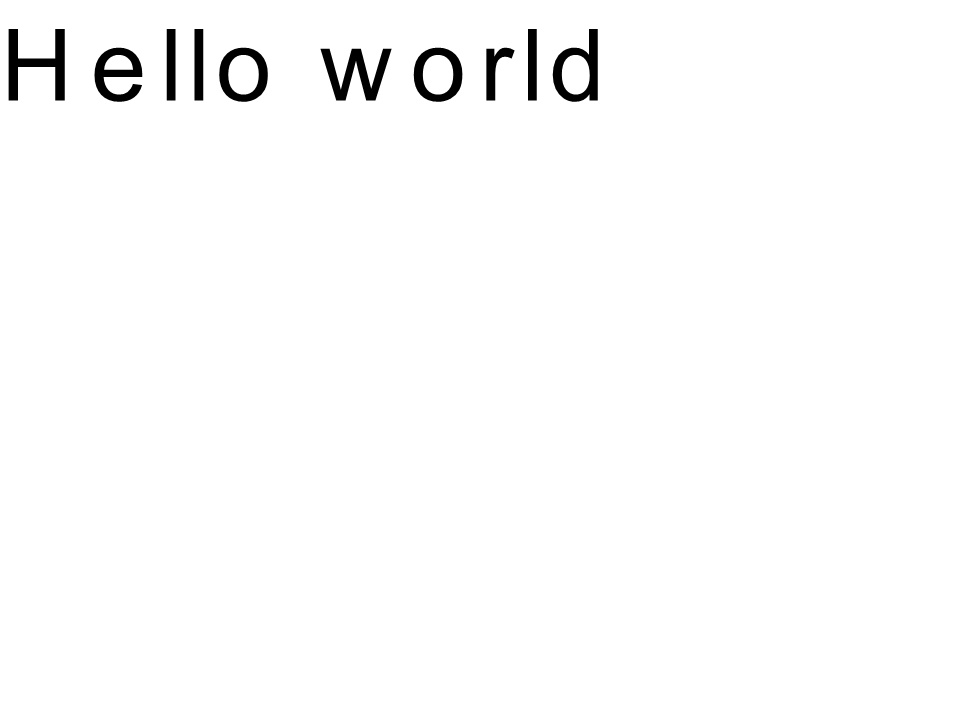 Arial kerning
 Calibri kerning
通过坐标渲染文本
变量 * glyphxCoorcorion *和 * glyphyCoorcoriation *负责文本输出的坐标。通过更改代码如下:
1    //Declare coordinate variables and the previous gid
2    GlyphId previousGid = null;
3    double glyphXCoordinate = 300;
4    double glyphYCoordinate = 300;
下一个结果将得到:
实现结果:
 Arial x=300 y=300
 Calibri x=300 y=300
如何将文本添加到图像
您还可以在现有图像上显示文本。为此,我们将按照以下方式重写:
 1
 2    public static void customDrawText(字符串文本,Ifont Font,Double Fontsize,Brush Backgroundbrush,Brush Textbrush,String Outfile,bitmap bitmap,double kerningCoofficity = 1,double CoortionX = 0,double coortiaty = 0)
 3    {
 4        //为文本行中的每个符号获取标识符
 5        glyphid [] gids = new Glyphid [text.length];
 6
 7        for (int i = 0; i < text.Length; i++)
 8            gids[i] = font.Encoding.DecodeToGid(text[i]);
 9
10        // Set common drawing settings
11        double dpi = 300;
12        double resolutionCorrection = dpi / 72; // 72 is font's internal dpi
13
14        // Prepare the output bitmap
15        Bitmap outBitmap = bitmap;
16
17        outBitmap.SetResolution((float)dpi, (float)dpi);
18
19        Graphics outGraphics = Graphics.FromImage(outBitmap);
20        outGraphics.FillRectangle(backgroundBrush, 0, 0, outBitmap.Width, outBitmap.Height);
21        outGraphics.SmoothingMode = SmoothingMode.HighQuality;
22
23        //Declare coordinate variables and the previous gid
24        GlyphId previousGid = null;
25        double glyphXCoordinate = coordinateX;
26        double glyphYCoordinate = coordinateY;
27
28        glyphYCoordinate += fontSize * resolutionCorrection;
29
30        //The loop paints every glyph in gids
31        foreach (GlyphId gid in gids)
32        {
33            // if the font contains the gid
34            if (gid != null)
35            {
36                Glyph glyph = font.GlyphAccessor.GetGlyphById(gid);
37                if (glyph == null)
38                    continue;
39
40                // The path that accepts drawing instructions
41                GraphicsPath path = new GraphicsPath();
42
43                // Create the IGlyphOutlinePainter implementation
44                GlyphOutlinePainter outlinePainter = new GlyphOutlinePainter(path);
45
46                // Create the renderer
47                Aspose.Font.Renderers.IGlyphRenderer renderer = new Aspose.Font.Renderers.GlyphOutlineRenderer(outlinePainter);
48
49                // Get common glyph properties
50                double kerning = 0;
51
52                // Get the kerning value
53
54                if (previousGid != null)
55                {
56                    kerning = (font.Metrics.GetKerningValue(previousGid, gid) / glyph.SourceResolution) * fontSize * resolutionCorrection;
57                    kerning += FontWidthToImageWith(font.Metrics.GetGlyphWidth(previousGid), glyph.SourceResolution, fontSize);
58                }
59
60                // Glyph positioning - increase the glyph X coordinate according to the kerning distance
61                glyphXCoordinate += kerning * kerningCoefficient;
62
63                // Glyph placement matrix
64                TransformationMatrix glyphMatrix = new TransformationMatrix(
65                        new double[]
66                                { fontSize * resolutionCorrection,
67                            0,
68                            0,
69                        // negative because of the bitmap coordinate system begins from the top
70                            - fontSize*resolutionCorrection,
71                            glyphXCoordinate,
72                            glyphYCoordinate
73                                });
74
75                // Render the current glyph
76                renderer.RenderGlyph(font, gid, glyphMatrix);
77
78                // Fill the path
79                path.FillMode = FillMode.Winding;
80
81                outGraphics.FillPath(textBrush, path);
82            }
83
84            //Set the current gid as previous to get the correct kerning for the next glyph
85            previousGid = gid;
86        }
87
88        //Save the results
89        outBitmap.Save(outFile);
90    }
让我们修改该方法的调用方式:
 1    var dataDir = @"C:\Temp\";
 2    var filename1 = datadir +“ arial.ttf”; //带有完整路径的字体文件名
 3
 4    var fontDefinition1 = new FontDefinition(FontType.TTF, new FontFileDefinition("ttf", new FileSystemStreamSource(fileName1)));
 5    var ttfFont1 = Font.Open(fontDefinition1) as TtfFont;
 6
 7    var bitmap = new Bitmap(960, 720);
 8
 9    GlyphOutlinePainter.CustomDrawText("Hello world", ttfFont1, 17, Brushes.White, Brushes.Black, dataDir + "Hello_Arial_out.png", bitmap);
10
11    var inputImagePath = dataDir + "Hello_Arial_out.png";
12    var bitmapAddText = new Bitmap(inputImagePath);
13
14    GlyphOutlinePainter.CustomDrawText("Hello world", ttfFont1, 17, Brushes.Transparent, Brushes.Gray, dataDir + "Hello_Arial_Shadow_out.png", bitmapAddText, 1, -3);
15
16    GlyphOutlinePainter.CustomDrawText("<= Shadow effect", ttfFont1, 17, Brushes.Transparent, Brushes.Brown, dataDir + "Hello_Arial_Shadow_out.png", bitmapAddText, 1, 400);
实现结果:
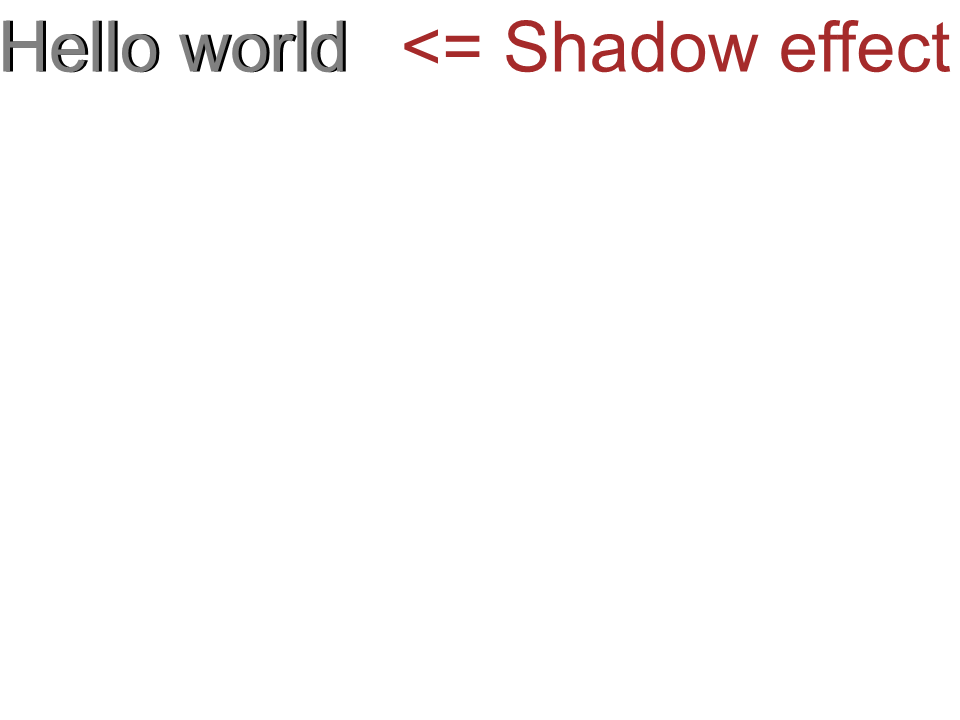 Arial shadow effect
从上到下输出文本
要显示从上到下的文本,让我们在customDrawText()方法中进行以下更改。
 1    public static void customDrawText(字符串文本,Ifont Font,Double Fontsize,Brush Backgredbrush,Brush Textbrush,String Outfile,bitmap bitmap,double kerningCoofficity = 1,double CoortionX = 0,double Coordicy = 0,double Coordicy = 0,bool topdown = false = false)
 2    {
 3        //为文本行中的每个符号获取标识符
 4        glyphid [] gids = new Glyphid [text.length];
 5
 6        for (int i = 0; i < text.Length; i++)
 7            gids[i] = font.Encoding.DecodeToGid(text[i]);
 8
 9        // Set common drawing settings
10        double dpi = 300;
11        double resolutionCorrection = dpi / 72; // 72 is font's internal dpi
12
13        // Prepare the output bitmap
14        Bitmap outBitmap = bitmap;
15
16        outBitmap.SetResolution((float)dpi, (float)dpi);
17
18        Graphics outGraphics = Graphics.FromImage(outBitmap);
19        outGraphics.FillRectangle(backgroundBrush, 0, 0, outBitmap.Width, outBitmap.Height);
20        outGraphics.SmoothingMode = SmoothingMode.HighQuality;
21
22        //Declare coordinate variables and the previous gid
23        GlyphId previousGid = null;
24        double glyphXCoordinate = coordinateX;
25        double glyphYCoordinate = coordinateY;
26
27        glyphYCoordinate += fontSize * resolutionCorrection;
28
29        //The loop paints every glyph in gids
30        foreach (GlyphId gid in gids)
31        {
32            // if the font contains the gid
33            if (gid != null)
34            {
35                Glyph glyph = font.GlyphAccessor.GetGlyphById(gid);
36                if (glyph == null)
37                    continue;
38
39                // The path that accepts drawing instructions
40                GraphicsPath path = new GraphicsPath();
41
42                // Create IGlyphOutlinePainter implementation
43                GlyphOutlinePainter outlinePainter = new GlyphOutlinePainter(path);
44
45                // Create the renderer
46                Aspose.Font.Renderers.IGlyphRenderer renderer = new Aspose.Font.Renderers.GlyphOutlineRenderer(outlinePainter);
47
48                // Get common glyph properties
49                double kerning = 0;
50
51                // Get kerning value
52                if (previousGid != null && !topDown)
53                {
54                    kerning = (font.Metrics.GetKerningValue(previousGid, gid) / glyph.SourceResolution) * fontSize * resolutionCorrection;
55                    kerning += FontWidthToImageWith(font.Metrics.GetGlyphWidth(previousGid), glyph.SourceResolution, fontSize);
56                }
57
58                if (topDown)
59                {
60                    glyphYCoordinate += fontSize * resolutionCorrection;
61                }
62                else
63                {
64                    // Glyph positioning - increase the glyph X coordinate according to kerning distance
65                    glyphXCoordinate += kerning * kerningCoefficient;
66                }
67
68                // Glyph placement matrix
69                TransformationMatrix glyphMatrix = new TransformationMatrix(
70                        new double[]
71                                { fontSize * resolutionCorrection,
72                            0,
73                            0,
74                        // negative because the bitmap coordinate system begins from the top
75                            - fontSize*resolutionCorrection,
76                            glyphXCoordinate,
77                            glyphYCoordinate
78                                });
79
80                // Render the current glyph
81                renderer.RenderGlyph(font, gid, glyphMatrix);
82
83                // Fill the path
84                path.FillMode = FillMode.Winding;
85
86                outGraphics.FillPath(textBrush, path);
87            }
88
89            //Set the current gid as previous to get correct kerning for the next glyph
90            previousGid = gid;
91        }
92
93        //Save the results
94        outBitmap.Save(outFile);
95    }
方法调用代码将有下一个外观:
1    var dataDir = @"C:\Temp\";
2    var filename1 = datadir +“ arial.ttf”; //带有完整路径的字体文件名
3    var fontdefinition1 = new fontdefinition(fonttype.ttf,new fontfiledefinition(“ ttf”,new filesystemstreamsource(filename1)));
4    var ttffont1 = font.open(fontdefinition1)为ttffont;
5    var bitmap =新的位图(960,720);
6
7    GlyphOutlinePainter.CustomDrawText("Top down", ttfFont1, 18, Brushes.White, Brushes.Black, dataDir + "Hello_Arial_TopDown.png", bitmap, 1, 400, 00, true);
实现结果:
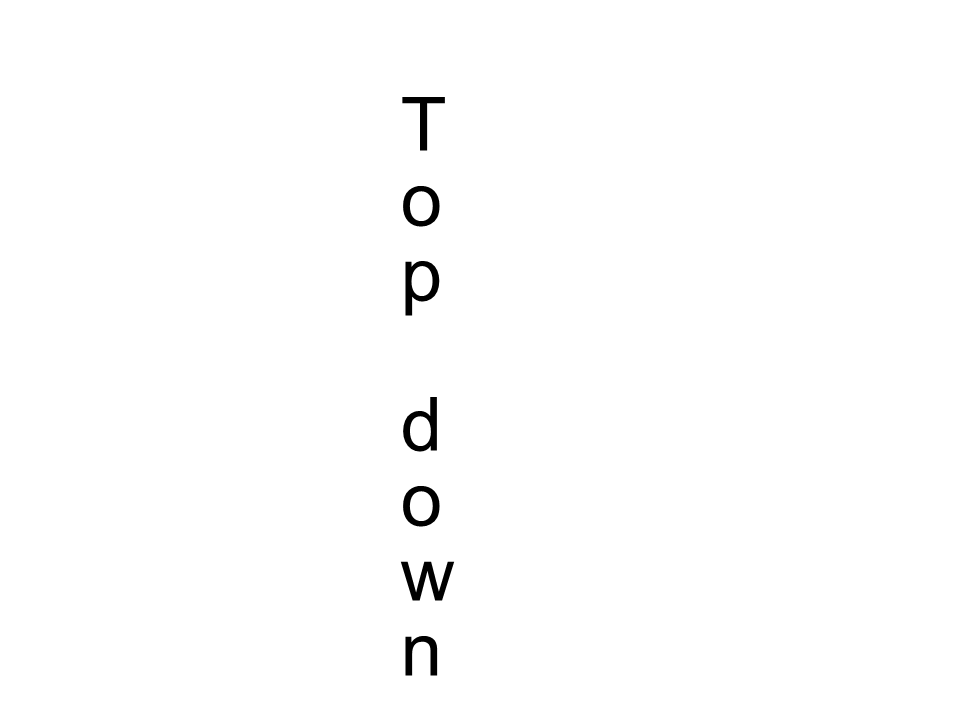 Arial top to down
附加信息
1    double dpi; // dots per inch
2    double resolutionCorrection = dpi / 72; // 72 is font's internal dpi
3    // Coordinate variables
4    double glyphXCoordinate; // X
5    double glyphYCoordinate; // Y;
6    // Kerning - horizontal spacing between two letters
7    double kerning = 0;