Plugins Licensing - Installation
Installing Aspose.Imaging library for .NET through NuGet
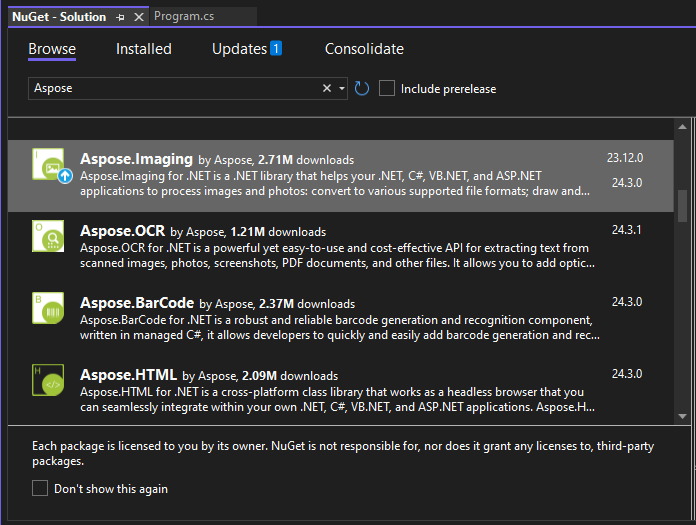
To download and install Aspose.Imaging API for .NET, open Microsoft Visual Studio and access the NuGet package manager. Search for "Aspose" to locate the desired Aspose.Imaging package. Click on `Install` to initiate the download process, and the selected package will be automatically downloaded and referenced in your project.
Install or Update Aspose.Imaging library using the Package Manager Console
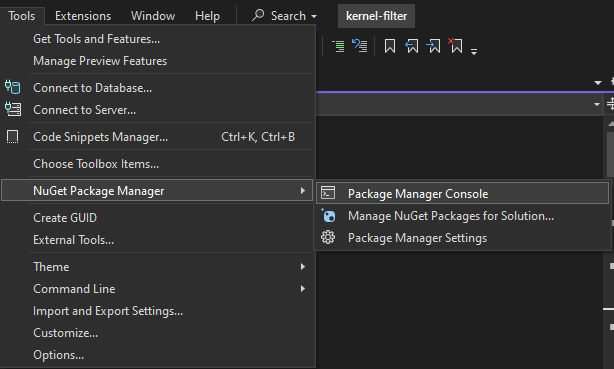
To reference the Aspose.Imaging API the package manager console, follow these steps:
- Open your solution or project in Visual Studio.
- Navigate to Tools -> Nuget Package Manager -> Package Manager Console in the menu to open the package manager console.
Enter the command `Install-Package Aspose.Imaging` and press Enter to install the most recent full release into your application. Alternatively, you have the option to include the `-prerelease` suffix in the command to indicate that the latest release, including hotfixes, should also be installed:
PM> Install-Package Aspose.Imaging
You will notice that the “Installing Nuget package Aspose.Imaging” prompt appears at the bottom of the window, indicating that the download process is underway:
  GET https://api.nuget.org/v3-flatcontainer/aspose.imaging/index.json
  OK https://api.nuget.org/v3-flatcontainer/aspose.imaging/index.json 167ms
  GET https://api.nuget.org/v3-flatcontainer/aspose.imaging/24.3.0/aspose.imaging.24.3.0.nupkg
  OK https://api.nuget.org/v3-flatcontainer/aspose.imaging/24.3.0/aspose.imaging.24.3.0.nupkg 34ms
Installing NuGet package Aspose.Imaging 24.3.0.
...
Successfully installed 'Aspose.Imaging 24.3.0'
Executing nuget actions took 334 ms
Time Elapsed: 00:00:12.4158551
PM>
Once the download is complete, you will receive the following confirmation messages. If you are not acquainted with the Aspose EULA, it is advisable to read the license referenced in the URL.
In the package manager console, you can utilize the command `Update-Package Aspose.Imaging` and press Enter to check for any updates to the Aspose.Imaging package and install them if available. Additionally, you can append the `-prerelease` suffix to update to the latest release.
Running on a Shared Server Environment
All Aspose .NET components are best operated with the Full Trust permission set. This is because Aspose .NET components sometimes require access to registry settings and files located outside of the virtual directory, such as for reading fonts. Additionally, Aspose .NET components rely on core .NET system classes, some of which also necessitate Full Trust permission to function properly in certain scenarios.
Internet Service Providers hosting multiple applications from various companies often enforce a Medium Trust security level. With .NET 2.0, this security level may impose the following constraints that could impact the functionality:
- RegistryPermission: This permission is not available, preventing access to the registry, which is necessary for enumerating installed fonts when rendering documents.
- FileIOPermission: Access is restricted to files within your application’s virtual directory hierarchy. This limitation may prevent fonts from being read during export.
For these aforementioned reasons, it is advisable for Aspose.Imaging to operate under Full Trust permissions. While some features of the library may still function in Medium trust for certain tasks, others may not (such as rendering), possibly due to calls to GDI+ image processing.
.NET Core DLLs installed via MSI package
Please note: When using the NetStandard DLL installed via the MSI package, it’s essential to include the necessary dependencies to ensure compatibility with the NetStandard version. For detailed instructions, please refer to the release notes for more information.
Aspose.Imaging .NET Core dlls in Non-Windows Environment
Aspose.Imaging is a cross-platform library that extends its support beyond the Windows operating system, catering to other operating systems as well.
Aspose.Imaging is a cross-platform library that offers support for popular platforms, including Linux-based systems. To successfully run Aspose.Imaging on such platforms, users may need to perform additional steps to install necessary dependencies.
Working with .NET Standard2.0, .NET Core 2.0, .NET Core 3.1, .NET5, .NET6 dlls
As Aspose.Imaging for .NET offers support for .NET Standard 2.0 (including .NET Core 2.0, .NET Core 3.1, and .NET 5) as well as .NET 6, it can be seamlessly utilized in Core Applications running on Linux-like operating systems. We are continually enhancing the .NET Core support in our API. However, to optimize the usage of features provided by Aspose.Imaging for .NET, we recommend that our customers perform the following operations:
Please install:
- libgdiplus package
- libc6-dev package
- package with Microsoft compatible fonts:
ttf-mscorefonts-installer
sudo apt-get install ttf-mscorefonts-installer
- package with other fonts:
apt-get update && apt-get install -y fontconfig fonts-wqy-zenhei
How to install libgdiplus package on Ubuntu Linux
To install libgdiplus package you can follow the instructions:
sudo apt install gnupg ca-certificates

sudo apt-key adv --keyserver hkp://keyserver.ubuntu.com:80 --recv-keys 3FA7E0328081BFF6A14DA29AA6A19B38D3D831EF

echo "deb https://download.mono-project.com/repo/ubuntu stable-bionic main" | sudo tee /etc/apt/sources.list.d/mono-official-stable.list

sudo apt update

sudo apt install libgdiplus
For more information please visit Mono Project
Working with .NET7 dlls
The .NET7 version of the Aspose.Imaging DLLs utilize an alternative graphics engine called Aspose.Drawing instead of `System.Drawing.Common/GDI+`. This means users do not need to employ any additional graphics engine to utilize the library. However, to achieve optimal results while utilizing the features of Aspose.Imaging for .NET, we recommend our customers perform the following operations:
Please install:
- Default fonts:
sudo apt-get update sudo apt-get install fonts-freefont-ttf
- Microsoft fonts (if necessary):
sudo apt-get install ttf-mscorefonts-installer
- Other fonts:
apt-get update && apt-get install -y fontconfig fonts-wqy-zenhei