Modifying Images

Dithering for Raster Images

Dithering is a technique of creating the illusion of new colors and shades by varying the pattern of dots that actually create an image. It is the most common means of reducing the color range of images down to the 256 (or fewer) colors. Aspose.Imaging provides the dithering support for RasterImage class by introducing Dither method that accepts two parameters. First is of type DitheringMethod to be applied with two possible options FloydSteinbergDithering and ThresholdDithering. The second parameter to Dither method is the BitCount in integer. BitCount defines the sampling size for the dithering result. Default value is 1 that represents black and white, whereas allowed values are 1, 4, 8 generating palettes with 2, 4 and 256 colors respectively.

import aspose.pycore as aspycore
from aspose.imaging import Image, DitheringMethod
from aspose.imaging.fileformats.jpeg import JpegImage
import os
if 'TEMPLATE_DIR' in os.environ:
templates_folder = os.environ['TEMPLATE_DIR']
else:
templates_folder = r"C:\Users\USER\Downloads\templates"
delete_output = 'SAVE_OUTPUT' not in os.environ
data_dir = templates_folder
# Create an instance of JpegImage and load an image as of JpegImage
with aspycore.as_of(Image.load(os.path.join(data_dir, "template.jpg")), JpegImage) as image:
# Peform Floyd Steinberg dithering on the current image and Save the resultant image
image.dither(DitheringMethod.THRESHOLD_DITHERING, 4)
image.save(os.path.join(data_dir, "result.bmp"))
if delete_output:
os.remove(os.path.join(data_dir, "result.bmp"))
view raw dither-image.py hosted with ❤ by GitHub

Adjusting Brightness, Contrast and Gamma

Color adjustments in digital images is one of the core features that most of the imaging libraries provide. Color adjustments can be categorized in the following.

  1. Brightness refers to the lightness or darkness of color. Increasing the brightness of an image lights out all colors whereas decreasing the brightness darkens all colors.
  2. Contrast refers to making the objects or details within an image more obvious. Increasing the contrast of an image increases the difference between light and dark areas so that the light areas becomes lighter and dark areas becomes darker. Decreasing the contrast will make lighter and darker areas stay approximately the same but the overall image becomes more homogeneous.
  3. Gamma optimizes the contrast and brightness of the indirect lighting that is illuminating an object in the image.

Adjusting Brightness

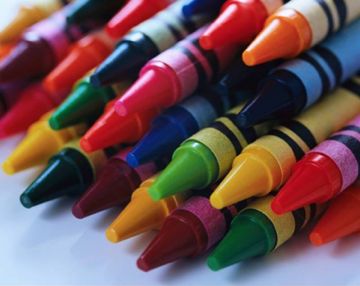
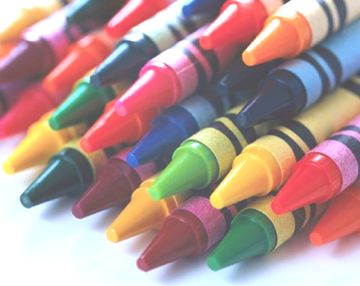
Aspose.Imaging for Python via .NET API provide adjust_brightness method for the RasterImage class that can be used to adjust the Brightness by passing an integer value as parameter. Highest parameter value denotes to a brighter image. Here is the original image and the resultant image for comparison.

Input File Output File

todo:image_alt_text

|

todo:image_alt_text

|
import aspose.pycore as aspycore
from aspose.imaging import RasterImage, Image
from aspose.imaging.fileformats.tiff.enums import TiffExpectedFormat, TiffPhotometrics
from aspose.imaging.imageoptions import TiffOptions
import os
if 'TEMPLATE_DIR' in os.environ:
templates_folder = os.environ['TEMPLATE_DIR']
else:
templates_folder = r"C:\Users\USER\Downloads\templates"
delete_output = 'SAVE_OUTPUT' not in os.environ
data_dir = templates_folder
# Load an image in an instance of Image
with Image.load(os.path.join(data_dir, "template.jpg")) as image:
# Cast object of Image to RasterImage
raster_image = aspycore.as_of(image, RasterImage)
# Check if RasterImage is cached and Cache RasterImage for better performance
if not raster_image.is_cached:
raster_image.cache_data()
# Adjust the brightness
raster_image.adjust_brightness(70)
# Create an instance of TiffOptions for the resultant image, Set various properties for the object of TiffOptions and Save the resultant image
tiff_options = TiffOptions(TiffExpectedFormat.DEFAULT)
tiff_options.bits_per_sample = [8, 8, 8]
tiff_options.photometric = TiffPhotometrics.RGB
raster_image.save(os.path.join(data_dir, "result.tiff"), tiff_options)
if delete_output:
os.remove(os.path.join(data_dir, "result.tiff"))

Adjusting Contrast

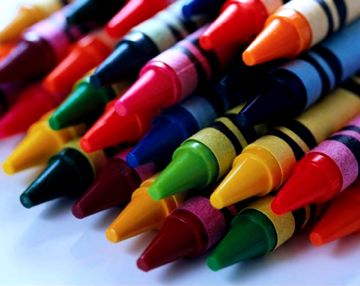
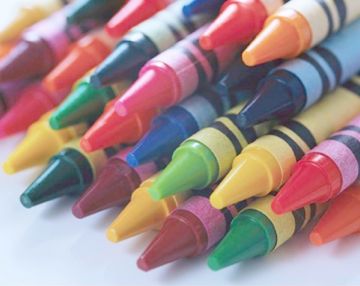
The adjust_contrast method exposed by the RasterImage class can be used to adjust the Contrast of an image by passing a float value as parameter.

import aspose.pycore as aspycore
from aspose.imaging import RasterImage, Image
from aspose.imaging.fileformats.tiff.enums import TiffExpectedFormat, TiffPhotometrics
from aspose.imaging.imageoptions import TiffOptions
import os
if 'TEMPLATE_DIR' in os.environ:
templates_folder = os.environ['TEMPLATE_DIR']
else:
templates_folder = r"C:\Users\USER\Downloads\templates"
delete_output = 'SAVE_OUTPUT' not in os.environ
data_dir = templates_folder
# Load an image in an instance of Image
with Image.load(os.path.join(data_dir, "template.jpg")) as image:
# Cast object of Image to RasterImage
raster_image = aspycore.as_of(image, RasterImage)
# Check if RasterImage is cached and Cache RasterImage for better performance
if not raster_image.is_cached:
raster_image.cache_data()
# Adjust the contrast
raster_image.adjust_contrast(10)
# Create an instance of TiffOptions for the resultant image, Set various properties for the object of TiffOptions and Save the resultant image to TIFF format
tiff_options = TiffOptions(TiffExpectedFormat.DEFAULT)
tiff_options.bits_per_sample = [8, 8, 8]
tiff_options.photometric = TiffPhotometrics.RGB
raster_image.save(os.path.join(data_dir, "result.tiff"), tiff_options)
if delete_output:
os.remove(os.path.join(data_dir, "result.tiff"))

Highest parameter value denotes to a higher contrast in the given image. Here is the original image and the resultant image for comparison.

Input File Output File

todo:image_alt_text

|

todo:image_alt_text

|

Adjusting Gamma

The adjust_gamma method exposed by the RasterImage class has two versions. One of the overloads accept one float value and performs the Gamma correction for red, blue & green channel coefficients. Whereas the other overload accepts three float parameters representing each color coefficient separately. The following code example demonstrates how to adjust_gamma on an image.

import aspose.pycore as aspycore
from aspose.imaging import RasterImage, Image
from aspose.imaging.fileformats.tiff.enums import TiffExpectedFormat, TiffPhotometrics
from aspose.imaging.imageoptions import TiffOptions
import os
if 'TEMPLATE_DIR' in os.environ:
templates_folder = os.environ['TEMPLATE_DIR']
else:
templates_folder = r"C:\Users\USER\Downloads\templates"
delete_output = 'SAVE_OUTPUT' not in os.environ
data_dir = templates_folder
# Load an image in an instance of Image
with Image.load(os.path.join(data_dir, "template.jpg")) as image:
# Cast object of Image to RasterImage
raster_image = aspycore.as_of(image, RasterImage)
# Check if RasterImage is cached and Cache RasterImage for better performance
if not raster_image.is_cached:
raster_image.cache_data()
# Adjust the contrast
raster_image.adjust_gamma(10)
# Create an instance of TiffOptions for the resultant image, Set various properties for the object of TiffOptions and Save the resultant image to TIFF format
tiff_options = TiffOptions(TiffExpectedFormat.DEFAULT)
tiff_options.bits_per_sample = [8, 8, 8]
tiff_options.photometric = TiffPhotometrics.RGB
raster_image.save(os.path.join(data_dir, "result.tiff"), tiff_options)
if delete_output:
os.remove(os.path.join(data_dir, "result.tiff"))
view raw adjust-gamma.py hosted with ❤ by GitHub

Here is the original image and the resultant image for comparison.

Input File Output File

todo:image_alt_text

|

todo:image_alt_text

|

Blur an Image

This article demonstrates the usage of Aspose.Imaging for Python via .NET to perform Blur effect on an image. Aspose.Imaging APIs have exposed efficient & easy to use methods to achieve this goal. Aspose.Imaging for Python via .NET has exposed the GaussianBlurFilterOptions class to create blur effect on the fly. GaussianBlurFilterOptions class need radius and sigma values to create blur effect on an image. The steps to perform Resize are as simple as below:

  1. Load an image using the factory method load exposed by Image class.
  2. Convert the image into RasterImage.
  3. Create an instance of GaussianBlurFilterOptions class with default constructor or provide radius and sigma values in the constructor.
  4. Call the RasterImage.Filter method while specifying rectangle as image bounds and GaussianBlurFilterOptions class instance.
  5. Save the results.

The following code example demonstrates how to create blur effect on an image.

import aspose.pycore as aspycore
from aspose.imaging import RasterImage, Image
from aspose.imaging.imagefilters.filteroptions import GaussianBlurFilterOptions
import os
if 'TEMPLATE_DIR' in os.environ:
templates_folder = os.environ['TEMPLATE_DIR']
else:
templates_folder = r"C:\Users\USER\Downloads\templates"
delete_output = 'SAVE_OUTPUT' not in os.environ
data_dir = templates_folder
# Load the image
with Image.load(os.path.join(data_dir, "template.gif")) as image:
# Cast the image into RasterImage, Pass Bounds[rectangle] of image and GaussianBlurFilterOptions instance to Filter method and Save the results
raster_image = aspycore.as_of(image, RasterImage)
raster_image.filter(raster_image.bounds, GaussianBlurFilterOptions(5, 5))
raster_image.save(os.path.join(data_dir, "result.gif"))
if delete_output:
os.remove(os.path.join(data_dir, "result.gif"))
view raw blur-image.py hosted with ❤ by GitHub

Verify Image Transparency

This article demonstrates the usage of Aspose.Imaging for Python via .NET to check image transparency. The steps to check image transparency are as simple as below:

  1. Load an image using the factory method Load exposed by Image class.
  2. Check image opacity if opacity is zero image is transparent.
  3. The following code example demonstrates how to check image is transparent or not.
import aspose.pycore as aspycore
from aspose.imaging import Image
from aspose.imaging.fileformats.png import PngImage
import os
if 'TEMPLATE_DIR' in os.environ:
templates_folder = os.environ['TEMPLATE_DIR']
else:
templates_folder = r"C:\Users\USER\Downloads\templates"
delete_output = 'SAVE_OUTPUT' not in os.environ
data_dir = templates_folder
with aspycore.as_of(Image.load(os.path.join(data_dir, "template.png")), PngImage) as image:
opacity = image.image_opacity
if opacity == 0:
print("Totally transparent image!")
else:
print("Opacity:", opacity)

Exporting Text as Shape While Converting EMF MetaFile

Using Aspose.Imaging for Python via .NET, developers can get text as shapes while converting EMF to SVG format. This topic explains in detail how to convert text into shape while converting EMF to SVG format. Aspose.Imaging for Python via .NET provides the text_as_shapes property to get text as shape while converting EMF metafile. Below is the code demonstration of the said functionality.

import aspose.pycore as aspycore
from aspose.imaging import Image, Color
from aspose.imaging.imageoptions import EmfRasterizationOptions, SvgOptions
import os
if 'TEMPLATE_DIR' in os.environ:
templates_folder = os.environ['TEMPLATE_DIR']
else:
templates_folder = r"C:\Users\USER\Downloads\templates"
delete_output = 'SAVE_OUTPUT' not in os.environ
data_dir = templates_folder
with Image.load(os.path.join(data_dir, "template.emf")) as image:
emf_rasterization_options = EmfRasterizationOptions()
emf_rasterization_options.background_color = Color.white
emf_rasterization_options.page_width = float(image.width)
emf_rasterization_options.page_height = float(image.height)
obj_init = SvgOptions()
obj_init.vector_rasterization_options = emf_rasterization_options
obj_init.text_as_shapes = True
image.save(os.path.join(data_dir, "result.svg"), obj_init)
obj_init2 = SvgOptions()
obj_init2.vector_rasterization_options = emf_rasterization_options
obj_init2.text_as_shapes = False
image.save(os.path.join(data_dir, "result2.svg"), obj_init2)
if delete_output:
os.remove(os.path.join(data_dir, "result.svg"))
os.remove(os.path.join(data_dir, "result2.svg"))

Implement Lossy GIF Compressor

Using Aspose.Imaging for Python via .NET, developers can sets pixel difference. GIF’s compression is based on a “dictionary” of strings of pixels seen. Normal encoder searches the dictionary for the longest string of pixels that exactly matches pixels in the image. Lossy encoder picks longest string of pixels that’s “similar enough” to pixels in the image. Below is the code demonstration of the said functionality.

from aspose.imaging import Image
from aspose.imaging.imageoptions import GifOptions
import os
if 'TEMPLATE_DIR' in os.environ:
templates_folder = os.environ['TEMPLATE_DIR']
else:
templates_folder = r"C:\Users\USER\Downloads\templates"
delete_output = 'SAVE_OUTPUT' not in os.environ
data_dir = templates_folder
# Sets the maximum allowed pixel difference. If greater than zero, loss compression will be used.
# Recommended value for optimal loss compression is 80. 30 is very light compression, 200 is heavy.
gif_export = GifOptions()
gif_export.max_diff = 80
with Image.load(os.path.join(data_dir, "template.gif")) as image:
image.save(os.path.join(data_dir, "result.gif"), gif_export)
if delete_output:
os.remove(os.path.join(data_dir, "result.gif"))

Resizing WMF file while converting to PNG

Using Aspose.Imaging for Python via .NET, developers can resize the WMF metafile while converting it to raster format. This topic explains the approach to load existing metafiles, resize it and convert it to raster format. Aspose.Imaging for Python via .NET provides the Image class to load WMF files and same can be used to resize and save the image to PNG format. The following code snippet shows you how to resize the WMF file while converting it to PNG.

from aspose.imaging import Image, Color
from aspose.imaging.imageoptions import EmfRasterizationOptions, PngOptions
import os
if 'TEMPLATE_DIR' in os.environ:
templates_folder = os.environ['TEMPLATE_DIR']
else:
templates_folder = r"C:\Users\USER\Downloads\templates"
delete_output = 'SAVE_OUTPUT' not in os.environ
data_dir = templates_folder
# Load an existing WMF image
with Image.load(os.path.join(data_dir, "template.emf")) as image:
# Call the resize method of Image class and width,height values and Calculate new PNG image height
image.resize(100, 100)
k = (image.width * 1.00) / image.height
# Create an instance of EmfRasterizationOptions class and set different properties
emf_rasterization = EmfRasterizationOptions()
emf_rasterization.background_color = Color.white_smoke
emf_rasterization.page_width = 100.0
emf_rasterization.page_height = 100.0 / k
emf_rasterization.border_x = 5.0
emf_rasterization.border_y = 10.0
# Create an instance of PngOptions class and provide rasterization option
image_options = PngOptions()
image_options.vector_rasterization_options = emf_rasterization
# Call the save method, provide output path and PngOptions to convert the WMF file to PNG and save the output
image.save(os.path.join(data_dir, "result.png"), image_options)
if delete_output:
os.remove(os.path.join(data_dir, "result.png"))

Support For BMP

Using Aspose.Imaging for Python via .NET, developers can load the BMP OS22XBITMAPHEADER. This header contains information specific to the bitmap data.

from aspose.imaging import Image
from aspose.imaging.imageoptions import PngOptions
import os
if 'TEMPLATE_DIR' in os.environ:
templates_folder = os.environ['TEMPLATE_DIR']
else:
templates_folder = r"C:\Users\USER\Downloads\templates"
delete_output = 'SAVE_OUTPUT' not in os.environ
data_dir = templates_folder
with Image.load(os.path.join(data_dir, "template.bmp")) as image:
image.save(os.path.join(data_dir, "result.png"), PngOptions())
if delete_output:
os.remove(os.path.join(data_dir, "result.png"))

Support For DIB

Aspose.Imaging now supports the Device-Independent Bitmap files. DIB file is similar to a BMP file, but has different header information. In the example below, an existing DIB file is loaded by passing the file path to the Image class static Load method.

The following code snippet shows you how to load a DIB file and convert it to PNG.

from aspose.imaging import Image
from aspose.imaging.imageoptions import PngOptions
import os
if 'TEMPLATE_DIR' in os.environ:
templates_folder = os.environ['TEMPLATE_DIR']
else:
templates_folder = r"C:\Users\USER\Downloads\templates"
delete_output = 'SAVE_OUTPUT' not in os.environ
data_dir = templates_folder
with Image.load(os.path.join(data_dir, "template.dib")) as image:
image.save(os.path.join(data_dir, "result.png"), PngOptions())
if delete_output:
os.remove(os.path.join(data_dir, "result.png"))

Support For Reading Pixel values of 48 bpp

Using Aspose.Imaging for Python via .NET, developers can load 16-bit color components from TIFF RGB 48Bpp. Please note that only TIFF with the following options are supported:

  • Color model: RGB 48Bpp or RGBA 64Bpp
  • Compression: Lzw, Deflate, Uncompressed
  • Byte order: Intel (Little Endian), Motorola (Big Endian).
  • Striped/Tiled: Only Striped
  • Planar Config: Contiguous, Separate

 Embedded ICC Profile is not applied for 16-bit color components. Below is the code demonstration of the said functionality. 

import aspose.pycore as aspycore
from aspose.imaging import RasterImage, Image, LoadOptions, Rectangle
import os
if 'TEMPLATE_DIR' in os.environ:
templates_folder = os.environ['TEMPLATE_DIR']
else:
templates_folder = r"C:\Users\USER\Downloads\templates"
delete_output = 'SAVE_OUTPUT' not in os.environ
data_dir = templates_folder
# ICC profile is not applied for 16-bit color components at the moment, so disable that option explicitly.
load_options = LoadOptions()
load_options.use_icc_profile_conversion = False
desired_area = Rectangle(470, 1350, 30, 30)
with aspycore.as_of(Image.load(os.path.join(data_dir, "template.tiff"), load_options), RasterImage) as image:
colors32_bit = image.load_argb_32_pixels(image.bounds)
print(colors32_bit)

Support For Change Window Size

Using Aspose.Imaging for Python via .NET, developers can now change window size in Binarize Bradley method. Below is the code demonstration of the said functionality. 

import aspose.pycore as aspycore
from aspose.imaging import Image
from aspose.imaging.fileformats.png import PngImage
import os
if 'TEMPLATE_DIR' in os.environ:
templates_folder = os.environ['TEMPLATE_DIR']
else:
templates_folder = r"C:\Users\USER\Downloads\templates"
delete_output = 'SAVE_OUTPUT' not in os.environ
data_dir = templates_folder
with aspycore.as_of(Image.load(os.path.join(data_dir, "template.png")), PngImage) as image:
image.binarize_bradley(10, 20)
image.save(os.path.join(data_dir, "result.png"))
if delete_output:
os.remove(os.path.join(data_dir, "result.png"))