Arbeiten mit Clips in PostScript | C++
Clip im PS-Dokument hinzufügen
Ein Clip in einem PS-Dokument ist ein Pfad, der den Inhalt des aktuellen Grafikstatus begrenzt, der im PS-Viewer oder -Editor angezeigt wird. Der Inhalt, der außerhalb der Grenzen verbleibt, wird abgeschnitten.
Ein Beschneidungspfad in C++ kann auf drei Arten zugewiesen werden:
- von System.Drawing.Drawing2D.GraphicsPath, das beliebige geschlossene Formen enthalten kann;
- nach Textgliederung;
- 1 bpp (Bits pro Pixel) 2-Farben-Bild als Schablonenmaske;
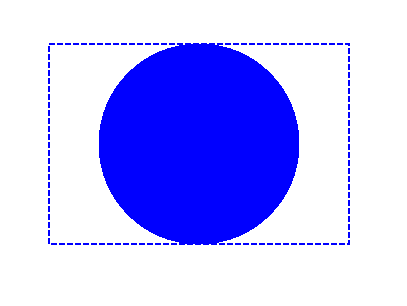
Derzeit bietet die Bibliothek Aspose.Page für C++ die erste und die zweite Möglichkeit zum Ausschneiden. Im folgenden Beispiel erhalten wir einen Kreis System.Drawing.Drawing2D.GraphicsPath aus einem Rechteck als Beschneidungspfad und schneiden im gleichen Grafikzustand ein blau gefülltes Rechteck ab.
Um in diesem Beispiel einen Clip zum neuen PsDocument mit der Aspose.Page für C++-Bibliothek hinzuzufügen, führen wir die folgenden Schritte aus:
- Erstellen Sie einen Ausgabestream für die resultierende PS-Datei.
- Erstellen Sie das Objekt PsSaveOptions mit Standardoptionen.
- Erstellen Sie ein einseitiges PsDocument mit einem bereits erstellten Ausgabestream und Speicheroptionen.
- Erstellen Sie einen neuen Grafikstatus.
- Erstellen Sie aus dem Rechteck einen Kreis System.Drawing.Drawing2D.GraphicsPath.
- Legen Sie einen Clip mit diesem Pfad fest.
- Stellen Sie einen Paint auf den aktuellen Grafikstatus von PsDocument ein.
- Füllen Sie den Rechteckpfad mit der aktuellen Farbe.
- Verlassen Sie den aktuellen Grafikstatus zur oberen Ebene eins.
- Übertragen Sie es an die Stelle des gefüllten Rechtecks.
- Zeichnen Sie mit einer gestrichelten Linie die Grenzen desselben Rechtecks über dem gefüllten Rechteck, um die Grenzen des abgeschnittenen gefüllten Rechtecks anzuzeigen.
- Schließen Sie die Seite.
- Speichern Sie das Dokument.
 1    // The path to the documents directory.
 2    System::String dataDir = RunExamples::GetDataDir_WorkingWithCanvas();
 3
 4    //Create output stream for PostScript document
 5    {
 6        System::SharedPtr<System::IO::Stream> outPsStream = System::MakeObject<System::IO::FileStream>(dataDir + u"Clipping_outPS.ps", System::IO::FileMode::Create);
 7        // Clearing resources under 'using' statement
 8        System::Details::DisposeGuard<1> __dispose_guard_0({ outPsStream});
 9        // ------------------------------------------
10
11        try
12        {
13            //Create save options with default values
14            System::SharedPtr<PsSaveOptions> options = System::MakeObject<PsSaveOptions>();
15
16            // Create new 1-paged PS Document
17            System::SharedPtr<PsDocument> document = System::MakeObject<PsDocument>(outPsStream, options, false);
18
19            //Create graphics path from the rectangle
20            System::SharedPtr<System::Drawing::Drawing2D::GraphicsPath> rectanglePath = System::MakeObject<System::Drawing::Drawing2D::GraphicsPath>();
21            rectanglePath->AddRectangle(System::Drawing::RectangleF(0.0f, 0.0f, 300.0f, 200.0f));
22
23            ////////////////////////////////////// Clipping by shape //////////////////////////////////////////////////////////////////////
24
25            //Save graphics state in order to return back to this state after transformation
26            document->WriteGraphicsSave();
27
28            //Displace current graphics state on 100 points to the right and 100 points to the bottom.
29            document->Translate(100.0f, 100.0f);
30
31            //Create graphics path from the circle
32            System::SharedPtr<System::Drawing::Drawing2D::GraphicsPath> circlePath = System::MakeObject<System::Drawing::Drawing2D::GraphicsPath>();
33            circlePath->AddEllipse(System::Drawing::RectangleF(50.0f, 0.0f, 200.0f, 200.0f));
34
35            //Add clipping by circle to the current graphics state
36            document->Clip(circlePath);
37
38            //Set paint in the current graphics state
39            document->SetPaint(System::MakeObject<System::Drawing::SolidBrush>(System::Drawing::Color::get_Blue()));
40
41            //Fill the rectangle in the current graphics state (with clipping)
42            document->Fill(rectanglePath);
43
44            //Restore graphics state to the previus (upper) level
45            document->WriteGraphicsRestore();
46
47            //Displace upper level graphics state on 100 points to the right and 100 points to the bottom.
48            document->Translate(100.0f, 100.0f);
49
50            System::SharedPtr<System::Drawing::Pen> pen = System::MakeObject<System::Drawing::Pen>(System::MakeObject<System::Drawing::SolidBrush>(System::Drawing::Color::get_Blue()), 2.0f);
51            pen->set_DashStyle(System::Drawing::Drawing2D::DashStyle::Dash);
52
53            document->SetStroke(pen);
54
55            //Draw the rectangle in the current graphics state (has no clipping) above clipped rectangle
56            document->Draw(rectanglePath);
57
58            ////////////////////////////////////// Clipping by text //////////////////////////////////////////////////////////////////////
59
60            //Save graphics state in order to return back to this state after transformation
61            document->WriteGraphicsSave();
62
63            //Displace current graphics state on 100 points to the right and 100 points to the bottom.
64            document->Translate(0.0f, 350.0f);
65
66            int32_t fontSize = 120;
67            System::SharedPtr<System::Drawing::Font> font = System::MakeObject<System::Drawing::Font>(u"Arial", static_cast<float>(fontSize), System::Drawing::FontStyle::Bold);
68
69            //Clip rectangle by text's outline
70            document->ClipText(u"ABC", font, 20.0f, static_cast<float>(fontSize + 10));
71            document->Fill(rectanglePath);
72
73            document->WriteGraphicsRestore();
74
75            document->Translate(0.0f, 350.0f);
76
77            document->SetStroke(pen);
78            //Draw the rectangle in the current graphics state (has no clipping) above clipped rectangle
79            document->Draw(rectanglePath);
80
81            //////////////////////////////////////////////////////////////////////////////////////////////////////////////////////////////
82
83            //Close current page
84            document->ClosePage();
85
86            //Save the document
87            document->Save();
88        }
89        catch(...)
90        {
91            __dispose_guard_0.SetCurrentException(std::current_exception());
92        }
93    }
Weitere Informationen finden Sie unter Arbeiten mit Clips in PS-Dokumenten in Java.
Das Ergebnis der Ausführung dieses Codes wird wie folgt angezeigt:

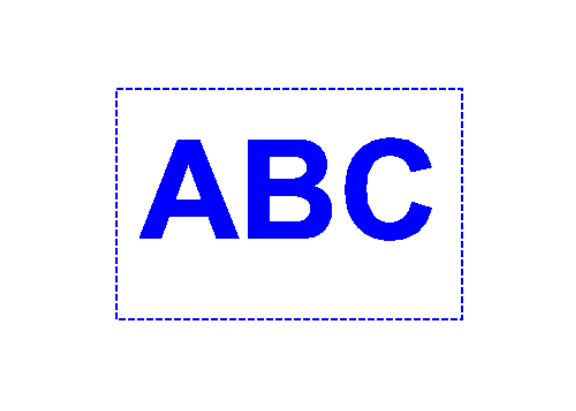
Im nächsten Beispiel erhalten wir eine Schriftart, die ein blau gefülltes Rechteck mit der Textkontur ausschneidet.
Um in diesem Beispiel einen Textausschnitt zum neuen PsDocument mit der Aspose.Page für C++-Bibliothek hinzuzufügen, führen wir die folgenden Schritte aus:
- Erstellen Sie einen Ausgabestream für die resultierende PS-Datei.
- Erstellen Sie ein PsSaveOptions-Objekt mit Standardoptionen.
- Erstellen Sie ein einseitiges PsDocument mit einem bereits erstellten Ausgabestream und Speicheroptionen.
- Erstellen Sie einen neuen Grafikstatus.
- Erstellen Sie eine Schriftart.
- Legen Sie einen Clip mit Text und Schriftart fest.
- Stellen Sie einen Paint auf den aktuellen Grafikstatus von PsDocument ein.
- Füllen Sie den Rechteckpfad mit der aktuellen Farbe.
- Verlassen Sie den aktuellen Grafikstatus zur oberen Ebene eins.
- Übertragen Sie es an die Stelle des gefüllten Rechtecks.
- Zeichnen Sie mit einer gestrichelten Linie die Grenzen desselben Rechtecks über dem gefüllten Rechteck, um die Grenzen des abgeschnittenen gefüllten Rechtecks anzuzeigen.
- Schließen Sie die Seite.
- Speichern Sie das Dokument.
 1//Create an output stream for the PostScript document
 2using (Stream outPsStream = new FileStream(dataDir + "Clipping_outPS.ps", FileMode.Create))
 3{
 4    //Create save options with default values
 5    PsSaveOptions options = new PsSaveOptions();
 6
 7    // Create a new 1-paged PS Document
 8    PsDocument document = new PsDocument(outPsStream, options, false);
 9
10    //Create a graphics path from the rectangle
11    GraphicsPath rectangePath = new GraphicsPath();
12    rectangePath.AddRectangle(new RectangleF(0, 0, 300, 200));
13
14    //Save the graphics state in order to return back to this state after transformation
15    document.WriteGraphicsSave();
16
17    //Displace the current graphics state on 100 points to the right and 100 points to the bottom.
18    document.Translate(100, 100);
19
20    //Set the paint in the current graphics state
21    document.SetPaint(new SolidBrush(Color.Blue));
22
23    //Create a font
24    int fontSize = 120;
25    Font font = new Font("Arial", fontSize, FontStyle.Bold);
26
27    //Clip the rectangle by text's outline
28    document.ClipText("ABC", font, 20, fontSize + 10);
29    document.Fill(rectanglePath);
30
31    //Restore the graphics state to the previus (upper) level
32    document.WriteGraphicsRestore();
33
34		//Displace the upper level graphics state on 100 points to the right and 100 points to the bottom.
35    document.Translate(100, 100);
36
37		Pen pen = new Pen(new SolidBrush(Color.Blue), 2);
38    pen.DashStyle = DashStyle.Dash;
39
40    document.SetStroke(pen);
41
42    //Draw the rectangle in the current graphics state (has no clipping) above the clipped rectangle
43    document.Draw(rectanglePath);
44
45    //Close the current page
46    document.ClosePage();
47
48    //Save the document
49    document.Save();
50}Das Ergebnis der Ausführung dieses Codes wird wie folgt angezeigt:

Sie können Beispiele und Datendateien herunterladen von GitHub.