Arbeiten mit Transformationen in PS-Datei | Python
Transformieren Sie einen Inhalt im PS-Dokument
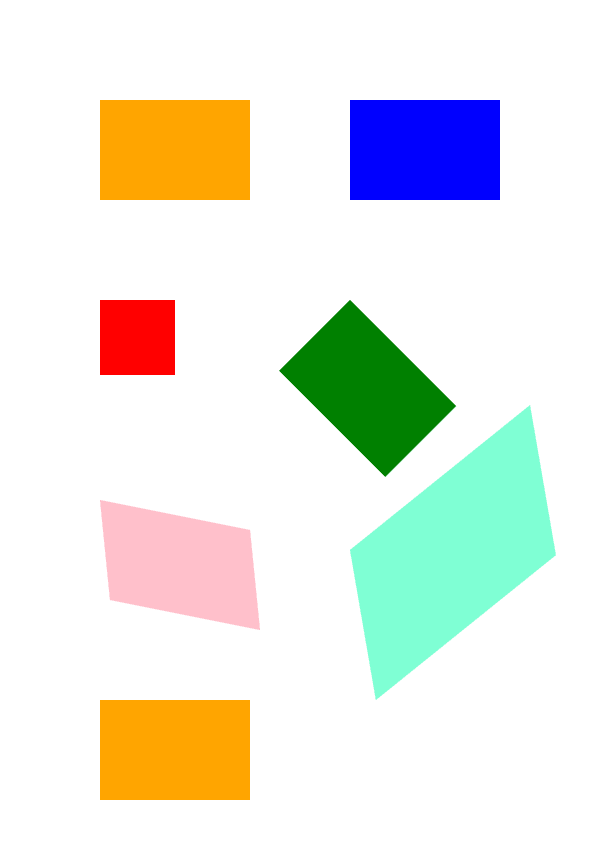
In diesem Artikel wird erläutert, wie Sie verschiedene Transformationen – Übersetzung, Skalierung, Drehung und Scherung – auf einen rechteckigen Pfad anwenden, der einem PsDocument hinzugefügt wurde.
Wir haben ein einzelnes Code-Snippet in mehrere Abschnitte unterteilt: den Anfang, das Ende und jede Transformation einzeln. In PostScript werden Transformationen immer innerhalb eines Grafikstatus durchgeführt, der durch die Operatoren “gsave” und “grestore” begrenzt wird. Daher enthält unser PsDocument Methoden wie “write_graphics_save()” und “write_graphics_restore()”, um diese Grafikzustände einzurichten und zurückzusetzen. Zwischen diesen Methoden können beliebige Inhalte, einschließlich verschachtelter Grafikzustände, hinzugefügt werden, was Transformationen oder Ausschneiden ermöglicht. Diese Transformationen wirken sich nur auf die verschachtelten Grafikzustände aus und haben keinen Einfluss auf die äußeren. Wenn jedoch eine Transformation ohne Verwendung der Methoden “write_graphics_save()” und “write_graphics_restore()” durchgeführt wird, wirkt sich dies auf den Grafikstatus der oberen Ebene aus und alle Inhalte im PsDocument unterliegen diesem Transformation.
Der Algorithmus zum Anwenden einer Transformation auf den Inhalt eines Dokuments von Grund auf umfasst die folgenden Schritte:
- Erstellen Sie einen Ausgabestream für die resultierende PS-Datei.
- Erstellen Sie PsSaveOptions.
- Erstellen Sie PsDocument mit dem bereits erstellten Ausgabestream und den Speicheroptionen.
- Speichern Sie einen Grafikstatus. Als wir einen neuen Grafikstatus erstellten, wurde der vorherige Grafikstatus in einen Grafikstatusstapel gelegt.
- Wenden Sie die erforderlichen Transformationen an: Translation, Skalierung, Rotation, Scherung oder eine beliebige Kombination davon. In unserem Code zeigen wir den Einfluss jeder Transformationskomponente einzeln und am Ende jeweils drei.
- Fügen Sie den für die Transformation erforderlichen Inhalt hinzu. In unserem Fall haben wir einen Reactangle aspose.pydrawing.GraphicsPath erstellt und ihn dann gefüllt. Wir haben vor allen Transformationen ein Rechteck erstellt und es nach jeder Transformation im aktuellen Grafikstatus einfach gefüllt.
- Stellen Sie den Grafikstatus wieder her, um zum vorherigen Zustand zurückzukehren, auf den sich die angewendeten Transformationen nicht auswirken. In unserem Fall handelt es sich um einen Grafikstatus der oberen Ebene.
In diesem Codeausschnitt initiieren wir die Erstellung eines PsDocument mithilfe eines Ausgabestreams und PsSaveOptions. Anschließend führen wir eine Übersetzung des Grafikzustands der oberen Ebene in die Koordinaten (100, 100) durch, um das erste Rechteck zu versetzen. Zum Schluss generieren wir das erste Rechteck.
  1data_dir = Util.get_data_dir_working_with_canvas()
  2
  3# Create an output stream for the PostScript document
  4with open(data_dir + "Transformations_outPS.ps", "wb") as out_ps_stream:
  5    # Create save options with default values
  6    options = PsSaveOptions()
  7
  8    # Create a new 1-paged PS Document
  9    document = PsDocument(out_ps_stream, options, False)
 10
 11    document.translate(100, 100)
 12
 13    # Create a graphics path from the rectangle
 14    path = aspose.pydrawing.drawing2d.GraphicsPath()
 15    path.add_rectangle(aspose.pydrawing.RectangleF(0, 0, 150, 100))
 16
 17    ##################################### No transformations ###############################################################
 18    # Set the paint in the graphics state on upper level
 19    document.set_paint(aspose.pydrawing.SolidBrush(aspose.pydrawing.Color.orange))
 20
 21    # Fill the first rectangle that is on the upper level graphics state and is without any transformations.
 22    document.fill(path)
 23    ########################################################################################################################
 24
 25
 26    ##################################### Translation ######################################################################
 27
 28    # Save the graphics state in order to return back to this state after the transformation
 29    document.write_graphics_save()
 30
 31    # Displace the current graphics state on 250 to the right. So we add a translation component to the current transformation.
 32    document.translate(250., 0.)
 33
 34    # Set the paint in the current graphics state
 35    document.set_paint(aspose.pydrawing.SolidBrush(aspose.pydrawing.Color.blue))
 36
 37    # Fill the second rectangle in the current graphics state (has translation transformation)
 38    document.fill(path)
 39
 40    # Restore the graphics state to the previus (upper) level
 41    document.write_graphics_restore()
 42    ########################################################################################################################
 43
 44
 45    # Displace on 200 to the bottom.
 46    document.translate(0., 200.)
 47
 48    ##################################### Scaling ##########################################################################
 49    # Save graphics state in order to return back to this state after transformation
 50    document.write_graphics_save()
 51
 52    # Scale the current graphics state on 0.5 in X axis and on 0.75f in Y axis. So we add a scale component to the current transformation.
 53    document.scale(0.5, 0.75)
 54
 55    # Set the paint in the current graphics state
 56    document.set_paint(aspose.pydrawing.SolidBrush(aspose.pydrawing.Color.red))
 57
 58    # Fill the third rectangle in the current graphics state (has scale transformation)
 59    document.fill(path)
 60
 61    # Restore the graphics state to the previus (upper) level
 62    document.write_graphics_restore()
 63    #####################################################################################################################
 64
 65
 66    # Displace the upper level graphics state on 250 to the right.
 67    document.translate(250., 0.)
 68
 69
 70    ##################################### Rotation ######################################################################
 71    #Save graphics state in order to return back to this state after transformation
 72    document.write_graphics_save()
 73
 74    # Rotate the current graphics state on 45 degrees around the origin of the current graphics state (350, 300). So we add a rotation component to the current transformation.
 75    document.rotate(float(45))
 76
 77    # Set the paint in the current graphics state
 78    document.set_paint(aspose.pydrawing.SolidBrush(aspose.pydrawing.Color.green))
 79
 80    # Fill the fourth rectangle in the current graphics state (has rotation transformation)
 81    document.fill(path)
 82
 83    # Restore the graphics state to the previus (upper) level
 84    document.write_graphics_restore()
 85    #####################################################################################################################
 86
 87
 88    # Returns the upper level graphics state back to the left and displace on 200 to the bottom.
 89    document.translate(-250., 200.)
 90
 91
 92    ##################################### Shearing ######################################################################
 93    # Save the graphics state in order to return back to this state after the transformation
 94    document.write_graphics_save()
 95
 96    # Shear the current graphics state. So we add shear component to the current transformation.
 97    document.shear(0.1, 0.2)
 98
 99    # Set the paint in the current graphics state
100    document.set_paint(aspose.pydrawing.SolidBrush(aspose.pydrawing.Color.pink))
101
102    # Fill the fifth rectangle in the current graphics state (has shear transformation)
103    document.fill(path)
104
105    # Restore the graphics state to the previus (upper) level
106    document.write_graphics_restore()
107    #####################################################################################################################
108
109
110    # Displace the upper level graphics state on 250 to the right.
111    document.translate(250., 0.)
112
113
114    ##################################### Complex transformation ########################################################
115    # Save the graphics state in order to return back to this state after the transformation
116    document.write_graphics_save()
117
118    # Transform the current graphics state with the complex transformation. So we add the translation, scale and rotation components to the current transformation.
119    document.transform(aspose.pydrawing.drawing2d.Matrix(1.2, -0.965925, 0.258819, 1.5, 0., 50.))
120
121    # Set the paint in the current graphics state
122    document.set_paint(aspose.pydrawing.SolidBrush(aspose.pydrawing.Color.aquamarine))
123
124    # Fill the sixth rectangle in the current graphics state (has complex transformation)
125    document.fill(path)
126
127    # Restore graphics state to the previus (upper) level
128    document.write_graphics_restore()
129    #####################################################################################################################
130
131
132    # Returns the upper level graphics state back to the left and displace on 200 to the bottom.
133    document.translate(-250., 200.)
134
135
136    ##################################### Again no transformation ########################################################
137    # Demonstrates that current graphics state's color is orange that was set up at the beginning of the code.
138    # Fill the seventh rectangle in the current graphics state (has no transformation)
139    document.fill(path)
140    #####################################################################################################################
141
142    # Close the current page
143    document.close_page()
144
145    # Save the document
146 document.save()Das Ergebnis der Ausführung dieses Codes ist
Sie können Beispiele und Datendateien herunterladen von GitHub.