Trabajar con clips en archivos PS| Python
Agregar clip en documento PS
En un documento PS, un clip es un límite definido por una ruta que restringe la visibilidad del contenido dentro del estado de gráficos actual en los visores o editores PS. Cualquier contenido que se extienda más allá de este límite será truncado.
En Python, los trazados de recorte se pueden asignar de tres formas:
- Utilizando cualquier clase implementada en aspose.pydrawing.GraphicsPath, capaz de contener formas cerradas.;
- Utilizando un esquema de texto;
- Empleando una imagen de 2 colores de 1 bpp (bits por píxel) como máscara de plantilla.
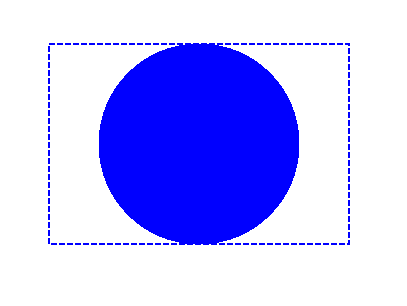
Actualmente, la biblioteca Aspose.Page para Python a través de .NET admite el primer y segundo método de recorte. En el siguiente ejemplo, creamos una forma circular como trazado de recorte y la usamos para recortar un rectángulo relleno de azul dentro del mismo estado de gráficos.
En el siguiente ejemplo, obtenemos una forma de círculo como trazado de recorte y cortamos un rectángulo relleno de azul en el mismo estado de gráfico.
Para agregar un clip al nuevo PsDocument con Aspose.Page para Python a través de la biblioteca .NET en este ejemplo, realizamos los siguientes pasos:
- Cree una secuencia de salida para el archivo PS resultante.
- Cree un objeto PsSaveOptions con las opciones predeterminadas.
- Cree un PsDocument de 1 página con un flujo de salida ya creado y opciones para guardar.
- Cree un nuevo estado de gráficos.
- Cree una forma de círculo (aspose.pydrawing.GraphicsPath objeto).
- Establezca un clip con esta ruta.
- Establezca una pintura en el estado de gráficos actual de PsDocument.
- Rellena el trazado del rectángulo con la pintura actual.
- Salga del estado de gráficos actual al nivel superior.
- Traduzca al lugar del rectángulo relleno.
- Traza con una línea discontinua los límites del mismo rectángulo encima del relleno para mostrar los límites del rectángulo relleno recortado.
- Cierra la página.
- Guarde el documento.
 1# Create an output stream for PostScript document
 2with open(data_dir + "Clipping_outPS.ps", "wb") as out_ps_stream:
 3    # Create the save options with default values
 4    options = PsSaveOptions()
 5
 6    # Create new 1-paged PS Document
 7    document = PsDocument(out_ps_stream, options, False)
 8
 9    # Create a graphics path from the rectangle
10    rectange_path = aspose.pydrawing.drawing2d.GraphicsPath()
11    rectange_path.add_rectangle(aspose.pydrawing.RectangleF(0, 0, 300, 200))
12
13    ##################################### Clipping by the shape //////////////////////////////////////////////////////////////////////
14
15    # Save the graphics state in order to return back to this state after the transformation
16    document.write_graphics_save()
17
18    # Displace the current graphics state on 100 points to the right and 100 points to the bottom.
19    document.translate(100, 100)
20
21    # Create a graphics path from the circle
22    circle_path = aspose.pydrawing.drawing2d.GraphicsPath()
23    circle_path.add_ellipse(aspose.pydrawing.RectangleF(50, 0, 200, 200))
24
25    # Add clipping by circle to the current graphics state
26    document.clip(circle_path)
27
28    # Set the paint in the current graphics state
29    document.set_paint(aspose.pydrawing.SolidBrush(aspose.pydrawing.Color.blue))
30
31    # Fill the rectangle in the current graphics state (with clipping)
32    document.fill(rectange_path)
33
34    # Restore the graphics state to the previus (upper) level
35    document.write_graphics_restore()
36
37    # Displace the upper level graphics state on 100 points to the right and 100 points to the bottom.
38    document.translate(100, 100)
39
40    pen = aspose.pydrawing.Pen(aspose.pydrawing.SolidBrush(aspose.pydrawing.Color.blue))
41    pen.width = float(2)
42    pen.dash_style = aspose.pydrawing.drawing2d.DashStyle.DASH
43
44    document.set_stroke(pen)
45
46    # Draw the rectangle in the current graphics state (has no clipping) above clipped rectangle
47    document.draw(rectange_path)
48
49    ########################################################################################################################
50
51    # Close the current page
52    document.close_page()
53
54    # Save the document
55 document.save()El resultado de ejecutar este código es
Puede descargar ejemplos y archivos de datos desde GitHub.