Trabajar con transformaciones en archivos PS | Python
Transformar un contenido en documento PS
Este artículo explora cómo aplicar varias transformaciones: traducción, escalado, rotación y corte a una ruta rectangular agregada a un PsDocument.
Hemos dividido un único fragmento de código en varias secciones: el principio, el final y cada transformación individualmente. En PostScript, las transformaciones siempre se realizan dentro de un estado de gráficos delimitado por los operadores “gsave” y “grestore”. Por lo tanto, nuestro PsDocument incluye métodos como “write_graphics_save()” y “write_graphics_restore()” para establecer y restablecer estos estados de gráficos. Entre estos métodos, se puede agregar cualquier contenido, incluidos estados de gráficos anidados, lo que permite transformaciones o recortes. Estas transformaciones afectan sólo a los estados de los gráficos anidados y no afectan a los externos. Sin embargo, si se realiza una transformación sin utilizar los métodos “write_graphics_save()” y “write_graphics_restore()”, afectará el estado de los gráficos del nivel superior y todo el contenido dentro del PsDocument estará sujeto a esta transformación.
El algoritmo para aplicar cualquier transformación al contenido de un documento desde cero implica los siguientes pasos:
- Cree una secuencia de salida para el archivo PS resultante.
- Cree PsSaveOptions.
- Cree PsDocument con el flujo de salida ya creado y las opciones de guardado.
- Guarde un estado de gráficos. Cuando creamos un nuevo estado de gráficos, el estado de gráficos anterior se colocó en una pila de estados de gráficos.
- Aplicar las transformaciones necesarias: traslación, escala, rotación, corte o cualquier combinación de ellas. En nuestro código, mostramos la influencia de cada componente de transformación por separado y al final 3 a la vez.
- Agregue el contenido necesario que se requiere para transformar. En nuestro caso, creamos un reaccionarángulo aspose.pydrawing.GraphicsPath y luego lo completamos. Creamos un rectángulo antes de cualquier transformación y simplemente lo rellenamos después de cada transformación en el estado de gráficos actual.
- Restaure el estado de los gráficos para volver al estado anterior donde las transformaciones aplicadas no afectan. En nuestro caso, es un estado de gráficos de nivel superior.
En este fragmento de código, iniciamos la creación de un PsDocument usando un flujo de salida y PsSaveOptions. Luego realizamos una traducción del estado de los gráficos de nivel superior a las coordenadas (100, 100) para compensar el primer rectángulo. Finalmente, generamos el primer rectángulo.
  1data_dir = Util.get_data_dir_working_with_canvas()
  2
  3# Create an output stream for the PostScript document
  4with open(data_dir + "Transformations_outPS.ps", "wb") as out_ps_stream:
  5    # Create save options with default values
  6    options = PsSaveOptions()
  7
  8    # Create a new 1-paged PS Document
  9    document = PsDocument(out_ps_stream, options, False)
 10
 11    document.translate(100, 100)
 12
 13    # Create a graphics path from the rectangle
 14    path = aspose.pydrawing.drawing2d.GraphicsPath()
 15    path.add_rectangle(aspose.pydrawing.RectangleF(0, 0, 150, 100))
 16
 17    ##################################### No transformations ###############################################################
 18    # Set the paint in the graphics state on upper level
 19    document.set_paint(aspose.pydrawing.SolidBrush(aspose.pydrawing.Color.orange))
 20
 21    # Fill the first rectangle that is on the upper level graphics state and is without any transformations.
 22    document.fill(path)
 23    ########################################################################################################################
 24
 25
 26    ##################################### Translation ######################################################################
 27
 28    # Save the graphics state in order to return back to this state after the transformation
 29    document.write_graphics_save()
 30
 31    # Displace the current graphics state on 250 to the right. So we add a translation component to the current transformation.
 32    document.translate(250., 0.)
 33
 34    # Set the paint in the current graphics state
 35    document.set_paint(aspose.pydrawing.SolidBrush(aspose.pydrawing.Color.blue))
 36
 37    # Fill the second rectangle in the current graphics state (has translation transformation)
 38    document.fill(path)
 39
 40    # Restore the graphics state to the previus (upper) level
 41    document.write_graphics_restore()
 42    ########################################################################################################################
 43
 44
 45    # Displace on 200 to the bottom.
 46    document.translate(0., 200.)
 47
 48    ##################################### Scaling ##########################################################################
 49    # Save graphics state in order to return back to this state after transformation
 50    document.write_graphics_save()
 51
 52    # Scale the current graphics state on 0.5 in X axis and on 0.75f in Y axis. So we add a scale component to the current transformation.
 53    document.scale(0.5, 0.75)
 54
 55    # Set the paint in the current graphics state
 56    document.set_paint(aspose.pydrawing.SolidBrush(aspose.pydrawing.Color.red))
 57
 58    # Fill the third rectangle in the current graphics state (has scale transformation)
 59    document.fill(path)
 60
 61    # Restore the graphics state to the previus (upper) level
 62    document.write_graphics_restore()
 63    #####################################################################################################################
 64
 65
 66    # Displace the upper level graphics state on 250 to the right.
 67    document.translate(250., 0.)
 68
 69
 70    ##################################### Rotation ######################################################################
 71    #Save graphics state in order to return back to this state after transformation
 72    document.write_graphics_save()
 73
 74    # Rotate the current graphics state on 45 degrees around the origin of the current graphics state (350, 300). So we add a rotation component to the current transformation.
 75    document.rotate(float(45))
 76
 77    # Set the paint in the current graphics state
 78    document.set_paint(aspose.pydrawing.SolidBrush(aspose.pydrawing.Color.green))
 79
 80    # Fill the fourth rectangle in the current graphics state (has rotation transformation)
 81    document.fill(path)
 82
 83    # Restore the graphics state to the previus (upper) level
 84    document.write_graphics_restore()
 85    #####################################################################################################################
 86
 87
 88    # Returns the upper level graphics state back to the left and displace on 200 to the bottom.
 89    document.translate(-250., 200.)
 90
 91
 92    ##################################### Shearing ######################################################################
 93    # Save the graphics state in order to return back to this state after the transformation
 94    document.write_graphics_save()
 95
 96    # Shear the current graphics state. So we add shear component to the current transformation.
 97    document.shear(0.1, 0.2)
 98
 99    # Set the paint in the current graphics state
100    document.set_paint(aspose.pydrawing.SolidBrush(aspose.pydrawing.Color.pink))
101
102    # Fill the fifth rectangle in the current graphics state (has shear transformation)
103    document.fill(path)
104
105    # Restore the graphics state to the previus (upper) level
106    document.write_graphics_restore()
107    #####################################################################################################################
108
109
110    # Displace the upper level graphics state on 250 to the right.
111    document.translate(250., 0.)
112
113
114    ##################################### Complex transformation ########################################################
115    # Save the graphics state in order to return back to this state after the transformation
116    document.write_graphics_save()
117
118    # Transform the current graphics state with the complex transformation. So we add the translation, scale and rotation components to the current transformation.
119    document.transform(aspose.pydrawing.drawing2d.Matrix(1.2, -0.965925, 0.258819, 1.5, 0., 50.))
120
121    # Set the paint in the current graphics state
122    document.set_paint(aspose.pydrawing.SolidBrush(aspose.pydrawing.Color.aquamarine))
123
124    # Fill the sixth rectangle in the current graphics state (has complex transformation)
125    document.fill(path)
126
127    # Restore graphics state to the previus (upper) level
128    document.write_graphics_restore()
129    #####################################################################################################################
130
131
132    # Returns the upper level graphics state back to the left and displace on 200 to the bottom.
133    document.translate(-250., 200.)
134
135
136    ##################################### Again no transformation ########################################################
137    # Demonstrates that current graphics state's color is orange that was set up at the beginning of the code.
138    # Fill the seventh rectangle in the current graphics state (has no transformation)
139    document.fill(path)
140    #####################################################################################################################
141
142    # Close the current page
143    document.close_page()
144
145    # Save the document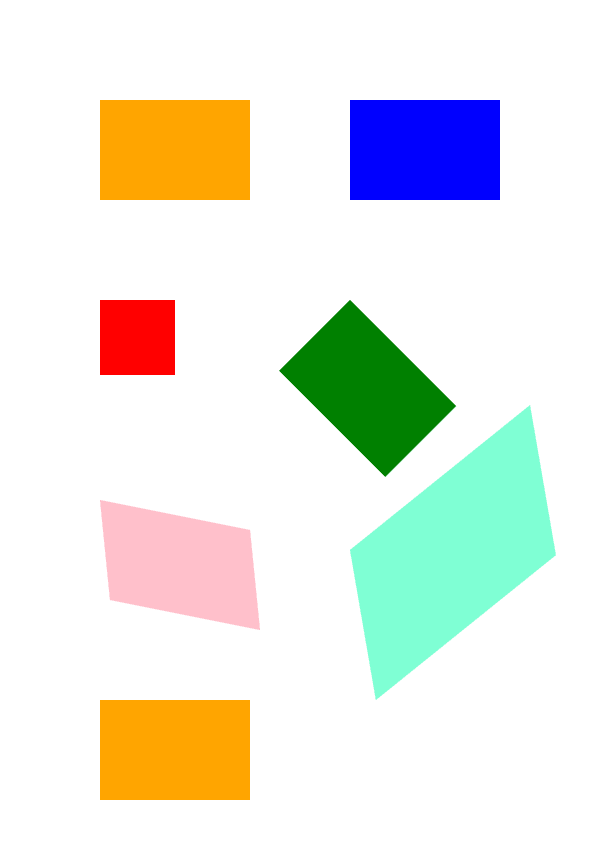
146 document.save()El resultado de ejecutar este código es
Puede descargar ejemplos y archivos de datos desde GitHub.