Travailler avec Gradientdans PS | Python
Ajouter un dégradé dans un document PS
Cet article explore l’implémentation des dégradés dans les documents PS à l’aide d’Aspose.Page pour Python.
Les dégradés représentent une transition douce entre les couleurs, améliorant le réalisme des images dessinées.
Dans Aspose.Page pour Python, les dégradés sont implémentés en tant que sous-classes de aspose.pydrawing.Brush, à savoir :
- aspose.pydrawing.drawing2d.LinearGradientBrush
- aspose.pydrawing.drawing2d.PathGradientBrush
Pour appliquer de la peinture ou un trait dans un PsDocument, les objets de la classe aspose.pydrawing.Brush pour la peinture et aspose.pydrawing.Pen pour le trait sont transmis aux méthodes respectives. Aspose.Page pour Python prend en charge toutes les classes essentielles de aspose.pydrawing.Brush proposées par la plateforme .NET, notamment aspose.pydrawing.Color, aspose.pydrawing.TextureBrush, aspose.pydrawing.drawing2d .LinearGradientBrush et aspose.pydrawing.drawing2d.PathGradientBrush. La couleur du trait est attribuée séparément des propriétés du trait à l’aide de aspose.pydrawing.Brush dans l’objet aspose.pydrawing.Pen.
Pour peindre des objets graphiques avec un dégradé, créez aspose.pydrawing.drawing2d.LinearGradientBrush ou aspose.pydrawing.drawing2d.PathGradientBrush et transmettez-le dans set_paint() ou un des méthodes fill_text() ou fill_and_Stroke_text(), qui acceptent aspose.pydrawing.Brush comme paramètre.
Pour décrire des objets graphiques avec un dégradé, transmettez aspose.pydrawing.drawing2d.LinearGradientBrush ou aspose.pydrawing.drawing2d.PathGradientBrush dans set_paint() ou l’un des * Méthodes outline_text()* ou fill_and_stroke_text(), qui acceptent la peinture par traits comme paramètre.
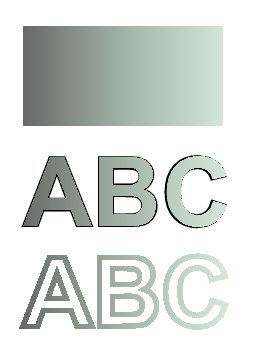
Dans l’exemple ci-dessous, nous montrons comment remplir une forme et un texte et décrire le texte avec un dégradé.
Un algorithme pour peindre des objets graphiques avec un dégradé dans un nouveau document PS comprend les étapes suivantes :
- Créez un flux de sortie pour le fichier PS résultant.
- Lancez une PsSaveOptions.
- Créez un PsDocument avec le flux de sortie déjà créé et enregistrez les options.
- Créez le chemin graphique nécessaire ou une police en fonction de l’objet que nous allons remplir ou décrire.
- Créez un objet de aspose.pydrawing.drawing2d.LinearGradientBrush ou aspose.pydrawing.drawing2d.PathGradientBrush en fonction de la forme pieux d’un dégradé.
- Définissez la transformation nécessaire sur ce pinceau.
- Définissez le pinceau dégradé comme peinture actuelle dans le PsDocument.
- Remplissez le chemin graphique avec la peinture actuelle ou remplissez le texte. Si nous utilisons l’une des méthodes de remplissage du texte qui accepte aspose.pydrawing.Brush comme paramètre, l’étape précédente peut être ignorée.
- Fermez la page.
- Enregistrez le document.
Si nous avons besoin de tracer (décrire) les objets graphiques avec un dégradé au lieu des 4 dernières étapes auront l’aspect suivant :
- Définissez le dégradé comme peinture actuelle dans PsDocument.
- Créez l’objet aspose.pydrawing.Pen.
- Définissez ce trait comme trait actuel dans PsDocument.
- Décrivez le chemin graphique avec le trait actuel ou décrivez le texte. Si nous utilisons l’une des méthodes pour décrire le texte qui accepte aspose.pydrawing.Pen comme paramètre, le point précédent peut être ignoré.
- Fermez la page.
- Enregistrez le document.
Voici 5 extraits de code distincts qui démontrent l’utilisation de différents dégradés. Dans celui-ci, nous créons un dégradé linéaire horizontal à partir de deux couleurs, remplissons un rectangle, remplissons un texte, décrivons un texte avec ce dégradé.
 1# The path to the documents directory.
 2data_dir = Util.get_data_dir_working_with_gradient()
 3
 4# Create an output stream for the PostScript document
 5with open(data_dir + "HorizontalGradient_outPS.ps", "wb") as out_ps_stream:
 6    # Create the save options with the A4 size
 7    options = PsSaveOptions()
 8
 9    # Create a new 1-paged PS Document
10    document = PsDocument(out_ps_stream, options, False)
11
12    offset_x = 200.
13    offset_y = 100.
14    width = 200.
15    height = 100.
16
17    # Create a graphics path from the first rectangle
18    path = aspose.pydrawing.drawing2d.GraphicsPath()
19    path.add_rectangle(aspose.pydrawing.RectangleF(offset_x, offset_y, width, height))
20
21    # Create a linear gradient brush with a rectangle as a bounds, start and end colors
22    brush = GraphicsFactory.create_linear_gradient_brush_by_rect_and_angle(aspose.pydrawing.RectangleF(0, 0, width, height),
23        aspose.pydrawing.Color.from_argb(150, 0, 0, 0), aspose.pydrawing.Color.from_argb(50, 40, 128, 70), 0)
24    # Create a transform for brush. X and Y scale component must be equal to the width and height of the rectangle correspondingly.
25    # Translation components are offsets of the rectangle
26    brush_transform = aspose.pydrawing.drawing2d.Matrix(width, 0., 0., height, offset_x, offset_y)
27    # Set the transform
28    brush.transform = brush_transform
29
30    # Set the paint
31    document.set_paint(brush)
32
33    # Fill the rectangle
34    document.fill(path)
35
36    # Fill the text with the gradient
37    font = ExternalFontCache.fetch_dr_font("Arial", 96, aspose.pydrawing.FontStyle.BOLD)
38    document.fill_and_stroke_text("ABC", font, 200, 300, brush,
39    GraphicsFactory.create_pen_by_brush_and_width(aspose.pydrawing.SolidBrush(aspose.pydrawing.Color.black), 2))
40
41    # Set a current stroke
42    document.set_stroke(GraphicsFactory.create_pen_by_brush_and_width(brush, 5))
43    # Outline text with the gradient
44    document.outline_text("ABC", font, 200, 400)
45
46    # Close the current page
47    document.close_page()
48
49    # Save the document
50    document.save()
Le résultat de l’exécution de ce code est

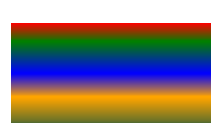
Dans cet extrait de code, vous pouvez voir la création d’un dégradé linéaire vertical à partir de 5 couleurs et le remplissage d’un rectangle avec ce dégradé.
 1# The path to the documents directory.
 2data_dir = Util.get_data_dir_working_with_gradient()
 3
 4# Create an output stream for the PostScript document
 5with open(data_dir + "VerticalGradient_outPS.ps", "wb") as out_ps_stream:
 6    # Create the save options with the A4 size
 7    options = PsSaveOptions()
 8
 9    # Create a new 1-paged PS Document
10    document = PsDocument(out_ps_stream, options, False)
11
12    offset_x = 200.
13    offset_y = 100.
14    width = 200.
15    height = 100.
16
17    # Create a graphics path from the first rectangle
18    path = aspose.pydrawing.drawing2d.GraphicsPath()
19    path.add_rectangle(aspose.pydrawing.RectangleF(offset_x, offset_y, width, height))
20
21    # Create an array of interpolation colors
22    colors = [ aspose.pydrawing.Color.red, aspose.pydrawing.Color.green, aspose.pydrawing.Color.blue,
23    aspose.pydrawing.Color.orange, aspose.pydrawing.Color.dark_olive_green ]
24    positions = [ 0.0, 0.1873, 0.492, 0.734, 1.0 ]
25    color_blend = aspose.pydrawing.drawing2d.ColorBlend()
26    color_blend.colors = colors
27    color_blend.positions = positions
28
29    # Create a linear gradient brush with a rectangle as a bounds, start and end colors
30    brush = GraphicsFactory.create_linear_gradient_brush_by_rect_and_angle(aspose.pydrawing.RectangleF(0, 0, width, height),
31    aspose.pydrawing.Color.beige, aspose.pydrawing.Color.dodger_blue, 0)
32    # Set interpolation colors
33    brush.interpolation_colors = color_blend
34    # Create a transform for brush. X and Y scale component must be equal to the width and height of the rectangle correspondingly.
35    # Translation components are offsets of the rectangle
36    brush_transform = aspose.pydrawing.drawing2d.Matrix(width, 0., 0., height, offset_x, offset_y)
37    # Rotate transform to get colors change in the vertical direction from up to down
38    brush_transform.rotate(90.)
39    # Set the transform
40    brush.transform = brush_transform
41
42    # Set the paint
43    document.set_paint(brush)
44
45    # Fill the rectangle
46    document.fill(path)
47
48    # Close the current page
49    document.close_page()
50
51    # Save the document
52    document.save()
Voici le résultat

Dans cet extrait de code, nous créons un dégradé linéaire diagonal à partir de 2 couleurs et remplissons un rectangle avec ce dégradé.
 1# Create an output stream for PostScript document
 2with open(data_dir + "DiagonaGradient_outPS.ps", "wb") as out_ps_stream:
 3    # Create the save options with A4 size
 4    options = PsSaveOptions()
 5
 6    # Create a new 1-paged PS Document
 7    document = PsDocument(out_ps_stream, options, False)
 8
 9    offset_x = 200.
10    offset_y = 100.
11    width = 200.
12    height = 100.
13
14    # Create a graphics path from the first rectangle
15    path = aspose.pydrawing.drawing2d.GraphicsPath()
16    path.add_rectangle(aspose.pydrawing.RectangleF(offset_x, offset_y, width, height))
17
18    # Create a linear gradient brush with a rectangle as a bounds, start and end colors
19    brush = GraphicsFactory.create_linear_gradient_brush_by_rect_and_angle(aspose.pydrawing.RectangleF(0, 0, width, height),
20    aspose.pydrawing.Color.from_argb(255, 255, 0, 0), aspose.pydrawing.Color.from_argb(255, 0, 0, 255), 0)
21
22    # Create a transform for brush. X and Y scale component must be equal to the width and height of the rectangle correspondingly.
23    # Translation components are offsets of the rectangle
24    brush_transform = aspose.pydrawing.drawing2d.Matrix(width, 0., 0., height, offset_x, offset_y)
25    # Rotate gradient, than scale and translate to get the visible color transition in the required rectangle
26    brush_transform.rotate(-45.)
27    hypotenuse = float(math.sqrt(200. * 200. + 100. * 100.))
28    ratio = hypotenuse / 200.
29    brush_transform.scale(-ratio, 1.)
30    brush_transform.translate(100. / brush_transform.elements[0], 0.)
31
32    # Set the transform
33    brush.transform = brush_transform
34
35    # Set the paint
36    document.set_paint(brush)
37
38    # Fill the rectangle
39    document.fill(path)
40
41    # Close the current page
42    document.close_page()
43
44    # Save the document
45    document.save()
Voici le résultat

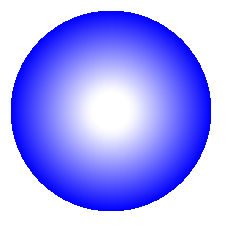
Ici, nous créons un dégradé radial à partir de 2 couleurs et remplissons un cercle avec ce dégradé.
 1# The path to the documents directory.
 2data_dir = Util.get_data_dir_working_with_gradient()
 3
 4# Create an output stream for the PostScript document
 5with open(data_dir + "RadialGradient1_outPS.ps", "wb") as out_ps_stream:
 6    # Create the save options with A4 size
 7    options = PsSaveOptions()
 8
 9    # Create a new 1-paged PS Document
10    document = PsDocument(out_ps_stream, options, False)
11
12    offset_x = 200.
13    offset_y = 100.
14    width = 200.
15    height = 200.
16
17    # Create a graphics path from the rectangle bounds
18    bounds = aspose.pydrawing.RectangleF(offset_x, offset_y, width, height)
19    path = aspose.pydrawing.drawing2d.GraphicsPath()
20    path.add_ellipse(bounds)
21
22    # Create and fill a color blend object
23    colors = [ aspose.pydrawing.Color.white, aspose.pydrawing.Color.white, aspose.pydrawing.Color.blue ]
24    positions = [ 0.0, 0.2, 1.0 ]
25    color_blend = aspose.pydrawing.drawing2d.ColorBlend()
26    color_blend.colors = colors
27    color_blend.positions = positions
28
29    brush_rect = aspose.pydrawing.drawing2d.GraphicsPath()
30    brush_rect.add_rectangle(aspose.pydrawing.RectangleF(0, 0, width, height))
31
32    # Create a path gradient brush with a rectangle as a bounds
33    brush = GraphicsFactory.create_path_gradient_brush_by_path(brush_rect)
34    # Set the interpolation colors
35    brush.interpolation_colors = color_blend
36    # Create a transform for brush. X and Y scale component must be equal to the width and height of the rectangle correspondingly.
37    # Translation components are offsets of the rectangle
38    brush_transform = aspose.pydrawing.drawing2d.Matrix(width, 0., 0., height, offset_x, offset_y)
39    # Set the transform
40    brush.transform = brush_transform
41
42    # Set the paint
43    document.set_paint(brush)
44
45    # Fill the rectangle
46    document.fill(path)
47
48    # Close the current page
49    document.close_page()
50
51    #Save the document
52    document.save()
Le résultat

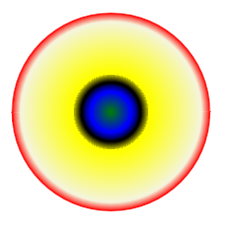
Dans cet extrait de code, nous créons un dégradé radial à partir de 6 couleurs et remplissons un rectangle avec ce dégradé.
 1# The path to the documents directory.
 2  data_dir = Util.get_data_dir_working_with_gradient()
 3
 4# Create an utput stream for the PostScript document
 5with open(data_dir + "RadialGradient2_outPS.ps", "wb") as out_ps_stream:
 6    # Create save options with the A4 size
 7    options = PsSaveOptions()
 8
 9    # Create a new 1-paged PS Document
10    document = PsDocument(out_ps_stream, options, False)
11
12    offset_x = 200.
13    offset_y = 100.
14    width = 200.
15    height = 200.
16
17    # Create a graphics path from the rectangle bounds
18    bounds = aspose.pydrawing.RectangleF(offset_x, offset_y, width, height)
19    path = aspose.pydrawing.drawing2d.GraphicsPath()
20    path.add_rectangle(bounds)
21
22    # Create and fill a color blend object
23    colors = [ aspose.pydrawing.Color.green, aspose.pydrawing.Color.blue, aspose.pydrawing.Color.black,
24    aspose.pydrawing.Color.yellow, aspose.pydrawing.Color.beige, aspose.pydrawing.Color.red ]
25    positions = [ 0.0, 0.2, 0.3, 0.4, 0.9, 1.0 ]
26    color_blend = aspose.pydrawing.drawing2d.ColorBlend()
27    color_blend.colors = colors
28    color_blend.positions = positions
29
30    brush_rect = aspose.pydrawing.drawing2d.GraphicsPath()
31    brush_rect.add_rectangle(aspose.pydrawing.RectangleF(0, 0, width, height))
32
33    # Create a path gradient brush with a rectangle as a bounds
34    brush = GraphicsFactory.create_path_gradient_brush_by_path(brush_rect)
35    # Set interpolation colors
36    brush.interpolation_colors = color_blend
37    # Create a transform for brush. X and Y scale component must be equal to the width and height of the rectangle correspondingly.
38    # Translation components are offsets of the rectangle
39    brush_transform = aspose.pydrawing.drawing2d.Matrix(width, 0., 0., height, offset_x, offset_y)
40    # Set the transform
41    brush.transform = brush_transform
42
43    # Set the paint
44    document.set_paint(brush)
45
46    # Fill the rectangle
47    document.fill(path)
48
49    # Close the current page
50    document.close_page()
51
52    # Save the document
53    document.save()
Le résultat ressemble à la prochaine façon

Vous pouvez télécharger des exemples et des fichiers de données à partir de GitHub.