Travailler avec des formesdans PS | Python
Ajouter des formes au document PS
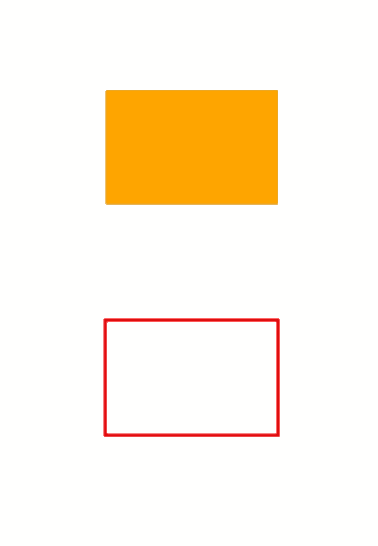
Ajouter un rectangle à PS
Afin d’insérer un rectangle dans PsDocument à l’aide d’Aspose.Page pour Python via la bibliothèque .NET, procédez comme suit :
- Créez un flux de sortie pour le fichier PS résultant.
- Créez un objet PsSaveOptions avec les options par défaut.
- Créez un PsDocument d’une page avec un flux de sortie déjà créé et enregistrez les options.
- Créez un rectangle aspose.pydrawing.GraphicsPath à partir du rectangle.
- Définissez une peinture sur l’état graphique actuel de PsDocument.
- Remplissez le rectangle.
- Fermez la page.
- Enregistrez le document.
Pour tracer (contourner) un rectangle, les 4 premières et les 2 dernières étapes seront les mêmes, mais la 5ème et la 6ème seront :
- Définissez le trait sur l’état graphique actuel du PsDocument.
- Tracez (décrivez) le rectangle.
 1# The path to the documents directory.
 2data_dir = Util.get_data_dir_working_with_shapes()
 3
 4# Create an output stream for the PostScript document
 5with open(data_dir + "AddRectangle_outPS.ps", "wb") as out_ps_stream:
 6    # Create save options with A4 size
 7    options = PsSaveOptions()
 8
 9    # Create a new 1-paged PS Document
10    document = PsDocument(out_ps_stream, options, False)
11
12    # Create a graphics path from the first rectangle
13    path = aspose.pydrawing.drawing2d.GraphicsPath()
14    path.add_rectangle(aspose.pydrawing.RectangleF(250, 100, 150, 100))
15    # Set the paint
16    document.set_paint(aspose.pydrawing.SolidBrush(aspose.pydrawing.Color.orange))
17    # Fill the rectangle
18    document.fill(path)
19
20    # Create a graphics path from the second rectangle
21    path = aspose.pydrawing.drawing2d.GraphicsPath()
22    path.add_rectangle(aspose.pydrawing.RectangleF(250, 300, 150, 100))
23    # Set stroke
24    document.set_stroke(GraphicsFactory.create_pen_by_brush_and_width(aspose.pydrawing.SolidBrush(aspose.pydrawing.Color.red), 3))
25    # Stroke (outline) the rectangle
26    document.draw(path)
27
28    # Close the current page
29    document.close_page()
30
31    # Save the document
32 document.save()Le résultat de l’exécution de ce code est

Ajouter Ellipse à PS
Pour ajouter une ellipse à PsDocument, 8 étapes doivent également être suivies :
- Créez un flux de sortie pour le fichier PS résultant.
- Créez un objet PsSaveOptions avec les options par défaut.
- Créez un PsDocument d’une page avec un flux de sortie déjà créé et enregistrez les options.
- Créez une ellipse aspose.pydrawing.drawing2d.GraphicsPath à partir du rectangle.
- Définissez la peinture sur l’état graphique actuel de PsDocument.
- Remplissez le chemin de l’ellipse.
- Fermez la page.
- Enregistrez le document.
Pour tracer (contourer) une ellipse, les 4 premières et les 2 dernières étapes seront les mêmes mais la 5ème et la 6ème seront :
- Définissez le trait sur l’état graphique actuel de PsDocument.
- Tracez (décrivez) l’ellipse.
 1# The path to the documents directory.
 2data_dir = Util.get_data_dir_working_with_shapes()
 3
 4# Create an output stream for PostScript document
 5with open(data_dir + "AddEllipse_outPS.ps", "wb") as out_ps_stream:
 6    # Create save options with the A4 size
 7    options = PsSaveOptions()
 8
 9    # Create a new 1-paged PS Document
10    document = PsDocument(out_ps_stream, options, False)
11
12    # Create a graphics path from the first ellipse
13    path = aspose.pydrawing.drawing2d.GraphicsPath()
14    path.add_ellipse(aspose.pydrawing.RectangleF(250, 100, 150, 100))
15    # Set the paint
16    document.set_paint(aspose.pydrawing.SolidBrush(aspose.pydrawing.Color.orange))
17    # Fill the ellipse
18    document.fill(path)
19
20    # Create a graphics path from the second ellipse
21    path = aspose.pydrawing.drawing2d.GraphicsPath()
22    path.add_ellipse(aspose.pydrawing.RectangleF(250, 300, 150, 100))
23    # Set the stroke
24    document.set_stroke(GraphicsFactory.create_pen_by_brush_and_width(aspose.pydrawing.SolidBrush(aspose.pydrawing.Color.red), 3))
25    # Stroke (outline) the ellipse
26    document.draw(path)
27
28    # Close the current page
29    document.close_page()
30
31    # Save the document
32    document.save()
Le résultat de l’exécution de ce code est

Comme nous pouvons le voir, n’importe quelle forme, fermée ou non, peut être remplie ou dessinée par PsDocument. Il peut également être clipsé, mais cela sera décrit dans un autre article.
Vous pouvez télécharger des exemples et des fichiers de données à partir de GitHub.