Работа с градиентом в PS-файле | Python
Добавить градиент в документ PS
В этой статье рассматривается реализация градиентов в документах PS с использованием Aspose.Page для Python.
Градиенты представляют собой плавный переход между цветами, повышая реалистичность нарисованных изображений.
В Aspose.Page для Python градиенты реализованы как подклассы aspose.pydrawing.Brush, а именно:
aspose.pydrawing.drawing2d.LinearGradientBrush
aspose.pydrawing.drawing2d.PathGradientBrush
Чтобы применить рисование или обводку в PsDocument, объекты класса aspose.pydrawing.Brush для рисования и aspose.pydrawing.Pen для обводки передаются в соответствующие методы. Aspose.Page для Python поддерживает все основные классы aspose.pydrawing.Brush, предлагаемые платформой .NET, включая aspose.pydrawing.Color, aspose.pydrawing.TextureBrush, aspose.pydrawing.drawing2d .LinearGradientBrush и aspose.pydrawing.drawing2d.PathGradientBrush. Цвет обводки назначается отдельно от свойств обводки с помощью aspose.pydrawing.Brush в объекте aspose.pydrawing.Pen.
Чтобы нарисовать графические объекты градиентом, создайте aspose.pydrawing.drawing2d.LinearGradientBrush или aspose.pydrawing.drawing2d.PathGradientBrush и передайте его в set_paint() или в один из них. методов fill_text() или fill_and_stroke_text(), которые принимают aspose.pydrawing.Brush в качестве параметра.
Чтобы обвести графические объекты градиентом, передайте либо aspose.pydrawing.drawing2d.LinearGradientBrush, либо aspose.pydrawing.drawing2d.PathGradientBrush в set_paint() или один из * outline_text()* или fill_and_stroke_text(), которые принимают обводку в качестве параметра.
В примере ниже мы демонстрируем, как заполнить фигуру и текст и обвести текст градиентом.
Алгоритм закрашивания графических объектов градиентом в новом PS-документе включает следующие шаги:
- Создайте выходной поток для полученного PS-файла.
- Запустите PsSaveOptions.
- Создайте PsDocument с уже созданным выходным потоком и сохраните параметры.
- Создайте необходимый графический контур или шрифт в зависимости от того, какой объект мы собираемся заливать или обводить.
- Создайте объект aspose.pydrawing.drawing2d.LinearGradientBrush или aspose.pydrawing.drawing2d.PathGradientBrush в зависимости от желаемой формы градиента.
- Установите необходимую трансформацию этой кисти.
- Установите градиентную кисть в качестве текущей краски в PsDocument.
- Заполните графический контур текущей краской или заполните текст. Если мы воспользуемся одним из методов заливки текста, принимающим aspose.pydrawing.Brush в качестве параметра, предыдущий шаг можно проигнорировать.
- Закройте страницу.
- Сохраните документ.
Если нам нужно обводка (обведение) графических объектов градиентом, то вместо последних 4-х шагов будет выглядеть следующим образом:
- Установите градиент в качестве текущей краски в PsDocument.
- Создайте объект aspose.pydrawing.Pen.
- Установите этот штрих в качестве текущего в PsDocument.
- Обведите графический путь текущей обводкой или обведите текст. Если мы используем один из методов выделения текста, который принимает aspose.pydrawing.Pen в качестве параметра, предыдущую точку можно игнорировать.
- Закройте страницу.
- Сохраните документ.
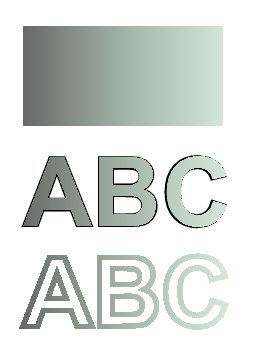
Вот 5 отдельных фрагментов кода, демонстрирующих использование различных градиентов. В этом мы создаем горизонтальный линейный градиент из двух цветов, заливаем прямоугольник, заливаем текст, обводим текст этим градиентом.
 1# The path to the documents directory.
 2data_dir = Util.get_data_dir_working_with_gradient()
 3
 4# Create an output stream for the PostScript document
 5with open(data_dir + "HorizontalGradient_outPS.ps", "wb") as out_ps_stream:
 6    # Create the save options with the A4 size
 7    options = PsSaveOptions()
 8
 9    # Create a new 1-paged PS Document
10    document = PsDocument(out_ps_stream, options, False)
11
12    offset_x = 200.
13    offset_y = 100.
14    width = 200.
15    height = 100.
16
17    # Create a graphics path from the first rectangle
18    path = aspose.pydrawing.drawing2d.GraphicsPath()
19    path.add_rectangle(aspose.pydrawing.RectangleF(offset_x, offset_y, width, height))
20
21    # Create a linear gradient brush with a rectangle as a bounds, start and end colors
22    brush = GraphicsFactory.create_linear_gradient_brush_by_rect_and_angle(aspose.pydrawing.RectangleF(0, 0, width, height),
23        aspose.pydrawing.Color.from_argb(150, 0, 0, 0), aspose.pydrawing.Color.from_argb(50, 40, 128, 70), 0)
24    # Create a transform for brush. X and Y scale component must be equal to the width and height of the rectangle correspondingly.
25    # Translation components are offsets of the rectangle
26    brush_transform = aspose.pydrawing.drawing2d.Matrix(width, 0., 0., height, offset_x, offset_y)
27    # Set the transform
28    brush.transform = brush_transform
29
30    # Set the paint
31    document.set_paint(brush)
32
33    # Fill the rectangle
34    document.fill(path)
35
36    # Fill the text with the gradient
37    font = ExternalFontCache.fetch_dr_font("Arial", 96, aspose.pydrawing.FontStyle.BOLD)
38    document.fill_and_stroke_text("ABC", font, 200, 300, brush,
39    GraphicsFactory.create_pen_by_brush_and_width(aspose.pydrawing.SolidBrush(aspose.pydrawing.Color.black), 2))
40
41    # Set a current stroke
42    document.set_stroke(GraphicsFactory.create_pen_by_brush_and_width(brush, 5))
43    # Outline text with the gradient
44    document.outline_text("ABC", font, 200, 400)
45
46    # Close the current page
47    document.close_page()
48
49    # Save the document
50    document.save()
Результат запуска этого кода:
В этом фрагменте кода вы можете увидеть создание вертикального линейного градиента из 5 цветов и заполнение этим градиентом прямоугольника.
 1# The path to the documents directory.
 2data_dir = Util.get_data_dir_working_with_gradient()
 3
 4# Create an output stream for the PostScript document
 5with open(data_dir + "VerticalGradient_outPS.ps", "wb") as out_ps_stream:
 6    # Create the save options with the A4 size
 7    options = PsSaveOptions()
 8
 9    # Create a new 1-paged PS Document
10    document = PsDocument(out_ps_stream, options, False)
11
12    offset_x = 200.
13    offset_y = 100.
14    width = 200.
15    height = 100.
16
17    # Create a graphics path from the first rectangle
18    path = aspose.pydrawing.drawing2d.GraphicsPath()
19    path.add_rectangle(aspose.pydrawing.RectangleF(offset_x, offset_y, width, height))
20
21    # Create an array of interpolation colors
22    colors = [ aspose.pydrawing.Color.red, aspose.pydrawing.Color.green, aspose.pydrawing.Color.blue,
23    aspose.pydrawing.Color.orange, aspose.pydrawing.Color.dark_olive_green ]
24    positions = [ 0.0, 0.1873, 0.492, 0.734, 1.0 ]
25    color_blend = aspose.pydrawing.drawing2d.ColorBlend()
26    color_blend.colors = colors
27    color_blend.positions = positions
28
29    # Create a linear gradient brush with a rectangle as a bounds, start and end colors
30    brush = GraphicsFactory.create_linear_gradient_brush_by_rect_and_angle(aspose.pydrawing.RectangleF(0, 0, width, height),
31    aspose.pydrawing.Color.beige, aspose.pydrawing.Color.dodger_blue, 0)
32    # Set interpolation colors
33    brush.interpolation_colors = color_blend
34    # Create a transform for brush. X and Y scale component must be equal to the width and height of the rectangle correspondingly.
35    # Translation components are offsets of the rectangle
36    brush_transform = aspose.pydrawing.drawing2d.Matrix(width, 0., 0., height, offset_x, offset_y)
37    # Rotate transform to get colors change in the vertical direction from up to down
38    brush_transform.rotate(90.)
39    # Set the transform
40    brush.transform = brush_transform
41
42    # Set the paint
43    document.set_paint(brush)
44
45    # Fill the rectangle
46    document.fill(path)
47
48    # Close the current page
49    document.close_page()
50
51    # Save the document
52    document.save()
Вот результат

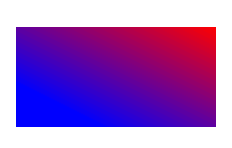
В этом фрагменте кода мы создаем диагональный линейный градиент из двух цветов и заливаем этим градиентом прямоугольник.
 1# Create an output stream for PostScript document
 2with open(data_dir + "DiagonaGradient_outPS.ps", "wb") as out_ps_stream:
 3    # Create the save options with A4 size
 4    options = PsSaveOptions()
 5
 6    # Create a new 1-paged PS Document
 7    document = PsDocument(out_ps_stream, options, False)
 8
 9    offset_x = 200.
10    offset_y = 100.
11    width = 200.
12    height = 100.
13
14    # Create a graphics path from the first rectangle
15    path = aspose.pydrawing.drawing2d.GraphicsPath()
16    path.add_rectangle(aspose.pydrawing.RectangleF(offset_x, offset_y, width, height))
17
18    # Create a linear gradient brush with a rectangle as a bounds, start and end colors
19    brush = GraphicsFactory.create_linear_gradient_brush_by_rect_and_angle(aspose.pydrawing.RectangleF(0, 0, width, height),
20    aspose.pydrawing.Color.from_argb(255, 255, 0, 0), aspose.pydrawing.Color.from_argb(255, 0, 0, 255), 0)
21
22    # Create a transform for brush. X and Y scale component must be equal to the width and height of the rectangle correspondingly.
23    # Translation components are offsets of the rectangle
24    brush_transform = aspose.pydrawing.drawing2d.Matrix(width, 0., 0., height, offset_x, offset_y)
25    # Rotate gradient, than scale and translate to get the visible color transition in the required rectangle
26    brush_transform.rotate(-45.)
27    hypotenuse = float(math.sqrt(200. * 200. + 100. * 100.))
28    ratio = hypotenuse / 200.
29    brush_transform.scale(-ratio, 1.)
30    brush_transform.translate(100. / brush_transform.elements[0], 0.)
31
32    # Set the transform
33    brush.transform = brush_transform
34
35    # Set the paint
36    document.set_paint(brush)
37
38    # Fill the rectangle
39    document.fill(path)
40
41    # Close the current page
42    document.close_page()
43
44    # Save the document
45    document.save()
Вот результат
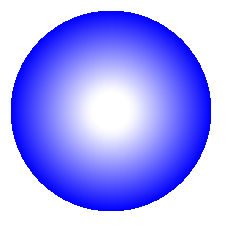
Здесь мы создаем радиальный градиент из двух цветов и заполняем этим градиентом круг.
 1# The path to the documents directory.
 2data_dir = Util.get_data_dir_working_with_gradient()
 3
 4# Create an output stream for the PostScript document
 5with open(data_dir + "RadialGradient1_outPS.ps", "wb") as out_ps_stream:
 6    # Create the save options with A4 size
 7    options = PsSaveOptions()
 8
 9    # Create a new 1-paged PS Document
10    document = PsDocument(out_ps_stream, options, False)
11
12    offset_x = 200.
13    offset_y = 100.
14    width = 200.
15    height = 200.
16
17    # Create a graphics path from the rectangle bounds
18    bounds = aspose.pydrawing.RectangleF(offset_x, offset_y, width, height)
19    path = aspose.pydrawing.drawing2d.GraphicsPath()
20    path.add_ellipse(bounds)
21
22    # Create and fill a color blend object
23    colors = [ aspose.pydrawing.Color.white, aspose.pydrawing.Color.white, aspose.pydrawing.Color.blue ]
24    positions = [ 0.0, 0.2, 1.0 ]
25    color_blend = aspose.pydrawing.drawing2d.ColorBlend()
26    color_blend.colors = colors
27    color_blend.positions = positions
28
29    brush_rect = aspose.pydrawing.drawing2d.GraphicsPath()
30    brush_rect.add_rectangle(aspose.pydrawing.RectangleF(0, 0, width, height))
31
32    # Create a path gradient brush with a rectangle as a bounds
33    brush = GraphicsFactory.create_path_gradient_brush_by_path(brush_rect)
34    # Set the interpolation colors
35    brush.interpolation_colors = color_blend
36    # Create a transform for brush. X and Y scale component must be equal to the width and height of the rectangle correspondingly.
37    # Translation components are offsets of the rectangle
38    brush_transform = aspose.pydrawing.drawing2d.Matrix(width, 0., 0., height, offset_x, offset_y)
39    # Set the transform
40    brush.transform = brush_transform
41
42    # Set the paint
43    document.set_paint(brush)
44
45    # Fill the rectangle
46    document.fill(path)
47
48    # Close the current page
49    document.close_page()
50
51    #Save the document
52    document.save()
Результат
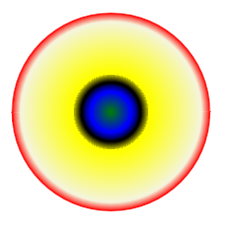
В этом фрагменте кода мы создаем радиальный градиент из 6 цветов и заливаем этим градиентом прямоугольник.
 1# The path to the documents directory.
 2  data_dir = Util.get_data_dir_working_with_gradient()
 3
 4# Create an utput stream for the PostScript document
 5with open(data_dir + "RadialGradient2_outPS.ps", "wb") as out_ps_stream:
 6    # Create save options with the A4 size
 7    options = PsSaveOptions()
 8
 9    # Create a new 1-paged PS Document
10    document = PsDocument(out_ps_stream, options, False)
11
12    offset_x = 200.
13    offset_y = 100.
14    width = 200.
15    height = 200.
16
17    # Create a graphics path from the rectangle bounds
18    bounds = aspose.pydrawing.RectangleF(offset_x, offset_y, width, height)
19    path = aspose.pydrawing.drawing2d.GraphicsPath()
20    path.add_rectangle(bounds)
21
22    # Create and fill a color blend object
23    colors = [ aspose.pydrawing.Color.green, aspose.pydrawing.Color.blue, aspose.pydrawing.Color.black,
24    aspose.pydrawing.Color.yellow, aspose.pydrawing.Color.beige, aspose.pydrawing.Color.red ]
25    positions = [ 0.0, 0.2, 0.3, 0.4, 0.9, 1.0 ]
26    color_blend = aspose.pydrawing.drawing2d.ColorBlend()
27    color_blend.colors = colors
28    color_blend.positions = positions
29
30    brush_rect = aspose.pydrawing.drawing2d.GraphicsPath()
31    brush_rect.add_rectangle(aspose.pydrawing.RectangleF(0, 0, width, height))
32
33    # Create a path gradient brush with a rectangle as a bounds
34    brush = GraphicsFactory.create_path_gradient_brush_by_path(brush_rect)
35    # Set interpolation colors
36    brush.interpolation_colors = color_blend
37    # Create a transform for brush. X and Y scale component must be equal to the width and height of the rectangle correspondingly.
38    # Translation components are offsets of the rectangle
39    brush_transform = aspose.pydrawing.drawing2d.Matrix(width, 0., 0., height, offset_x, offset_y)
40    # Set the transform
41    brush.transform = brush_transform
42
43    # Set the paint
44    document.set_paint(brush)
45
46    # Fill the rectangle
47    document.fill(path)
48
49    # Close the current page
50    document.close_page()
51
52    # Save the document
53    document.save()
Результат выглядит следующим образом
Вы можете загрузить примеры и файлы данных с сайта GitHub.