Робота з кліпами у файлі PS| Java
Додайте кліп у документ PS
Кліп у документі PS — це шлях, який обмежує вміст поточного стану графіки, який буде показано у засобі перегляду або редакторі PS. Вміст, що залишився за межами, буде відрізано.
Відсічний контур у Java можна призначити трьома способами:
- будь-яким класом, реалізованим java.awt.Shape, який може містити будь-які закриті форми;
- за планом тексту;
- на 1 bpp (біт на піксель) 2-колірне зображення як трафаретна маска;
На даний момент бібліотека Aspose.Page для Java пропонує перший і другий способи відсікання.
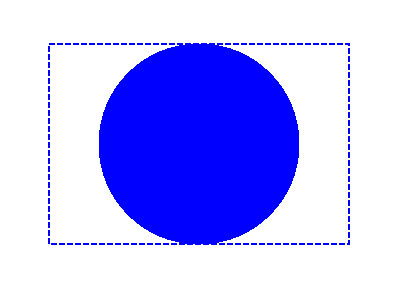
У наведеному нижче прикладі ми отримуємо форму кола як відсічний контур і відрізаємо прямокутник із синьою заливкою в такому самому графічному стані.
Щоб додати кліп до нового PsDocument за допомогою Aspose.Page для бібліотеки Java у цьому прикладі, ми виконуємо такі дії:
- Створіть вихідний потік для отриманого файлу PS.
- Створіть об’єкт PsSaveOptions із параметрами за замовчуванням.
- Створіть 1-сторінковий PsDocument із уже створеним вихідним потоком і параметрами збереження.
- Створіть новий графічний стан.
- Створіть форму кола (об’єкт java.awt.geom.Ellipse2D).
- Встановіть кліп із цим шляхом.
- Установіть фарбу для поточного стану графіки PsDocument.
- Заповніть контур прямокутника поточною фарбою.
- Вихід із поточного стану графіки на верхній рівень.
- Перекладіть на місце зафарбованого прямокутника.
- Обведіть пунктирною лінією межі того самого прямокутника над зафарбованим, щоб показати межі обрізаного прямокутника з заливкою.
- Закрийте сторінку.
- Збережіть документ.
 1// Demonstrates clipping by shape and clipping by text in PS document.
 2String outputFileName = "ApplyClipByShape_outPS.ps";
 3
 4//Create save options with A4 size
 5PsSaveOptions options = new PsSaveOptions();
 6
 7// Create new 1-paged PS Document
 8PsDocument document = new PsDocument(getOutputDir() + outputFileName, options, false);
 9
10//Create graphics path from the rectangle
11GeneralPath rectanglePath = new GeneralPath();
12rectanglePath.append(new Rectangle2D.Float(0, 0, 300, 200), false);
13
14////////////////////////////////////// Clipping by shape ///////////////////////////////
15
16//Save graphics state in order to return back to this state after transformation
17document.writeGraphicsSave();
18
19//Displace current graphics state on 100 points to the right and 100 points to the bottom.
20document.translate(100, 100);
21
22//Create graphics path from the circle
23GeneralPath circlePath = new GeneralPath();
24circlePath.append(new Ellipse2D.Float(50, 0, 200, 200), false);
25
26//Add clipping by circle to the current graphics state
27document.clip(circlePath);
28
29//Set paint in the current graphics state
30document.setPaint(Color.BLUE);
31
32//Fill the rectangle in the current graphics state (with clipping)
33document.fill(rectanglePath);
34
35//Restore graphics state to the previous (upper) level
36document.writeGraphicsRestore();
37
38//Displace upper level graphics state on 100 points to the right and 100 points to the bottom.
39document.translate(100, 100);
40
41//Create dashed stroke similar to Pen with DashStyle.Dash
42float[] dash = new float[] { 5.0f };
43BasicStroke stroke = new BasicStroke(2.0f, BasicStroke.CAP_BUTT, BasicStroke.JOIN_MITER, 10.0f, dash, 0.0f);
44
45document.setStroke(stroke);
46
47//Draw the rectangle in the current graphics state (has no clipping) above clipped rectangle
48document.draw(rectanglePath);
49
50//Close current page
51document.closePage();
52
53//Save the document
54document.save();Дивіться роботу з кліпами в документах PS у .NET.
Результат виконання цього коду виглядає як
У наступному прикладі ми отримуємо шрифт, який використовується для вирізання синього прямокутника з контуром тексту.
Щоб додати вирізання тексту до нового PsDocument за допомогою Aspose.Page для бібліотеки Java у цьому прикладі, ми виконуємо такі дії:
- Створіть вихідний потік для отриманого файлу PS.
- Створіть об’єкт PsSaveOptions із параметрами за замовчуванням.
- Створіть 1-сторінковий PsDocument із уже створеним вихідним потоком і параметрами збереження.
- Створіть новий графічний стан.
- Створіть шрифт.
- Встановіть кліп із текстом і шрифтом.
- Установіть фарбу для поточного стану графіки PsDocument.
- Заповніть контур прямокутника поточною фарбою.
- Вихід із поточного стану графіки на верхній рівень.
- Перекладіть на місце зафарбованого прямокутника.
- Обведіть пунктирною лінією межі того самого прямокутника над зафарбованим, щоб показати межі обрізаного прямокутника з заливкою.
- Закрийте сторінку.
- Збережіть документ.
 1// Demonstrates clipping by text in PS document.
 2String outputFileName = "ApplyClipByText_outPS.ps";
 3
 4//Create save options with A4 size
 5PsSaveOptions options = new PsSaveOptions();
 6
 7// Create new 1-paged PS Document
 8PsDocument document = new PsDocument(getOutputDir() + outputFileName, options, false);
 9
10//Create graphics path from the rectangle
11GeneralPath rectanglePath = new GeneralPath();
12rectanglePath.append(new Rectangle2D.Float(0, 0, 300, 200), false);
13
14//Save graphics state in order to return back to this state after transformation
15document.writeGraphicsSave();
16
17//Displace current graphics state on 100 points to the right and 100 points to the bottom.
18document.translate(100, 100);
19
20float[] dash = new float[] { 5.0f };
21BasicStroke stroke = new BasicStroke(2.0f, BasicStroke.CAP_BUTT, BasicStroke.JOIN_MITER, 10.0f, dash, 0.0f);
22
23int fontSize = 120;
24Font font = new Font("Arial", Font.BOLD, fontSize);
25
26//Clip rectangle by text's outline
27document.clipText("ABC", font, 20, fontSize + 10);
28
29//Set paint in the current graphics state
30document.setPaint(Color.BLUE);
31
32document.fill(rectanglePath);
33
34document.writeGraphicsRestore();
35
36document.translate(100, 100);
37
38//Set paint in the current graphics state
39document.setPaint(Color.BLUE);
40
41document.setStroke(stroke);
42//Draw the rectangle in the current graphics state (has no clipping) above clipped rectangle
43document.draw(rectanglePath);
44
45//Close current page
46document.closePage();
47
48//Save the document
49document.save();Дивіться роботу з кліпами в документах PS у .NET.
Результат виконання цього коду виглядає як

Ви можете завантажити приклади і файли даних з GitHub.