Робота з кліпами в PostScript | .NET
Додайте кліп у документ PS
Кліп у документі PS — це шлях, який обмежує вміст поточного стану графіки, який буде показано у засобі перегляду або редакторі PS. Вміст, що залишився за межами, буде відрізано.
Відсічний контур у .NET можна призначити трьома способами:
- за System.Drawing.Drawing2D.GraphicsPath, який може містити будь-які закриті форми;
- за планом тексту;
- на 1 bpp (біт на піксель) 2-колірне зображення як трафаретна маска;
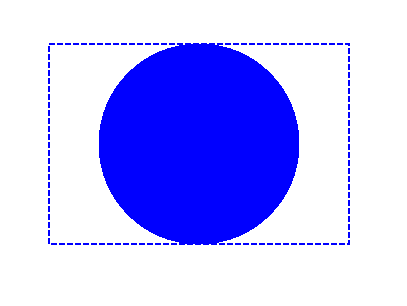
На даний момент бібліотека Aspose.Page для .NET пропонує перший і другий способи відсікання. У наведеному нижче прикладі ми отримуємо коло System.Drawing.Drawing2D.GraphicsPath із прямокутника як відсічного контуру та відрізаємо прямокутник із синьою заливкою в такому самому графічному стані.
Щоб додати кліп до нового PsDocument за допомогою бібліотеки Aspose.Page для .NET у цьому прикладі, ми виконуємо такі дії:
- Створіть вихідний потік для отриманого файлу PS.
- Створіть об’єкт PsSaveOptions із параметрами за замовчуванням.
- Створіть 1-сторінковий PsDocument із уже створеним вихідним потоком і параметрами збереження.
- Створіть новий графічний стан.
- Створіть коло System.Drawing.Drawing2D.GraphicsPath із прямокутника.
- Встановіть кліп із цим шляхом.
- Установіть фарбу для поточного стану графіки PsDocument.
- Заповніть контур прямокутника поточною фарбою.
- Вихід із поточного стану графіки на верхній рівень.
- Перекладіть на місце зафарбованого прямокутника.
- Обведіть пунктирною лінією межі того самого прямокутника над зафарбованим, щоб показати межі обрізаного прямокутника з заливкою.
- Закрийте сторінку.
- Збережіть документ.
 1// Demonstrates clipping by shape and clipping by text in PS document.
 2
 3string outputFileName = "ApplyClipByShape_outPS.ps";
 4
 5//Create save options with A4 size
 6PsSaveOptions options = new PsSaveOptions();
 7
 8// Create new 1-paged PS Document
 9PsDocument document = new PsDocument(OutputDir + outputFileName, options, false);
10
11//Create graphics path from the rectangle
12GraphicsPath rectanglePath = new GraphicsPath();
13rectanglePath.AddRectangle(new RectangleF(0, 0, 300, 200));
14
15////////////////////////////////////// Clipping by shape //////////////////////////////////////////////////////////////////////
16
17//Save graphics state in order to return back to this state after transformation
18document.WriteGraphicsSave();
19
20//Displace current graphics state on 100 points to the right and 100 points to the bottom.
21document.Translate(100, 100);
22
23//Create graphics path from the circle
24GraphicsPath circlePath = new GraphicsPath();
25circlePath.AddEllipse(new RectangleF(50, 0, 200, 200));
26
27//Add clipping by circle to the current graphics state
28document.Clip(circlePath);
29
30//Set paint in the current graphics state
31document.SetPaint(new SolidBrush(Color.Blue));
32
33//Fill the rectangle in the current graphics state (with clipping)
34document.Fill(rectanglePath);
35
36//Restore graphics state to the previus (upper) level
37document.WriteGraphicsRestore();
38
39//Displace upper level graphics state on 100 points to the right and 100 points to the bottom.
40document.Translate(100, 100);
41
42Pen pen = new Pen(new SolidBrush(Color.Blue), 2);
43pen.DashStyle = DashStyle.Dash;
44
45document.SetStroke(pen);
46
47//Draw the rectangle in the current graphics state (has no clipping) above clipped rectangle
48document.Draw(rectanglePath);
49
50//Close current page
51document.ClosePage();
52
53//Save the document
54document.Save();Для Linux, MacOS та інших операційних систем, відмінних від Windows, ми пропонуємо використовувати наш пакет Nuget Aspose.Page.Drawing. Він використовує бекенд Aspose.Drawing замість системної бібліотеки System.Drawing.
Тому імпортуйте простір імен Aspose.Page.Drawing замість System.Drawing. У наведеному вище фрагменті коду Aspose.Page.Drawing.Rectangle буде використано замість System.Drawing.Rectangle, Aspose.Page.Drawing.Drawing2D.GraphicsPath використовуватиметься замість System.Drawing.Drawing2D.GraphicsPath тощо. Наші приклади коду на GitHub містять усі необхідні заміни.
Дивіться роботу з кліпами в документах PS у Java.
Результат виконання цього коду виглядає як
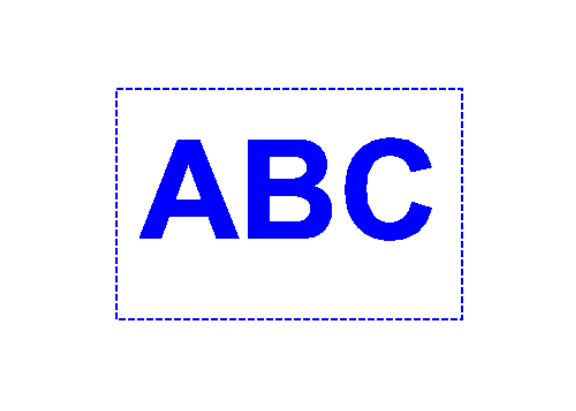
У наступному прикладі ми отримуємо шрифт, який обрізає прямокутник із синьою заливкою контуром тексту.
Щоб додати фрагмент тексту до нового PsDocument за допомогою бібліотеки Aspose.Page для .NET у цьому прикладі, ми виконуємо такі дії:
- Створіть вихідний потік для отриманого файлу PS.
- Створіть об’єкт PsSaveOptions із параметрами за замовчуванням.
- Створіть 1-сторінковий PsDocument із уже створеним вихідним потоком і параметрами збереження.
- Створіть новий графічний стан.
- Створіть шрифт.
- Встановіть кліп із текстом і шрифтом.
- Установіть фарбу для поточного стану графіки PsDocument.
- Заповніть контур прямокутника поточною фарбою.
- Вихід із поточного стану графіки на верхній рівень.
- Перекладіть на місце зафарбованого прямокутника.
- Обведіть пунктирною лінією межі того самого прямокутника над зафарбованим, щоб показати межі обрізаного прямокутника з заливкою.
- Закрийте сторінку.
- Збережіть документ.
 1// Demonstrates clipping by text in PS document.
 2
 3string outputFileName = "ApplyClipByText_outPS.ps";
 4
 5//Create save options with A4 size
 6PsSaveOptions options = new PsSaveOptions();
 7
 8// Create new 1-paged PS Document
 9PsDocument document = new PsDocument(OutputDir + outputFileName, options, false);
10
11//Create graphics path from the rectangle
12GraphicsPath rectanglePath = new GraphicsPath();
13rectanglePath.AddRectangle(new RectangleF(0, 0, 300, 200));
14
15//Save graphics state in order to return back to this state after transformation
16document.WriteGraphicsSave();
17
18//Displace current graphics state on 100 points to the right and 100 points to the bottom.
19document.Translate(100, 100);
20
21Pen pen = new Pen(new SolidBrush(Color.Blue), 2);
22pen.DashStyle = DashStyle.Dash;
23int fontSize = 120;
24System.Drawing.Font font = new System.Drawing.Font("Arial", fontSize, FontStyle.Bold);
25
26//Clip rectangle by text's outline
27document.ClipText("ABC", font, 20, fontSize + 10);
28
29//Set paint in the current graphics state
30document.SetPaint(new SolidBrush(Color.Blue));
31
32document.Fill(rectanglePath);
33
34document.WriteGraphicsRestore();
35
36document.Translate(100, 100);
37
38document.SetStroke(pen);
39//Draw the rectangle in the current graphics state (has no clipping) above clipped rectangle
40document.Draw(rectanglePath);
41
42//Close current page
43document.ClosePage();
44
45//Save the document
46document.Save();Для Linux, MacOS та інших операційних систем, відмінних від Windows, ми пропонуємо використовувати наш пакет Nuget Aspose.Page.Drawing. Він використовує бекенд Aspose.Drawing замість системної бібліотеки System.Drawing. Тому імпортуйте простір імен Aspose.Page.Drawing замість System.Drawing. У наведеному вище фрагменті коду Aspose.Page.Drawing.Rectangle буде використано замість System.Drawing.Rectangle, Aspose.Page.Drawing.Drawing2D.GraphicsPath використовуватиметься замість System.Drawing.Drawing2D.GraphicsPath тощо. Наші приклади коду на GitHub містять усі необхідні заміни.
Дивіться роботу з кліпами в документах PS у Java.
Результат виконання цього коду виглядає як
Ви можете завантажити приклади і файли даних з GitHub.