Робота з градієнтом у файлі PS | Python
Додайте градієнт у документ PS
У цій статті розглядається реалізація градієнтів у документах PS за допомогою Aspose.Page для Python.
Градієнти являють собою плавний перехід між кольорами, підвищуючи реалістичність намальованих зображень.
У Aspose.Page для Python градієнти реалізовані як підкласи aspose.pydrawing.Brush, а саме:
aspose.pydrawing.drawing2d.LinearGradientBrush
aspose.pydrawing.drawing2d.PathGradientBrush
Щоб застосувати фарбу або обведення в PsDocument, об’єкти класу aspose.pydrawing.Brush для малювання та aspose.pydrawing.Pen для обведення передаються у відповідні методи. Aspose.Page для Python підтримує всі основні класи aspose.pydrawing.Brush, які пропонуються платформою .NET, включаючи aspose.pydrawing.Color, aspose.pydrawing.TextureBrush, aspose.pydrawing.drawing2d .LinearGradientBrush і aspose.pydrawing.drawing2d.PathGradientBrush. Колір обведення призначається окремо від властивостей обведення за допомогою aspose.pydrawing.Brush в об’єкті aspose.pydrawing.Pen.
Щоб намалювати графічні об’єкти градієнтом, створіть aspose.pydrawing.drawing2d.LinearGradientBrush або aspose.pydrawing.drawing2d.PathGradientBrush і передайте його в set_paint() або один методів fill_text() або fill_and_stroke_text(), які приймають aspose.pydrawing.Brush як параметр.
Щоб окреслити графічні об’єкти градієнтом, передайте aspose.pydrawing.drawing2d.LinearGradientBrush або aspose.pydrawing.drawing2d.PathGradientBrush у set_paint() або один із * Методи outline_text()* або fill_and_stroke_text(), які приймають фарбу обведення як параметр.
У наведеному нижче прикладі ми демонструємо, як заповнити фігуру та текст і окреслити текст градієнтом.
Алгоритм розмальовування графічних об’єктів градієнтом у новому документі PS включає наступні кроки:
- Створіть вихідний потік для отриманого файлу PS.
- Запустіть PsSaveOptions.
- Створіть PsDocument із уже створеним вихідним потоком і параметрами збереження.
- Створіть необхідний графічний шлях або шрифт в залежності від того, який об’єкт ми збираємося заповнити або обвести.
- Створіть об’єкт aspose.pydrawing.drawing2d.LinearGradientBrush або aspose.pydrawing.drawing2d.PathGradientBrush в залежності від бажаної форми градієнта.
- Встановіть на цьому пензлі необхідну трансформацію.
- Встановіть кисть градієнта як поточну фарбу в PsDocument
- Заповніть графічний контур поточною фарбою або заповніть текст. Якщо ми використовуємо один із методів заповнення тексту, який приймає aspose.pydrawing.Brush як параметр, попередній крок можна проігнорувати.
- Закрийте сторінку.
- Збережіть документ.
Якщо нам потрібно обведення (контур) графічних об’єктів з градієнтом замість останніх 4 кроків виглядатиме наступним чином:
- Встановіть градієнт як поточну фарбу в PsDocument.
- Створіть об’єкт aspose.pydrawing.Pen.
- Встановіть цей штрих як поточний штрих у PsDocument.
- Окресліть контур графіки поточним штрихом або обведіть текст. Якщо ми використовуємо один із методів виділення тексту, який приймає aspose.pydrawing.Pen як параметр, попередній пункт можна проігнорувати.
- Закрийте сторінку.
- Збережіть документ.
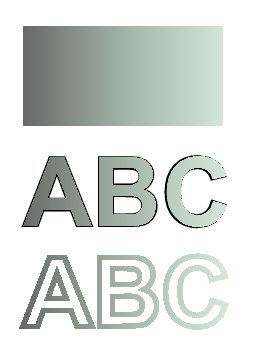
Ось 5 окремих фрагментів коду, які демонструють використання різних градієнтів. У цьому ми створюємо горизонтальний лінійний градієнт із двох кольорів, заповнюємо прямокутник, заповнюємо текст, обводимо текст цим градієнтом.
 1# The path to the documents directory.
 2data_dir = Util.get_data_dir_working_with_gradient()
 3
 4# Create an output stream for the PostScript document
 5with open(data_dir + "HorizontalGradient_outPS.ps", "wb") as out_ps_stream:
 6    # Create the save options with the A4 size
 7    options = PsSaveOptions()
 8
 9    # Create a new 1-paged PS Document
10    document = PsDocument(out_ps_stream, options, False)
11
12    offset_x = 200.
13    offset_y = 100.
14    width = 200.
15    height = 100.
16
17    # Create a graphics path from the first rectangle
18    path = aspose.pydrawing.drawing2d.GraphicsPath()
19    path.add_rectangle(aspose.pydrawing.RectangleF(offset_x, offset_y, width, height))
20
21    # Create a linear gradient brush with a rectangle as a bounds, start і end colors
22    brush = GraphicsFactory.create_linear_gradient_brush_by_rect_and_angle(aspose.pydrawing.RectangleF(0, 0, width, height),
23        aspose.pydrawing.Color.from_argb(150, 0, 0, 0), aspose.pydrawing.Color.from_argb(50, 40, 128, 70), 0)
24    # Create a transform for brush. X і Y scale component must be equal to the width і height of the rectangle correspondingly.
25    # Translation components are offsets of the rectangle
26    brush_transform = aspose.pydrawing.drawing2d.Matrix(width, 0., 0., height, offset_x, offset_y)
27    # Set the transform
28    brush.transform = brush_transform
29
30    # Set the paint
31    document.set_paint(brush)
32
33    # Fill the rectangle
34    document.fill(path)
35
36    # Fill the text with the gradient
37    font = ExternalFontCache.fetch_dr_font("Arial", 96, aspose.pydrawing.FontStyle.BOLD)
38    document.fill_and_stroke_text("ABC", font, 200, 300, brush,
39    GraphicsFactory.create_pen_by_brush_and_width(aspose.pydrawing.SolidBrush(aspose.pydrawing.Color.black), 2))
40
41    # Set a current stroke
42    document.set_stroke(GraphicsFactory.create_pen_by_brush_and_width(brush, 5))
43    # Outline text with the gradient
44    document.outline_text("ABC", font, 200, 400)
45
46    # Close the current page
47    document.close_page()
48
49    # Save the document
50    document.save()
Результатом виконання цього коду є
У цьому фрагменті коду ви можете побачити створення вертикального лінійного градієнта з 5 кольорів і заповнення цим градієнтом прямокутника.
 1# The path to the documents directory.
 2data_dir = Util.get_data_dir_working_with_gradient()
 3
 4# Create an output stream for the PostScript document
 5with open(data_dir + "VerticalGradient_outPS.ps", "wb") as out_ps_stream:
 6    # Create the save options with the A4 size
 7    options = PsSaveOptions()
 8
 9    # Create a new 1-paged PS Document
10    document = PsDocument(out_ps_stream, options, False)
11
12    offset_x = 200.
13    offset_y = 100.
14    width = 200.
15    height = 100.
16
17    # Create a graphics path from the first rectangle
18    path = aspose.pydrawing.drawing2d.GraphicsPath()
19    path.add_rectangle(aspose.pydrawing.RectangleF(offset_x, offset_y, width, height))
20
21    # Create an array of interpolation colors
22    colors = [ aspose.pydrawing.Color.red, aspose.pydrawing.Color.green, aspose.pydrawing.Color.blue,
23    aspose.pydrawing.Color.orange, aspose.pydrawing.Color.dark_olive_green ]
24    positions = [ 0.0, 0.1873, 0.492, 0.734, 1.0 ]
25    color_blend = aspose.pydrawing.drawing2d.ColorBlend()
26    color_blend.colors = colors
27    color_blend.positions = positions
28
29    # Create a linear gradient brush with a rectangle as a bounds, start і end colors
30    brush = GraphicsFactory.create_linear_gradient_brush_by_rect_and_angle(aspose.pydrawing.RectangleF(0, 0, width, height),
31    aspose.pydrawing.Color.beige, aspose.pydrawing.Color.dodger_blue, 0)
32    # Set interpolation colors
33    brush.interpolation_colors = color_blend
34    # Create a transform for brush. X і Y scale component must be equal to the width і height of the rectangle correspondingly.
35    # Translation components are offsets of the rectangle
36    brush_transform = aspose.pydrawing.drawing2d.Matrix(width, 0., 0., height, offset_x, offset_y)
37    # Rotate transform to get colors change in the vertical direction from up to down
38    brush_transform.rotate(90.)
39    # Set the transform
40    brush.transform = brush_transform
41
42    # Set the paint
43    document.set_paint(brush)
44
45    # Fill the rectangle
46    document.fill(path)
47
48    # Close the current page
49    document.close_page()
50
51    # Save the document
52    document.save()
Ось і результат

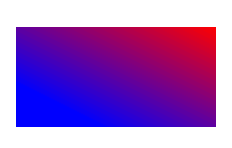
У цьому фрагменті коду ми створюємо діагональний лінійний градієнт із 2 кольорів і заповнюємо цим градієнтом прямокутник.
 1# Create an output stream for PostScript document
 2with open(data_dir + "DiagonaGradient_outPS.ps", "wb") as out_ps_stream:
 3    # Create the save options with A4 size
 4    options = PsSaveOptions()
 5
 6    # Create a new 1-paged PS Document
 7    document = PsDocument(out_ps_stream, options, False)
 8
 9    offset_x = 200.
10    offset_y = 100.
11    width = 200.
12    height = 100.
13
14    # Create a graphics path from the first rectangle
15    path = aspose.pydrawing.drawing2d.GraphicsPath()
16    path.add_rectangle(aspose.pydrawing.RectangleF(offset_x, offset_y, width, height))
17
18    # Create a linear gradient brush with a rectangle as a bounds, start і end colors
19    brush = GraphicsFactory.create_linear_gradient_brush_by_rect_and_angle(aspose.pydrawing.RectangleF(0, 0, width, height),
20    aspose.pydrawing.Color.from_argb(255, 255, 0, 0), aspose.pydrawing.Color.from_argb(255, 0, 0, 255), 0)
21
22    # Create a transform for brush. X і Y scale component must be equal to the width і height of the rectangle correspondingly.
23    # Translation components are offsets of the rectangle
24    brush_transform = aspose.pydrawing.drawing2d.Matrix(width, 0., 0., height, offset_x, offset_y)
25    # Rotate gradient, than scale і translate to get the visible color transition in the required rectangle
26    brush_transform.rotate(-45.)
27    hypotenuse = float(math.sqrt(200. * 200. + 100. * 100.))
28    ratio = hypotenuse / 200.
29    brush_transform.scale(-ratio, 1.)
30    brush_transform.translate(100. / brush_transform.elements[0], 0.)
31
32    # Set the transform
33    brush.transform = brush_transform
34
35    # Set the paint
36    document.set_paint(brush)
37
38    # Fill the rectangle
39    document.fill(path)
40
41    # Close the current page
42    document.close_page()
43
44    # Save the document
45    document.save()
Ось і результат
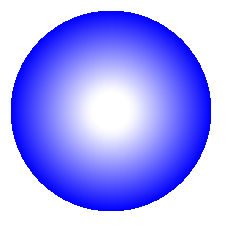
Тут ми створюємо радіальний градієнт з 2 кольорів і заливаємо коло цим градієнтом.
 1# The path to the documents directory.
 2data_dir = Util.get_data_dir_working_with_gradient()
 3
 4# Create an output stream for the PostScript document
 5with open(data_dir + "RadialGradient1_outPS.ps", "wb") as out_ps_stream:
 6    # Create the save options with A4 size
 7    options = PsSaveOptions()
 8
 9    # Create a new 1-paged PS Document
10    document = PsDocument(out_ps_stream, options, False)
11
12    offset_x = 200.
13    offset_y = 100.
14    width = 200.
15    height = 200.
16
17    # Create a graphics path from the rectangle bounds
18    bounds = aspose.pydrawing.RectangleF(offset_x, offset_y, width, height)
19    path = aspose.pydrawing.drawing2d.GraphicsPath()
20    path.add_ellipse(bounds)
21
22    # Create і fill a color blend object
23    colors = [ aspose.pydrawing.Color.white, aspose.pydrawing.Color.white, aspose.pydrawing.Color.blue ]
24    positions = [ 0.0, 0.2, 1.0 ]
25    color_blend = aspose.pydrawing.drawing2d.ColorBlend()
26    color_blend.colors = colors
27    color_blend.positions = positions
28
29    brush_rect = aspose.pydrawing.drawing2d.GraphicsPath()
30    brush_rect.add_rectangle(aspose.pydrawing.RectangleF(0, 0, width, height))
31
32    # Create a path gradient brush with a rectangle as a bounds
33    brush = GraphicsFactory.create_path_gradient_brush_by_path(brush_rect)
34    # Set the interpolation colors
35    brush.interpolation_colors = color_blend
36    # Create a transform for brush. X і Y scale component must be equal to the width і height of the rectangle correspondingly.
37    # Translation components are offsets of the rectangle
38    brush_transform = aspose.pydrawing.drawing2d.Matrix(width, 0., 0., height, offset_x, offset_y)
39    # Set the transform
40    brush.transform = brush_transform
41
42    # Set the paint
43    document.set_paint(brush)
44
45    # Fill the rectangle
46    document.fill(path)
47
48    # Close the current page
49    document.close_page()
50
51    #Save the document
52    document.save()
Результат
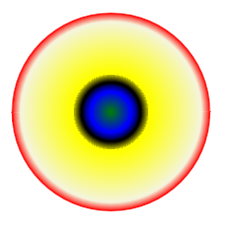
У цьому фрагменті коду ми створюємо радіальний градієнт із 6 кольорів і заливаємо цим градієнтом прямокутник.
 1# The path to the documents directory.
 2  data_dir = Util.get_data_dir_working_with_gradient()
 3
 4# Create an utput stream for the PostScript document
 5with open(data_dir + "RadialGradient2_outPS.ps", "wb") as out_ps_stream:
 6    # Create save options with the A4 size
 7    options = PsSaveOptions()
 8
 9    # Create a new 1-paged PS Document
10    document = PsDocument(out_ps_stream, options, False)
11
12    offset_x = 200.
13    offset_y = 100.
14    width = 200.
15    height = 200.
16
17    # Create a graphics path from the rectangle bounds
18    bounds = aspose.pydrawing.RectangleF(offset_x, offset_y, width, height)
19    path = aspose.pydrawing.drawing2d.GraphicsPath()
20    path.add_rectangle(bounds)
21
22    # Create і fill a color blend object
23    colors = [ aspose.pydrawing.Color.green, aspose.pydrawing.Color.blue, aspose.pydrawing.Color.black,
24    aspose.pydrawing.Color.yellow, aspose.pydrawing.Color.beige, aspose.pydrawing.Color.red ]
25    positions = [ 0.0, 0.2, 0.3, 0.4, 0.9, 1.0 ]
26    color_blend = aspose.pydrawing.drawing2d.ColorBlend()
27    color_blend.colors = colors
28    color_blend.positions = positions
29
30    brush_rect = aspose.pydrawing.drawing2d.GraphicsPath()
31    brush_rect.add_rectangle(aspose.pydrawing.RectangleF(0, 0, width, height))
32
33    # Create a path gradient brush with a rectangle as a bounds
34    brush = GraphicsFactory.create_path_gradient_brush_by_path(brush_rect)
35    # Set interpolation colors
36    brush.interpolation_colors = color_blend
37    # Create a transform for brush. X і Y scale component must be equal to the width і height of the rectangle correspondingly.
38    # Translation components are offsets of the rectangle
39    brush_transform = aspose.pydrawing.drawing2d.Matrix(width, 0., 0., height, offset_x, offset_y)
40    # Set the transform
41    brush.transform = brush_transform
42
43    # Set the paint
44    document.set_paint(brush)
45
46    # Fill the rectangle
47    document.fill(path)
48
49    # Close the current page
50    document.close_page()
51
52    # Save the document
53    document.save()
Результат виглядає таким чином
Ви можете завантажити приклади і файли даних з GitHub.