Робота з перетвореннями у файлі PS | Python
Перетворення вмісту в документі PS
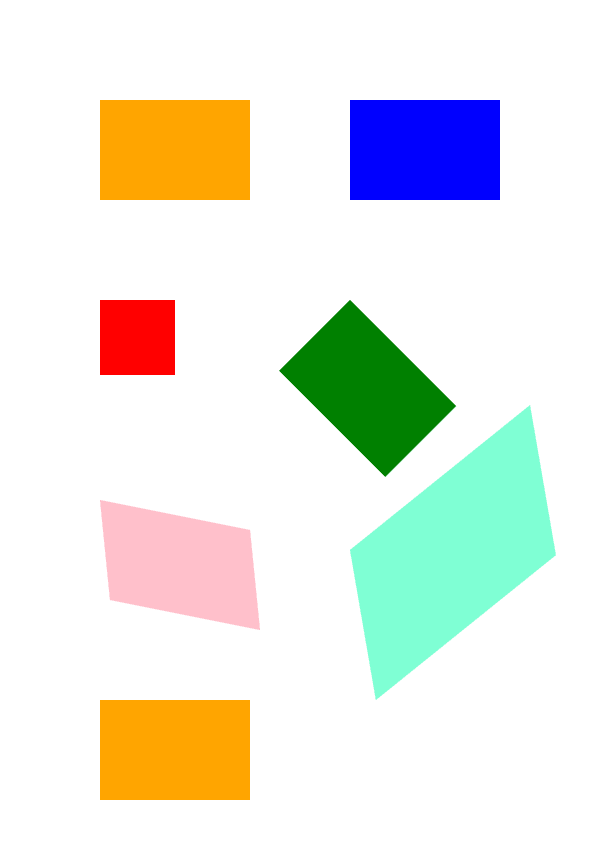
У цій статті досліджується, як застосувати різні трансформації — перенесення, масштабування, обертання та зсув до прямокутного шляху, доданого до PsDocument.
Ми розбили один фрагмент коду на кілька розділів: початок, кінець і кожне перетворення окремо. У PostScript перетворення завжди виконуються в межах графічного стану, розділеного операторами “gsave” і “grestore”. Тому наш PsDocument містить такі методи, як “write_graphics_save()” і “write_graphics_restore()” для встановлення та скидання цих графічних станів. Між цими методами можна додавати будь-який вміст, у тому числі стани вкладеної графіки, дозволяючи перетворення або вирізання. Ці перетворення впливають лише на стани вкладених графіків і не впливають на зовнішні. Однак, якщо перетворення виконується без використання методів “write_graphics_save()” і “write_graphics_restore()”, це впливає на стан графіки верхнього рівня, і весь вміст у PsDocument піддається цьому перетворення.
Алгоритм застосування будь-якої трансформації до вмісту документа з нуля включає наступні кроки:
- Створіть вихідний потік для отриманого файлу PS.
- Створіть PsSaveOptions.
- Створіть PsDocument із уже створеним вихідним потоком і параметрами збереження.
- Збережіть стан графіки. Коли ми створили новий графічний стан, попередній графічний стан було поміщено в стек графічних станів.
- Застосуйте необхідні перетворення: перенесення, масштабування, обертання, зсув або будь-яку їх комбінацію. У нашому коді ми показуємо вплив кожного компонента трансформації окремо та по 3 компоненти одночасно в кінці.
- Додайте необхідний вміст, який потрібно трансформувати. У нашому випадку ми створили прямокутник aspose.pydrawing.GraphicsPath, а потім заповнили його. Ми створили один прямокутник до будь-яких перетворень і просто заповнюємо його після кожного перетворення в поточному стані графіки.
- Відновіть стан графіки, щоб повернутися до попереднього, де застосовані трансформації не впливають. У нашому випадку це графічний стан верхнього рівня.
У цьому фрагменті коду ми починаємо створення PsDocument за допомогою вихідного потоку та PsSaveOptions. Потім ми виконуємо трансляцію стану графіки верхнього рівня в координати (100, 100), щоб змістити перший прямокутник. Нарешті, ми генеруємо перший прямокутник.
  1data_dir = Util.get_data_dir_working_with_canvas()
  2
  3# Create an output stream for the PostScript document
  4with open(data_dir + "Transformations_outPS.ps", "wb") as out_ps_stream:
  5    # Create save options with default values
  6    options = PsSaveOptions()
  7
  8    # Create a new 1-paged PS Document
  9    document = PsDocument(out_ps_stream, options, False)
 10
 11    document.translate(100, 100)
 12
 13    # Create a graphics path from the rectangle
 14    path = aspose.pydrawing.drawing2d.GraphicsPath()
 15    path.add_rectangle(aspose.pydrawing.RectangleF(0, 0, 150, 100))
 16
 17    ##################################### No transformations ###############################################################
 18    # Set the paint in the graphics state on upper level
 19    document.set_paint(aspose.pydrawing.SolidBrush(aspose.pydrawing.Color.orange))
 20
 21    # Fill the first rectangle that is on the upper level graphics state і is without any transformations.
 22    document.fill(path)
 23    ########################################################################################################################
 24
 25
 26    ##################################### Translation ######################################################################
 27
 28    # Save the graphics state in order to return back to this state after the transformation
 29    document.write_graphics_save()
 30
 31    # Displace the current graphics state on 250 to the right. So we add a translation component to the current transformation.
 32    document.translate(250., 0.)
 33
 34    # Set the paint in the current graphics state
 35    document.set_paint(aspose.pydrawing.SolidBrush(aspose.pydrawing.Color.blue))
 36
 37    # Fill the second rectangle in the current graphics state (has translation transformation)
 38    document.fill(path)
 39
 40    # Restore the graphics state to the previus (upper) level
 41    document.write_graphics_restore()
 42    ########################################################################################################################
 43
 44
 45    # Displace on 200 to the bottom.
 46    document.translate(0., 200.)
 47
 48    ##################################### Scaling ##########################################################################
 49    # Save graphics state in order to return back to this state after transformation
 50    document.write_graphics_save()
 51
 52    # Scale the current graphics state on 0.5 in X axis і on 0.75f in Y axis. So we add a scale component to the current transformation.
 53    document.scale(0.5, 0.75)
 54
 55    # Set the paint in the current graphics state
 56    document.set_paint(aspose.pydrawing.SolidBrush(aspose.pydrawing.Color.red))
 57
 58    # Fill the third rectangle in the current graphics state (has scale transformation)
 59    document.fill(path)
 60
 61    # Restore the graphics state to the previus (upper) level
 62    document.write_graphics_restore()
 63    #####################################################################################################################
 64
 65
 66    # Displace the upper level graphics state on 250 to the right.
 67    document.translate(250., 0.)
 68
 69
 70    ##################################### Rotation ######################################################################
 71    #Save graphics state in order to return back to this state after transformation
 72    document.write_graphics_save()
 73
 74    # Rotate the current graphics state on 45 degrees around the origin of the current graphics state (350, 300). So we add a rotation component to the current transformation.
 75    document.rotate(float(45))
 76
 77    # Set the paint in the current graphics state
 78    document.set_paint(aspose.pydrawing.SolidBrush(aspose.pydrawing.Color.green))
 79
 80    # Fill the fourth rectangle in the current graphics state (has rotation transformation)
 81    document.fill(path)
 82
 83    # Restore the graphics state to the previus (upper) level
 84    document.write_graphics_restore()
 85    #####################################################################################################################
 86
 87
 88    # Returns the upper level graphics state back to the left і displace on 200 to the bottom.
 89    document.translate(-250., 200.)
 90
 91
 92    ##################################### Shearing ######################################################################
 93    # Save the graphics state in order to return back to this state after the transformation
 94    document.write_graphics_save()
 95
 96    # Shear the current graphics state. So we add shear component to the current transformation.
 97    document.shear(0.1, 0.2)
 98
 99    # Set the paint in the current graphics state
100    document.set_paint(aspose.pydrawing.SolidBrush(aspose.pydrawing.Color.pink))
101
102    # Fill the fifth rectangle in the current graphics state (has shear transformation)
103    document.fill(path)
104
105    # Restore the graphics state to the previus (upper) level
106    document.write_graphics_restore()
107    #####################################################################################################################
108
109
110    # Displace the upper level graphics state on 250 to the right.
111    document.translate(250., 0.)
112
113
114    ##################################### Complex transformation ########################################################
115    # Save the graphics state in order to return back to this state after the transformation
116    document.write_graphics_save()
117
118    # Transform the current graphics state with the complex transformation. So we add the translation, scale і rotation components to the current transformation.
119    document.transform(aspose.pydrawing.drawing2d.Matrix(1.2, -0.965925, 0.258819, 1.5, 0., 50.))
120
121    # Set the paint in the current graphics state
122    document.set_paint(aspose.pydrawing.SolidBrush(aspose.pydrawing.Color.aquamarine))
123
124    # Fill the sixth rectangle in the current graphics state (has complex transformation)
125    document.fill(path)
126
127    # Restore graphics state to the previus (upper) level
128    document.write_graphics_restore()
129    #####################################################################################################################
130
131
132    # Returns the upper level graphics state back to the left і displace on 200 to the bottom.
133    document.translate(-250., 200.)
134
135
136    ##################################### Again no transformation ########################################################
137    # Demonstrates that current graphics state's color is orange that was set up at the beginning of the code.
138    # Fill the seventh rectangle in the current graphics state (has no transformation)
139    document.fill(path)
140    #####################################################################################################################
141
142    # Close the current page
143    document.close_page()
144
145    # Save the document
146 document.save()Результатом виконання цього коду є
Ви можете завантажити приклади і файли даних з GitHub.