Rendering Reports Programmatically
Rendering via Reporting Services Web Service
If you have a Report Server running with Aspose.Words for Reporting Services installed on it, you can render reports to Microsoft Word documents using the Reporting Service Web Service. Follow these steps to achieve that on .Net 6 or higher version (assuming you use Reporting Services 2022):
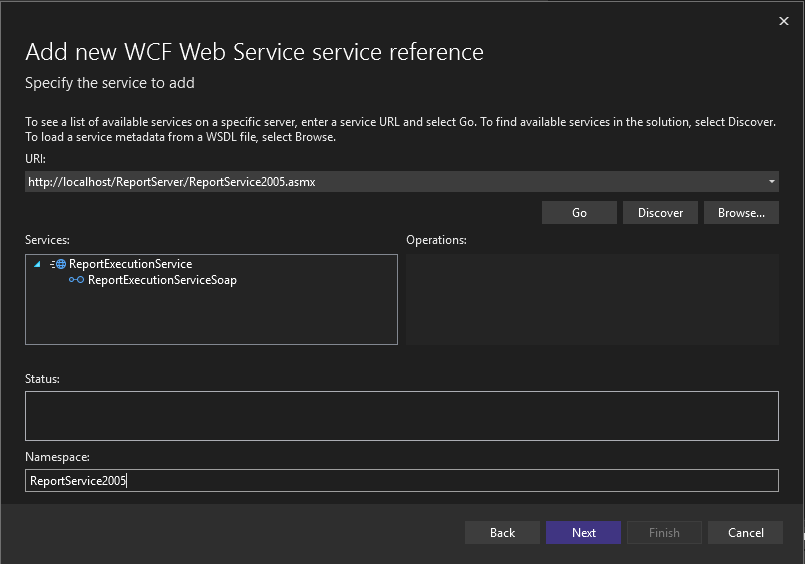
Step 1. Add a reference to the ReportingService2005 Web service
- Open your project in Visual Studio, right click on the Dependencies folder and select Manage Connected Services.
- Then select Add service reference and use WCF Web services to add the reference.
- Enter the
URLof the ReportingService2005 Web service:http://<your server>/ReportServer/ReportService2005.asmx. - Once the service is found, enter
ReportingService2005in the Namespace textbox.
Adding a reference to the ReportingService2005 Web service in Visual Studio:

Step 2. Add a reference to the ReportExecutionService Web service
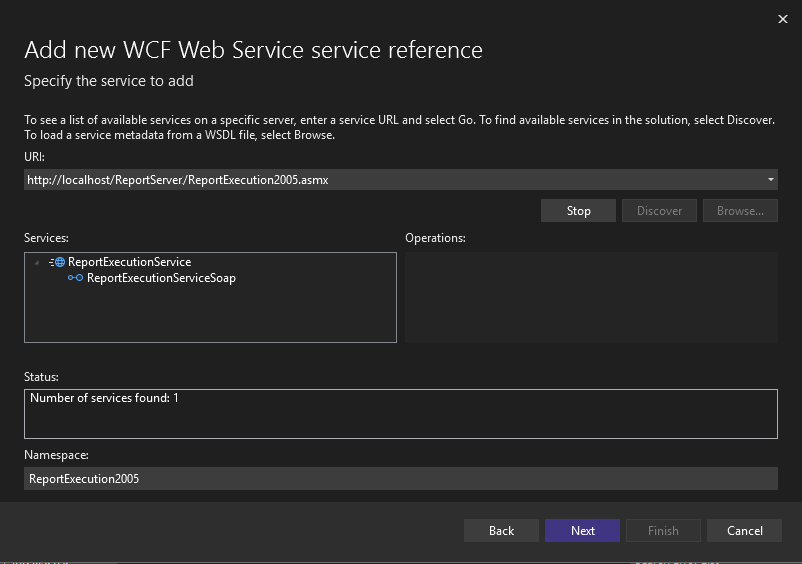
- Repeat Step 1 for the ReportExecutionService Web service:
http://<your server>/ReportServer/ReportExecution2005.asmx. - Once the service is found, enter
ReportExecution2005in the Namespace textbox.
Adding a reference to the ReportExecutionService Web service in Visual Studio:

Step 3. Add required packages
Install the System.ServiceModel.Primitives package.
Step 4. Implement creating SSRS client
Add the following class to your application:
C#
using ReportExecution2005;
using System.ServiceModel;
using System.Security.Principal;

/// <summary>
/// Implements SSRS client creation.
/// </summary>
public static class ServiceClientUtils
{
    public static ReportExecutionServiceSoapClient CreateClient(this string executionEndPointUrl, string userName, string password)
    {
        var rsBinding = new BasicHttpBinding();

        rsBinding.Security.Mode = BasicHttpSecurityMode.TransportCredentialOnly;
        rsBinding.Security.Transport.ClientCredentialType = HttpClientCredentialType.Ntlm;

        rsBinding.MaxBufferSize = int.MaxValue;
        rsBinding.MaxBufferPoolSize = int.MaxValue;
        rsBinding.MaxReceivedMessageSize = int.MaxValue;

        var rsEndpointAddress = new EndpointAddress(executionEndPointUrl);
        var rsClient = new ReportExecutionServiceSoapClient(rsBinding, rsEndpointAddress);

        rsClient.ClientCredentials.Windows.ClientCredential.UserName = userName;
        rsClient.ClientCredentials.Windows.ClientCredential.Password = password;
        rsClient.ClientCredentials.Windows.AllowedImpersonationLevel = TokenImpersonationLevel.Impersonation;

        return rsClient;
    }
}
Step 5. Implement scenario logic
Add the following code to your application and fill in the required settings according to the comments:
C#
using ReportExecution2005;
using RenderingUsingWebService;

// Settings

const string relativeReportPath = "Secify relative path to a report."; // For example: "/Report1"

const string userName = "Windows user login."; // For example: "Administrator".
const string password = "Windows user password."; // For example: "123".

const string renderingExtensionName = "AWDOCX"; // One of extension name as specified here: /words/reportingservices/installing-on-the-server-manually/#step-3-register-asposewords-for-reporting-services-as-a-rendering-extension
const string ouputFilePath = "Path to ouput report file path."; // For example: "C:\Temp\out.docx"

const string execution2005EndPointUrl = "Execution end point."; // For example: http://localhost/ReportServer/ReportExecution2005.asmx

// Settings end.

// 1. Create client.
var client = execution2005EndPointUrl.CreateClient(userName, password);

// 2. Load report.
var trustedHeader = new TrustedUserHeader();
var loadReponse = await client.LoadReportAsync(trustedHeader, relativeReportPath, null);

// 3. Render report using specified extension.
var renderRequest = new RenderRequest(loadReponse.ExecutionHeader, trustedHeader, renderingExtensionName, null);
var renderResponse = await client.RenderAsync(renderRequest);

// 4. Save received report document to the file.
using var fileStream = File.OpenWrite(ouputFilePath);
await fileStream.WriteAsync(renderResponse.Result, 0, renderResponse.Result.Length);

Console.WriteLine($"Report saved to the file: \"{ouputFilePath}\".");
Rendering via Report Viewer Working in Local Mode
If you use the Microsoft Report Viewer control in your application, you can use its capabilities to render local reports (RDL and RDLC) to Microsoft Word documents programmatically. Follow these steps (assuming you use Report Viewer 2005):
Step 1. Integrate Aspose.Words for Reporting Services with Report Viewer
Follow the instructions described in the section Integrate with Microsoft Report Viewer in Local Mode
Step 2. Implement the rendering method
Implement the following method in your application:
C#
using System;
using System.Collections;
using System.Collections.Generic;
using System.Data;
using System.IO;
using System.Reflection;
using System.Windows.Forms;
using Aspose.Words.ReportingServices;
using Microsoft.Reporting.WinForms;
using Microsoft.ReportingServices.ReportRendering;
/// <summary>
/// Renders a local (RDL or RDLC) reports to a Microsoft Word document on disk.
/// </summary>
/// <param name="viewer">A ReportViewer instance with Aspose.Words for Reporting Services export formats integrated.</param>
/// <param name="reportName">The name (including path) of the local report.</param>
/// <param name="documentName">The name (including path) of the resulting document.</param>
/// <param name="format">
/// The export format, should be:
/// "AWDOC" for DOC
/// "AWDOCX" for DOCX
/// "AWRTF" for RTF
/// "AWWML" for WordML
/// "AWHTML" for HTML
/// "AWMHTML" for MHTML
/// "AWODT" for ODT
/// "AWTXT" for TXT
/// "AWXPS" for XPS
/// "AWEPUB" for EPUB
/// </param>
/// <param name="deviceInfo">
/// The device info string as it would appear in rsreportserver.config, for example
/// "<DeviceInfo><PageBreaksMode>OnEachPage</PageBreaksMode></DeviceInfo>". May be null.
/// </param>
private static void RenderReportToFile(
    ReportViewer viewer,
    string reportName,
    string documentName,
    string format,
    string deviceInfo)
{
    string extension;
    string mimeType;
    string encoding;
    Warning[] warnings;
    string[] streamIds;
    LocalReport report = viewer.LocalReport;

    // Load and set up the report.
    report.ReportPath = reportName;
    report.EnableExternalImages = true;
    report.EnableHyperlinks = true;

    // Get the information about report's parameters.
    ReportParameterInfoCollection parameterInfos = report.GetParameters();
    if (parameterInfos.Count > 0)
    {
        // If the report requires parameters set, add them as the following pattern shows:
        List<Microsoft.Reporting.WinForms.ReportParameter> parameters = new List<Microsoft.Reporting.WinForms.ReportParameter>();

        // Repeat this until all parameters are set.
        Microsoft.Reporting.WinForms.ReportParameter parameter = new Microsoft.Reporting.WinForms.ReportParameter(
            "name",
            "value");
        parameters.Add(parameter);
        report.SetParameters(parameters);
    }

    // We have to specify data sources for local report rendering. GetDataTables() returns a list of DataTable objects
    // populated with real report data.
    List<DataTable> tables = GetDataTables();

    // Add the data sources.
    foreach (DataTable table in tables)
        report.DataSources.Add(new ReportDataSource(table.TableName, table));

    // Render to appropriate format using Aspose extensions
    ReportViewerHelper asposeHelper = new ReportViewerHelper(reportViewer);
    asposeHelper.AddExtensions();
    byte[] reportBytes = asposeHelper.Render(format);

    // Write document bytes to a file.
    using (FileStream stream = File.OpenWrite(documentName))
        stream.Write(reportBytes, 0, reportBytes.Length);
}
Step 3. Call the RenderReportToFile method
You can call the RenderReportToFile method from any point of your application. The call might look like the following:
C#
RenderReportToFile(
    reportViewer1,
    @"C:\Work\MyReport.rdlc",
    @"C:\Work\MyReport.doc",
    "AWDOC",
    null);