บทนำและการสร้างตาราง
Aspose.Words อนุญาตให้ผู้ใช้สร้างตารางในเอกสารตั้งแต่ต้นและมีวิธีการต่างๆ มากมายในการดำเนินการดังกล่าว บทความนี้นำเสนอรายละเอียดเกี่ยวกับวิธีเพิ่มตารางที่จัดรูปแบบลงในเอกสารของคุณโดยใช้แต่ละวิธี รวมถึงการเปรียบเทียบแต่ละวิธีในตอนท้ายของบทความ
สไตล์ตารางเริ่มต้น
ตารางที่สร้างขึ้นใหม่จะได้รับค่าเริ่มต้นที่คล้ายกับที่ใช้ใน Microsoft Word:
คุณสมบัติตาราง | ค่าเริ่มต้นใน Aspose.Words |
---|---|
Border Style |
Single |
Border Width |
1/2 pt |
Border Color |
Black |
Left and Right Padding |
5.4 pts |
AutoFit Mode |
AutoFit to Window |
Allow AutoFit |
True |
ตารางสามารถเป็นแบบอินไลน์ได้หากอยู่ในตำแหน่งที่แน่นหนา หรือเป็นแบบลอยตัวหากสามารถวางตำแหน่งไว้ที่ใดก็ได้บนหน้าได้ ตามค่าเริ่มต้น Aspose.Words จะสร้างตารางแบบอินไลน์เสมอ
|
สร้างตารางด้วย DocumentBuilder
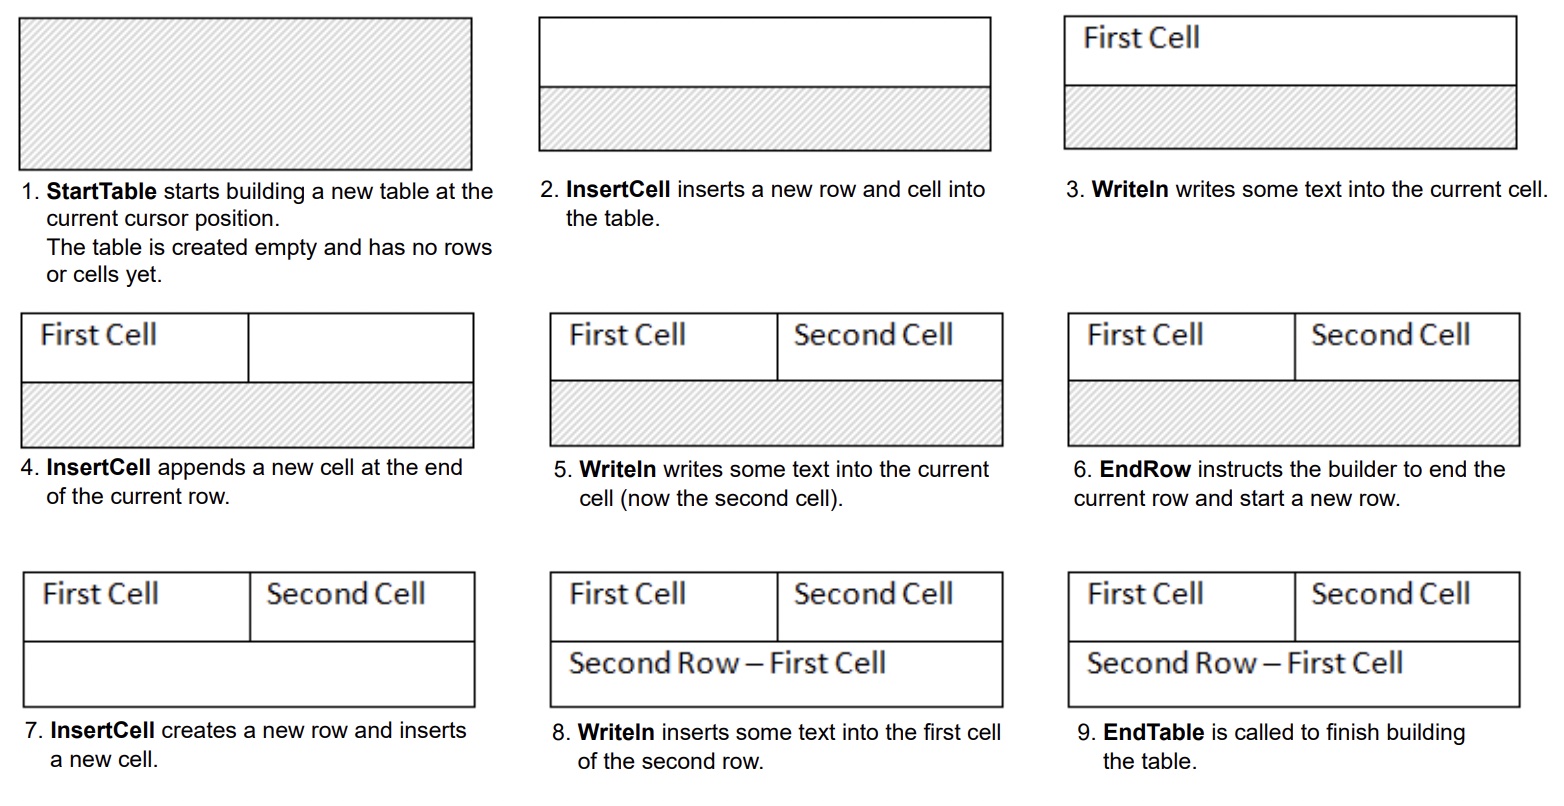
ใน Aspose.Words ผู้ใช้จะสร้างตารางในเอกสารโดยใช้ DocumentBuilder ได้ อัลกอริธึมพื้นฐานสำหรับการสร้างตารางมีดังนี้:
- เริ่มตารางด้วย StartTable
- เพิ่มเซลล์ลงในตารางโดยใช้ InsertCell ซึ่งจะเป็นการเริ่มต้นแถวใหม่โดยอัตโนมัติ
- หรือใช้คุณสมบัติ CellFormat เพื่อระบุการจัดรูปแบบเซลล์
- แทรกเนื้อหาเซลล์โดยใช้วิธี DocumentBuilder ที่เหมาะสม เช่น Writeln, InsertImage และอื่นๆ
- ทำซ้ำขั้นตอนที่ 2-4 จนกระทั่งแถวเสร็จสมบูรณ์
- โทร EndRow เพื่อสิ้นสุดแถวปัจจุบัน
- เลือกใช้คุณสมบัติ RowFormat เพื่อระบุการจัดรูปแบบแถว
- ทำซ้ำขั้นตอนที่ 2-7 จนกว่าตารางจะเสร็จสมบูรณ์
- โทร EndTable เพื่อสร้างตารางให้เสร็จ
รายละเอียดที่สำคัญ:
- StartTable สามารถเรียกภายในเซลล์ได้ ซึ่งในกรณีนี้ StartTable จะเริ่มสร้างตารางที่ซ้อนกันภายในเซลล์
- หลังจากเรียก InsertCell เซลล์ใหม่จะถูกสร้างขึ้น และเนื้อหาใดๆ ที่คุณเพิ่มโดยใช้วิธีอื่นของคลาส DocumentBuilder จะถูกเพิ่มลงในเซลล์ปัจจุบัน หากต้องการสร้างเซลล์ใหม่ในแถวเดียวกัน ให้เรียก InsertCell อีกครั้ง
- ถ้า InsertCell ถูกเรียกทันทีหลังจาก EndRow และสิ้นสุดแถว ตารางจะดำเนินต่อไปในแถวใหม่
- ควรเรียกเมธอด EndTable เพื่อสิ้นสุดตารางเพียงครั้งเดียวหลังจากการเรียก EndRow การเรียก EndTable จะเลื่อนเคอร์เซอร์จากเซลล์ปัจจุบันไปยังตำแหน่งหลังตารางทันที
ขั้นตอนการสร้างตารางสามารถเห็นได้ชัดเจนในภาพต่อไปนี้:
ตัวอย่างโค้ดต่อไปนี้แสดงวิธีสร้างตารางอย่างง่ายโดยใช้ DocumentBuilder พร้อมการจัดรูปแบบเริ่มต้น:
# For complete examples and data files, please go to https://github.com/aspose-words/Aspose.Words-for-Python-via-.NET.git. | |
doc = aw.Document() | |
builder = aw.DocumentBuilder(doc) | |
# Start building the table. | |
builder.start_table() | |
builder.insert_cell() | |
builder.write("Row 1, Cell 1 Content.") | |
# Build the second cell. | |
builder.insert_cell() | |
builder.write("Row 1, Cell 2 Content.") | |
# Call the following method to end the row and start a new row. | |
builder.end_row() | |
# Build the first cell of the second row. | |
builder.insert_cell() | |
builder.write("Row 2, Cell 1 Content") | |
# Build the second cell. | |
builder.insert_cell() | |
builder.write("Row 2, Cell 2 Content.") | |
builder.end_row() | |
# Signal that we have finished building the table. | |
builder.end_table() | |
doc.save(ARTIFACTS_DIR + "WorkingWithTables.create_simple_table.docx") |
ตัวอย่างโค้ดต่อไปนี้แสดงวิธีการสร้างตารางที่จัดรูปแบบโดยใช้ DocumentBuilder:
# For complete examples and data files, please go to https://github.com/aspose-words/Aspose.Words-for-Python-via-.NET.git. | |
doc = aw.Document() | |
builder = aw.DocumentBuilder(doc) | |
table = builder.start_table() | |
builder.insert_cell() | |
# Table wide formatting must be applied after at least one row is present in the table. | |
table.left_indent = 20.0 | |
# Set height and define the height rule for the header row. | |
builder.row_format.height = 40.0 | |
builder.row_format.height_rule = aw.HeightRule.AT_LEAST | |
builder.cell_format.shading.background_pattern_color = drawing.Color.from_argb(198, 217, 241) | |
builder.paragraph_format.alignment = aw.ParagraphAlignment.CENTER | |
builder.font.size = 16 | |
builder.font.name = "Arial" | |
builder.font.bold = True | |
builder.cell_format.width = 100.0 | |
builder.write("Header Row,\n Cell 1") | |
# We don't need to specify this cell's width because it's inherited from the previous cell. | |
builder.insert_cell() | |
builder.write("Header Row,\n Cell 2") | |
builder.insert_cell() | |
builder.cell_format.width = 200.0 | |
builder.write("Header Row,\n Cell 3") | |
builder.end_row() | |
builder.cell_format.shading.background_pattern_color = drawing.Color.white | |
builder.cell_format.width = 100.0 | |
builder.cell_format.vertical_alignment = aw.tables.CellVerticalAlignment.CENTER | |
# Reset height and define a different height rule for table body. | |
builder.row_format.height = 30.0 | |
builder.row_format.height_rule = aw.HeightRule.AUTO | |
builder.insert_cell() | |
# Reset font formatting. | |
builder.font.size = 12 | |
builder.font.bold = False | |
builder.write("Row 1, Cell 1 Content") | |
builder.insert_cell() | |
builder.write("Row 1, Cell 2 Content") | |
builder.insert_cell() | |
builder.cell_format.width = 200.0 | |
builder.write("Row 1, Cell 3 Content") | |
builder.end_row() | |
builder.insert_cell() | |
builder.cell_format.width = 100.0 | |
builder.write("Row 2, Cell 1 Content") | |
builder.insert_cell() | |
builder.write("Row 2, Cell 2 Content") | |
builder.insert_cell() | |
builder.cell_format.width = 200.0 | |
builder.write("Row 2, Cell 3 Content.") | |
builder.end_row() | |
builder.end_table() | |
doc.save(ARTIFACTS_DIR + "WorkingWithTables.formatted_table.docx") |
ตัวอย่างโค้ดต่อไปนี้แสดงวิธีการแทรกตารางที่ซ้อนกันโดยใช้ DocumentBuilder:
# For complete examples and data files, please go to https://github.com/aspose-words/Aspose.Words-for-Python-via-.NET.git. | |
doc = aw.Document() | |
builder = aw.DocumentBuilder(doc) | |
cell = builder.insert_cell() | |
builder.writeln("Outer Table Cell 1") | |
builder.insert_cell() | |
builder.writeln("Outer Table Cell 2") | |
# This call is important to create a nested table within the first table. | |
# Without this call, the cells inserted below will be appended to the outer table. | |
builder.end_table() | |
# Move to the first cell of the outer table. | |
builder.move_to(cell.first_paragraph) | |
# Build the inner table. | |
builder.insert_cell() | |
builder.writeln("Inner Table Cell 1") | |
builder.insert_cell() | |
builder.writeln("Inner Table Cell 2") | |
builder.end_table() | |
doc.save(ARTIFACTS_DIR + "WorkingWithTables.nested_table.docx") |
สร้างตารางผ่าน DOM (Document Object Model)
คุณสามารถแทรกตารางลงใน DOM ได้โดยตรงโดยการเพิ่มโหนด Table ใหม่ในตำแหน่งที่ต้องการ
โปรดทราบว่าทันทีหลังจากการสร้างโหนดตาราง ตัวตารางจะว่างเปล่าโดยสิ้นเชิง นั่นคือยังไม่มีแถวและเซลล์ หากต้องการแทรกแถวและเซลล์ลงในตาราง ให้เพิ่มโหนดย่อย Row และ Cell ที่เหมาะสมลงใน DOM
ตัวอย่างโค้ดต่อไปนี้แสดงวิธีการสร้างตารางใหม่ตั้งแต่ต้นโดยการเพิ่มโหนดย่อยที่เหมาะสมลงในแผนผังเอกสาร:
# For complete examples and data files, please go to https://github.com/aspose-words/Aspose.Words-for-Python-via-.NET.git. | |
doc = aw.Document() | |
# We start by creating the table object. Note that we must pass the document object | |
# to the constructor of each node. This is because every node we create must belong | |
# to some document. | |
table = aw.tables.Table(doc) | |
doc.first_section.body.append_child(table) | |
# Here we could call EnsureMinimum to create the rows and cells for us. This method is used | |
# to ensure that the specified node is valid. In this case, a valid table should have at least one Row and one cell. | |
# Instead, we will handle creating the row and table ourselves. | |
# This would be the best way to do this if we were creating a table inside an algorithm. | |
row = aw.tables.Row(doc) | |
row.row_format.allow_break_across_pages = True | |
table.append_child(row) | |
# We can now apply any auto fit settings. | |
table.auto_fit(aw.tables.AutoFitBehavior.FIXED_COLUMN_WIDTHS) | |
cell = aw.tables.Cell(doc) | |
cell.cell_format.shading.background_pattern_color = drawing.Color.light_blue | |
cell.cell_format.width = 80 | |
cell.append_child(aw.Paragraph(doc)) | |
cell.first_paragraph.append_child(aw.Run(doc, "Row 1, Cell 1 Text")) | |
row.append_child(cell) | |
# We would then repeat the process for the other cells and rows in the table. | |
# We can also speed things up by cloning existing cells and rows. | |
row.append_child(cell.clone(False)) | |
row.last_cell.append_child(aw.Paragraph(doc)) | |
row.last_cell.first_paragraph.append_child(aw.Run(doc, "Row 1, Cell 2 Text")) | |
doc.save(ARTIFACTS_DIR + "WorkingWithTables.insert_table_directly.docx") |
##Create ตารางจาก HTML
Aspose.Words รองรับการแทรกเนื้อหาลงในเอกสารจากแหล่ง HTML โดยใช้วิธี InsertHtml อินพุตอาจเป็นหน้า HTML ที่สมบูรณ์หรือเพียงบางส่วนก็ได้
เมื่อใช้วิธีการ InsertHtml ผู้ใช้สามารถแทรกตารางลงในเอกสารผ่านแท็กตาราง เช่น <table>
, <tr>
, <td>
ตัวอย่างโค้ดต่อไปนี้แสดงวิธีการแทรกตารางลงในเอกสารจากสตริงที่มีแท็ก HTML:
# For complete examples and data files, please go to https://github.com/aspose-words/Aspose.Words-for-Python-via-.NET.git. | |
doc = aw.Document() | |
builder = aw.DocumentBuilder(doc) | |
# Note that AutoFitSettings does not apply to tables inserted from HTML. | |
builder.insert_html("<table>" + | |
"<tr>" + | |
"<td>Row 1, Cell 1</td>" + | |
"<td>Row 1, Cell 2</td>" + | |
"</tr>" + | |
"<tr>" + | |
"<td>Row 2, Cell 2</td>" + | |
"</tr>" + | |
"</table>") | |
doc.save(ARTIFACTS_DIR + "WorkingWithTables.insert_table_from_html.docx") |
แทรกสำเนาของตารางที่มีอยู่
บ่อยครั้งคุณจำเป็นต้องสร้างตารางโดยยึดตามตารางที่มีอยู่แล้วในเอกสาร วิธีที่ง่ายที่สุดในการทำซ้ำตารางโดยที่ยังคงการจัดรูปแบบทั้งหมดไว้คือการโคลนโหนดตารางโดยใช้วิธี Clone
เทคนิคเดียวกันนี้สามารถใช้เพื่อเพิ่มสำเนาของแถวหรือเซลล์ที่มีอยู่ลงในตารางได้
ตัวอย่างโค้ดต่อไปนี้แสดงวิธีการทำซ้ำตารางโดยใช้ตัวสร้างโหนด:
# For complete examples and data files, please go to https://github.com/aspose-words/Aspose.Words-for-Python-via-.NET.git. | |
doc = aw.Document(MY_DIR + "Tables.docx") | |
table = doc.get_child(aw.NodeType.TABLE, 0, True).as_table() | |
# Clone the table and insert it into the document after the original. | |
table_clone = table.clone(True).as_table() | |
table.parent_node.insert_after(table_clone, table) | |
# Insert an empty paragraph between the two tables, | |
# or else they will be combined into one upon saving this has to do with document validation. | |
table.parent_node.insert_after(aw.Paragraph(doc), table) | |
doc.save(ARTIFACTS_DIR + "WorkingWithTables.clone_complete_table.docx") |
ตัวอย่างโค้ดต่อไปนี้แสดงวิธีการโคลนแถวสุดท้ายของตารางและผนวกเข้ากับตาราง:
# For complete examples and data files, please go to https://github.com/aspose-words/Aspose.Words-for-Python-via-.NET.git. | |
doc = aw.Document(MY_DIR + "Tables.docx") | |
table = doc.get_child(aw.NodeType.TABLE, 0, True).as_table() | |
cloned_row = table.last_row.clone(True).as_row() | |
# Remove all content from the cloned row's cells. This makes the row ready for new content to be inserted into. | |
for cell in cloned_row.cells: | |
cell = cell.as_cell() | |
cell.remove_all_children() | |
table.append_child(cloned_row) | |
doc.save(ARTIFACTS_DIR + "WorkingWithTables.clone_last_row.docx") |
หากคุณกำลังมองหาการสร้างตารางในเอกสารที่ขยายแบบไดนามิกตามแต่ละระเบียนจากแหล่งข้อมูลของคุณ ไม่แนะนำให้ใช้วิธีการข้างต้น แต่ผลลัพธ์ที่ต้องการจะทำได้ง่ายกว่าโดยใช้ Mail merge กับขอบเขต
เปรียบเทียบวิธีสร้างตาราง
Aspose.Words มีหลายวิธีในการสร้างตารางใหม่ในเอกสาร แต่ละวิธีมีข้อดีและข้อเสียในตัวเอง ดังนั้นการเลือกใช้มักขึ้นอยู่กับสถานการณ์เฉพาะ
มาดูวิธีการสร้างตารางเหล่านี้ให้ละเอียดยิ่งขึ้น และเปรียบเทียบข้อดีและข้อเสีย:
วิธี | ข้อดี | ข้อเสีย |
---|---|---|
ผ่าน DocumentBuilder | วิธีการมาตรฐานสำหรับการแทรกตารางและเนื้อหาเอกสารอื่นๆ | บางครั้งก็เป็นเรื่องยากที่จะสร้างตารางที่หลากหลายในเวลาเดียวกันด้วยอินสแตนซ์ตัวสร้างเดียวกัน |
ผ่านทาง DOM | เข้ากันได้ดีกว่าด้วยโค้ดที่อยู่รอบๆ ที่สร้างและแทรกโหนดลงใน DOM โดยตรงโดยไม่ต้องใช้ DocumentBuilder | ตารางถูกสร้างขึ้น “ว่างเปล่า”: ก่อนที่จะดำเนินการส่วนใหญ่ คุณต้องเรียก EnsureMinimum เพื่อสร้างโหนดลูกที่ขาดหายไป |
จากภาษา HTML | สามารถสร้างตารางใหม่จากแหล่ง HTML โดยใช้แท็กเช่น <table> , <tr> , <td> |
รูปแบบตาราง Microsoft Word ที่เป็นไปได้บางรูปแบบไม่สามารถใช้กับ HTML ได้ |
การโคลนตารางที่มีอยู่ | คุณสามารถสร้างสำเนาของตารางที่มีอยู่โดยที่ยังคงการจัดรูปแบบแถวและเซลล์ทั้งหมดไว้ | ต้องลบโหนดย่อยที่เหมาะสมออกก่อนที่ตารางจะพร้อมใช้งาน |