使用列和行
要更好地控制表的工作方式,请了解如何操作列和行。
查找表元素索引
列,行和单元格通过其索引访问所选文档节点来管理。 查找任何节点的索引涉及从父节点收集元素类型的所有子节点,然后使用IndexOf方法在集合中查找所需节点的索引。
查找文档中表的索引
有时您可能需要对文档中的特定表进行更改。 为此,您可以通过其索引引用表。
下面的代码示例演示如何检索文档中表的索引:
// For complete examples and data files, please go to https://github.com/aspose-words/Aspose.Words-for-Java.git. | |
Table table = (Table) doc.getChild(NodeType.TABLE, 0, true); | |
NodeCollection allTables = doc.getChildNodes(NodeType.TABLE, true); | |
int tableIndex = allTables.indexOf(table); |
在表中查找行的索引
同样,您可能需要对选定表中的特定行进行更改。 为此,您还可以通过其索引引用行。
下面的代码示例演示如何检索表中的行的索引:
// For complete examples and data files, please go to https://github.com/aspose-words/Aspose.Words-for-Java.git. | |
int rowIndex = table.indexOf(table.getLastRow()); |
查找行中单元格的索引
最后,您可能需要对特定单元格进行更改,您也可以通过单元格索引执行此操作。
下面的代码示例演示如何检索行中单元格的索引:
// For complete examples and data files, please go to https://github.com/aspose-words/Aspose.Words-for-Java.git. | |
int cellIndex = row.indexOf(row.getCells().get(4)); |
使用列
在Aspose.Words文档对象模型(DOM)中,Table节点由Row个节点和Cell个节点组成。 因此,在Aspose.Words的Document
对象模型中,与Word文档中一样,没有列的概念。
根据设计,Microsoft Word和Aspose.Words中的表行是完全独立的,基本属性和操作仅包含在表的行和单元格中。 这使表具有一些有趣的属性的能力:
- 每个表行可以具有完全不同数量的单元格
- 垂直地,每行的单元格可以具有不同的宽度
- 可以连接具有不同行格式和单元格数的表
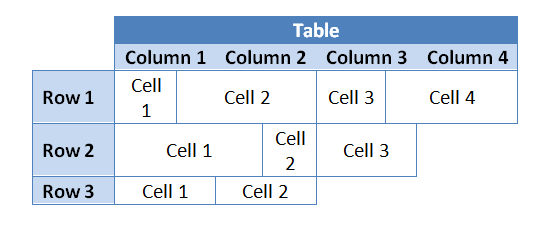
对列执行的任何操作实际上都是"快捷方式",通过集体更改行单元格来执行操作,使其看起来像是应用于列。 也就是说,您可以通过简单地迭代相同的表行单元格索引来对列执行操作。
下面的代码示例通过证明facade类来简化此类操作,该类收集构成表的"列"的单元格:
// For complete examples and data files, please go to https://github.com/aspose-words/Aspose.Words-for-Java.git. | |
/// <summary> | |
/// Represents a facade object for a column of a table in a Microsoft Word document. | |
/// </summary> | |
static class Column | |
{ | |
private Column(Table table, int columnIndex) { | |
if (table != null) { | |
mTable = table; | |
} else { | |
throw new IllegalArgumentException("table"); | |
} | |
mColumnIndex = columnIndex; | |
} | |
/// <summary> | |
/// Returns a new column facade from the table and supplied zero-based index. | |
/// </summary> | |
public static Column fromIndex(Table table, int columnIndex) | |
{ | |
return new Column(table, columnIndex); | |
} | |
private ArrayList<Cell> getCells() { | |
return getColumnCells(); | |
} | |
/// <summary> | |
/// Returns the index of the given cell in the column. | |
/// </summary> | |
public int indexOf(Cell cell) | |
{ | |
return getColumnCells().indexOf(cell); | |
} | |
/// <summary> | |
/// Inserts a brand new column before this column into the table. | |
/// </summary> | |
public Column insertColumnBefore() | |
{ | |
ArrayList<Cell> columnCells = getCells(); | |
if (columnCells.size() == 0) | |
throw new IllegalArgumentException("Column must not be empty"); | |
// Create a clone of this column. | |
for (Cell cell : columnCells) | |
cell.getParentRow().insertBefore(cell.deepClone(false), cell); | |
// This is the new column. | |
Column column = new Column(columnCells.get(0).getParentRow().getParentTable(), mColumnIndex); | |
// We want to make sure that the cells are all valid to work with (have at least one paragraph). | |
for (Cell cell : column.getCells()) | |
cell.ensureMinimum(); | |
// Increase the index which this column represents since there is now one extra column in front. | |
mColumnIndex++; | |
return column; | |
} | |
/// <summary> | |
/// Removes the column from the table. | |
/// </summary> | |
public void remove() | |
{ | |
for (Cell cell : getCells()) | |
cell.remove(); | |
} | |
/// <summary> | |
/// Returns the text of the column. | |
/// </summary> | |
public String toTxt() throws Exception | |
{ | |
StringBuilder builder = new StringBuilder(); | |
for (Cell cell : getCells()) | |
builder.append(cell.toString(SaveFormat.TEXT)); | |
return builder.toString(); | |
} | |
/// <summary> | |
/// Provides an up-to-date collection of cells which make up the column represented by this facade. | |
/// </summary> | |
private ArrayList<Cell> getColumnCells() | |
{ | |
ArrayList<Cell> columnCells = new ArrayList<Cell>(); | |
for (Row row : mTable.getRows()) | |
{ | |
Cell cell = row.getCells().get(mColumnIndex); | |
if (cell != null) | |
columnCells.add(cell); | |
} | |
return columnCells; | |
} | |
private int mColumnIndex; | |
private Table mTable; | |
} |
下面的代码示例演示如何将空白列插入到表中:
// For complete examples and data files, please go to https://github.com/aspose-words/Aspose.Words-for-Java.git. | |
Document doc = new Document(getMyDir() + "Tables.docx"); | |
Table table = (Table) doc.getChild(NodeType.TABLE, 0, true); | |
Column column = Column.fromIndex(table, 0); | |
// Print the plain text of the column to the screen. | |
System.out.println(column.toTxt()); | |
// Create a new column to the left of this column. | |
// This is the same as using the "Insert Column Before" command in Microsoft Word. | |
Column newColumn = column.insertColumnBefore(); | |
for (Cell cell : newColumn.getColumnCells()) | |
cell.getFirstParagraph().appendChild(new Run(doc, "Column Text " + newColumn.indexOf(cell))); |
下面的代码示例演示如何从文档中的表中删除列:
// For complete examples and data files, please go to https://github.com/aspose-words/Aspose.Words-for-Java.git. | |
Document doc = new Document(getMyDir() + "Tables.docx"); | |
Table table = (Table) doc.getChild(NodeType.TABLE, 1, true); | |
Column column = Column.fromIndex(table, 2); | |
column.remove(); |
将行指定为标题行
您可以选择仅在第一页上或在每页上重复表中的第一行作为标题行(如果表被拆分为多个)。 在Aspose.Words中,您可以使用HeadingFormat属性在每个页面上重复标题行。
如果这些行一个接一个地位于表的开头,则还可以标记多个标题行。 为此,您需要将HeadingFormat属性应用于这些行。
下面的代码示例演示如何生成一个表,其中包括在后续页上重复的标题行:
// For complete examples and data files, please go to https://github.com/aspose-words/Aspose.Words-for-Java.git. | |
Document doc = new Document(); | |
DocumentBuilder builder = new DocumentBuilder(doc); | |
builder.startTable(); | |
builder.getRowFormat().setHeadingFormat(true); | |
builder.getParagraphFormat().setAlignment(ParagraphAlignment.CENTER); | |
builder.getCellFormat().setWidth(100.0); | |
builder.insertCell(); | |
builder.writeln("Heading row 1"); | |
builder.endRow(); | |
builder.insertCell(); | |
builder.writeln("Heading row 2"); | |
builder.endRow(); | |
builder.getCellFormat().setWidth(50.0); | |
builder.getParagraphFormat().clearFormatting(); | |
for (int i = 0; i < 50; i++) | |
{ | |
builder.insertCell(); | |
builder.getRowFormat().setHeadingFormat(false); | |
builder.write("Column 1 Text"); | |
builder.insertCell(); | |
builder.write("Column 2 Text"); | |
builder.endRow(); | |
} | |
doc.save(getArtifactsDir() + "WorkingWithTables.RepeatRowsOnSubsequentPages.docx"); |
防止表和行跨越页面
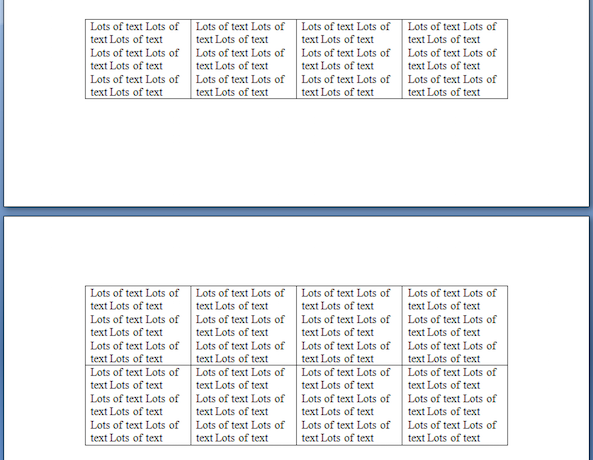
有些时候,表的内容不应该跨页分割。 例如,如果标题位于表格上方,则标题和表格应始终保持在同一页面上,以保持正确的外观。
有两种不同的技术可用于实现此功能:
Allow row break across pages
,应用于表行Keep with next
,应用于表格单元格中的段落
默认情况下,上述属性处于禁用状态。

保持行不跨越页面
这涉及到限制行单元格内的内容在页面上被分割。 在Microsoft Word中,这可以在表属性下找到,作为选项"允许行跨页中断"。 在Aspose.Words中,这是在Row的RowFormat对象下作为属性RowFormat.AllowBreakAcrossPages找到的。

下面的代码示例演示如何为表中的每行禁用跨页分隔行:
// For complete examples and data files, please go to https://github.com/aspose-words/Aspose.Words-for-Java.git. | |
Document doc = new Document(getMyDir() + "Table spanning two pages.docx"); | |
Table table = (Table) doc.getChild(NodeType.TABLE, 0, true); | |
// Disable breaking across pages for all rows in the table. | |
for (Row row : (Iterable<Row>) table.getRows()) | |
row.getRowFormat().setAllowBreakAcrossPages(false); | |
doc.save(getArtifactsDir() + "WorkingWithTables.RowFormatDisableBreakAcrossPages.docx"); |
防止表跨页
为了阻止表跨页面拆分,我们需要指定我们希望表中包含的内容保持在一起。
为此,Aspose.Words使用一种方法,该方法允许用户选择一个表,并为表单元格中的每个段落启用KeepWithNext参数为true。 例外情况是表中的最后一段,应将其设置为false。

下面的代码示例演示如何将表设置为在同一页上保持在一起:
// For complete examples and data files, please go to https://github.com/aspose-words/Aspose.Words-for-Java.git. | |
Document doc = new Document(getMyDir() + "Table spanning two pages.docx"); | |
Table table = (Table) doc.getChild(NodeType.TABLE, 0, true); | |
// We need to enable KeepWithNext for every paragraph in the table to keep it from breaking across a page, | |
// except for the last paragraphs in the last row of the table. | |
for (Cell cell : (Iterable<Cell>) table.getChildNodes(NodeType.CELL, true)) | |
{ | |
cell.ensureMinimum(); | |
for (Paragraph para : (Iterable<Paragraph>) cell.getParagraphs()) | |
if (!(cell.getParentRow().isLastRow() && para.isEndOfCell())) | |
para.getParagraphFormat().setKeepWithNext(true); | |
} | |
doc.save(getArtifactsDir() + "WorkingWithTables.KeepTableTogether.docx"); |