GridWeb を使用してワークシートをカスタマイズされたコレクション オブジェクトにバインドする
カスタム コレクションを使用してワークシートをバインドする
この機能を説明するために、この記事ではサンプル アプリケーションの作成方法を順を追って説明します。まず、カスタム コレクションを作成し、そのコレクションを使用してワークシートにバインドします。
ステップ 1: カスタム レコードの作成
カスタム コレクションを作成する前に、コレクションに格納されるカスタム レコードを保持するクラスを作成します。この記事の目的は、独自のカスタム コレクションを作成し、それらを Aspose.Cells.GridWeb にバインドする方法を説明することです。そのため、カスタム レコードを作成する方法はあなた次第です。
以下の例では、5 つのプライベート フィールドと、プライベート フィールドへのアクセスを制御する 5 つのパブリック プロパティを含む MyCustomRecord クラスを使用しています。プロパティの構造は次のとおりです。
- 読み書きする StringField1 プロパティ文字列フィールド1 (ストリング)。
- 読み取り専用の ReadonlyField2 プロパティ文字列フィールド2 (ストリング)。
- 読み書きする DateField1 プロパティ日付フィールド1 (日付時刻)。
- 読み書きする IntField1 プロパティintfield1 (整数)。
- 読み書きする DoubleField1 プロパティダブルフィールド1 (ダブル)。
C#
 //Creating a class that will act as record for the custom collection

public class MyCustomRecord

{

    //Private data members

    private string stringfield1;

    private string stringfield2 = "ABC";

    private DateTime datefield1;

    private int intfield1;

    private double doublefield1;

    //Creating a string property

    public string StringField1

    {

        get { return stringfield1; }

        set { stringfield1 = value; }

    }

    //Creating a readonly string property

    public string ReadonlyField2

    {

        get { return stringfield2; }

    }

    //Creating a DateTime property

    public DateTime DateField1

    {

        get { return datefield1; }

        set { datefield1 = value; }

    }

    //Creating an int property

    public int IntField1

    {

        get { return intfield1; }

        set { intfield1 = value; }

    }

    //Creating a double property

    public double DoubleField1

    {

        get { return doublefield1; }

        set { doublefield1 = value; }

    }

}
ステップ 2: カスタム コレクションの作成
ここで、カスタム コレクションを作成して、顧客レコードを追加し、そこからアクセスします。簡単にするために、この例では読み取り専用インデクサーを含む MyCollection クラスを使用します。このインデクサーを使用して、コレクションに格納されている任意のカスタム レコードを取得できます。
C#
 //Creating a custom collection

public class MyCollection : CollectionBase

{

    //Leaving the collection constructor empty

    public MyCollection()

    {

    }

    //Creating a readonly property for custom collection. This Item property is used by GridWeb control to

    //determine the collection's type

    public MyCustomRecord this[int index]

    {

        get { return (MyCustomRecord)this.List[index]; }

    }

}
手順 3: ワークシートをカスタム コレクションにバインドする
カスタム コレクションの作成プロセスが完了しました。カスタム コレクションを使用して、 Aspose.Cells.GridWeb のワークシートにバインドします。最初に Web フォームを作成し、それに GridWeb コントロールを追加して、いくつかのコードを追加します。
カスタム コレクションをバインドに使用するには、まず MyCollection クラスのオブジェクトを作成します (上記の手順で作成)。 次に、MyCustomRecord オブジェクトを作成して MyCollection オブジェクトに追加します。
最後に、MyCollection オブジェクトをワークシートのデータ ソースとして設定し、ワークシートをコレクションにバインドします。この時点で、ワークシートのバインドされた列の検証規則も作成できます。
C#
 //Implementing Page_Load event handler

protected void Page_Load(object sender, EventArgs e)

{

    if (Page.IsPostBack == false && this.GridWeb1.IsPostBack == false)

    {

        //Creating an object of custom collection

        MyCollection list = new MyCollection();

        //Creating an instance of Random class

        System.Random rand = new System.Random();

        //Creating a loop that will run 5 times

        for (int i = 0; i < 5; i++)

        {

            //Creating an object of Custom Record

            MyCustomRecord rec = new MyCustomRecord();

            //Initializing all properties of Custom Record

            rec.DateField1 = DateTime.Now;

            rec.DoubleField1 = rand.NextDouble() * 10;

            rec.IntField1 = rand.Next(20);

            rec.StringField1 = "ABC_" + i;

            //Adding Custom Record to Collection

            ((IList)list).Add(rec);

        }

        //Accessing a desired worksheet

        GridWorksheet sheet = GridWeb1.WorkSheets[0];

        //Setting the Data Source of worksheet

        sheet.DataSource = list;

        //Creating columns automatically

        sheet.CreateAutoGenratedColumns();

        //Setting the validation type of value to DateTime

        sheet.BindColumns[2].Validation.ValidationType = ValidationType.DateTime;

        //Binding worksheet

        sheet.DataBind();

        //Assigning an event handler to InitializeNewBindRow event of the worksheet

        //sheet.InitializeNewBindRow += new InitializeNewBindRowHandler(GridWeb1_InitializeNewBindRow);

    }

}
ステップ 4: ワークシートの InitializeNewBindRow イベントの処理
上記のコードでは、GridWeb1_InitializeNewBindRow イベント ハンドラーをワークシートの InitializeNewBindRow に割り当てるために使用される追加のコード行に気付いたかもしれません。このイベントは、バインドされた新しい行がワークシートに追加されるたびにトリガーされます。 MyCustomRecord オブジェクトの DateField1 プロパティのため、このイベントのイベント ハンドラーを作成しました。
Aspose.Cells.GridWeb は自動的に初期化されます整数とダブル値**ゼロ (0)**新しいバインドされた行が GridWeb コントロールに追加されるたびに。日付については、GridWeb コントロールがシステムから現在の日付を自動的に追加するようにします。そのために、InitializeNewBindRow イベントの GridWeb1_InitializeNewBindRow イベント ハンドラーを作成しました。
bindObject 引数を使用して GridWeb から MyCustomRecord クラスの特定のインスタンスにアクセスし、現在のシステム日付をその DateField1 プロパティに割り当てます。
C#
 //Creating GridWeb1_InitializeNewBindRow event handler

private void GridWeb1_InitializeNewBindRow(GridWorksheet sender, object bindObject)

{

    //Accessing that custom record object that is newly bound

    MyCustomRecord rec = (MyCustomRecord)bindObject;

    //Initializing the DateTime of a property when a new row gets bound to the database

    rec.DateField1 = DateTime.Now;

}
ステップ 5: アプリケーションの実行
次のいずれかを押してアプリケーションを実行しますCtrl+F5または始めるVS.NET のボタン。 Web フォームが新しいブラウザー ウィンドウで開かれます。
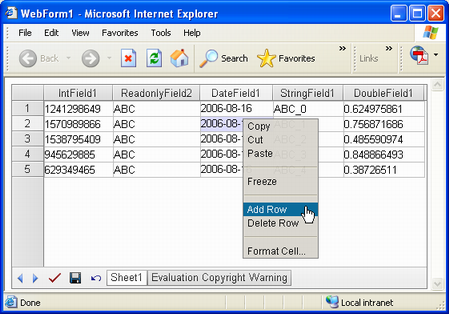
カスタム コレクションにバインドされたワークシート

GridWeb コントロールを右クリックして、レコードを追加または削除します。たとえば、次のように選択して、ワークシートに新しいレコードを追加します。行を追加するオプション。
メニューから [行の追加] オプションを選択する
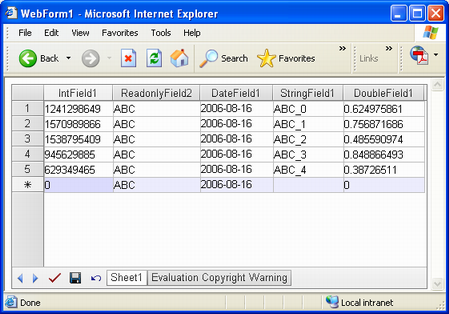
ワークシートに新しい行が追加されると、セルには現在のシステム日付を含むデフォルト データが含まれます。
既定のデータを含む新しい行がワークシートに追加されました
データを変更したら、セーブまた送信変更を保存します。
[保存] ボタンをクリックして変更を保存する
