
C#에서 SMTP 클라이언트를 사용하여 이메일 전송, 메시지 전달 및 메일 병합 수행
이메일 전송
SmtpClient 클래스를 사용한 이메일 전송
다음은 SmtpClient 클래스는 애플리케이션이 SMTP(Simple Mail Transfer Protocol)를 통해 이메일을 보낼 수 있게 합니다.
주요 기능 중 하나는 대량 메시지 전송.
또한 완전히 지원합니다 동기식 및 비동기식 프로그래밍 모델을 사용할 수 있습니다. 작업이 완료될 때까지 메인 스레드를 차단하여 이메일을 전송하려면 개발자는 동기식 중 하나를 사용할 수 있습니다 보내기 메서드. 또는 이메일 전송 중에 메인 스레드가 계속 실행되도록 하려면 개발자는 SendAsync 메서드.
또한, SmtpClient 다음 형식으로 메시지 전송을 지원합니다 전송 중립 캡슐화 형식 (TNEF).
동기식 이메일 전송
이메일 메시지는 다음을 사용해 동기적으로 전송할 수 있습니다 보내기 메서드 SmtpClient 클래스. 지정된 이메일 메시지를 SMTP 서버를 통해 전송합니다. 이메일 메시지를 동기식으로 보내려면 아래 단계에 따라 진행하십시오:
- 다음의 인스턴스를 생성합니다 MailMessage class를 사용하고 해당 속성을 설정합니다.
- 다음의 인스턴스를 생성합니다 SmtpClient class에 호스트, 포트, 사용자명 및 비밀번호를 지정합니다.
- 다음을 사용하여 메시지를 전송합니다 보내기 메서드 SmtpClient class에 전달하고 MailMessage 인스턴스.
아래 C# 코드 스니펫은 Outlook 이메일을 동기식으로 보내는 방법을 보여줍니다.
// Declare msg as MailMessage instance
MailMessage msg = new MailMessage();

// Create an instance of SmtpClient class
SmtpClient client = new SmtpClient();

// Specify your mailing host server, Username, Password, Port # and Security option
client.Host = "mail.server.com";
client.Username = "username";
client.Password = "password";
client.Port = 587;
client.SecurityOptions = SecurityOptions.SSLExplicit;

try
{
    // Client.Send will send this message
    client.Send(msg);
    Console.WriteLine("Message sent");
}
catch (Exception ex)
{
    Trace.WriteLine(ex.ToString());
}
비동기적으로 이메일 전송
때때로 이메일을 백그라운드에서 전송하는 동안 프로그램이 다른 작업을 계속 실행하도록 비동기적으로 메일을 보내고 싶을 수 있습니다. .NET Framework 4.5부터는 다음에 따라 구현된 비동기 메서드를 사용할 수 있습니다 TAP 모델. 아래 C# 코드 스니펫은 작업 기반 비동기 패턴 메서드를 사용하여 Outlook 이메일 메시지를 보내는 방법을 보여줍니다:
-
SendAsync 지정된 메시지를 보냅니다.
-
IAsyncSmtpClient - 애플리케이션이 간단 메일 전송 프로토콜(SMTP)을 사용해 메시지를 보낼 수 있도록 합니다.
-
SmtpClient.CreateAsync - Aspose.Email.Clients.Smtp.SmtpClient 클래스의 새로운 인스턴스를 생성합니다
-
SmtpSend - Aspose.Email.Clients.Smtp.IAsyncSmtpClient.SendAsync(Aspose.Email.Clients.Smtp.Models.SmtpSend) 메서드 매개변수 설정.
-
SmtpForward - Aspose.Email.Clients.Smtp.IAsyncSmtpClient.ForwardAsync(Aspose.Email.Clients.Smtp.Models.SmtpForward) 인자.
// Authenticate the client to obtain necessary permissions
static readonly string tenantId = "YOU_TENANT_ID";
static readonly string clientId = "YOU_CLIENT_ID";
static readonly string redirectUri = "http://localhost";
static readonly string username = "username";
static readonly string[] scopes = { "https://outlook.office.com/SMTP.Send" };

// Use the SmtpAsync method for asynchronous operations
static async Task Main(string[] args)
{
    await SmtpAsync();
    Console.ReadLine();
}

static async Task SmtpAsync()
{
    // Create token provider and get access token
    var tokenProvider = new TokenProvider(clientId, tenantId, redirectUri, scopes);
    var client = SmtpClient.CreateAsync("outlook.office365.com", username, tokenProvider, 587).GetAwaiter().GetResult();

    // Create a message to send
    var eml = new MailMessage("from@domain.com", "to@domain.com", "test subj async", "test body async");

    // send message
    var sendOptions = SmtpSend.Create();
    sendOptions.AddMessage(eml);
    await client.SendAsync(sendOptions);
    Console.WriteLine("message was sent");

    // forward message
    var fwdOptions = SmtpForward.Create();
    fwdOptions.SetMessage(eml);
    fwdOptions.AddRecipient("rec@domain.com");
    await client.ForwardAsync(fwdOptions);
    Console.WriteLine("message was forwarded");
}

// Token provider implementation
public class TokenProvider : IAsyncTokenProvider
{
    private readonly PublicClientApplicationOptions _pcaOptions;
    private readonly string[] _scopes;

    public TokenProvider(string clientId, string tenantId, string redirectUri, string[] scopes)
    {
        _pcaOptions = new PublicClientApplicationOptions
        {
            ClientId = clientId,
            TenantId = tenantId,
            RedirectUri = redirectUri
        };

        _scopes = scopes;
    }

    public async Task<OAuthToken> GetAccessTokenAsync(bool ignoreExistingToken = false, CancellationToken cancellationToken = default)
    {

        var pca = PublicClientApplicationBuilder
            .CreateWithApplicationOptions(_pcaOptions).Build();

        try
        {
            var result = await pca.AcquireTokenInteractive(_scopes)
                .WithUseEmbeddedWebView(false)
                .ExecuteAsync(cancellationToken);

            return new OAuthToken(result.AccessToken);
        }
        catch (MsalException ex)
        {
            Console.WriteLine($"Error acquiring access token: {ex}");
        }
        catch (Exception ex)
        {
            Console.WriteLine($"Error: {ex}");
        }

        return null;
    }

    public void Dispose()
    {

    }
}
디스크에서 메시지 전송
EML 파일은 헤더, 메시지 본문 및 첨부 파일을 포함합니다. Aspose.Email은 개발자가 EML 파일을 다양한 방식으로 작업할 수 있게 합니다. 이 섹션에서는 디스크에서 EML 파일을 로드하고 SMTP를 통해 이메일로 전송하는 방법을 보여줍니다. .eml 파일을 디스크 또는 스트림에서 로드하여 MailMessage 클래스를 사용하여 이메일 메시지를 전송합니다. SmtpClient 클래스. MailMessage 클래스는 새로운 이메일 메시지를 생성하고, 디스크 또는 스트림에서 이메일 메시지 파일을 로드하며, 메시지를 저장하는 기본 클래스입니다. 아래 C# 코드 스니펫은 디스크에 저장된 메시지를 보내는 방법을 보여줍니다.
// Load an EML file in MailMessage class
var message = MailMessage.Load(dataDir + "test.eml");

// Send this message using SmtpClient
var client = new SmtpClient("host", "username", "password");

try
{
    client.Send(message);
}
catch (Exception ex)
{
    Console.WriteLine(ex.Message);
}
텍스트 형식으로 이메일 전송
다음은 본문 속성, 클래스의 속성 MailMessage 클래스는 메시지 본문의 일반 텍스트 콘텐츠를 지정하는 데 사용됩니다. 일반 텍스트 이메일 메시지를 보내려면 다음 단계를 따르세요:
- 다음의 인스턴스를 생성합니다. MailMessage 클래스.
- 발신자와 수신자 이메일 주소를 지정하십시오. MailMessage 인스턴스.
- 지정하세요 본문 콘텐츠는 일반 텍스트 메시지에 사용됩니다.
- 다음의 인스턴스를 생성합니다. SmtpClient 클래스를 사용하여 이메일을 보내십시오.
다음 코드 스니펫은 일반 텍스트 이메일을 보내는 방법을 보여줍니다.
//Create an instance of the MailMessage class
var message = new MailMessage();

// Set From field, To field and Plain text body
message.From = "sender@sender.com";
message.To.Add("receiver@receiver.com");
message.Body = "This is Plain Text Body";

// Create an instance of the SmtpClient class
var client = new SmtpClient();

// And Specify your mailing host server, Username, Password and Port
client.Host = "smtp.server.com";
client.Username = "Username";
client.Password = "Password";
client.Port = 25;

try
{
    //Client.Send will send this message
    client.Send(message);
    Console.WriteLine("Message sent");
}
catch (Exception ex)
{
    System.Diagnostics.Trace.WriteLine(ex.ToString());
}
HTML 본문을 포함한 이메일 전송
아래 프로그래밍 샘플은 간단한 HTML 이메일 메시지를 보낼 수 있는 방법을 보여줍니다. HtmlBody, 클래스의 속성 MailMessage 클래스는 메시지 본문의 HTML 콘텐츠를 지정하는 데 사용됩니다. 간단한 HTML 이메일을 보내려면 다음 단계를 따르세요:
- 다음의 인스턴스를 생성합니다. MailMessage 클래스.
- 발신자 및 수신자 이메일 주소를 지정하십시오. MailMessage 인스턴스.
- 지정하세요 HtmlBody 콘텐츠.
- 다음의 인스턴스를 생성합니다. SmtpClient 클래스를 사용하여 이메일을 전송합니다. 보내기 메서드.
이 문서의 목적을 위해 이메일의 HTML 내용은 기본적인 형태입니다:
This is the HTML body 대부분의 HTML 이메일은 더 복잡합니다. 아래 코드 스니펫은 HTML 본문을 포함한 이메일을 보내는 방법을 보여줍니다.public static void Run()
{
// Declare msg as MailMessage instance
var msg = new MailMessage();
// Use MailMessage properties like specify sender, recipient, message and HtmlBody
msg.From = "newcustomeronnet@gmail.com";
msg.To = "asposetest123@gmail.com";
msg.Subject = "Test subject";
msg.HtmlBody = "<html><body>This is the HTML body</body></html>";
var client = GetSmtpClient();
try
{
// Client will send this message
client.Send(msg);
Console.WriteLine("Message sent");
}
catch (Exception ex)
{
Trace.WriteLine(ex.ToString());
}
Console.WriteLine(Environment.NewLine + "Email sent with HTML body.");
}
private static SmtpClient GetSmtpClient()
{
var client = new SmtpClient("smtp.gmail.com", 587, "your.email@gmail.com", "your.password");
client.SecurityOptions = SecurityOptions.Auto;
return client;
}
대체 텍스트와 함께 HTML 이메일 전송
다음 사용 AlternateView 클래스는 이메일 메시지를 다양한 형식으로 복사본을 지정합니다. 예를 들어, HTML로 메시지를 보낼 경우 HTML을 표시할 수 없는 이메일 리더를 사용하는 수신자를 위해 일반 텍스트 버전을 제공하고 싶을 수 있습니다. 또는 뉴스레터를 보낼 경우 일반 텍스트 버전을 선택한 수신자를 위해 텍스트의 일반 텍스트 복사본을 제공하고 싶을 수 있습니다. 대체 텍스트가 있는 이메일을 보내려면 다음 단계를 따르세요:
- 다음의 인스턴스를 생성합니다. MailMessage 클래스.
- 발신자 및 수신자 이메일 주소를 지정하십시오. MailMessage 인스턴스.
- 다음의 인스턴스를 생성합니다. AlternateView 클래스.
이것은 문자열에 지정된 내용을 사용하여 이메일 메시지에 대한 대체 뷰를 생성합니다.
- 인스턴스를 추가하십시오. AlternateView 클래스를 MailMessage 객체.
- 다음의 인스턴스를 생성합니다. SmtpClient 클래스를 사용하여 이메일을 전송합니다. 보내기 메서드.
다음 코드 스니펫은 대체 텍스트가 있는 이메일을 보내는 방법을 보여줍니다.
// Declare message as MailMessage instance
var message = new MailMessage();

// Creates AlternateView to view an email message using the content specified in the //string
var alternate = AlternateView.CreateAlternateViewFromString("Alternate Text");

// Adding alternate text
message.AlternateViews.Add(alternate);
대량 이메일 전송
다음 방법을 사용하여 이메일 배치를 보낼 수 있습니다 SmtpClient 클래스는 보내기 다음과 같은 매개변수를 받는 메서드 오버로드 MailMessageCollection:
- 다음의 인스턴스를 생성합니다 SmtpClient 클래스.
- 지정하세요 SmtpClient 클래스 속성.
- 다음의 인스턴스를 생성합니다. MailMessage 클래스.
- 인스턴스에 발신자, 수신자, 메일 제목 및 메시지를 지정하십시오. MailMessage 클래스.
- 다른 사람에게 이메일을 보내려면 위의 두 단계를 다시 반복하십시오.
- 다음의 인스턴스를 생성합니다 MailMessageCollection 클래스.
- 인스턴스를 추가하십시오. MailMessage 클래스는 객체의 MailMessageCollection 클래스.
- 이제 다음을 사용하여 이메일을 전송하세요. SmtpClient 클래스 보내기 인스턴스를 전달하는 메서드 MailMessageCollection 그 안의 클래스.
다음 코드 스니펫은 대량 이메일을 전송하는 방법을 보여줍니다.
// Create SmtpClient as client and specify server, port, user name and password
var client = new SmtpClient("mail.server.com", 25, "Username", "Password");

// Create instances of MailMessage class and Specify To, From, Subject and Message
var message1 = new MailMessage("msg1@from.com", "msg1@to.com", "Subject1", "message1, how are you?");
var message2 = new MailMessage("msg1@from.com", "msg2@to.com", "Subject2", "message2, how are you?");
var message3 = new MailMessage("msg1@from.com", "msg3@to.com", "Subject3", "message3, how are you?");

// Create an instance of MailMessageCollection class
var manyMsg = new MailMessageCollection();
manyMsg.Add(message1);
manyMsg.Add(message2);
manyMsg.Add(message3);

try
{
    // Send Messages using Send method
    client.Send(manyMsg);
    Console.WriteLine("Message sent");
}
catch (Exception ex)
{
    Trace.WriteLine(ex.ToString());
}
대량 이메일 성공 추적
대량으로 메시지를 보낼 때 성공적으로 전송된 메시지 수에 대한 정보를 얻고 해당 메시지 목록을 받을 수도 있습니다. 이 SucceededSending 이벤트는 이 목적을 위해 사용됩니다.
코드 예시:
using (var client = new SmtpClient(host, SecurityOptions.Auto))
{
    int messageCount = 0;

    client.SucceededSending += (sender, eventArgs) =>
    {
        Console.WriteLine("The message '{0}' was successfully sent.", eventArgs.Message.Subject);
        messageCount++;
    };

    client.Send(messages);

    Console.WriteLine("{0} messages were successfully sent.", messageCount);
}
다중 연결을 사용한 이메일 전송
다음은 UseMultiConnection 속성은 무거운 작업을 위해 다중 연결을 생성하는 데 사용할 수 있습니다. 다중 연결 모드에서 사용할 연결 수는 다음을 사용하여 설정할 수 있습니다 SmtpClient.ConnectionsQuantity. 다음 코드 스니펫은 여러 메시지를 전송하기 위한 멀티연결 모드 사용을 보여줍니다.
var smtpClient = new SmtpClient();
smtpClient.Host = "<HOST>";
smtpClient.Username = "<USERNAME>";
smtpClient.Password = "<PASSWORD>";
smtpClient.Port = 587;
smtpClient.SupportedEncryption = EncryptionProtocols.Tls;
smtpClient.SecurityOptions = SecurityOptions.SSLExplicit;

var messages = new List<MailMessage>();
for (int i = 0; i < 20; i++)
{
    MailMessage message = new MailMessage(
        "<EMAIL ADDRESS>",
        "<EMAIL ADDRESS>",
        "Test Message - " + Guid.NewGuid().ToString(),
        "SMTP Send Messages with MultiConnection");
    messages.Add(message);
}

smtpClient.ConnectionsQuantity = 5;
smtpClient.UseMultiConnection = MultiConnectionMode.Enable;
smtpClient.Send(messages);
TNEF 형식으로 메시지 전송
TNEF 이메일은 표준 API를 사용하여 보낼 경우 손실될 수 있는 특수한 형식을 가지고 있습니다. 해당 SmtpClient 클래스 UseTnef 속성을 설정하면 이메일을 TNEF 형식으로 보낼 수 있습니다. 다음 코드 스니펫은 메시지를 TNEF로 보내는 방법을 보여줍니다.
var emlFileName = RunExamples.GetDataDir_Email() + "Message.eml";     // A TNEF Email

// Load from eml
var eml1 = MailMessage.Load(emlFileName, new EmlLoadOptions());
eml1.From = "somename@gmail.com";
eml1.To.Clear();
eml1.To.Add(new MailAddress("first.last@test.com"));
eml1.Subject = "With PreserveTnef flag during loading";
eml1.Date = DateTime.Now;

var client = new SmtpClient("smtp.gmail.com", 587, "somename", "password");
client.SecurityOptions = SecurityOptions.Auto;
client.UseTnef = true;     // Use this flag to send as TNEF
client.Send(eml1);
회의 요청 보내기
Aspose.Email은 개발자가 이메일에 캘린더 기능을 추가할 수 있게 합니다.
이메일을 통한 요청 전송
이메일로 회의 요청을 보내려면 다음 단계에 따라 진행하십시오:
- 다음의 인스턴스를 생성합니다. MailMessage 클래스.
- 인스턴스를 사용해 발신자와 수신자 주소를 지정합니다 MailMessage 클래스.
- 다음의 인스턴스를 초기화합니다 Appointment class에 값을 전달합니다.
- 요약 및 설명을 지정합니다 Calendar 인스턴스.
- 다음 추가 Calendar 에게 MailMessage 인스턴스를 생성하고 이를 전달합니다 Appointment 인스턴스.
|이메일로 전송된 iCalendar 회의 요청| | :- | |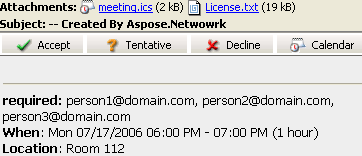 | 다음 코드 스니펫은 이메일을 통해 요청을 보내는 방법을 보여줍니다.
// Create an instance of the MailMessage class
var msg = new MailMessage();

// Set the sender, recipient, who will receive the meeting request. Basically, the recipient is the same as the meeting attendees
msg.From = "newcustomeronnet@gmail.com";
msg.To = "person1@domain.com, person2@domain.com, person3@domain.com, asposetest123@gmail.com";

// Create Appointment instance
var app = new Appointment("Room 112", new DateTime(2015, 7, 17, 13, 0, 0), new DateTime(2015, 7, 17, 14, 0, 0), msg.From, msg.To);
app.Summary = "Release Meetting";
app.Description = "Discuss for the next release";

// Add appointment to the message and Create an instance of SmtpClient class
msg.AddAlternateView(app.RequestApointment());
var client = GetSmtpClient();

try
{
    // Client.Send will send this message
    client.Send(msg);
    Console.WriteLine("Message sent");
}
catch (Exception ex)
{
    Trace.WriteLine(ex.ToString());
}
메시지 전달
SMTP 클라이언트를 사용한 메시지 전달
이메일 전달은 일반적인 관행입니다. 수신된 이메일은 특정 수신자에게 전달될 수 있습니다. 해당 전달 이 메서드는 수신하거나 저장된 이메일을 원하는 수신자에게 전달하는 데 사용할 수 있습니다. 아래 코드 스니펫은 SMTP 클라이언트를 사용하여 이메일을 전달하는 방법을 보여줍니다.
//Create an instance of SmtpClient class
var client = new SmtpClient();

// Specify your mailing host server, Username, Password, Port and SecurityOptions
client.Host = "mail.server.com";
client.Username = "username";
client.Password = "password";
client.Port = 587;
client.SecurityOptions = SecurityOptions.SSLExplicit;
var message = MailMessage.Load(dataDir + "Message.eml");
client.Forward("Recipient1@domain.com", "Recipient2@domain.com", message);
MailMessage 없이 메시지 전달
API는 먼저 로드하지 않고 EML 메시지를 전달하는 것도 지원합니다 MailMessage. 시스템 메모리가 제한된 경우에 유용합니다.
using (var client = new SmtpClient(host, smtpPort, username, password, SecurityOptions.Auto))
{
    using (var fs = File.OpenRead(@"test.eml"))
    {
        client.Forward(sender, recipients, fs);
    }
}
MailMessage 없이 비동기적으로 메시지 전달
using (var client = new SmtpClient(host, smtpPort, username, password))
{
    using (var fs = File.OpenRead(@"test.eml"))
    {
        await client.ForwardAsync(sender, recipients, fs);
    }
}
메일 병합
이메일 병합 방법
메일 병합을 사용하면 유사한 이메일 메시지를 일괄 생성 및 전송할 수 있습니다. 이메일 내용은 동일하지만, 받는 사람의 연락처 정보(이름, 성, 회사 등)를 활용해 개인화할 수 있습니다.
|메일 병합 작동 방식 예시:| | :- | |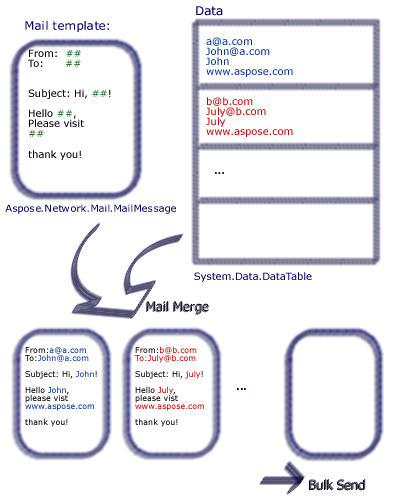 | Aspose.Email을 사용하면 개발자가 다양한 데이터 소스의 데이터를 포함하는 메일 병합을 설정할 수 있습니다.
Aspose.Email으로 메일 병합을 수행하려면 다음 단계를 따르세요:
- 다음 서명 이름을 가진 함수를 생성합니다
- 다음의 인스턴스를 생성합니다. MailMessage 클래스.
- 보낸 사람, 받는 사람, 제목 및 본문을 지정합니다.
- 이메일 끝에 서명을 생성합니다.
- 다음의 인스턴스를 생성합니다. TemplateEngine 클래스와 이를 전달합니다 MailMessage 인스턴스.
- 다음에서 서명을 가져옵니다 TemplateEngine 인스턴스.
- DataTable 클래스의 인스턴스를 생성합니다.
- DataTable 클래스에 Receipt, FirstName, LastName 열을 데이터 원본으로 추가합니다.
- DataRow 클래스의 인스턴스를 생성합니다.
- DataRow 객체에 수신 주소와 이름 및 성을 지정합니다.
- 다음의 인스턴스를 생성합니다. MailMessageCollection 클래스
- 지정하세요 TemplateEngine 및 DataTable 인스턴스를 MailMessageCollection 인스턴스.
- 다음의 인스턴스를 생성합니다. SmtpClient class에 서버, 포트, 사용자명 및 비밀번호를 지정합니다.
- 다음으로 이메일 전송: SmtpClient 클래스 보내기 메서드.
아래 샘플에서 #FirstName#은 사용자가 값을 설정하는 DataTable 열을 나타냅니다. 아래 코드 스니펫은 메일 병합을 수행하는 방법을 보여줍니다.
public static void Run()
{
    // The path to the File directory.
    string dataDir = RunExamples.GetDataDir_SMTP();
    string dstEmail = dataDir + "EmbeddedImage.msg";

    // Create a new MailMessage instance
    MailMessage msg = new MailMessage();

    // Add subject and from address
    msg.Subject = "Hello, #FirstName#";
    msg.From = "sender@sender.com";

    // Add email address to send email also Add mesage field to HTML body
    msg.To.Add("your.email@gmail.com");
    msg.HtmlBody = "Your message here";
    msg.HtmlBody += "Thank you for your interest in <STRONG>Aspose.Email</STRONG>.";

    // Use GetSignment as the template routine, which will provide the same signature
    msg.HtmlBody += "<br><br>Have fun with it.<br><br>#GetSignature()#";

    // Create a new TemplateEngine with the MSG message,  Register GetSignature routine. It will be used in MSG.
    TemplateEngine engine = new TemplateEngine(msg);
    engine.RegisterRoutine("GetSignature", GetSignature);

    // Create an instance of DataTable and Fill a DataTable as data source
    DataTable dt = new DataTable();
    dt.Columns.Add("Receipt", typeof(string));
    dt.Columns.Add("FirstName", typeof(string));
    dt.Columns.Add("LastName", typeof(string));

    DataRow dr = dt.NewRow();
    dr["Receipt"] = "abc<asposetest123@gmail.com>";
    dr["FirstName"] = "a";
    dr["LastName"] = "bc";
    dt.Rows.Add(dr);
    dr = dt.NewRow();
    dr["Receipt"] = "John<email.2@gmail.com>";
    dr["FirstName"] = "John";
    dr["LastName"] = "Doe";
    dt.Rows.Add(dr);
    dr = dt.NewRow();
    dr["Receipt"] = "Third Recipient<email.3@gmail.com>";
    dr["FirstName"] = "Third";
    dr["LastName"] = "Recipient";
    dt.Rows.Add(dr);

    MailMessageCollection messages;
    try
    {
        // Create messages from the message and datasource.
        messages = engine.Instantiate(dt);

        // Create an instance of SmtpClient and specify server, port, username and password
        SmtpClient client = new SmtpClient("smtp.gmail.com", 587, "your.email@gmail.com", "your.password");
        client.SecurityOptions = SecurityOptions.Auto;

        // Send messages in bulk
        client.Send(messages);
    }
    catch (MailException ex)
    {
        Debug.WriteLine(ex.ToString());
    }

    catch (SmtpException ex)
    {
        Debug.WriteLine(ex.ToString());
    }

    Console.WriteLine(Environment.NewLine + "Message sent after performing mail merge.");
}

// Template routine to provide signature
static object GetSignature(object[] args)
{
    return "Aspose.Email Team<br>Aspose Ltd.<br>" + DateTime.Now.ToShortDateString();
}
행별 메일 병합 수행 방법
사용자는 개별 데이터 행을 병합하고 완전하고 준비된 MailMessage object. 해당 TemplateEngine.Merge method는 행별 메일 병합을 수행하는 데 사용할 수 있습니다.
// Create message from the data in current row.
message = engine.Merge(currentRow);
DNS로 메일 보내기
프로젝트 요구 사항에 따라 구성된 SMTP 서버를 통해 이메일을 보내는 것이 불가능한 경우가 있습니다. 이런 경우 MX(메일 교환) 레코드를 조회해 수신자 도메인의 메일 서버로 직접 메시지를 전달할 수 있습니다.
Aspose.Email은 다음을 제공합니다 DnsClient MX 레코드를 확인하는 클래스입니다. 각 수신자에 대해 아래 코드는 해당 도메인의 메일 교환 서버를 조회하고, SmtpClient 인증 없이 구성됨(포트 25). 다음 코드 스니펫은 수신자 도메인의 메일 서버를 사용해 이메일을 보내는 방법을 보여줍니다.
static void Main(string[] args)
{
    try
    {
        MailMessage msg = new MailMessage("add1@domain.com", "add1@domain.com", "test", "this is a test");
        msg.CC.Add(new MailAddress("add2@domain.com", "CC Display Name"));
        DnsSendMessage(msg);
    }
    catch (Exception e)
    {
        Console.WriteLine(e.Message);
    }
}

private static void DnsSendMessage(MailMessage msg)
{
    // Get all the recipients in To, CC and Bcc in one collection
    MailAddressCollection addresses = new MailAddressCollection();
    foreach (MailAddress to in msg.To)
    {
        addresses.Add(to);
    }

    foreach (MailAddress cc in msg.CC)
    {
        addresses.Add(cc);
    }

    foreach (MailAddress bcc in msg.Bcc)
    {
        addresses.Add(bcc);
    }

    // Send mail using DNS to each address
    foreach (MailAddress addr in addresses)
    {
        // Find mail exchange servers with the help of DnsClient
        DnsClient dnsClient = new DnsClient();
        Question mxQuestion = new Question(addr.Host, QueryType.MX);
        if (dnsClient.Resolve(mxQuestion))
        {
            // Try to send a message
            foreach (ResourceRecord record in dnsClient.ReceivedMessage.Answers)
            {
                MXResourceRecord cnRecord = record as MXResourceRecord;
                if (cnRecord != null)
                {
                    try
                    {
                        // Send message
                        SmtpClient client = new SmtpClient();
                        client.AuthenticationMethod = SmtpAuthentication.None;
                        client.Host = cnRecord.ExchangeName;
                        client.Port = 25;
                        client.Send(msg);
                        Console.WriteLine("Mail sent to " + addr.Address);
                    }
                    catch (SmtpException e)
                    {
                        Console.WriteLine(cnRecord.ExchangeName + ": " + e.Message + Environment.NewLine);
                        continue;
                    }
                }
            }
        }
    }
}
전송 및 실패 메시지에 대한 전달 알림 받기
성공 및 실패한 메시지에 대한 전달 알림을 받으려면 파이프(|)를 사용합니다 (|) 연산자를 사용해 값을 결합합니다. DeliveryNotificationOptions 열거형을 만들고 이를 DeliveryNotificationOptions 속성 MailMessage 클래스. 다음 코드 스니펫은 성공적으로 전송된 메시지와 실패한 메시지 모두에 대한 알림을 받는 방법을 보여줍니다.
// Create the message
MailMessage msg = new MailMessage();
msg.From = "sender@sender.com";
msg.To = "receiver@receiver.com";
msg.Subject = "the subject of the message";

// Set delivery notifications for success and failed messages and add the MIME headers
msg.DeliveryNotificationOptions = DeliveryNotificationOptions.OnSuccess | DeliveryNotificationOptions.OnFailure;
msg.Headers.Add("Read-Receipt-To", "sender@sender.com");
msg.Headers.Add("Disposition-Notification-To", "sender@sender.com");

// Send the message
SmtpClient client = new SmtpClient("host", "username", "password");
client.Send(msg);
Office 문서를 메시지 본문으로 사용
Aspose.Email은 네트워크 프로토콜 및 Microsoft Outlook 기능을 처리하지만 자체적으로 Word 문서나 Excel 워크북을 렌더링하지 못합니다. 그러나 Aspose.Email을 다른 Aspose 제품과 결합하면 Office 문서를 HTML이나 MHTML로 변환해 이메일 본문으로 사용할 수 있습니다.
Microsoft Word 문서를 메시지 본문으로 사용
이 예제는 Aspose.Words for .NET Word 문서를 로드하고 MHTML 형식으로 변환합니다. Aspose.Email은 MHTML을 MailMessage 객체를 이메일 본문으로 사용하고 SMTP를 통해 전송합니다. HTML 서식 및 이미지가 원본 문서와 동일하게 Outlook이나 웹메일 클라이언트에서 보존됩니다.
- Aspose.Words를 사용해 Microsoft Word 문서를 로드합니다
Document클래스. - MHTML 형식의 스트림에 저장합니다.
- MHTML 스트림을 MailMessage 객체를 사용하여 MhtmlLoadOptions.
- 다른 메시지 속성을 설정합니다.
- 다음으로 이메일을 보냅니다 SmtpClient 클래스.
// Load a Word document from disk and save it to stream as MHTML
Document wordDocument = new Document(folderPath + "invoice.docx");
MemoryStream mhtmlStream = new MemoryStream();
wordDocument.Save(mhtmlStream, SaveFormat.Mhtml);

// Load the MHTML in a MailMessage object
mhtmlStream.Position = 0;
using (MailMessage message = MailMessage.Load(mhtmlStream, new MhtmlLoadOptions()))
{
    message.Subject = "Sending Invoice by Email";
    message.From = "sender@gmail.com";
    message.To = "recipient@gmail.com";

    // Save the message in MSG format to disk
    message.Save(folderPath + "WordDocAsEmailBody_out.msg", SaveOptions.DefaultMsgUnicode);

    // Send the email message
    using (SmtpClient client = new SmtpClient("smtp.gmail.com", 587, "sender@gmail.com", "password"))
    {
        client.SecurityOptions = SecurityOptions.SSLExplicit;
        client.Send(message);
    }
}
Microsoft Excel 워크시트를 메시지 본문으로 사용
이 예제는 Aspose.Cells for .NET Excel 워크북을 로드하고 HTML 스트림으로 변환합니다. Aspose.Email은 HTML을 MailMessage 그리고 SMTP를 통해 전송합니다.
- Aspose.Cells를 사용해 Microsoft Excel 워크북을 로드합니다
Workbook클래스. - 로드된 워크북을
MemoryStreamHTML 형식으로. - 스트림에서 HTML을 문자열로 읽습니다.
- 새로운 MailMessage 객체를 만들고 그
HtmlBodyHTML 콘텐츠에. - 다음으로 이메일을 보냅니다 SmtpClient 클래스.
// Load the desired workbook from disk
Workbook workbook = new Workbook(dataDir + "Data.xlsx");

// Save the workbook to a memory stream in HTML format
MemoryStream ms = new MemoryStream();
workbook.Save(ms, SaveFormat.Html);
ms.Position = 0;

// Define a StreamReader object with the above MemoryStream
StreamReader sr = new StreamReader(ms);

// Load the saved HTML from StreamReader into a string variable
string strHtmlBody = sr.ReadToEnd();

// Define a new MailMessage object and set its HtmlBody
MailMessage message = new MailMessage();
message.HtmlBody = strHtmlBody;
message.Subject = "Inline Excel Message";
message.From = "sender@abc.com";
message.To = "receiver@xyz.com";
message.IsBodyHtml = true;

SmtpClient client = new SmtpClient();
client.Host = "smtp.gmail.com";
client.Username = "Username";
client.Password = "Password";
client.Port = 587;
client.SecurityOptions = SecurityOptions.Auto;
client.Send(message);