
ใช้ SMTP Client เพื่อส่งอีเมล ส่งต่อข้อความ และทำ Mail Merge ใน C#
การส่งอีเมล
ส่งอีเมลด้วยคลาส SmtpClient
นี้ SmtpClient คลาสทำให้แอปพลิเคชันส่งอีเมลผ่าน Simple Mail Transfer Protocol (SMTP).
หนึ่งในคุณลักษณะสำคัญของมันคือความสามารถในการ ส่งข้อความเป็นกลุ่ม.
มันยังรองรับเต็มรูปแบบ แบบซิงโครนัส และ แบบอะซิงโครนัส โมเดลการเขียนโปรแกรม การส่งอีเมลโดยบล็อกเธรดหลักจนการทำงานเสร็จ นักพัฒนาสามารถใช้หนึ่งในเมธอดแบบซิงโครนัส ส่ง เมธอด อย่างไรก็ตาม เพื่อให้เธรดหลักทำงานต่อได้ขณะที่อีเมลกำลังส่ง นักพัฒนาสามารถใช้ SendAsync เมธอด.
เพิ่มเติม, SmtpClient รองรับการส่งข้อความใน Transport Neutral Encapsulation Format (TNEF).
ส่งอีเมลแบบ synchronous
ข้อความอีเมลสามารถส่งแบบซิงโครนัสโดยใช้ ส่ง เมธอดของ SmtpClient คลาส ส่งข้อความอีเมลที่ระบุผ่านเซิร์ฟเวอร์ SMTP เพื่อให้ส่งออกไป เพื่อส่งอีเมลแบบซิงโครนัส ทำตามขั้นตอนต่อไปนี้:
- สร้างอินสแตนซ์ของ MailMessage คลาสและตั้งค่าคุณสมบัติต่าง ๆ ของมัน
- สร้างอินสแตนซ์ของ SmtpClient คลาสและระบุโฮสต์, พอร์ต, ชื่อผู้ใช้ & รหัสผ่าน
- ส่งข้อความโดยใช้ ส่ง เมธอดของ SmtpClient คลาสและส่งผ่าน MailMessage อินสแตนซ์
ตัวอย่างโค้ด C# ต่อไปนี้แสดงวิธีส่งอีเมล Outlook แบบซิงโครนัส
// For complete examples and data files, please go to https://github.com/aspose-email/Aspose.Email-for-.NET
// Declare msg as MailMessage instance
MailMessage msg = new MailMessage();

// Create an instance of SmtpClient class
SmtpClient client = new SmtpClient();

// Specify your mailing host server, Username, Password, Port # and Security option
client.Host = "mail.server.com";
client.Username = "username";
client.Password = "password";
client.Port = 587;
client.SecurityOptions = SecurityOptions.SSLExplicit;

try
{
    // Client.Send will send this message
    client.Send(msg);
    Console.WriteLine("Message sent");
}
catch (Exception ex)
{
    Trace.WriteLine(ex.ToString());
}
ส่งอีเมลแบบอะซิงโครนัส
บางครั้งคุณอาจต้องการส่งเมลแบบอะซิงโครนัสให้โปรแกรมทำงานอื่นต่อไปในขณะที่อีเมลกำลังส่งในพื้นหลัง ตั้งแต่ .NET Framework 4.5 คุณสามารถใช้เมธอดอะซิงโครนัสที่ทำตาม TAP model ตัวอย่างโค้ด C# ด้านล่างแสดงวิธีส่งข้อความอีเมล Outlook ด้วยเมธอดแบบ asynchronous ที่อิงตาม task:
-
SendAsync ส่งข้อความที่ระบุ.
-
IAsyncSmtpClient - อนุญาตให้แอปพลิเคชันส่งข้อความโดยใช้โปรโตคอล SMTP (Simple Mail Transfer Protocol).
-
SmtpClient.CreateAsync - สร้างอินสแตนซ์ใหม่ของคลาส Aspose.Email.Clients.Smtp.SmtpClient
-
SmtpSend - ชุดพารามิเตอร์ของเมธอด Aspose.Email.Clients.Smtp.IAsyncSmtpClient.SendAsync(Aspose.Email.Clients.Smtp.Models.SmtpSend)
-
SmtpForward - พารามิเตอร์ของ Aspose.Email.Clients.Smtp.IAsyncSmtpClient.ForwardAsync(Aspose.Email.Clients.Smtp.Models.SmtpForward)
// Authenticate the client to obtain necessary permissions
static readonly string tenantId = "YOU_TENANT_ID";
static readonly string clientId = "YOU_CLIENT_ID";
static readonly string redirectUri = "http://localhost";
static readonly string username = "username";
static readonly string[] scopes = { "https://outlook.office.com/SMTP.Send" };

// Use the SmtpAsync method for asynchronous operations
static async Task Main(string[] args)
{
    await SmtpAsync();
    Console.ReadLine();
}

static async Task SmtpAsync()
{
    // Create token provider and get access token
    var tokenProvider = new TokenProvider(clientId, tenantId, redirectUri, scopes);
    var client = SmtpClient.CreateAsync("outlook.office365.com", username, tokenProvider, 587).GetAwaiter().GetResult();

    // Create a message to send
    var eml = new MailMessage("from@domain.com", "to@domain.com", "test subj async", "test body async");

    // send message
    var sendOptions = SmtpSend.Create();
    sendOptions.AddMessage(eml);
    await client.SendAsync(sendOptions);
    Console.WriteLine("message was sent");

    // forward message
    var fwdOptions = SmtpForward.Create();
    fwdOptions.SetMessage(eml);
    fwdOptions.AddRecipient("rec@domain.com");
    await client.ForwardAsync(fwdOptions);
    Console.WriteLine("message was forwarded");
}

// Token provider implementation
public class TokenProvider : IAsyncTokenProvider
{
    private readonly PublicClientApplicationOptions _pcaOptions;
    private readonly string[] _scopes;

    public TokenProvider(string clientId, string tenantId, string redirectUri, string[] scopes)
    {
        _pcaOptions = new PublicClientApplicationOptions
        {
            ClientId = clientId,
            TenantId = tenantId,
            RedirectUri = redirectUri
        };

        _scopes = scopes;
    }

    public async Task<OAuthToken> GetAccessTokenAsync(bool ignoreExistingToken = false, CancellationToken cancellationToken = default)
    {

        var pca = PublicClientApplicationBuilder
            .CreateWithApplicationOptions(_pcaOptions).Build();

        try
        {
            var result = await pca.AcquireTokenInteractive(_scopes)
                .WithUseEmbeddedWebView(false)
                .ExecuteAsync(cancellationToken);

            return new OAuthToken(result.AccessToken);
        }
        catch (MsalException ex)
        {
            Console.WriteLine($"Error acquiring access token: {ex}");
        }
        catch (Exception ex)
        {
            Console.WriteLine($"Error: {ex}");
        }

        return null;
    }

    public void Dispose()
    {

    }
}
ส่งข้อความจากดิสก์
ไฟล์ EML มีส่วนหัว ส่วนเนื้อหา และไฟล์แนบ Aspose.Email ช่วยให้นักพัฒนาสามารถทำงานกับไฟล์ EML ได้หลายวิธี ส่วนนี้แสดงวิธีโหลดไฟล์ EML จากดิสก์และส่งเป็นอีเมลโดยใช้ SMTP คุณสามารถโหลดไฟล์ .eml จากดิสก์หรือสตรีมเข้าไปใน MailMessage คลาสและส่งข้อความอีเมลโดยใช้ SmtpClient คลาส. เมธอด MailMessage คลาสเป็นคลาสหลักสำหรับสร้างข้อความอีเมลใหม่ โหลดไฟล์ข้อความอีเมลจากดิสก์หรือสตรีม และบันทึกข้อความ ตัวอย่างโค้ด C# ต่อไปนี้แสดงวิธีส่งข้อความที่เก็บไว้จากดิสก์.
// For complete examples and data files, please go to https://github.com/aspose-email/Aspose.Email-for-.NET
// Load an EML file in MailMessage class
var message = MailMessage.Load(dataDir + "test.eml");

// Send this message using SmtpClient
var client = new SmtpClient("host", "username", "password");

try
{
    client.Send(message);
}
catch (Exception ex)
{
    Console.WriteLine(ex.Message);
}
ส่งอีเมลในรูปแบบข้อความธรรมดา
นี้ Body คุณสมบัติ, เป็นคุณสมบัติของ MailMessage คลาส, ใช้ระบุเนื้อหาข้อความธรรมดของส่วนข้อความ. เพื่อส่งอีเมลข้อความธรรมดา, ปฏิบัตตามขั้นตอนต่อไปนี้:
- สร้างอินสแตนซ์ของ MailMessage คลาส.
- ระบุที่อยู่อีเมลผู้ส่งและผู้รับใน MailMessage อินสแตนซ์
- ระบุ Body เนื้อหา, ใช้สำหรับข้อความแบบข้อความธรรมดา.
- สร้างอินสแตนซ์ของ SmtpClient คลาสและส่งอีเมล.
โค้ดตัวอย่างต่อไปนี้แสดงวิธีการส่งอีเมลข้อความธรรมดา.
// For complete examples and data files, please go to https://github.com/aspose-email/Aspose.Email-for-.NET
//Create an instance of the MailMessage class
var message = new MailMessage();

// Set From field, To field and Plain text body
message.From = "sender@sender.com";
message.To.Add("receiver@receiver.com");
message.Body = "This is Plain Text Body";

// Create an instance of the SmtpClient class
var client = new SmtpClient();

// And Specify your mailing host server, Username, Password and Port
client.Host = "smtp.server.com";
client.Username = "Username";
client.Password = "Password";
client.Port = 25;

try
{
    //Client.Send will send this message
    client.Send(message);
    Console.WriteLine("Message sent");
}
catch (Exception ex)
{
    System.Diagnostics.Trace.WriteLine(ex.ToString());
}
ส่งอีเมลพร้อมส่วนเนื้อหา HTML
ตัวอย่างโปรแกรมด้านล่างแสดงวิธีการส่งอีเมล HTML อย่างง่าย. HtmlBody, เป็นคุณสมบัติของ MailMessage คลาส, ใช้ระบุเนื้อหา HTML ของส่วนข้อความ. เพื่อส่งอีเมล HTML อย่างง่าย, ปฏิบัตตามขั้นตอนต่อไปนี้:
- สร้างอินสแตนซ์ของ MailMessage คลาส.
- ระบุที่อยู่อีเมลผู้ส่งและผู้รับใน MailMessage อินสแตนซ์
- ระบุ HtmlBody เนื้อหา.
- สร้างอินสแตนซ์ของ SmtpClient คลาสและส่งอีเมลโดยใช้ ส่ง เมธอด.
เพื่อจุดประสงค์ของบทความนี้ เนื้อหา HTML ของอีเมลเป็นเพียงพื้นฐาน:
This is the HTML body อีเมล HTML ส่วนใหญ่จะซับซ้อนมากกว่า ตัวอย่างโค้ดต่อไปนี้แสดงวิธีส่งอีเมลที่มีส่วนเนื้อหา HTML.// For complete examples and data files, please go to https://github.com/aspose-email/Aspose.Email-for-.NET
public static void Run()
{
// Declare msg as MailMessage instance
var msg = new MailMessage();
// Use MailMessage properties like specify sender, recipient, message and HtmlBody
msg.From = "newcustomeronnet@gmail.com";
msg.To = "asposetest123@gmail.com";
msg.Subject = "Test subject";
msg.HtmlBody = "<html><body>This is the HTML body</body></html>";
var client = GetSmtpClient();
try
{
// Client will send this message
client.Send(msg);
Console.WriteLine("Message sent");
}
catch (Exception ex)
{
Trace.WriteLine(ex.ToString());
}
Console.WriteLine(Environment.NewLine + "Email sent with HTML body.");
}
private static SmtpClient GetSmtpClient()
{
var client = new SmtpClient("smtp.gmail.com", 587, "your.email@gmail.com", "your.password");
client.SecurityOptions = SecurityOptions.Auto;
return client;
}
ส่งอีเมล HTML พร้อมข้อความสำรอง
ใช้ AlternateView คลาสเพื่อระบุสำเนาข้อความอีเมลในรูปแบบต่างๆ. ตัวอย่างเช่น หากคุณส่งข้อความเป็น HTML, คุณอาจต้องการให้เวอร์ชันข้อความธรรมดาสำหรับผู้รับที่ใช้โปรแกรมอ่านอีเมลที่ไม่รองรับ HTML. หรือหากคุณส่งจดหมายข่าว, คุณอาจต้องการให้สำเนาข้อความธรรมดาสำหรับผู้รับที่เลือกรับเวอร์ชันข้อความธรรมดา. เพื่อส่งอีเมลพร้อมข้อความสำรอง, ปฏิบัติตามขั้นตอนต่อไปนี้:
- สร้างอินสแตนซ์ของ MailMessage คลาส.
- ระบุที่อยู่อีเมลผู้ส่งและผู้รับใน MailMessage อินสแตนซ์
- สร้างอินสแตนซ์ของ AlternateView คลาส.
นี่จะสร้างมุมมองสำรองสำหรับข้อความอีเมลโดยใช้เนื้อหาที่ระบุในสตริง.
- เพิ่มอินสแตนซ์ของ AlternateView คลาสไปยัง MailMessage อ็อบเจ็กต์.
- สร้างอินสแตนซ์ของ SmtpClient คลาสและส่งอีเมลโดยใช้ ส่ง เมธอด.
โค้ดตัวอย่างต่อไปนี้แสดงวิธีการส่งอีเมลพร้อมข้อความสำรอง.
// For complete examples and data files, please go to https://github.com/aspose-email/Aspose.Email-for-.NET
// Declare message as MailMessage instance
var message = new MailMessage();

// Creates AlternateView to view an email message using the content specified in the //string
var alternate = AlternateView.CreateAlternateViewFromString("Alternate Text");

// Adding alternate text
message.AlternateViews.Add(alternate);
ส่งอีเมลแบบกลุ่ม
เราสามารถส่งชุดของอีเมลโดยใช้ SmtpClient คลาสของ ส่ง เมธอดโอเวอร์โหลดที่รับ MailMessageCollection:
- สร้างอินสแตนซ์ของ SmtpClient คลาส.
- ระบุ SmtpClient คุณสมบัติของคลาส.
- สร้างอินสแตนซ์ของ MailMessage คลาส.
- ระบุผู้ส่ง, ผู้รับ, เรื่องอีเมลและข้อความในอินสแตนซ์ของ MailMessage คลาส.
- ทำซ้ำสองขั้นตอนข้างต้นอีกครั้ง หากคุณต้องการส่งอีเมลไปยังคนอื่น.
- สร้างอินสแตนซ์ของ MailMessageCollection คลาส.
- เพิ่มอินสแตนซ์ของ MailMessage คลาสในออบเจกต์ของ MailMessageCollection คลาส.
- ตอนนี้ส่งอีเมลของคุณโดยใช้ SmtpClient คลาส ส่ง เมธอดโดยส่งออบเจกต์ instance ของ MailMessageCollection คลาสในนั้น.
โค้ดตัวอย่างต่อไปนี้แสดงวิธีส่งอีเมลเป็นกลุ่ม.
// For complete examples and data files, please go to https://github.com/aspose-email/Aspose.Email-for-.NET
// Create SmtpClient as client and specify server, port, user name and password
var client = new SmtpClient("mail.server.com", 25, "Username", "Password");

// Create instances of MailMessage class and Specify To, From, Subject and Message
var message1 = new MailMessage("msg1@from.com", "msg1@to.com", "Subject1", "message1, how are you?");
var message2 = new MailMessage("msg1@from.com", "msg2@to.com", "Subject2", "message2, how are you?");
var message3 = new MailMessage("msg1@from.com", "msg3@to.com", "Subject3", "message3, how are you?");

// Create an instance of MailMessageCollection class
var manyMsg = new MailMessageCollection();
manyMsg.Add(message1);
manyMsg.Add(message2);
manyMsg.Add(message3);

try
{
    // Send Messages using Send method
    client.Send(manyMsg);
    Console.WriteLine("Message sent");
}
catch (Exception ex)
{
    Trace.WriteLine(ex.ToString());
}
ติดตามความสำเร็จของอีเมลแบบกลุ่ม
เมื่อคุณส่งข้อความเป็นกลุ่ม คุณสามารถรับข้อมูลเกี่ยวกับจำนวนข้อความที่ส่งสำเร็จและแม้แต่รับรายการของข้อความเหล่านั้นได้. SucceededSending เหตุการณ์นี้ใช้เพื่อวัตถุประสงค์นี้.
ตัวอย่างโค้ด:
using (var client = new SmtpClient(host, SecurityOptions.Auto))
{
    int messageCount = 0;

    client.SucceededSending += (sender, eventArgs) =>
    {
        Console.WriteLine("The message '{0}' was successfully sent.", eventArgs.Message.Subject);
        messageCount++;
    };

    client.Send(messages);

    Console.WriteLine("{0} messages were successfully sent.", messageCount);
}
ส่งอีเมลด้วย MultiConnection
นี้ UseMultiConnection คุณสมบัตินี้สามารถใช้เพื่อสร้างการเชื่อมต่อหลาย ๆ รายการสำหรับการทำงานหนัก คุณยังสามารถตั้งจำนวนการเชื่อมต่อที่จะใช้ในโหมด multi-connection โดยใช้ SmtpClient.ConnectionsQuantity. โค้ดตัวอย่างต่อไปนี้สาธิตการใช้โหมดหลายการเชื่อมต่อสำหรับการส่งหลายข้อความ.
var smtpClient = new SmtpClient();
smtpClient.Host = "<HOST>";
smtpClient.Username = "<USERNAME>";
smtpClient.Password = "<PASSWORD>";
smtpClient.Port = 587;
smtpClient.SupportedEncryption = EncryptionProtocols.Tls;
smtpClient.SecurityOptions = SecurityOptions.SSLExplicit;

var messages = new List<MailMessage>();
for (int i = 0; i < 20; i++)
{
    MailMessage message = new MailMessage(
        "<EMAIL ADDRESS>",
        "<EMAIL ADDRESS>",
        "Test Message - " + Guid.NewGuid().ToString(),
        "SMTP Send Messages with MultiConnection");
    messages.Add(message);
}

smtpClient.ConnectionsQuantity = 5;
smtpClient.UseMultiConnection = MultiConnectionMode.Enable;
smtpClient.Send(messages);
ส่งข้อความในรูปแบบ TNEF
อีเมล TNEF มีรูปแบบพิเศษที่อาจสูญหายหากส่งโดยใช้ API มาตรฐาน. SmtpClient คลาส UseTnef คุณสมบัติสามารถตั้งค่าเพื่อส่งอีเมลในรูปแบบ TNEF ตัวอย่างโค้ดต่อไปนี้แสดงวิธีการส่งข้อความเป็น TNEF
var emlFileName = RunExamples.GetDataDir_Email() + "Message.eml";     // A TNEF Email

// Load from eml
var eml1 = MailMessage.Load(emlFileName, new EmlLoadOptions());
eml1.From = "somename@gmail.com";
eml1.To.Clear();
eml1.To.Add(new MailAddress("first.last@test.com"));
eml1.Subject = "With PreserveTnef flag during loading";
eml1.Date = DateTime.Now;

var client = new SmtpClient("smtp.gmail.com", 587, "somename", "password");
client.SecurityOptions = SecurityOptions.Auto;
client.UseTnef = true;     // Use this flag to send as TNEF
client.Send(eml1);
ส่งคำขอประชุม
Aspose.Email ให้ผู้พัฒนาสามารถเพิ่มฟังก์ชันวัดปฏิทินลงในอีเมลของคุณ
ส่งคำขอผ่านอีเมล
เพื่อส่งคำขอการประชุมผ่านอีเมล ให้ทำตามขั้นตอนต่อไปนี้:
- สร้างอินสแตนซ์ของ MailMessage คลาส.
- ระบุที่อยู่ผู้ส่งและผู้รับโดยใช้อินสแตนซ์ของ MailMessage คลาส.
- เริ่มต้นอินสแตนซ์ของ Appointment คลาสและส่งค่าของมัน
- ระบุสรุปและรายละเอียดใน Calendar อินสแตนซ์
- เพิ่ม Calendar ไปยัง MailMessage อินสแตนซ์และส่งค่าให้ Appointment อินสแตนซ์
|คำขอประชุม iCalendar ส่งทางอีเมล| | :- | |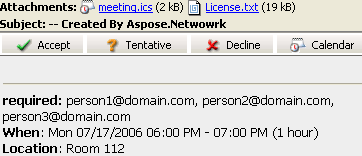 | ตัวอย่างโค้ดต่อไปนี้แสดงวิธีส่งคำขอผ่านอีเมล
// Create an instance of the MailMessage class
var msg = new MailMessage();

// Set the sender, recipient, who will receive the meeting request. Basically, the recipient is the same as the meeting attendees
msg.From = "newcustomeronnet@gmail.com";
msg.To = "person1@domain.com, person2@domain.com, person3@domain.com, asposetest123@gmail.com";

// Create Appointment instance
var app = new Appointment("Room 112", new DateTime(2015, 7, 17, 13, 0, 0), new DateTime(2015, 7, 17, 14, 0, 0), msg.From, msg.To);
app.Summary = "Release Meetting";
app.Description = "Discuss for the next release";

// Add appointment to the message and Create an instance of SmtpClient class
msg.AddAlternateView(app.RequestApointment());
var client = GetSmtpClient();

try
{
    // Client.Send will send this message
    client.Send(msg);
    Console.WriteLine("Message sent");
}
catch (Exception ex)
{
    Trace.WriteLine(ex.ToString());
}
ส่งต่อข้อความ
ส่งต่อข้อความด้วย SMTP Client
การส่งต่ออีเมลเป็นการปฏิบัติทั่วไป อีเมลที่ได้รับสามารถส่งต่อไปยังผู้รับเฉพาะได้. ส่งต่อ เมธอดนี้สามารถใช้เพื่อส่งต่ออีเมลที่ได้รับหรือบันทึกไปยังผู้รับที่ต้องการ ตัวอย่างโค้ดต่อไปนี้แสดงวิธีส่งต่ออีเมลโดยใช้ SMTP Client.
//Create an instance of SmtpClient class
var client = new SmtpClient();

// Specify your mailing host server, Username, Password, Port and SecurityOptions
client.Host = "mail.server.com";
client.Username = "username";
client.Password = "password";
client.Port = 587;
client.SecurityOptions = SecurityOptions.SSLExplicit;
var message = MailMessage.Load(dataDir + "Message.eml");
client.Forward("Recipient1@domain.com", "Recipient2@domain.com", message);
ส่งต่อข้อความโดยไม่ใช้ MailMessage
API ยังรองรับการส่งต่อข้อความ EML โดยไม่ต้องโหลดเข้าก่อน MailMessage. สิ่งนี้มีประโยชน์ในกรณีที่ทรัพยากรระบบโดยเฉพาะหน่วยความจำมีจำกัด
using (var client = new SmtpClient(host, smtpPort, username, password, SecurityOptions.Auto))
{
    using (var fs = File.OpenRead(@"test.eml"))
    {
        client.Forward(sender, recipients, fs);
    }
}
ส่งต่อข้อความแบบอะซิงโครนัสโดยไม่ใช้ MailMessage
using (var client = new SmtpClient(host, smtpPort, username, password))
{
    using (var fs = File.OpenRead(@"test.eml"))
    {
        await client.ForwardAsync(sender, recipients, fs);
    }
}
Mail Merge
วิธีรวมอีเมล
Mail merge ช่วยให้คุณสร้างและส่งอีเมลหลายฉบับที่คล้ายกัน เนื้อหาหลักของอีเมลจะเหมือนกัน แต่เนื้อหาสามารถปรับให้เป็นส่วนบุคคลได้ โดยทั่วไปรายละเอียดติดต่อของผู้รับ (ชื่อ, นามสกุล, บริษัท ฯลฯ) จะใช้เพื่อปรับเนื้อหาอีเมล
|ภาพอธิบายการทำงานของ mail merge:| | :- | |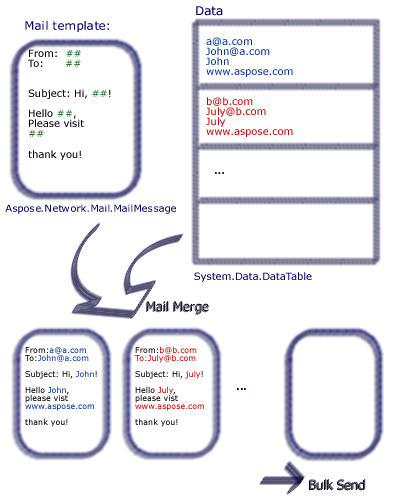 | Aspose.Email ให้ผู้พัฒนาตั้งค่า mail merge ที่รวมข้อมูลจากแหล่งข้อมูลหลายรูปแบบ
เพื่อทำการรวมจดหมายด้วย Aspose.Email ให้ทำตามขั้นตอนต่อไปนี้:
- สร้างฟังก์ชันด้วยลายเซ็นชื่อ
- สร้างอินสแตนซ์ของ MailMessage คลาส.
- ระบุผู้ส่ง, ผู้รับ, เรื่อง, และเนื้อหา
- สร้างลายเซ็นสำหรับส่วนท้ายของอีเมล
- สร้างอินสแตนซ์ของ TemplateEngine คลาสและส่งต่อให้ MailMessage อินสแตนซ์
- รับลายเซ็นใน TemplateEngine อินสแตนซ์
- สร้างอินสแตนซ์ของคลาส DataTable.
- เพิ่มคอลัมน์ Receipt, FirstName และ LastName เป็นแหล่งข้อมูลในคลาส DataTable.
- สร้างอินสแตนซ์ของคลาส DataRow.
- ระบุที่อยู่ผู้รับ ชื่อและนามสกุลในอ็อบเจ็กต์ DataRow.
- สร้างอินสแตนซ์ของ MailMessageCollection คลาส
- ระบุ TemplateEngine และอินสแตนซ์ DataTable ใน MailMessageCollection อินสแตนซ์
- สร้างอินสแตนซ์ของ SmtpClient คลาสและระบุเซิร์ฟเวอร์, พอร์ต, ชื่อผู้ใช้, และรหัสผ่าน
- ส่งอีเมลโดยใช้ SmtpClient คลาส ส่ง เมธอด.
ในตัวอย่างด้านล่าง #FirstName# แสดงคอลัมน์ของ DataTable ซึ่งค่าถูกตั้งโดยผู้ใช้ ตัวอย่างโค้ดต่อไปนี้แสดงวิธีทำ Mail Merge.
// For complete examples and data files, please go to https://github.com/aspose-email/Aspose.Email-for-.NET
public static void Run()
{
    // The path to the File directory.
    string dataDir = RunExamples.GetDataDir_SMTP();
    string dstEmail = dataDir + "EmbeddedImage.msg";

    // Create a new MailMessage instance
    MailMessage msg = new MailMessage();

    // Add subject and from address
    msg.Subject = "Hello, #FirstName#";
    msg.From = "sender@sender.com";

    // Add email address to send email also Add mesage field to HTML body
    msg.To.Add("your.email@gmail.com");
    msg.HtmlBody = "Your message here";
    msg.HtmlBody += "Thank you for your interest in <STRONG>Aspose.Email</STRONG>.";

    // Use GetSignment as the template routine, which will provide the same signature
    msg.HtmlBody += "<br><br>Have fun with it.<br><br>#GetSignature()#";

    // Create a new TemplateEngine with the MSG message,  Register GetSignature routine. It will be used in MSG.
    TemplateEngine engine = new TemplateEngine(msg);
    engine.RegisterRoutine("GetSignature", GetSignature);

    // Create an instance of DataTable and Fill a DataTable as data source
    DataTable dt = new DataTable();
    dt.Columns.Add("Receipt", typeof(string));
    dt.Columns.Add("FirstName", typeof(string));
    dt.Columns.Add("LastName", typeof(string));

    DataRow dr = dt.NewRow();
    dr["Receipt"] = "abc<asposetest123@gmail.com>";
    dr["FirstName"] = "a";
    dr["LastName"] = "bc";
    dt.Rows.Add(dr);
    dr = dt.NewRow();
    dr["Receipt"] = "John<email.2@gmail.com>";
    dr["FirstName"] = "John";
    dr["LastName"] = "Doe";
    dt.Rows.Add(dr);
    dr = dt.NewRow();
    dr["Receipt"] = "Third Recipient<email.3@gmail.com>";
    dr["FirstName"] = "Third";
    dr["LastName"] = "Recipient";
    dt.Rows.Add(dr);

    MailMessageCollection messages;
    try
    {
        // Create messages from the message and datasource.
        messages = engine.Instantiate(dt);

        // Create an instance of SmtpClient and specify server, port, username and password
        SmtpClient client = new SmtpClient("smtp.gmail.com", 587, "your.email@gmail.com", "your.password");
        client.SecurityOptions = SecurityOptions.Auto;

        // Send messages in bulk
        client.Send(messages);
    }
    catch (MailException ex)
    {
        Debug.WriteLine(ex.ToString());
    }

    catch (SmtpException ex)
    {
        Debug.WriteLine(ex.ToString());
    }

    Console.WriteLine(Environment.NewLine + "Message sent after performing mail merge.");
}

// Template routine to provide signature
static object GetSignature(object[] args)
{
    return "Aspose.Email Team<br>Aspose Ltd.<br>" + DateTime.Now.ToShortDateString();
}
วิธีทำ Mail Merge แถวต่อแถว
ผู้ใช้สามารถรวมแถวข้อมูลเฉพาะเจาะจงและยังสามารถรับชุดข้อมูลที่สมบูรณ์และพร้อมใช้งาน MailMessage อ็อบเจ็กต์. TemplateEngine.Merge เมธอดสามารถใช้เพื่อทำการรวมเมลแบบแถวต่อแถว
// For complete examples and data files, please go to https://github.com/aspose-email/Aspose.Email-for-.NET
// Create message from the data in current row.
message = engine.Merge(currentRow);