Wグラデーションの操作 | Python
PSドキュメントにグラデーションを追加する
この記事では、Aspose.Page for Pythonを使用してPSドキュメントにグラデーションを実装する方法について説明します。
グラデーションは、色間の滑らかな遷移を表現し、描画画像のリアリティを高めます。
Aspose.Page for Pythonでは、グラデーションはaspose.pydrawing.Brushのサブクラスとして実装されています。具体的には、
- aspose.pydrawing.drawing2d.LinearGradientBrush
- aspose.pydrawing.drawing2d.PathGradientBrush
PsDocument でペイントまたはストロークを適用するには、ペイント用の aspose.pydrawing.Brush クラスのオブジェクトとストローク用の aspose.pydrawing.Pen クラスのオブジェクトがそれぞれのメソッドに渡されます。Aspose.Page for Python は、.NET プラットフォームで提供される aspose.pydrawing.Brush 内のすべての必須クラス (aspose.pydrawing.Color、aspose.pydrawing.TextureBrush、aspose.pydrawing.drawing2d.LinearGradientBrush、aspose.pydrawing.drawing2d.PathGradientBrush など) をサポートしています。ストロークの色は、aspose.pydrawing.Pen オブジェクト の aspose.pydrawing.Brush を使用して、ストロークのプロパティとは別に割り当てられます。
グラフィック オブジェクトをグラデーションで描画するには、aspose.pydrawing.drawing2d.LinearGradientBrush または aspose.pydrawing.drawing2d.PathGradientBrush を作成し、set_paint() または fill_text() メソッドや fill_and_stroke_text() メソッドのいずれかに渡します。これらのメソッドは、aspose.pydrawing.Brush をパラメーターとして受け取ります。
グラフィック オブジェクトをグラデーションでアウトラインするには、aspose.pydrawing.drawing2d.LinearGradientBrush または aspose.pydrawing.drawing2d.PathGradientBrush を set_paint() または outline_text() メソッドや fill_and_stroke_text() メソッドのいずれかに渡します。これらのメソッドは、ストローク ペイントをパラメーターとして受け取ります。
以下の例では、図形とテキストを塗りつぶし、テキストにグラデーションでアウトラインを設定する方法を示します。
新しいPSドキュメントでグラフィックオブジェクトにグラデーションを適用するアルゴリズムは、以下の手順で構成されます。
- 結果のPSファイル用の出力ストリームを作成します。
- PsSaveOptions を初期化します。
- 既に作成済みの出力ストリームと保存オプションを使用して、 PsDocument を作成します。
- 塗りつぶしまたはアウトラインを設定するオブジェクトに応じて、必要なグラフィックパスまたはフォントを作成します。
- 希望するグラデーションの形状に応じて、aspose.pydrawing.drawing2d.LinearGradientBrush または aspose.pydrawing.drawing2d.PathGradientBrush のオブジェクトを作成します。
- このブラシに必要な変換を設定します。
- PsDocument でグラデーション ブラシを現在のペイントとして設定します。
- グラフィック パスを現在のペイントで塗りつぶすか、テキストを塗りつぶします。aspose.pydrawing.Brush をパラメーターとして受け入れるテキスト塗りつぶしメソッドのいずれかを使用する場合は、前の手順は省略できます。
- ページを閉じます。
- ドキュメントを保存します。
最後の4つの手順の代わりに、グラデーションを使ってグラフィックオブジェクトを*ストローク(アウトライン)*する必要がある場合は、次のようになります。
- PsDocument でグラデーションを現在のペイントとして設定します。
- aspose.pydrawing.Pen オブジェクトを作成します。
- このストロークを PsDocument で現在のストロークとして設定します。
- 現在のストロークでグラフィックパスのアウトラインを作成するか、テキストのアウトラインを作成します。aspose.pydrawing.Pen をパラメーターとして受け入れるテキストのアウトライン方法のいずれかを使用する場合は、前の手順は無視できます。
- ページを閉じます。
- ドキュメントを保存します。
以下に、異なるグラデーションの使い方を示す5つのコードスニペットを紹介します。
このコードスニペットでは、2色で水平方向の線形グラデーションを作成し、長方形を塗りつぶし、テキストを塗りつぶし、このグラデーションでテキストのアウトラインを作成します。
 1# The path to the documents directory.
 2data_dir = Util.get_data_dir_working_with_gradient()
 3
 4# Create an output stream for the PostScript document
 5with open(data_dir + "HorizontalGradient_outPS.ps", "wb") as out_ps_stream:
 6    # Create the save options with the A4 size
 7    options = PsSaveOptions()
 8
 9    # Create a new 1-paged PS Document
10    document = PsDocument(out_ps_stream, options, False)
11
12    offset_x = 200.
13    offset_y = 100.
14    width = 200.
15    height = 100.
16
17    # Create a graphics path from the first rectangle
18    path = aspose.pydrawing.drawing2d.GraphicsPath()
19    path.add_rectangle(aspose.pydrawing.RectangleF(offset_x, offset_y, width, height))
20
21    # Create a linear gradient brush with a rectangle as a bounds, start and end colors
22    brush = GraphicsFactory.create_linear_gradient_brush_by_rect_and_angle(aspose.pydrawing.RectangleF(0, 0, width, height),
23        aspose.pydrawing.Color.from_argb(150, 0, 0, 0), aspose.pydrawing.Color.from_argb(50, 40, 128, 70), 0)
24    # Create a transform for brush. X and Y scale component must be equal to the width and height of the rectangle correspondingly.
25    # Translation components are offsets of the rectangle
26    brush_transform = aspose.pydrawing.drawing2d.Matrix(width, 0., 0., height, offset_x, offset_y)
27    # Set the transform
28    brush.transform = brush_transform
29
30    # Set the paint
31    document.set_paint(brush)
32
33    # Fill the rectangle
34    document.fill(path)
35
36    # Fill the text with the gradient
37    font = ExternalFontCache.fetch_dr_font("Arial", 96, aspose.pydrawing.FontStyle.BOLD)
38    document.fill_and_stroke_text("ABC", font, 200, 300, brush,
39    GraphicsFactory.create_pen_by_brush_and_width(aspose.pydrawing.SolidBrush(aspose.pydrawing.Color.black), 2))
40
41    # Set a current stroke
42    document.set_stroke(GraphicsFactory.create_pen_by_brush_and_width(brush, 5))
43    # Outline text with the gradient
44    document.outline_text("ABC", font, 200, 400)
45
46    # Close the current page
47    document.close_page()
48
49    # Save the document
50    document.save()
このコードを実行すると、次のようになります。

このコードスニペットでは、5色から垂直方向の線形グラデーションを作成し、そのグラデーションで四角形を塗りつぶしています。
 1# The path to the documents directory.
 2data_dir = Util.get_data_dir_working_with_gradient()
 3
 4# Create an output stream for the PostScript document
 5with open(data_dir + "VerticalGradient_outPS.ps", "wb") as out_ps_stream:
 6    # Create the save options with the A4 size
 7    options = PsSaveOptions()
 8
 9    # Create a new 1-paged PS Document
10    document = PsDocument(out_ps_stream, options, False)
11
12    offset_x = 200.
13    offset_y = 100.
14    width = 200.
15    height = 100.
16
17    # Create a graphics path from the first rectangle
18    path = aspose.pydrawing.drawing2d.GraphicsPath()
19    path.add_rectangle(aspose.pydrawing.RectangleF(offset_x, offset_y, width, height))
20
21    # Create an array of interpolation colors
22    colors = [ aspose.pydrawing.Color.red, aspose.pydrawing.Color.green, aspose.pydrawing.Color.blue,
23    aspose.pydrawing.Color.orange, aspose.pydrawing.Color.dark_olive_green ]
24    positions = [ 0.0, 0.1873, 0.492, 0.734, 1.0 ]
25    color_blend = aspose.pydrawing.drawing2d.ColorBlend()
26    color_blend.colors = colors
27    color_blend.positions = positions
28
29    # Create a linear gradient brush with a rectangle as a bounds, start and end colors
30    brush = GraphicsFactory.create_linear_gradient_brush_by_rect_and_angle(aspose.pydrawing.RectangleF(0, 0, width, height),
31    aspose.pydrawing.Color.beige, aspose.pydrawing.Color.dodger_blue, 0)
32    # Set interpolation colors
33    brush.interpolation_colors = color_blend
34    # Create a transform for brush. X and Y scale component must be equal to the width and height of the rectangle correspondingly.
35    # Translation components are offsets of the rectangle
36    brush_transform = aspose.pydrawing.drawing2d.Matrix(width, 0., 0., height, offset_x, offset_y)
37    # Rotate transform to get colors change in the vertical direction from up to down
38    brush_transform.rotate(90.)
39    # Set the transform
40    brush.transform = brush_transform
41
42    # Set the paint
43    document.set_paint(brush)
44
45    # Fill the rectangle
46    document.fill(path)
47
48    # Close the current page
49    document.close_page()
50
51    # Save the document
52    document.save()
結果はこちら

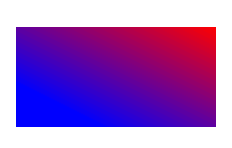
このコードスニペットでは、2色で斜めの線形グラデーションを作成し、このグラデーションで四角形を塗りつぶします。
 1# Create an output stream for PostScript document
 2with open(data_dir + "DiagonaGradient_outPS.ps", "wb") as out_ps_stream:
 3    # Create the save options with A4 size
 4    options = PsSaveOptions()
 5
 6    # Create a new 1-paged PS Document
 7    document = PsDocument(out_ps_stream, options, False)
 8
 9    offset_x = 200.
10    offset_y = 100.
11    width = 200.
12    height = 100.
13
14    # Create a graphics path from the first rectangle
15    path = aspose.pydrawing.drawing2d.GraphicsPath()
16    path.add_rectangle(aspose.pydrawing.RectangleF(offset_x, offset_y, width, height))
17
18    # Create a linear gradient brush with a rectangle as a bounds, start and end colors
19    brush = GraphicsFactory.create_linear_gradient_brush_by_rect_and_angle(aspose.pydrawing.RectangleF(0, 0, width, height),
20    aspose.pydrawing.Color.from_argb(255, 255, 0, 0), aspose.pydrawing.Color.from_argb(255, 0, 0, 255), 0)
21
22    # Create a transform for brush. X and Y scale component must be equal to the width and height of the rectangle correspondingly.
23    # Translation components are offsets of the rectangle
24    brush_transform = aspose.pydrawing.drawing2d.Matrix(width, 0., 0., height, offset_x, offset_y)
25    # Rotate gradient, than scale and translate to get the visible color transition in the required rectangle
26    brush_transform.rotate(-45.)
27    hypotenuse = float(math.sqrt(200. * 200. + 100. * 100.))
28    ratio = hypotenuse / 200.
29    brush_transform.scale(-ratio, 1.)
30    brush_transform.translate(100. / brush_transform.elements[0], 0.)
31
32    # Set the transform
33    brush.transform = brush_transform
34
35    # Set the paint
36    document.set_paint(brush)
37
38    # Fill the rectangle
39    document.fill(path)
40
41    # Close the current page
42    document.close_page()
43
44    # Save the document
45    document.save()
結果はこちら
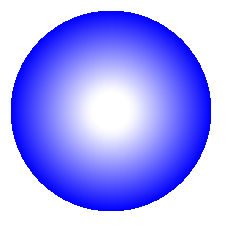
ここでは、2色から放射状グラデーションを作成し、このグラデーションで円を塗りつぶします。
 1# The path to the documents directory.
 2data_dir = Util.get_data_dir_working_with_gradient()
 3
 4# Create an output stream for the PostScript document
 5with open(data_dir + "RadialGradient1_outPS.ps", "wb") as out_ps_stream:
 6    # Create the save options with A4 size
 7    options = PsSaveOptions()
 8
 9    # Create a new 1-paged PS Document
10    document = PsDocument(out_ps_stream, options, False)
11
12    offset_x = 200.
13    offset_y = 100.
14    width = 200.
15    height = 200.
16
17    # Create a graphics path from the rectangle bounds
18    bounds = aspose.pydrawing.RectangleF(offset_x, offset_y, width, height)
19    path = aspose.pydrawing.drawing2d.GraphicsPath()
20    path.add_ellipse(bounds)
21
22    # Create and fill a color blend object
23    colors = [ aspose.pydrawing.Color.white, aspose.pydrawing.Color.white, aspose.pydrawing.Color.blue ]
24    positions = [ 0.0, 0.2, 1.0 ]
25    color_blend = aspose.pydrawing.drawing2d.ColorBlend()
26    color_blend.colors = colors
27    color_blend.positions = positions
28
29    brush_rect = aspose.pydrawing.drawing2d.GraphicsPath()
30    brush_rect.add_rectangle(aspose.pydrawing.RectangleF(0, 0, width, height))
31
32    # Create a path gradient brush with a rectangle as a bounds
33    brush = GraphicsFactory.create_path_gradient_brush_by_path(brush_rect)
34    # Set the interpolation colors
35    brush.interpolation_colors = color_blend
36    # Create a transform for brush. X and Y scale component must be equal to the width and height of the rectangle correspondingly.
37    # Translation components are offsets of the rectangle
38    brush_transform = aspose.pydrawing.drawing2d.Matrix(width, 0., 0., height, offset_x, offset_y)
39    # Set the transform
40    brush.transform = brush_transform
41
42    # Set the paint
43    document.set_paint(brush)
44
45    # Fill the rectangle
46    document.fill(path)
47
48    # Close the current page
49    document.close_page()
50
51    #Save the document
52    document.save()
結果
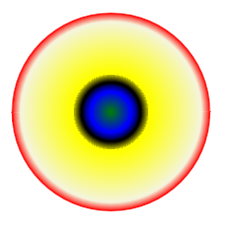
このコードスニペットでは、6色から放射状グラデーションを作成し、そのグラデーションで四角形を塗りつぶします。
 1# The path to the documents directory.
 2  data_dir = Util.get_data_dir_working_with_gradient()
 3
 4# Create an utput stream for the PostScript document
 5with open(data_dir + "RadialGradient2_outPS.ps", "wb") as out_ps_stream:
 6    # Create save options with the A4 size
 7    options = PsSaveOptions()
 8
 9    # Create a new 1-paged PS Document
10    document = PsDocument(out_ps_stream, options, False)
11
12    offset_x = 200.
13    offset_y = 100.
14    width = 200.
15    height = 200.
16
17    # Create a graphics path from the rectangle bounds
18    bounds = aspose.pydrawing.RectangleF(offset_x, offset_y, width, height)
19    path = aspose.pydrawing.drawing2d.GraphicsPath()
20    path.add_rectangle(bounds)
21
22    # Create and fill a color blend object
23    colors = [ aspose.pydrawing.Color.green, aspose.pydrawing.Color.blue, aspose.pydrawing.Color.black,
24    aspose.pydrawing.Color.yellow, aspose.pydrawing.Color.beige, aspose.pydrawing.Color.red ]
25    positions = [ 0.0, 0.2, 0.3, 0.4, 0.9, 1.0 ]
26    color_blend = aspose.pydrawing.drawing2d.ColorBlend()
27    color_blend.colors = colors
28    color_blend.positions = positions
29
30    brush_rect = aspose.pydrawing.drawing2d.GraphicsPath()
31    brush_rect.add_rectangle(aspose.pydrawing.RectangleF(0, 0, width, height))
32
33    # Create a path gradient brush with a rectangle as a bounds
34    brush = GraphicsFactory.create_path_gradient_brush_by_path(brush_rect)
35    # Set interpolation colors
36    brush.interpolation_colors = color_blend
37    # Create a transform for brush. X and Y scale component must be equal to the width and height of the rectangle correspondingly.
38    # Translation components are offsets of the rectangle
39    brush_transform = aspose.pydrawing.drawing2d.Matrix(width, 0., 0., height, offset_x, offset_y)
40    # Set the transform
41    brush.transform = brush_transform
42
43    # Set the paint
44    document.set_paint(brush)
45
46    # Fill the rectangle
47    document.fill(path)
48
49    # Close the current page
50    document.close_page()
51
52    # Save the document
53    document.save()
結果 looks the next way
サンプルとデータ ファイルは GitHub からダウンロードできます。