Python で PDF にテキストを追加する方法
このガイドでは、.NET 経由で Aspose.PDF for Python を使用して PDF ドキュメントにテキストコンテンツを追加する方法について説明します。シンプルなテキストフラグメントの特定の位置への配置から、スタイリング (フォント、サイズ、色、スタイル)、右から左 (RTL) 言語の処理、ハイパーリンクの埋め込み、段落レイアウト、リスト、透明効果の操作まで、テキスト挿入のコアテクニックを学びます。また、HTML や LaTeX フラグメント、カスタムフォント、行間隔や文字間隔などのテキストフォーマットオプションの使用など、高度なシナリオについても取り上げています。
シンプルな注釈を作成する場合でも、リッチなタイポグラフィレイアウトを作成する場合でも、このリソースは Aspose.PDF を使用して PDF 内のテキストを操作するための基本的な構成要素を提供します。
基本的なテキスト挿入
.NET 経由の Python 用 Aspose.PDF には、PDF ファイル内のテキストを処理するための強力で柔軟な API が用意されています。 シンプルな静的ラベル、豊富な形式のコンテンツ、多言語テキスト、インタラクティブなハイパーリンクなど、必要なものがすべてツールキットなら、簡潔な Python コードですべてを実行できます。
テキスト追加シンプルケース
Aspose.PDF for Python via .NET では、単純なテキストフラグメントをページ上の特定の位置に追加する方法を示しています。新しい PDF ドキュメントを作成し、ページを追加し、指定した座標にテキストを挿入し、生成されたファイルを保存する方法を学習します。
- 新規作成 文書 対象。
- 使用
document.pages.add()新しい空白を作成するには ページ. - を作成
TextFragmentテキストコンテンツ付き。 - を使用してテキストの位置を設定します
Positionクラス。指定した場合Position、テキストはドキュメント内の左から右に配置され、下方に移動します。 - テキストの外観をカスタマイズします。フォントサイズ、色、フォントスタイルなどは、を使用して設定できます。
TextState. - を添付してください
TextFragmentでページの段落コレクションへpage.paragraphs.add(text_fragment). - 文書を保存します。
次のコードスニペットは、既存の PDF ファイルにテキストを追加する方法を示しています。
import math
import sys
import os
import aspose.pdf as ap

# region Basic text insertion
def add_text_simple_case(output_file_name):
    # Create a new document
    document = ap.Document()
    page = document.pages.add()

    # Add a text fragment at a specific position
    text_fragment = ap.text.TextFragment("Hello, Aspose!")
    text_fragment.position = ap.text.Position(100, 600)

    page.paragraphs.add(text_fragment)
    document.save(output_file_name)
このコード例ではテキストフラグメントを使用しています。TextParagraph を使用して PDF ページにテキストを追加することもできます。 ザ・テキストフラグメント は 1 つのテキストです。これは 1 つのテキスト文字列を表し、個別に配置したり、スタイルを設定したり、配置したりできます。小さくてシンプルなテキストコンテンツを追加する必要がある場合に最適です。
ザ・テキスト段落 はテキストフラグメントのグループです。複数のテキスト行を追加できます。TextParagraph は 1 つ以上の TextFragment オブジェクトのコンテナまたはコレクションです。複数のフラグメントをグループ化する必要がある場合に最適です。たとえば、複数の行、単語、またはフォーマットされた要素から成るテキストブロックを作成する場合などです。 TextParagraph では、ページ上のテキストの配置、行間隔、および自動レイアウトも管理されます。赤い線は TextParagraph でのみ使用できます。
テキストの操作の詳細については、を参照してください。 PDF 内のテキストフォーマット そして PDF からテキストを検索して取得.
テキストパラグラフを使用してテキストを追加
.NET 経由の Python 用 Aspose.PDF では、次の方法でテキストの段落を追加できます。 TextBuilder そして TextParagraph ラッピングオプション付き。
- 新規作成 文書 と空白 ページ を使用します
document.pages.add(). - ファイルからテキストを読み取るか、デフォルトのテキストを使用します。
- を作成
TextBuilderレイアウトと折り返しのコントロールを備えた段落レベルのコンテンツを追加します。 - を作成
TextParagraphそしてラップモードを設定します (この例ではDISCRETIONARY_HYPHENATION). - を作成
TextFragment、スタイルを適用し、フラグメントを段落に追加します。 - を使用して段落をページに追加します
TextBuilder. - 文書を保存します。
import math
import sys
import os
import aspose.pdf as ap

def add_paragraph(output_file_name):
    document = ap.Document()
    page = document.pages.add()

    lorem_path = LOREM_PATH
    if os.path.exists(lorem_path):
        with open(lorem_path, "r", encoding="utf-8") as file:
            text = file.read()
    else:
        text = "Lorem ipsum sample text not found."

    builder = ap.text.TextBuilder(page)
    paragraph = ap.text.TextParagraph()
    paragraph.first_line_indent = 20
    paragraph.rectangle = ap.Rectangle(80, 800, 400, 200, True)
    # paragraph.formatting_options.wrap_mode = TextFormattingOptions.WordWrapMode.BY_WORDS
    paragraph.formatting_options.wrap_mode = (
        ap.text.TextFormattingOptions.WordWrapMode.DISCRETIONARY_HYPHENATION
    )

    fragment = ap.text.TextFragment(text)
    fragment.text_state.font = ap.text.FontRepository.find_font("Times New Roman")
    fragment.text_state.font_size = 12

    paragraph.append_line(fragment)
    builder.append_paragraph(paragraph)

    document.save(output_file_name)
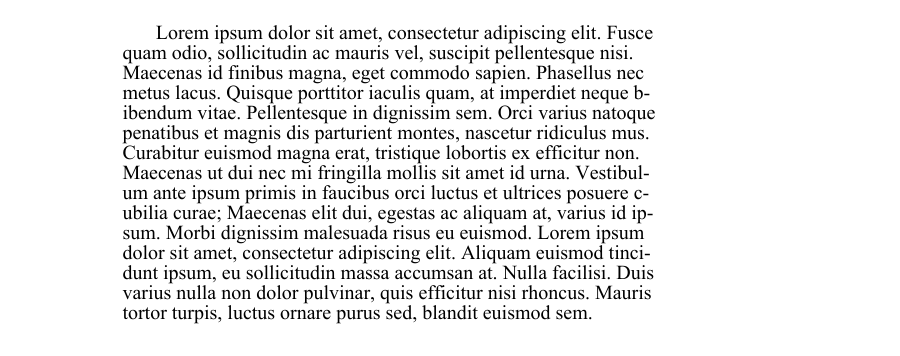
PDF にインデント付きの段落を追加
次のコードスニペットは、新しい PDF ドキュメントを作成し、インデントスタイルの異なる 2 段落のテキストを追加する方法を示しています。
-
最初の段落は1行目のインデントを示しています(最初の行だけがインデントされています)。
-
2 番目の段落は、2 行目以降の行をインデントする方法を示しています (1 行目以降の行はすべてインデントされます)。
Aspose.PDF の「TextParagraph」、「TextBuilder」、「TextFragment」クラスを使用して、レイアウトとフォーマットを正確に制御します。
import math
import sys
import os
import aspose.pdf as ap

def add_paragraphs_indents(output_file_name):
    document = ap.Document()
    page = document.pages.add()

    lorem_path = LOREM_PATH
    if os.path.exists(lorem_path):
        with open(lorem_path, "r", encoding="utf-8") as file:
            text = file.read()
    else:
        text = "Lorem ipsum sample text not found."

    fragment = ap.text.TextFragment(text)
    fragment.text_state.font = ap.text.FontRepository.find_font("Times New Roman")
    fragment.text_state.font_size = 12

    builder = ap.text.TextBuilder(page)
    paragraph1 = ap.text.TextParagraph()
    paragraph1.first_line_indent = 20
    paragraph1.rectangle = ap.Rectangle(80, 800, 300, 50, True)
    paragraph1.formatting_options.wrap_mode = (
        ap.text.TextFormattingOptions.WordWrapMode.BY_WORDS
    )

    paragraph1.append_line(fragment)
    builder.append_paragraph(paragraph1)

    paragraph2 = ap.text.TextParagraph()
    paragraph2.subsequent_lines_indent = 20
    paragraph2.rectangle = ap.Rectangle(320, 800, 500, 50, True)
    paragraph2.formatting_options.wrap_mode = (
        ap.text.TextFormattingOptions.WordWrapMode.BY_WORDS
    )

    paragraph2.append_line(fragment)
    builder.append_paragraph(paragraph2)
    document.save(output_file_name)
PDF に新しいテキスト行を追加
.NET 経由の Aspose.PDF for Python では、TextFragment、TextParagraph、および TextBuilder クラスを使用して PDF ドキュメントに複数行のテキストを挿入できます。
- 新しい文書を作成します。
- 改行文字を含むテキストフラグメントを定義します。
- テキストスタイルを設定します。
- フラグメントを段落に追加します。
- 段落の位置を設定します。
- ページ上に段落をレンダリングします。
- 文書を保存します。
import math
import sys
import os
import aspose.pdf as ap

def add_new_line(output_file):
    """Add a new line of text to a PDF document."""
    # Create PDF document
    document = ap.Document()
    page = document.pages.add()

    # Initialize new TextFragment with text containing required newline markers
    text_fragment = ap.text.TextFragment("Applicant Name: " + os.linesep + " Joe Smoe")

    # Set text fragment properties if necessary
    text_fragment.text_state.font_size = 12
    text_fragment.text_state.font = ap.text.FontRepository.find_font("TimesNewRoman")
    text_fragment.text_state.background_color = ap.Color.light_gray
    text_fragment.text_state.foreground_color = ap.Color.red

    # Create TextParagraph object
    par = ap.text.TextParagraph()

    # Add new TextFragment to paragraph
    par.append_line(text_fragment)

    # Set paragraph position
    par.position = ap.text.Position(100, 600)

    # Create TextBuilder object
    text_builder = ap.text.TextBuilder(page)

    # Add the TextParagraph using TextBuilder
    text_builder.append_paragraph(par)

    # Save PDF document
    document.save(output_file)
PDF の改行とログ通知の確認
複数のテキストフラグメントを含む PDF ドキュメントを作成し、Aspose.PDF 通知ロギングを有効にしてレンダリング中のレイアウトイベント (改行やテキストの折り返しなど) を監視する方法を示します。
- 新しい PDF ドキュメントを作成します。
- 通知ログを有効にする。
- document.pages.add () を使用して最初のページを作成します。
- 複数のテキストフラグメントを追加します。
- page.paragraphs.add (テキスト) を使用して各テキストフラグメントをレンダリングします。
- 文書を保存します。
import math
import sys
import os
import aspose.pdf as ap

def determine_line_break(output_file):
    """Create a PDF document with multiple text fragments and log notifications."""
    # Create PDF document
    document = ap.Document()

    # Enable notification logging
    document.enable_notification_logging = True

    page = document.pages.add()

    for i in range(4):
        text = ap.text.TextFragment(
            "Lorem ipsum \r\ndolor sit amet, consectetur adipiscing elit, "
            "sed do eiusmod tempor incididunt ut labore et dolore magna aliqua. "
            "Ut enim ad minim veniam, quis nostrud exercitation ullamco laboris "
            "nisi ut aliquip ex ea commodo consequat. Duis aute irure dolor in "
            "reprehenderit in voluptate velit esse cillum dolore eu fugiat nulla "
            "pariatur. Excepteur sint occaecat cupidatat non proident, sunt in "
            "culpa qui officia deserunt mollit anim id est laborum."
        )
        text.text_state.font_size = 20
        page.paragraphs.add(text)

    # Save PDF document
    document.save(output_file)

    notifications = document.pages[1].get_notifications()
    print(notifications)
PDF でテキスト幅を動的に測定
.NET 経由の Aspose.PDF for Python を使用して、特定のフォントの文字と文字列の幅を動的に測定します。‘font.Measure_String () ‘メソッドと ‘TextState.Measure_String ()’ メソッドを使用して、測定された文字列幅が一貫していて正確であることを確認します。
- ‘FontRepository.find_Font () ‘を使用して、リポジトリから Arial フォントオブジェクトを取得します。
- TextState オブジェクトを作成して、フォントのプロパティを管理します。
- 個々の文字を測定します。
- 「A」と「z」の間のすべての文字について、両方の方法の結果を比較します。
- どちらの測定方法でも同じ結果が得られることを確認してください。
import math
import sys
import os
import aspose.pdf as ap

def get_text_width_dynamically(output_file):
    font = ap.text.FontRepository.find_font("Arial")
    ts = ap.text.TextState()
    ts.font = font
    ts.font_size = 14

    if math.fabs(font.measure_string("A", 14) - 9.337) > 0.001:
        print("Unexpected font string measure!")

    if math.fabs(ts.measure_string("z") - 7.0) > 0.001:
        print("Unexpected font string measure!")

    c_code = ord("A")
    while c_code <= ord("z"):
        c = chr(c_code)

        fn_measure = font.measure_string(str(c), 14)
        ts_measure = ts.measure_string(str(c))

        if math.fabs(fn_measure - ts_measure) > 0.001:
            print("Font and state string measuring doesn't match!")

        c_code += 1
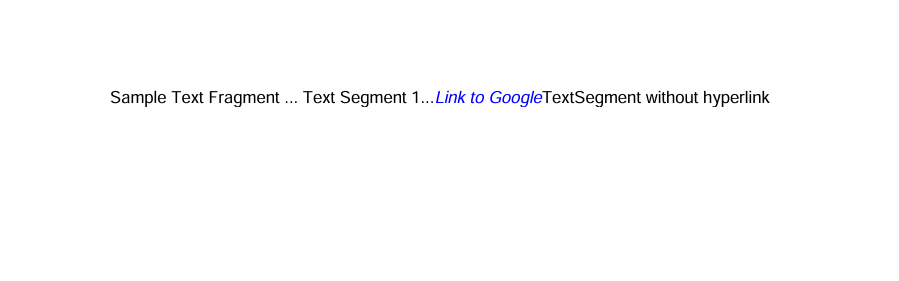
ハイパーリンク付きのテキストを追加
.NET 経由で Aspose.PDF for Python を使用して、クリック可能なハイパーリンクを PDF 内のテキストに追加します。このライブラリは、1 つの TextFragment 内に複数のテキストセグメントを追加する方法、特定のセグメントにハイパーリンクを適用する方法、テキストセグメントを個別にスタイルする方法 (色、斜体フォントなど) を示しています。
- ‘Document () ‘を使用して新しいドキュメントとページを作成し、‘document.pages.add ()’ を使用して空白ページを追加します。
- テキストフラグメントを作成します。
- 複数のテキストセグメントオブジェクトを追加します。各セグメントには独自のコンテンツとスタイルを設定できます。たとえば、プレーンテキストやハイパーリンクテキストなどです。
- セグメントにハイパーリンクを適用します。目的の URL を使用して WebHyperlink オブジェクトを作成します。
- セグメントのスタイルを設定します。text_state を使用して色、フォントスタイル、サイズなどをカスタマイズします。
- 「page.paragraphs.add ()」を使用してフラグメントをページに追加します。
- PDF を保存します。
import math
import sys
import os
import aspose.pdf as ap

def add_text_with_hyperlink(output_file_name):
    document = ap.Document()
    page = document.pages.add()

    fragment = ap.text.TextFragment("Sample Text Fragment")

    segment = ap.text.TextSegment(" ... Text Segment 1...")
    fragment.segments.append(segment)

    segment = ap.text.TextSegment("Link to Aspose")
    fragment.segments.append(segment)
    segment.hyperlink = ap.WebHyperlink("https://products.aspose.com/pdf")
    segment.text_state.foreground_color = ap.Color.blue
    segment.text_state.font_style = ap.text.FontStyles.ITALIC

    segment = ap.text.TextSegment("TextSegment without hyperlink")
    fragment.segments.append(segment)

    page.paragraphs.add(fragment)
    document.save(output_file_name)
PDF ドキュメントへの右から左 (RTL) テキストの追加
RTL (右から左へ) は、テキストが右から左に書き込まれる方向を示すプロパティです。 Aspose.PDF for Python(.NET 経由)では、アラビア語やヘブライ語などの右から左(RTL)形式のテキストを PDF 文書に追加する方法を示しています。
- ‘Document () ‘を使用して新しいドキュメントとページを作成し、‘document.pages.add ()’ を使用して空白ページを追加します。
- RTL コンテンツを含むテキストフラグメントを作成します。アラビア語、ヘブライ語、またはその他の RTL 言語のテキストをフラグメントコンテンツとして挿入します。 フォントとスタイルを設定します。RTL スクリプトをサポートするフォント (タホマ、Arial Unicode MS など) を選択してください。必要に応じて [フォントサイズ] と [フォアグラウンドカラー] を設定します。
- 「テキスト_フラグメント.水平配置」を使用して水平方向の配置を右に設定します。
- テキストフラグメントをページに追加します。
- PDF ドキュメントを保存します。
import math
import sys
import os
import aspose.pdf as ap
def add_text_with_rtl_text(output_file_name):
document = ap.Document()
page = document.pages.add()
# Styled text fragment
text_fragment = ap.text.TextFragment(
"يعتبر خوجا نصر الدين شخصية فولكلورية من الشرق الإسلامي وبعض شعوب البحر الأبيض المتوسط والبلقان، وهو بطل القصص والحكايات القصيرة الفكاهية والساخرة، وأحيانًا الحكايات اليومية."
)
text_fragment.text_state.font = ap.text.FontRepository.find_font("Tahoma")
text_fragment.text_state.font_size = 14
text_fragment.text_state.foreground_color = ap.Color.blue
text_fragment.horizontal_alignment = ap.HorizontalAlignment.RIGHT
page.paragraphs.add(text_fragment)
document.save(output_file_name)

テキストスタイリング
フォントスタイルでテキストを追加
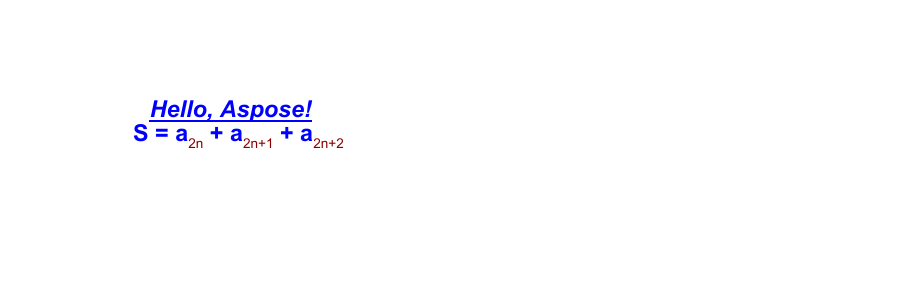
これは、テキストスタイル、フォントのカスタマイズ、および混合形式のテキスト (下付きテキストセグメントを使用) を示す、より高度な例です。Aspose.PDF では、フォントファミリー、サイズ、色、太字、斜体、下線などのフォントプロパティをテキストフラグメントに適用する方法を説明しています。 さらに、このコードスニペットでは、1つのフラグメント内で複数のテキストセグメントを使用して複雑なテキスト式を作成する方法を示しています。たとえば、数式や科学記法でよく必要となる下付き文字や上付き文字などが含まれます。
- ‘Document () ‘を使用して新しいドキュメントとページを作成し、‘document.pages.add ()’ を使用して空白ページを追加します。
- シンプルなスタイルのテキスト用の TextFragment を作成します。
- テキストコンテンツを定義します。
- 位置 (x, y) 座標を使用して位置を設定します。
- 「text_state プロパティ」(フォント、フォントサイズ、フォアグラウンドカラー、フォントスタイル、アンダーライン) を使用してスタイルを適用します。
- 複数の TextSegment オブジェクトを含む複雑な式を作成します。各 TextSegment はテキストの一部を表し、独自のスタイルを設定できます。これにより、数学式や化学式などの式を作成できます。
- 複数の TextState オブジェクトを定義します。1 つはメインテキスト (テキスト_ステートレター) 用です。もう 1 つは下付き文字または上付き文字テキスト (text_state_index) 用です。
- テキストセグメントを結合します。「segments.append ()」を使用して各セグメントを「テキストフラグメント」に追加します。
- 両方のテキストオブジェクトをページに追加します。‘page.paragraphs.add () ‘を使用してそれらをドキュメントに配置してください。
- 最終文書を保存します。
import math
import sys
import os
import aspose.pdf as ap

def add_text_with_font_styling(output_file_name):
    document = ap.Document()
    page = document.pages.add()

    # Initialize an empty TextFragment to build a formula using segments
    formula = ap.text.TextFragment()
    text_fragment = ap.text.TextFragment("Hello, Aspose!")
    text_fragment.position = ap.text.Position(100, 600)
    text_fragment.text_state.font = ap.text.FontRepository.find_font("Arial")
    text_fragment.text_state.font_size = 14
    text_fragment.text_state.foreground_color = ap.Color.blue
    text_fragment.text_state.font_style = (
        ap.text.FontStyles.BOLD | ap.text.FontStyles.ITALIC
    )
    text_fragment.text_state.underline = True
    text_fragment.horizontal_alignment = ap.HorizontalAlignment.LEFT

    text_state_letters = ap.text.TextState()
    text_state_letters.font = ap.text.FontRepository.find_font("Arial")
    text_state_letters.font_size = 14
    text_state_letters.foreground_color = ap.Color.blue
    text_state_letters.font_style = ap.text.FontStyles.BOLD

    text_state_index = ap.text.TextState()
    text_state_index.font = ap.text.FontRepository.find_font("Arial")
    text_state_index.font_size = 14
    text_state_index.foreground_color = ap.Color.dark_red
    # text_state_index.superscript = True
    text_state_index.subscript = True

    position = ap.text.Position(100, 500)

    # Helper function to add segments
    def add_segment(text, state):
        seg = ap.text.TextSegment(text)
        seg.text_state = state
        seg.position = position
        formula.segments.append(seg)

    add_segment("S = a", text_state_letters)
    add_segment("2n", text_state_index)
    add_segment(" + a", text_state_letters)
    add_segment("2n+1", text_state_index)
    add_segment(" + a", text_state_letters)
    add_segment("2n+2", text_state_index)
    formula.horizontal_alignment = ap.HorizontalAlignment.LEFT

    page.paragraphs.add(text_fragment)
    page.paragraphs.add(formula)
    document.save(output_file_name)
テキストを透明に追加
Aspose.PDF for Python を使用して、半透明のシェイプとテキストを PDF ドキュメントに追加します。 部分的に不透明の色付き長方形を作成し、透明な前景色でTextFragmentをオーバーレイします。
- Document オブジェクトを初期化し、図面コンテンツ用の空白ページを追加します。
- 図形を描くことができるキャンバスを作成するには、「ap.Drawing.Graph」を使用してください。
- 塗りつぶしが半透明の長方形を追加します。
- キャンバスの位置がずれるのを防ぐ。
- キャンバスをページに追加します。グラフィカルシェイプをページパラグラフコレクションに挿入します。
- 透明なテキストフラグメントを作成します。
- テキストフラグメントをページ段落コレクションに挿入します。
- PDF ドキュメントを保存します。
import math
import sys
import os
import aspose.pdf as ap

def add_text_transparent(output_file_name):
    # Create PDF document
    document = ap.Document()
    page = document.pages.add()

    # Create Graph object
    canvas = ap.drawing.Graph(100.0, 400.0)

    # Create rectangle with semi-transparent fill
    rect = ap.drawing.Rectangle(100, 100, 400, 400)
    rect.graph_info.fill_color = ap.Color.from_argb(128, 0xC5, 0xB5, 0xFF)
    canvas.shapes.add(rect)

    # Prevent position shift
    canvas.is_change_position = False
    page.paragraphs.add(canvas)

    # Create transparent text
    text = ap.text.TextFragment(
        "This is the transparent text. "
        "This is the transparent text. "
        "This is the transparent text."
    )
    text.text_state.foreground_color = ap.Color.from_argb(30, 0, 255, 0)
    page.paragraphs.add(text)

    document.save(output_file_name)
PDF に不可視テキストを追加
この例は、表示されているテキストと非表示のテキストの両方を含む PDF ドキュメントを作成する方法を示しています。非表示のテキストは文書構造の一部のままですが、表示されないため、レイアウトに影響を与えずにメタデータ、アクセシビリティタグ、または検索可能なコンテンツを埋め込むのに便利です。
- PDF ドキュメントとページを作成します。
- 繰り返し表示されるコンテンツを含むテキストフラグメントを作成します。
- 2 つ目のテキストフラグメントを追加し、非表示にします。
- 文書を保存します。
import math
import sys
import os
import aspose.pdf as ap

def add_text_invisible(output_file_name):
    # Create PDF document
    document = ap.Document()
    page = document.pages.add()

    # Add visible text
    text1 = ap.text.TextFragment(
        "This is the visible text. This is the visible text. This is the visible text."
    )
    page.paragraphs.add(text1)

    # Create transparent text
    text2 = ap.text.TextFragment(
        "This is the invisible text. "
        "This is the invisible text. "
        "This is the invisible text."
    )
    text2.text_state.invisible = True
    page.paragraphs.add(text2)

    document.save(output_file_name)
PDF に境界線スタイルを設定したテキストを追加
Aspose.PDF ライブラリでは、枠線が見えるスタイル付きテキストフラグメントを含む PDF ドキュメントを作成する方法を示します。この方法では、背景色と前景色、フォント設定、およびテキストの四角形の周囲にストローク (境界線) を適用して視覚的に強調します。
- PDF ドキュメントとページを作成します。
- テキストフラグメントの作成と配置。メッセージを含むテキストフラグメントを追加し、その位置を設定します。
- テキストスタイルを適用します。フォントをタイムズ・ニュー・ローマンのサイズ 12 に設定します。明るいグレーの背景と赤のフォアグラウンド (テキスト) カラーを適用します。
- ボーダースタイルを設定します。
- ページにテキストを追加します。TextBuilder を使用してスタイル付きテキストをページに追加します。
- 文書を保存します。
import math
import sys
import os
import aspose.pdf as ap

def add_text_border(output_file_name):
    # Create PDF document
    document = ap.Document()
    # Get particular page
    page = document.pages.add()
    # Create text fragment
    text_fragment = ap.text.TextFragment("This is sample text with border.")
    text_fragment.position = ap.text.Position(10, 700)

    # Set text properties
    text_fragment.text_state.font = ap.text.FontRepository.find_font("Times New Roman")
    text_fragment.text_state.font_size = 12
    text_fragment.text_state.background_color = ap.Color.light_gray
    text_fragment.text_state.foreground_color = ap.Color.red
    # Set StrokingColor property for drawing border (stroking) around text rectangle.
    # Note: This only affects the border if draw_text_rectangle_border is set to True.
    text_fragment.text_state.stroking_color = ap.Color.dark_red
    # Enable drawing of the text rectangle border
    text_fragment.text_state.draw_text_rectangle_border = True

    text_builder = ap.text.TextBuilder(page)
    text_builder.append_text(text_fragment)

    # Save PDF document
    document.save(output_file_name)
PDF に取り消し線付きテキストを追加
PDF 文書内のテキストフラグメントに取り消し線(取り消し線)書式を追加します。取り消し線付きテキストは、注釈付き文書内の削除、改訂、強調を示すのに便利です。
- ‘Document () ‘を使用して新しいドキュメントとページを作成し、‘document.pages.add ()’ を使用して空白ページを追加します。
- テキストフラグメントの作成とスタイル設定
- 色と取り消し線のフォーマットを適用します。背景を明るい灰色に、テキストの色を赤に設定し、取り消し線を有効にします。
- テキストを配置します。
- 「TextBuilder」を使用して、スタイル付きテキストをページに追加します。
- 文書を保存します。
import math
import sys
import os
import aspose.pdf as ap

def add_strikeout_text(output_file_name):
    # Create PDF document
    document = ap.Document()
    page = document.pages.add()

    # Create text fragment
    text_fragment = ap.text.TextFragment("This is sample strikeout text.")
    # Set text properties
    text_fragment.text_state.font_size = 12
    text_fragment.text_state.font = ap.text.FontRepository.find_font("TimesNewRoman")
    text_fragment.text_state.background_color = ap.Color.light_gray
    text_fragment.text_state.foreground_color = ap.Color.red
    text_fragment.text_state.strike_out = True
    text_fragment.text_state.font_style = ap.text.FontStyles.BOLD
    text_fragment.position = ap.text.Position(100, 600)

    # Create TextBuilder object
    text_builder = ap.text.TextBuilder(page)
    text_builder.append_text(text_fragment)

    # Save PDF document
    document.save(output_file_name)
高度なカラーエフェクト
PDF 内のテキストへの軸グラデーションの適用
.NET 経由の Python Aspose.PDF は、PDF ドキュメント内のテキストに線形グラデーション効果を適用する方法を示しています。軸方向のグラデーションはテキスト全体で赤から青にスムーズに移行し、視覚的に印象的な見出しになります。この手法は、PDF ドキュメントレイアウトの定型化されたタイトル、ブランディング、装飾要素に最適です。
- 新しい文書を初期化し、空白ページを追加します。
- テキストフラグメントの作成とスタイル設定タイトルを追加し、位置、フォント、サイズを設定します。
- 「グラデーションアキシャルシェーディング」で軸グラデーションシェーディングを適用します。グラデーションアキシャルシェーディングを使用してフォアグラウンドカラーを赤から青に設定します。
- 下線スタイルを追加します。
- スタイル付きテキストフラグメントをページに挿入します。
- 文書を保存します。
import math
import sys
import os
import aspose.pdf as ap

def apply_gradient_axial_shading_to_text(output_file_name):
    # Create PDF document
    document = ap.Document()
    page = document.pages.add()

    text_fragment = ap.text.TextFragment("PDF TITLE")
    text_fragment.position = ap.text.Position(100, 600)
    text_fragment.text_state.font_size = 36
    text_fragment.text_state.font = ap.text.FontRepository.find_font("Arial Bold")

    text_fragment.text_state.foreground_color = ap.Color()
    text_fragment.text_state.foreground_color.pattern_color_space = (
        ap.drawing.GradientAxialShading(ap.Color.red, ap.Color.blue)
    )
    text_fragment.text_state.underline = True

    page.paragraphs.add(text_fragment)
    document.save(output_file_name)
PDF のテキストへの放射状グラデーションの適用
放射状グラデーションを使うと、テキストの中心から外側に放射状に広がる円形の色の変化が生まれ、タイトル、ヘッダー、装飾要素に視覚的にダイナミックなスタイルを設定できます。
- 新しい文書を初期化し、空白ページを追加します。
- テキストフラグメントの作成とスタイル設定タイトルを追加し、位置、フォント、サイズを設定します。
- 「グラデーションラディアルシェーディング」で放射状グラデーションを適用します。グラディエント・トラディアル・シェーディングを使用してフォアグラウンド・カラーを赤から青に設定します。
- 下線スタイルを追加します。
- スタイル付きテキストフラグメントをページに挿入します。
- 文書を保存します。
import math
import sys
import os
import aspose.pdf as ap

def apply_gradient_radial_shading_to_text(output_file_name):
    # Create PDF document
    document = ap.Document()
    page = document.pages.add()

    text_fragment = ap.text.TextFragment("PDF TITLE")
    text_fragment.position = ap.text.Position(100, 600)
    text_fragment.text_state.font_size = 36
    text_fragment.text_state.font = ap.text.FontRepository.find_font("Arial Bold")

    # Apply radial gradient shading (red to blue)
    text_fragment.text_state.foreground_color = ap.Color()
    text_fragment.text_state.foreground_color.pattern_color_space = (
        ap.drawing.GradientRadialShading(ap.Color.red, ap.Color.blue)
    )
    text_fragment.text_state.underline = True

    page.paragraphs.add(text_fragment)
    document.save(output_file_name)

HTML フラグメントと LaTeX フラグメント
PDF ドキュメントに HTML テキストを追加
.NET ライブラリ経由の Aspose.PDF for Python では、HTMLFragment クラスを使用して HTML 形式のコンテンツを PDF ドキュメントに挿入できます。HTML タグを使用すると、スタイルが設定されたテキスト、構造化されたテキスト、または数式のようなテキストを PDF に直接レンダリングできます。
- ‘Document () ‘を使用して新しいドキュメントとページを作成し、‘document.pages.add ()’ を使用して空白ページを追加します。
- HTMLFragment クラスのインスタンスを作成し、HTML 文字列をパラメーターとして渡します。
- 「page.paragraphs.add ()」を使用してフラグメントをページに追加し、HTML コンテンツを挿入します。
- PDF を保存します。
import math
import sys
import os
import aspose.pdf as ap

def add_text_html_fragment(output_file_name):
    # Create a new document
    document = ap.Document()
    page = document.pages.add()

    # Add a text fragment at a specific position
    text_fragment = ap.HtmlFragment("<pre>S=a<sub>2n</sub>+a<sup>2</sup><pre>")

    page.paragraphs.add(text_fragment)
    document.save(output_file_name)

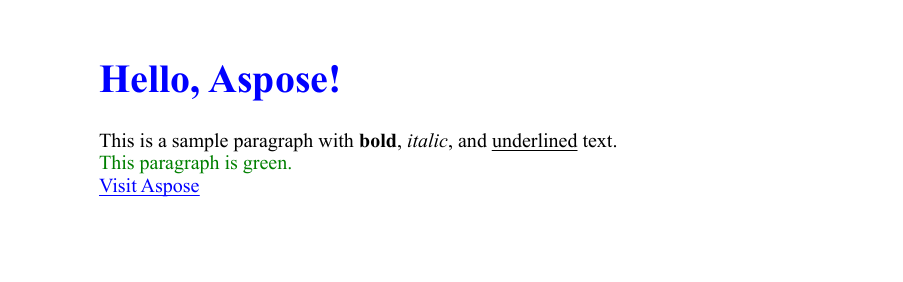
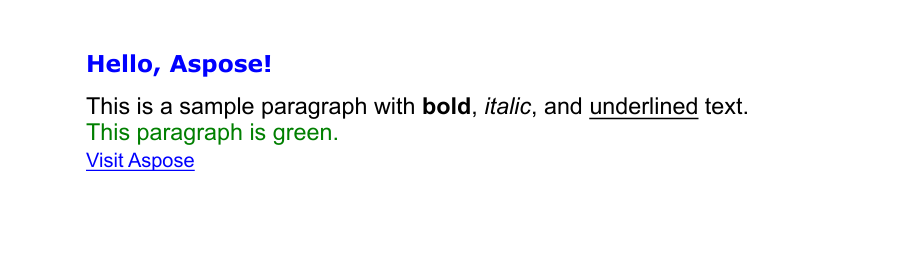
さまざまなフォーマットのスタイル付き HTML フラグメントを PDF ドキュメントに追加
HTML フラグメントを定義し、HTML タグを使用してテキストスタイルを直接設定できます。スタイル設定された HTML コンテンツを PDF 文書に埋め込みます。このコードスニペットは、新しい PDF ファイルを作成し、ページを追加し、さまざまな書式要素 (見出し、段落、リンク、インラインスタイル) を含む HTML フラグメントを挿入し、結果を指定されたパスに保存します。
- PDF を表す新しい Document オブジェクトを初期化します。
- HTML コンテンツが配置される文書に空白ページを追加します。
- HTML コンテンツを準備します。HTML 文字列には、h1 見出し、太字、斜体、下線付きのテキストを含む緑色の段落、およびフォントサイズを大きくした Web サイトへのハイパーリンクが含まれています。
- HTML フラグメントを作成します。HTML 文字列を HTMLFragment オブジェクトでラップします。
- HTML をページに挿入します。HTML フラグメントをページの段落コレクションに追加し、HTML をネイティブ PDF コンテンツとしてレンダリングします。
- 文書を保存します。
import math
import sys
import os
import aspose.pdf as ap

def add_html_fragment(output_file_name):
    document = ap.Document()
    page = document.pages.add()
    html_content = """
        <h1 style='color:blue;'>Hello, Aspose!</h1>
        <p>This is a sample paragraph with <b>bold</b>, <i>italic</i>, and <u>underlined</u> text.</p>
        <p style='color:green;'>This paragraph is green.</p>
        <a href='https://www.aspose.com' style='font-size:16px;'>Visit Aspose</a>
    """
    html_fragment = ap.HtmlFragment(html_content)
    page.paragraphs.add(html_fragment)
    document.save(output_file_name)
オーバーライドされたテキスト状態の HTML フラグメントの追加
前の例で見たように、HTML コードでスタイルを直接設定することができます。これには利点もありますが、欠点もあります。顧客の HTML を扱っていて、出力の見た目を統一したいとします。 この場合、次の例に示すように、独自の TextState を使用してお客様のスタイルをオーバーライドできます。
- ‘Document () ‘を使用して新しいドキュメントとページを作成し、‘document.pages.add ()’ を使用して空白ページを追加します。
- HTML コンテンツを準備します。HTML 文字列には、Verdana フォントの h1 見出し、太字、斜体、下線付きのテキストを含む緑色の段落、およびより大きなフォントサイズの Web サイトへのハイパーリンクが含まれています。
- HTML フラグメントを作成します。HTML 文字列を HTMLFragment オブジェクトでラップします。
- テキストフォーマットをオーバーライドします。TextState オブジェクトを作成し、フォント、フォントサイズ、テキストカラーを設定します。
- HTML フラグメントをページの段落コレクションに追加します。
- 文書を保存します。
import math
import sys
import os
import aspose.pdf as ap

def add_html_fragment_override_text_state(output_file_name):
    document = ap.Document()
    page = document.pages.add()
    html_content = """
        <h1 style='color:blue;font-family:Verdana'>Hello, Aspose!</h1>
        <p>This is a sample paragraph with <b>bold</b>, <i>italic</i>, and <u>underlined</u> text.</p>
        <p style='color:green;'>This paragraph is green.</p>
        <a href='https://www.aspose.com' style='font-size:16px;'>Visit Aspose</a>
    """
    html_fragment = ap.HtmlFragment(html_content)
    html_fragment.text_state = ap.text.TextState()
    html_fragment.text_state.font = ap.text.FontRepository.find_font("Arial")
    html_fragment.text_state.font_size = 14
    html_fragment.text_state.foreground_color = ap.Color.red

    page.paragraphs.add(html_fragment)
    document.save(output_file_name)
LaTeX テキストを PDF ドキュメントに追加
.NET 経由で Aspose.PDF for Python の TexFragment クラスを使用して、LaTeX 形式の数式を PDF ドキュメントに追加します。 LaTeXは、科学文書や数学文書の作成に広く使用されている強力な組版システムです。TexFragment を使用すると、LaTeX の数学表記法と記号を PDF ページ内に直接レンダリングできます。
- ‘Document () ‘を使用して新しいドキュメントとページを作成し、‘document.pages.add ()’ を使用して空白ページを追加します。
- TeXFragment クラスを使用すると、LaTeX 構文を直接レンダリングできます。
- 「page.paragraphs.add ()」を使用して LaTeX コンテンツを PDF レイアウトに追加します。
- PDF を保存します。
import math
import sys
import os
import aspose.pdf as ap

def add_text_latex_fragment(output_file_name):
    # Create a new document
    document = ap.Document()
    page = document.pages.add()

    # Add a text fragment at a specific position
    text_fragment = ap.TeXFragment(
        "\\underbrace{\\overbrace{a+b}^6 \\cdot \\overbrace{c+d}^7}_\\text{example of text} = 42"
    )

    page.paragraphs.add(text_fragment)
    document.save(output_file_name)

カスタムフォント
ファイルからカスタムフォントを使用する
この例では、.NET 経由で Aspose.PDF for Python のカスタム OpenType フォントを使用して PDF ファイルにテキストを追加できます。新しい PDF ドキュメントを作成する方法、テキストをページ上に正確に配置する方法、フォントの種類、サイズ、色、斜体スタイルなどのカスタム書式を適用する方法を示します。
- 新しい PDF ドキュメントを作成し、ページを追加します。
- PDF に追加するテキストコンテンツを定義します。
- テキストの位置を設定します。
- テキストフラグメントをページに追加します。
- PDF ドキュメントを保存します。
この機能はOTFだけでなく、TTFフォントでも機能します。
import math
import sys
import os
import aspose.pdf as ap

def use_custom_font_from_file(output_file_name):
    font_path = os.path.join(FONT_DIR, "BriosoPro Italic.otf")
    document = ap.Document()
    page = document.pages.add()

    fragment = ap.text.TextFragment("Hello, Aspose!")
    fragment.position = ap.text.Position(100, 600)
    fragment.text_state.font = ap.text.FontRepository.open_font(font_path)
    fragment.text_state.font_size = 24
    fragment.text_state.foreground_color = ap.Color.blue
    fragment.text_state.font_style = ap.text.FontStyles.ITALIC

    page.paragraphs.add(fragment)
    document.save(output_file_name)

ストリームからカスタムフォントを使用する
このコードスニペットは、.NET 経由で Aspose.PDF for Python でカスタムの埋め込み OpenType (OTF) フォントを使用して PDF ドキュメントにテキストを追加する方法を示しています。フォントファイルをストリームとして開き、PDF に埋め込んでさまざまなシステムでフォントを使用できるようにする方法、フォントサイズ、色、斜体スタイルなどのテキストフォーマットを適用する方法を示します。この方法は、フォントがインストールされていないデバイスで共有したり表示したりしても、タイポグラフィが維持される、視覚的に一貫した PDF を作成するのに理想的です。
- フォントファイルをバイナリストリームとしてロードします。
- 「フォントリポジトリ.Open_FONT」を使用してフォントを開いて埋め込みます。
- 新しい PDF ドキュメントを作成し、ページを追加します。
- 次のようにスタイル付きテキストフラグメントを追加します。 -埋め込みカスタムフォント。 -イタリックスタイルとブルーカラー。 -特定のフォントサイズと位置。
- 最終文書を指定した出力パスに保存します。
import math
import sys
import os
import aspose.pdf as ap

def use_custom_font_from_stream(output_file_name):
    font_path = os.path.join(FONT_DIR, "BriosoPro Italic.otf")
    with open(font_path, "rb") as font_stream:
        font = ap.text.FontRepository.open_font(font_stream, ap.text.FontTypes.OTF)
        font.is_embedded = True

        document = ap.Document()
        page = document.pages.add()

        fragment = ap.text.TextFragment("Hello, Aspose!")
        fragment.position = ap.text.Position(100, 600)
        fragment.text_state.font = font
        fragment.text_state.font_size = 14
        fragment.text_state.foreground_color = ap.Color.blue
        fragment.text_state.font_style = ap.text.FontStyles.ITALIC

        page.paragraphs.add(fragment)
        document.save(output_file_name)
フォントを埋め込むと、プラットフォーム間で一貫したレンダリングが可能になるため、このアプローチはブランディング、デザインの忠実性、多言語サポートに最適です。