Adding Tables to PDF using Python
Adding tables to existing PDF documents is a common need for enhancing data presentation, structuring information, or generating reports. Aspose.PDF for Python via .NET offers a comprehensive solution for this task, enabling developers to insert tables into existing PDFs seamlessly.
This guide provides a step-by-step approach to adding tables to existing PDF documents using Aspose.PDF for Python via .NET. It covers the initialization of a table, setting column widths, defining borders, populating rows and cells, and saving the modified document. Additionally, the guide explores advanced features, such as handling cell borders, applying margins and padding, and utilizing AutoFit settings to dynamically adjust table dimensions.
Whether you’re looking to enhance the visual appeal of your PDFs or organize data more effectively, this guide serves as a valuable resource for leveraging Aspose.PDF for Python’s powerful table manipulation capabilities.
Creating Basic Tables
Creating Table
This example demonstrates how to create a Table in a PDF document with borders and multiple rows.
- Create a new PDF document.
- Adds a blank page to the document.
- Initialize the Table.
- Set the overall table border.
- Set the border for individual cells.
- Add Rows and Cells.
- Insert the table into the page.
- Save the PDF to the specified path.
    import aspose.pdf as ap
    from os import path

    path_outfile = path.join(self.data_dir, outfile)

    # Load source PDF document
    document = ap.Document()
    page = document.pages.add()
    # Initializes a new instance of the Table
    table = ap.Table()
    # Set the table border color as LightGray
    table.border = ap.BorderInfo(ap.BorderSide.ALL, 5, ap.Color.light_gray)
    # Set the border for table cells
    table.default_cell_border = ap.BorderInfo(
        ap.BorderSide.ALL, 5, ap.Color.light_gray
    )
    # Create a loop to add 10 rows
    for row_count in range(0, 10):
        # Add row to table
        row = table.rows.add()
        # Add table cells
        row.cells.add("Column (" + str(row_count) + ", 1)")
        row.cells.add("Column (" + str(row_count) + ", 2)")
        row.cells.add("Column (" + str(row_count) + ", 3)")
    # Add table object to first page of input document
    page.paragraphs.add(table)

    # Save updated document containing table object
    document.save(path_outfile)
Adding Images to Table cells
This code snippet shows how to insert images into Table cells in a PDF document.
- Create a new PDF document.
- Initialize the Table.
- Set column widths in points.
- A text fragment is added to the first cell.
- An ‘ap.Image()’ instance is added to the second cell.
- Set the path to the image file with ‘img.file’.
- The ‘img.fix_width’ and ‘img.fix_height’ control the image size inside the cell.
- Insert the Table into the PDF page.
- Save the PDF.
    import aspose.pdf as ap
    from os import path

    # Instantiate Document object
    document = ap.Document()
    page = document.pages.add()
    # Instantiate a table object
    table = ap.Table()
    # Set width for table cells
    table.column_widths = "200 100"

    # Create row object and add it to table instance
    row = table.rows.add()
    # Create cell object and add it to row instance
    cell = row.cells.add()
    # Add textfragment to paragraphs collection of cell object
    cell.paragraphs.add(ap.text.TextFragment(image))
    # Create an image instance
    img = ap.Image()
    # Set image type as SVG
    # Path for source file
    img.file = path.join(self.data_dir, image)
    # Set width for image instance
    img.fix_width = 50
    # Set height for image instance
    img.fix_height = 50
    # Add another cell to row object
    cell = row.cells.add()
    # Add SVG image to paragraphs collection of recently added cell instance
    cell.paragraphs.add(img)

    # Add table to paragraphs collection of page object
    page.paragraphs.add(table)
    # Save PDF file
    document.save(path_outfile)
You can add SVG images into table cells in a PDF document:
    import aspose.pdf as ap
    from os import path

    path_outfile = path.join(self.data_dir, outfile)

    # Instantiate Document object
    document = ap.Document()
    page = document.pages.add()
    # Instantiate a table object
    table = ap.Table()
    # Set width for table cells
    table.column_widths = "200 100"
    for image in images:
        # Create row object and add it to table instance
        row = table.rows.add()
        # Create cell object and add it to row instance
        cell = row.cells.add()
        # Add textfragment to paragraphs collection of cell object
        cell.paragraphs.add(ap.text.TextFragment(image))
        # Create an image instance
        img = ap.Image()
        # Set image type as SVG
        img.file_type = ap.ImageFileType.SVG
        # Path for source file
        img.file = path.join(self.data_dir, image)
        # Set width for image instance
        img.fix_width = 50
        # Set height for image instance
        img.fix_height = 50
        # Add another cell to row object
        cell = row.cells.add()
        # Add SVG image to paragraphs collection of recently added cell instance
        cell.paragraphs.add(img)

    # Add table to paragraphs collection of page object
    page.paragraphs.add(table)
    # Save PDF file
    document.save(path_outfile)
ColSpan and RowSpan in Tables
This example shows how to merge table cells vertically and horizontally to create complex table layouts.
- Set the overall table border.
- Set the default cell borders.
- Merge two cells horizontally into one.
- Merge the cell vertically across two rows.
- Row 5 accounts for the rowspan by skipping the merged column.
- Insert the table into the page.
- Save the PDF.
    import aspose.pdf as ap
    from os import path

    path_outfile = path.join(self.data_dir, outfile)

    # Load source PDF document
    document = ap.Document()
    page = document.pages.add()

    # Initializes a new instance of the Table
    table = ap.Table()
    # Set the table border color as LightGray
    table.border = ap.BorderInfo(ap.BorderSide.ALL, 0.5, ap.Color.black)
    # Set the border for table cells
    table.default_cell_border = ap.BorderInfo(
        ap.BorderSide.ALL, 0.5, ap.Color.black
    )
    # Add 1st row to table
    row1 = table.rows.add()
    for cellCount in range(1, 5):
        # Add table cells
        row1.cells.add("Test 1" + str(cellCount))

    # Add 2nd row to table
    row2 = table.rows.add()
    row2.cells.add("Test 2 1")
    cell = row2.cells.add("Test 2 2")
    cell.col_span = 2
    row2.cells.add("Test 2 4")

    # Add 3rd row to table
    row3 = table.rows.add()
    row3.cells.add("Test 3 1")
    row3.cells.add("Test 3 2")
    row3.cells.add("Test 3 3")
    row3.cells.add("Test 3 4")

    # Add 4th row to table
    row4 = table.rows.add()
    row4.cells.add("Test 4 1")
    cell = row4.cells.add("Test 4 2")
    cell.row_span = 2
    row4.cells.add("Test 4 3")
    row4.cells.add("Test 4 4")

    # Add 5th row to table
    row5 = table.rows.add()
    row5.cells.add("Test 5 1")
    row5.cells.add("Test 5 3")
    row5.cells.add("Test 5 4")

    # Add table object to first page of input document
    page.paragraphs.add(table)
    # Save updated document containing table object
    document.save(path_outfile)

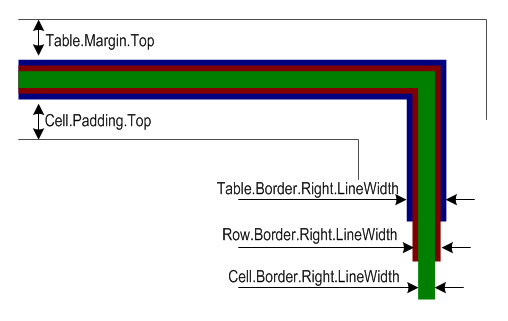
Applying Borders to Tables and Cells
This example shows how to set cell padding, table margins, and control word wrapping for text in table cells.
- Set the widths of the columns.
- Define the table and cell borders.
- Set padding Inside cells for consistent spacing.
- Apply the padding to all cells by default.
- Add Text and Controlling Wrapping.
- Add Rows and Cells.
- Save the PDF.
    import aspose.pdf as ap
    from os import path

    path_outfile = path.join(self.data_dir, outfile)
    # Load source PDF document
    document = ap.Document()
    page = document.pages.add()
    # Instantiate a table object
    tab1 = ap.Table()
    # Add the table in paragraphs collection of the desired section
    page.paragraphs.add(tab1)
    # Set with column widths of the table
    tab1.column_widths = "50 50 50"
    # Set default cell border using BorderInfo object
    tab1.default_cell_border = ap.BorderInfo(ap.BorderSide.ALL, 0.1)
    # Set table border using another customized BorderInfo object
    tab1.border = ap.BorderInfo(ap.BorderSide.ALL, 1)
    # Create MarginInfo object and set its left, bottom, right and top margins
    margin = ap.MarginInfo()
    margin.top = 5
    margin.left = 5
    margin.right = 5
    margin.bottom = 5
    # Set the default cell padding to the MarginInfo object
    tab1.default_cell_padding = margin
    # Create rows in the table and then cells in the rows
    row1 = tab1.rows.add()
    row1.cells.add("col1")
    row1.cells.add("col2")
    row1.cells.add()
    text = ap.text.TextFragment("col3 with large text string")
    # Row1.Cells.Add("col3 with large text string to be placed inside cell")
    row1.cells[2].paragraphs.add(text)
    row1.cells[2].is_word_wrapped = False
    row2 = tab1.rows.add()
    row2.cells.add("item1")
    row2.cells.add("item2")
    row2.cells.add("item3")
    # Save updated document containing table object
    document.save(path_outfile)

Table Layout and Sizing
Auto-fitting columns and rows
This code snippet shows how to automatically adjust table column widths to fit the page. Please note that in the parameter table.column_widths = “50 50 50” - its points. But you can also specify centimeters (cm), inch or %.
- Set initial column widths.
- Automatically adjusts columns to fit the page width.
- Define cell and table borders.
- The ’table.default_cell_padding’ uses ‘MarginInfo()’ for consistent spacing inside cells.
- Add Rows with ’table.rows.add()’, and add Cells with ‘row.cells.add()’.
- Save the PDF.
    import aspose.pdf as ap
    from os import path

    path_outfile = path.join(self.data_dir, outfile)

    # Load source PDF document
    document = ap.Document()
    page = document.pages.add()
    # Instantiate a table object
    table = ap.Table()

    page.paragraphs.add(table)

    table.column_widths = "50 50 50"
    table.column_adjustment = ap.ColumnAdjustment.AUTO_FIT_TO_WINDOW

    table.default_cell_border = ap.BorderInfo(ap.BorderSide.ALL, 0.1)

    table.border = ap.BorderInfo(ap.BorderSide.ALL, 1)

    margin = ap.MarginInfo()
    margin.top = 5
    margin.left = 5
    margin.right = 5
    margin.bottom = 5

    table.default_cell_padding = margin

    row1 = table.rows.add()
    row1.cells.add("col1")
    row1.cells.add("col2")
    row1.cells.add("col3")
    row2 = table.rows.add()
    row2.cells.add("item1")
    row2.cells.add("item2")
    row2.cells.add("item3")

    document.save(path_outfile)
Adjusting spacing around content
This example shows how to create tables that span multiple pages, handle long text in cells, and apply padding and borders.
- Add new table to the page using ‘page.paragraphs.add(table)’.
- Define the widths of columns with ’table.column_widths’.
- Sets individual cell borders with ’table.default_cell_border’.
- Set the table overall border with ’table.border’.
- Define default padding for cells using ‘MarginInfo()’.
- Add text using ‘TextFragment’.
- Add another row.
- Save the PDF.
    import aspose.pdf as ap
    from os import path

    path_outfile = path.join(self.data_dir, outfile)

    # Create PDF document
    document = ap.Document()
    page = document.pages.add()

    # Instantiate a table object that will be nested inside outerTable that will break inside the same page
    table = ap.Table()
    # Add page
    page = document.pages.add()

    # Instantiate a table object
    table = ap.Table()

    # Add the table in paragraphs collection of the desired section
    page.paragraphs.add(table)

    # Set column widths of the table
    table.column_widths = "50 50 50"

    # Set default cell border using BorderInfo object
    table.default_cell_border = ap.BorderInfo(ap.BorderSide.ALL, 0.1)

    # Set table border using another customized BorderInfo object
    table.border = ap.BorderInfo(ap.BorderSide.ALL, 1)

    # Create MarginInfo object and set its left, bottom, right and top margins
    margin = ap.MarginInfo()
    margin.top = 5
    margin.left = 5
    margin.right = 5
    margin.bottom = 5

    # Set the default cell padding to the MarginInfo object
    table.default_cell_padding = margin

    # Create rows and cells
    row1 = table.rows.add()
    row1.cells.add("col1")
    row1.cells.add("col2")
    row1.cells.add()

    # Add a long text fragment into the third cell
    text = ap.text.TextFragment("col3 with large text string")
    row1.cells[2].paragraphs.add(text)
    row1.cells[2].is_word_wrapped = False

    # Add another row
    row2 = table.rows.add()
    row2.cells.add("item1")
    row2.cells.add("item2")
    row2.cells.add("item3")

    # Save PDF document
    document.save(path_outfile)
Styling Table Corners
Aspose.PDF for Python via .NET shows how to apply rounded corners to a table and customize the border radius.
- Create a new table instance.
- Initialize a border for all sides.
- Set the corner radius.
- Apply the rounded corner style.
- Add Rows and Cells.
- Insert the table into the PDF page with ‘page.paragraphs.add(table)’.
- Save the PDF document.
    import aspose.pdf as ap
    from os import path

    path_outfile = path.join(self.data_dir, outfile)

    # Load source PDF document
    document = ap.Document()
    page = document.pages.add()
    # Initializes a new instance of the Table
    table = ap.Table()

    # Create a table
    table = ap.Table()

    # Create a blank BorderInfo object
    b_info = ap.BorderInfo(ap.BorderSide.ALL)

    # Set the border a rounded border where radius of round is 15
    b_info.rounded_border_radius = 15

    # Set the table corner style as Round
    table.corner_style = ap.BorderCornerStyle.ROUND

    # Set the table border information
    table.border = b_info

    # Create a loop to add 10 rows
    for row_count in range(0, 10):
        # Add row to table
        row = table.rows.add()
        # Add table cells
        row.cells.add("Column (" + str(row_count) + ", 1)")
        row.cells.add("Column (" + str(row_count) + ", 2)")
        row.cells.add("Column (" + str(row_count) + ", 3)")

    # Add table object to first page of input document
    page.paragraphs.add(table)
    # Save updated document containing table object
    document.save(path_outfile)
Adding Content to Tables
Using HTML Fragments in Cells
This example shows how to insert HTML-formatted content into table cells.
- Define table and cell borders.
- Add HTML content.
- Add Rows. A loop adds multiple rows with HTML-formatted content in each cell.
- Insert the table into the PDF page with ‘page.paragraphs.add(table)’.
- Save the PDF document.
    import aspose.pdf as ap
    from os import path

    path_outfile = path.join(self.data_dir, outfile)

    # Instantiate Document object
    document = ap.Document()
    page = document.pages.add()
    # Instantiate a table object
    table = ap.Table()

    # Set the table border color as LightGray
    table.border = ap.BorderInfo(ap.BorderSide.ALL, 0.5, ap.Color.light_gray)
    # Set the border for table cells
    table.default_cell_border = ap.BorderInfo(
        ap.BorderSide.ALL, 0.5, ap.Color.light_gray
    )
    # Create a loop to add 10 rows
    row_count = 1
    while row_count < 10:
        # Add row to table
        row = table.rows.add()
        # Add table cells
        cell = row.cells.add()
        cell.paragraphs.add(
            ap.HtmlFragment(f"Column <strong>({row_count}, 1)</strong>")
        )

        cell = row.cells.add()
        cell.paragraphs.add(
            ap.HtmlFragment(
                f"Column <span style='color:red'>({row_count}, 2)</span>"
            )
        )

        cell = row.cells.add()
        cell.paragraphs.add(
            ap.HtmlFragment(
                f"Column <span style='text-decoration: underline'>({row_count}, 3)</span>"
            )
        )
        row_count += 1

    # Add table object to first page of input document
    page.paragraphs.add(table)
    # Save updated document containing table object
    document.save(path_outfile)
Using LaTeX Fragments in Cells
This example shows how to insert LaTeX-formatted content into table cells for mathematical or styled expressions.
- Define table and cell borders.
- Add LaTeX Content.
- Add Rows. A loop adds multiple rows with LaTeX-formatted content in each cell.
- Insert the table into the PDF page with ‘page.paragraphs.add(table)’.
- Save the PDF document.
    import aspose.pdf as ap
    from os import path

    path_outfile = path.join(self.data_dir, outfile)

    # Instantiate Document object
    document = ap.Document()
    page = document.pages.add()
    # Instantiate a table object
    table = ap.Table()

    # Set the table border color as LightGray
    table.border = ap.BorderInfo(ap.BorderSide.ALL, 0.5, ap.Color.light_gray)
    # Set the border for table cells
    table.default_cell_border = ap.BorderInfo(
        ap.BorderSide.ALL, 0.5, ap.Color.light_gray
    )
    # Create a loop to add 10 rows
    row_count = 1
    while row_count < 10:
        # Add row to table
        row = table.rows.add()
        # Add table cells
        cell = row.cells.add()
        cell.paragraphs.add(
            ap.LatexFragment(f"Column $\\mathbf{{({row_count}, 1)}}$")
        )

        cell = row.cells.add()
        cell.paragraphs.add(
            ap.LatexFragment(
                f"Column $\\textcolor{{red}}{{({row_count}, 2)}}$"
            )
        )

        cell = row.cells.add()
        cell.paragraphs.add(
            ap.LatexFragment(
                f"Column $\\underline{{({row_count}, 3)}}$"
            )
        )
        row_count += 1

    # Add table object to first page of input document
    page.paragraphs.add(table)
    # Save updated document containing table object
    document.save(path_outfile)
Advanced Table Features
Inserting Tables across Pages
This example shows how to create multiple tables in a PDF, set page margins, and force a table to start on a new page.
- Set Page margins using ‘page_info.margin’.
- Set the page orientation to landscape ‘page_info.is_landscape’.
- First Table:
- define two columns with specified widths.
- add the Rows in a loop with ‘row.fixed_row_height’.
- populate Cells with text fragments.
- Second Table:
- create a new table with ’table1.column_widths’.
- force the table to start on a new page.
- Add the first table.
- Add the second table on a new page.
- Save the Document
    import aspose.pdf as ap
    from os import path

    # The path to the documents directory
    path_outfile = path.join(self.data_dir, outfile)

    # Create PDF document
    document = ap.Document()

    # Set page and margin information
    page_info = document.page_info
    margin_info = page_info.margin

    margin_info.left = 37
    margin_info.right = 37
    margin_info.top = 37
    margin_info.bottom = 37
    page_info.is_landscape = True

    # First table with 120 rows
    table = ap.Table()
    table.column_widths = "50 100"

    cur_page = document.pages.add()

    for i in range(1, 121):
        row = table.rows.add()
        row.fixed_row_height = 15
        cell1 = row.cells.add()
        cell1.paragraphs.add(ap.text.TextFragment("Content 1"))
        cell2 = row.cells.add()
        cell2.paragraphs.add(ap.text.TextFragment("Content 2"))

    cur_page.paragraphs.add(table)

    # Second table with 10 rows
    table1 = ap.Table()
    table1.column_widths = "100 100"

    for i in range(1, 11):
        row = table1.rows.add()
        cell1 = row.cells.add()
        cell1.paragraphs.add(ap.text.TextFragment("Content 3"))
        cell2 = row.cells.add()
        cell2.paragraphs.add(ap.text.TextFragment("Content 4"))

    table1.is_in_new_page = True  # Force table to new page
    cur_page.paragraphs.add(table1)

    # Save updated document containing table object
    document.save(path_outfile)
Creating borderless Tables
This example shows how to create a large table that can break vertically across pages, repeat columns, and apply different background colors to header cells.
- Initialize the Table.
- Set a default border for all cells.
- Header cells use ‘col_span’ to merge multiple columns.
- Set the cell background for better visual distinction with ‘background_color set’
- Add Rows.
- Insert the table into the PDF page with ‘page.paragraphs.add(table)’.
- Save the PDF document.
    import aspose.pdf as ap
    from os import path

    # The path to the documents directory
    path_outfile = path.join(self.data_dir, outfile)

    # Create PDF document
    document = ap.Document()
    page = document.pages.add()

    table = ap.Table()
    table.broken = ap.TableBroken.VERTICAL
    table.default_cell_border = ap.BorderInfo(ap.BorderSide.ALL)
    table.repeating_columns_count = 2
    page.paragraphs.add(table)

    # Add header Row
    row = table.rows.add()
    cell = row.cells.add("header 1")
    cell.col_span = 2
    cell.background_color = ap.Color.light_gray
    row.cells.add("header 3")

    cell2 = row.cells.add("header 4")
    cell2.col_span = 2
    cell2.background_color = ap.Color.light_blue
    row.cells.add("header 6")

    cell3 = row.cells.add("header 7")
    cell3.col_span = 2
    cell3.background_color = ap.Color.light_green
    cell4 = row.cells.add("header 9")

    cell4.col_span = 3
    cell4.background_color = ap.Color.light_coral
    row.cells.add("header 12")
    row.cells.add("header 13")
    row.cells.add("header 14")
    row.cells.add("header 15")
    row.cells.add("header 16")
    row.cells.add("header 17")

    row_counter = 0
    while row_counter < 3:
        # Create rows in the table and then cells in the rows
        row1 = table.rows.add()
        row1.cells.add("col " + str(row_counter) + ", 1")
        row1.cells.add("col " + str(row_counter) + ", 2")
        row1.cells.add("col " + str(row_counter) + ", 3")
        row1.cells.add("col " + str(row_counter) + ", 4")
        row1.cells.add("col " + str(row_counter) + ", 5")
        row1.cells.add("col " + str(row_counter) + ", 6")
        row1.cells.add("col " + str(row_counter) + ", 7")
        row1.cells.add("col " + str(row_counter) + ", 8")
        row1.cells.add("col " + str(row_counter) + ", 9")
        row1.cells.add("col " + str(row_counter) + ", 10")
        row1.cells.add("col " + str(row_counter) + ", 11")
        row1.cells.add("col " + str(row_counter) + ", 12")
        row1.cells.add("col " + str(row_counter) + ", 13")
        row1.cells.add("col " + str(row_counter) + ", 14")
        row1.cells.add("col " + str(row_counter) + ", 15")
        row1.cells.add("col " + str(row_counter) + ", 16")
        row1.cells.add("col " + str(row_counter) + ", 17")
        row_counter += 1

    document.save(path_outfile)
Repeating Header rows on multiple Pages
This example shows how to create a table that spans multiple pages while keeping header rows visible on each page.
- Initialize the Table.
- Repeat Header Rows including font, size, and color.
- Set Column Widths and apply Borders to the table.
- Add Header rows.
- Add many data rows to force table across multiple pages.
- Insert the table into the PDF page with ‘page.paragraphs.add(table)’.
- Save the PDF document.
    import aspose.pdf as ap
    from os import path

    path_outfile = path.join(self.data_dir, outfile)

    # Create PDF document
    document = ap.Document()
    page = document.pages.add()

    # Instantiate a table object
    table = ap.Table()

    # Set the table to break across pages
    table.broken = ap.TableBroken.VERTICAL

    # Set number of repeating header rows
    table.repeating_rows_count = 2

    text_state = ap.text.TextState()
    text_state.font_size = 12
    text_state.font = ap.text.FontRepository.find_font("TimesNewRoman")
    text_state.foreground_color = ap.Color.red
    table.repeating_rows_style =  text_state

    # Set column widths
    table.column_widths = "100 100 100"

    # Set borders
    table.default_cell_border = ap.BorderInfo(ap.BorderSide.ALL, 0.5, ap.Color.black)
    table.border = ap.BorderInfo(ap.BorderSide.ALL, 1, ap.Color.black)

    # Add header rows that will repeat on each page
    header_row1 = table.rows.add()
    header_row1.cells.add("Header 1-1")
    header_row1.cells.add("Header 1-2")
    header_row1.cells.add("Header 1-3")

    # Set background color for header rows
    for cell in header_row1.cells:
        cell.background_color = ap.Color.light_gray

    header_row2 = table.rows.add()
    header_row2.cells.add("Header 2-1")
    header_row2.cells.add("Header 2-2")
    header_row2.cells.add("Header 2-3")

    for cell in header_row2.cells:
        cell.background_color = ap.Color.light_blue

    # Add many data rows to force table across multiple pages
    for i in range(1, 101):
        row = table.rows.add()
        row.cells.add(f"Data {i}-1")
        row.cells.add(f"Data {i}-2")
        row.cells.add(f"Data {i}-3")

    # Add table to page
    page.paragraphs.add(table)

    # Save document
    document.save(path_outfile)
Repeating Columns
The function ‘add_repeating_columns’ creates a PDF document with a table that has repeating columns. It sets up a bordered table, adds headers, fills in data rows, and saves the generated PDF file to the specified location. Setting this property will cause the table to break to the next page column-wise and repeat the given column count at the start of the next page.
- Initializes a new PDF document.
- Adds a page with custom dimensions.
- Set Table Border Style.
- Initialize Table.
- Add table to the PDF page.
- Add header row.
- Add data rows.
- Save PDF Document.
    import aspose.pdf as ap
    from os import path

    path_outfile = path.join(self.data_dir, outfile)

    # Create PDF document
    document = ap.Document()

    # Add page
    page = document.pages.add()
    page.set_page_size(ap.PageSize.A5.height, ap.PageSize.A5.width)

    # Define border
    border = ap.BorderInfo(ap.BorderSide.ALL, 0.5, ap.Color.light_gray)

    # Create table
    table = ap.Table()
    table.broken = ap.TableBroken.VERTICAL
    table.column_adjustment = ap.ColumnAdjustment.AUTO_FIT_TO_CONTENT
    table.repeating_columns_count = 5
    table.border = border
    table.default_cell_border = border

    # Add table to page
    page.paragraphs.add(table)

    # Add header row
    row = table.rows.add()
    for i in range(1, 6):
        cell = row.cells.add(f"header {i}")
        cell.background_color = ap.Color.light_gray

    for i in range(6, 18):
        row.cells.add(f"header {i}")

    # Add data rows
    for row_counter in range(1, 6):
        row = table.rows.add()
        for i in range(1, 6):
            cell = row.cells.add(f"cell {row_counter},{i}")
            cell.background_color = ap.Color.light_gray
        for i in range(6, 18):
            row.cells.add(f"cell {row_counter},{i}")

    # Save PDF document
    document.save(path_outfile)
    print(f"File saved at: {path_outfile}")