How to create YouTube thumbnail generator programmatically in Java
Introduction
The purpose of this document is to demonstrate API usage of some compound tools of Aspose.PSD for Java on a real-world example. In this article, a simple Java program that generates YouTube thumbnails for the DW Documentary channel will have written and explained. This channel has been chosen from the real world because its thumbnails are quite standard, and they illustrate the usage of a few popular compound tools of Aspose.PSD for Java (e.g. drop shadow effect, radial gradient fill, drawing text and shapes):

How it works in a nutshell
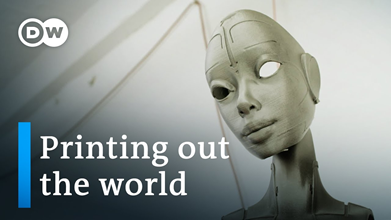
A simple Java program takes as input two arguments: a caption and an image. An in-memory Photoshop document (PSD) is generated from that input using Aspose.PSD for Java. After, the program converts the document from PSD to PNG file format to get a YouTube thumbnail with a size of 1280x720 pixels. The output image looks similar to the following:
Technical requirements
The following technologies are required to succeed in running the code of this article:
- Java 6+
- Aspose.PSD for Java (latest)
Getting started
As it was already mentioned, the program uses in-memory PSD to generate a thumbnail. So, let us create a PSD document, to begin with:
PsdImage psdImage = new PsdImage(1280, 720);
If you look more closely at the YouTube thumbnail above you may notice that it consists of several components:
- a background image (printed mask)
- a radial psd gradient (highlights the area in the top right-hand corner)
- a logotype with a shadow effect
- a caption and a simple drawing (blue rectangle)
Let us dive deeper to see how to implement each of these components using Aspose.PSD for Java in the next sections.
1. Add a background image
The order of layers is important. Therefore, a background image must be added first to do not overlap other layers. Pay attention that only raster file formats are supported at the moment.
1.1. Add a background image to a Photoshop layer
To add a raster image into PSD, an input stream must be passed as an argument during the construction of the layer (see more examples of loading raster images):
1.2. Fit the background image to the canvas
The following 2 actions (resizing, positioning) are useful for those cases when the image size differs from the canvas size, although the image in this article has the same size as the canvas (assume it will not always be so).
Make sure the loaded image fits the canvas size (see more examples of resizing):
After resizing, the image position is changed. Therefore, to reset the position of the image, move the resized image to the top left-hand corner:
2. Add a radial gradient
There are two ways of adding a radial gradient, using:
- a gradient overlay effect on an existing layer (a gradient effect that binds to the current layer and applies to its content)
- a new gradient fill layer (a separate layer that keeps standalone configuration of the gradient)
It is enough to use the gradient overlay effect for this example. However, to make this article more interesting and useful the gradient fill layer is used since all layer effects apply in similar manner and another layer effect will be used in the next section.
2.1. Add a radial gradient fill layer
The process of adding a new gradient fill layer consists from the following 2 steps:
\1. It is necessary to declare gradient fill settings since there are no predefined ones. The minimum required configuration looks like as follows (meant that gradient type, scale, color and transparency points are required properties):
The configuration above declares a radial gradient that is transparent on the edges and dark blue in the center. The gradient position is in the middle of the canvas by default.
To reverse the gradient fill and slightly shift it to the upper right corner use corresponding optional properties:
\2. When the configuration is done, add a gradient fill layer along with its settings into PSD:
Add a logotype with a shadow
The drop shadow is an effect that allows to add a custom shadow along the contour of the object (image, text etc.).
3.1. Add a logotype to a Photoshop layer
The same approach as in section 1.1. can be used to add a logotype into PSD:
3.2. Position the logotype
The loaded image is closely adhered to the top left-hand corner by default. However, some margins need to be added to look like the original YouTube thumbnail on the channel. Therefore, the image position should be shifted away from the edges of the layer:
3.3. Add a drop shadow effect to the logotype
The logotype can be invisible if a light background image is used. Therefore, it is desirable to add a drop shadow effect to a logotype through blending options property (see more examples of shadowing):
The drop shadow effect does not have the required properties because of the default configuration (it looks as Photoshop’s one). However, the shadow above is modified to look like a translucent border blurred on the edges.
4. Add a drawing of text and a shape
3.1. Create a graphic layer
Drawing is not supported by a regular layer directly. Therefore, the graphics engine is used beside the layer to provide an API for drawing (see more examples of drawing):
Layer graphicLayer = psdImage.addRegularLayer(); Graphics graphics = new Graphics(graphicLayer);
3.2. Draw multiline text
A savvy reader may ask: why not use a text layer to add a text? Well, there are a couple of reasons: text editing is not required in this case because PSD is generated from scratch each time; the font customization is not supported by the text API yet (v20.6 at the time of writing).
It is easy to draw some text with a customized font just instantiate a desirable font and invoke the corresponding method from the graphics engine. However, to make a rectangle (see details in the next section) that changes its height automatically based on the number of lines of text is a little harder. The exact height of all lines must be calculated first:
Where 1.15 is the line height, 3 is the text padding.
3.3. Draw a rectangle
A rectangle is also easy to draw even with a gradient brush (just set an area to draw and a color range). When the height of text is known the size and the position of the rectangle calculates. To draw a filled rectangle in psd (not just a frame) call the corresponding method from the graphics engine with all of that:
Where 40, 15, 25 are indents.
Result
So, the shaping of the thumbnail has finished. Therefore, it is a time to export the thumbnail to a raster file format (for example, PNG) for further distribution:
Conclusion
In this article, we have created a YouTube thumbnail generator for the DW Documentary channel and explained how to use some of the most popular compound tools such as drop shadow effect, radial gradient fill, drawing text, and shapes.
Full Example
You can download Aspose.PSD SDK