# Aspose.Slides for C++
> Complete English documentation. Each page retains its canonical source URL.
# Aspose.Slides for C++
> Start here: install Aspose.Slides for C++, create a first presentation, and find the guides for common tasks, the API reference and support.
Source: https://docs.aspose.com/slides/cpp/
Updated: 2026-10-27
 Aspose.Slides for C++ is a native C++ library for creating, reading, editing and converting PowerPoint and OpenDocument presentations, without Microsoft PowerPoint or Office Automation.
It loads and saves PPT, PPTX, PPS, POT and ODP, including macro-enabled and template variants, and exports to PDF, XPS, HTML, SVG, TIFF, Markdown and images.
Explore features and support — browse the library features and open their guides.
------
Get Started
GETTING STARTED
EVALUATE
Build with Slides
COMMON TASKS
SLIDES WORKFLOWS
EXAMPLES
Reference & Support
REFERENCE
SUPPORT
------
## **Your first presentation**
On Windows, create a C++ **Console App** project in Visual Studio and install the NuGet package in the Package Manager Console (**Tools** > **NuGet Package Manager** > **Package Manager Console**):
```powershell
Install-Package Aspose.Slides.Cpp
```
On Linux, download the Linux ZIP package and set up the CMake project described in [Installation](https://docs.aspose.com/slides/cpp/installation/#linux).
Then use this code as your program's main source file. It creates a presentation with one text box and saves it:
```cpp
#include
#include
#include
#include
#include
#include
#include
#include
using namespace Aspose::Slides;
using namespace Aspose::Slides::Export;
using namespace System;
int main()
{
auto presentation = MakeObject();
auto slide = presentation->get_Slide(0);
auto shape = slide->get_Shapes()->AddAutoShape(ShapeType::Rectangle, 50, 50, 400, 100);
shape->get_TextFrame()->set_Text(u"Hello, Aspose.Slides!");
presentation->Save(u"hello.pptx", SaveFormat::Pptx);
presentation->Dispose();
return 0;
}
```
To run it on Windows, select the **x64** platform in the toolbar and press **Ctrl+F5**. On Linux, save it as *main.cpp* in the project folder, then build and run it there:
```bash
cmake -S . -B build -DCMAKE_BUILD_TYPE=Release
cmake --build build
./build/hello
```
The program saves *hello.pptx* with one slide holding a text box. Without a license, the saved file carries an evaluation watermark — see [Licensing](https://docs.aspose.com/slides/cpp/licensing/). For more ways to create and fill a presentation, see [Create Presentations](https://docs.aspose.com/slides/cpp/create-presentation/).
## Related articles
- [API Reference](https://docs.aspose.com/slides/cpp/api-reference/)
- [Product Overview](https://docs.aspose.com/slides/cpp/product-overview/)
# Customize 3D Charts in Presentations Using C++
> Create 3D charts in PowerPoint presentations with Aspose.Slides for C++. Adjust rotation, height proportions, chart depth, and spacing between series with C++ examples.
Source: https://docs.aspose.com/slides/cpp/3d-chart/
Updated: 2026-11-09
## **Overview**
Aspose.Slides for C++ lets you customize the view of a 3D chart through [IChart::get_Rotation3D](https://reference.aspose.com/slides/cpp/aspose.slides.charts/ichart/get_rotation3d/). This article demonstrates how to adjust rotation, height proportions, depth, right-angle axes, and spacing between series, then save the presentation in PPTX format.
## **Set the Rotation and Depth of a 3D Chart**
The example below creates a [Presentation](https://reference.aspose.com/slides/cpp/aspose.slides/presentation/) and uses [IShapeCollection::AddChart](https://reference.aspose.com/slides/cpp/aspose.slides/ishapecollection/addchart/) to add a stacked 3D column chart to its first slide. It replaces the default series and categories with two series containing three values each. Worksheet index `0` identifies the chart's first data worksheet; row `0` holds series names, and column `0` holds category labels.
The [set_RotationX](https://reference.aspose.com/slides/cpp/aspose.slides.charts/irotation3d/set_rotationx/) and [set_RotationY](https://reference.aspose.com/slides/cpp/aspose.slides.charts/irotation3d/set_rotationy/) methods set the chart's rotation to 40 and 270 degrees, respectively. [set_DepthPercents](https://reference.aspose.com/slides/cpp/aspose.slides.charts/irotation3d/set_depthpercents/) sets its depth to 150% of its width, while [set_RightAngleAxes](https://reference.aspose.com/slides/cpp/aspose.slides.charts/irotation3d/set_rightangleaxes/) enables right-angle axes instead of perspective. The resulting presentation contains the populated chart with these 3D view settings.
```cpp
#include
#include
#include
#include
#include
#include
#include
#include
#include
#include
#include
#include
#include
#include
#include
#include
using namespace Aspose::Slides;
using namespace Aspose::Slides::Charts;
using namespace Aspose::Slides::Export;
using namespace System;
auto presentation = MakeObject();
auto slide = presentation->get_Slide(0);
auto chart = slide->get_Shapes()->AddChart(ChartType::StackedColumn3D, 0, 0, 500, 500);
chart->get_ChartData()->get_Series()->Clear();
chart->get_ChartData()->get_Categories()->Clear();
auto workbook = chart->get_ChartData()->get_ChartDataWorkbook();
auto worksheetIndex = 0;
double values[2][3] = { { 20, 50, 30 }, { 30, 10, 60 } };
for (auto categoryIndex = 0; categoryIndex < 3; categoryIndex++)
{
auto categoryName = String::Format(u"Category {0}", categoryIndex + 1);
auto categoryCell = workbook->GetCell(worksheetIndex, categoryIndex + 1, 0, ObjectExt::Box(categoryName));
chart->get_ChartData()->get_Categories()->Add(categoryCell);
}
for (auto seriesIndex = 0; seriesIndex < 2; seriesIndex++)
{
auto seriesName = String::Format(u"Series {0}", seriesIndex + 1);
auto seriesCell = workbook->GetCell(worksheetIndex, 0, seriesIndex + 1, ObjectExt::Box(seriesName));
auto series = chart->get_ChartData()->get_Series()->Add(seriesCell, chart->get_Type());
for (auto categoryIndex = 0; categoryIndex < 3; categoryIndex++)
{
auto valueCell = workbook->GetCell(worksheetIndex, categoryIndex + 1, seriesIndex + 1, ObjectExt::Box(values[seriesIndex][categoryIndex]));
series->get_DataPoints()->AddDataPointForBarSeries(valueCell);
}
}
chart->get_Rotation3D()->set_RightAngleAxes(true);
chart->get_Rotation3D()->set_RotationX(40);
chart->get_Rotation3D()->set_RotationY(270);
chart->get_Rotation3D()->set_DepthPercents(150);
presentation->Save(u"Rotation3D_out.pptx", SaveFormat::Pptx);
presentation->Dispose();
```
## **Adjust the Height Proportions of a 3D Chart**
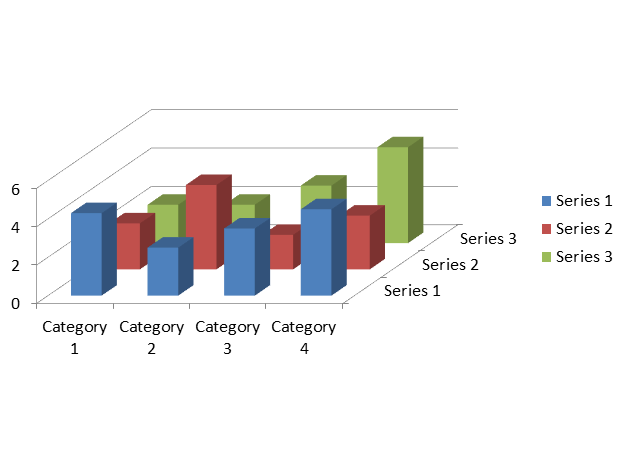
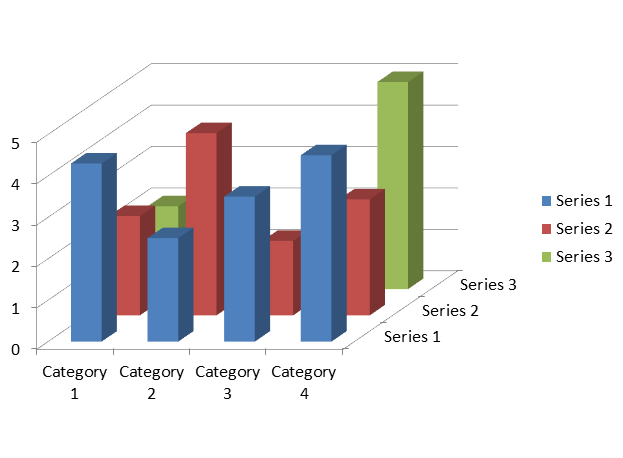
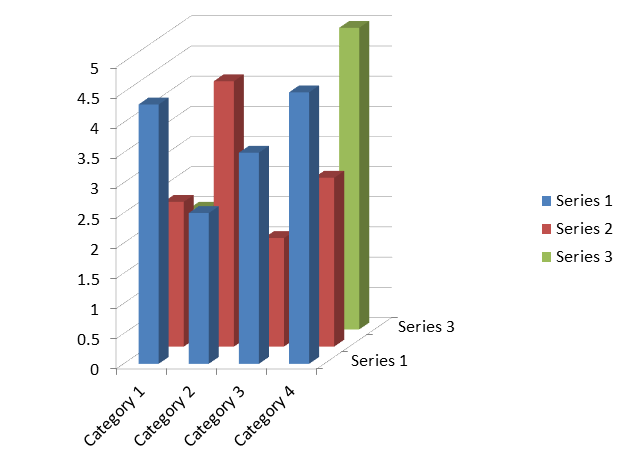
Use [IRotation3D::set_HeightPercents](https://reference.aspose.com/slides/cpp/aspose.slides.charts/irotation3d/set_heightpercents/) to set the height of a 3D chart as a percentage of its width. This changes the proportions of the 3D scene without resizing the chart object on the slide.
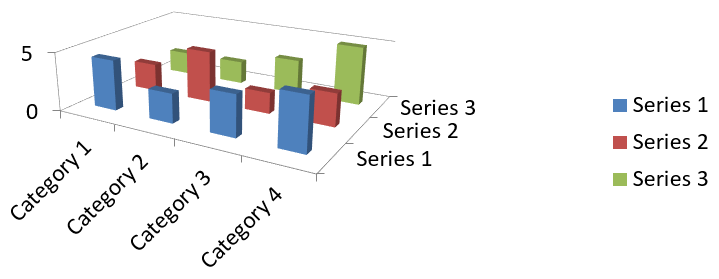
The following example creates a [Column3D](https://reference.aspose.com/slides/cpp/aspose.slides.charts/charttype/) chart with the default data: three series and four categories. It saves three presentations with height proportions of 50%, 100%, and 200%. The chart's position, width, and height remain fixed. The data, rotation, depth, series spacing, and formatting are identical in all three files; only the height percentage changes.
```cpp
#include
#include
#include
#include
#include
#include
#include
#include
#include
#include
#include
#include
#include
#include
#include
using namespace Aspose::Slides;
using namespace Aspose::Slides::Charts;
using namespace Aspose::Slides::Export;
using namespace System;
auto presentation = MakeObject();
auto slide = presentation->get_Slide(0);
auto chart = slide->get_Shapes()->AddChart(ChartType::Column3D, 40, 30, 620, 460);
chart->get_Rotation3D()->set_RotationX(20);
chart->get_Rotation3D()->set_RotationY(30);
chart->get_Rotation3D()->set_RightAngleAxes(true);
chart->get_Rotation3D()->set_DepthPercents(100);
chart->get_ChartData()->get_Series()->idx_get(0)->get_ParentSeriesGroup()->set_GapDepth(150);
for (uint16_t heightPercent : { 50, 100, 200 })
{
chart->get_Rotation3D()->set_HeightPercents(heightPercent);
auto fileName = String::Format(u"chart_height_{0}.pptx", heightPercent);
presentation->Save(fileName, SaveFormat::Pptx);
}
presentation->Dispose();
```
The following images from the equivalent .NET example were exported using Microsoft PowerPoint and illustrate the same height settings. A smaller percentage produces a flatter scene, while a larger percentage produces a taller scene within the same chart object. PowerPoint may also adjust axis tick intervals and label placement to fit the scene.
| Height: 50% | Height: 100% | Height: 200% |
| --- | --- | --- |
|  |  |  |
These methods control different aspects of the chart:
| Method | Effect |
| --- | --- |
| [IRotation3D::set_HeightPercents](https://reference.aspose.com/slides/cpp/aspose.slides.charts/irotation3d/set_heightpercents/) | Height of the 3D scene as a percentage of its width. |
| [IShape::set_Height](https://reference.aspose.com/slides/cpp/aspose.slides/ishape/set_height/) | Height of the chart object on the slide, in points. |
| [IRotation3D::set_DepthPercents](https://reference.aspose.com/slides/cpp/aspose.slides.charts/irotation3d/set_depthpercents/) | Depth of the 3D scene as a percentage of its width. |
| [IChartSeriesGroup::set_GapDepth](https://reference.aspose.com/slides/cpp/aspose.slides.charts/ichartseriesgroup/set_gapdepth/) | Spacing between series along the depth axis, as a percentage of the marker width. |
The height setting affects 3D column and bar charts, including cylinder, cone, and pyramid variants, as well as 3D line, area, pie, and surface charts. The comparison above uses the verified `Column3D` type. The setting does not change the appearance of a 2D `ClusteredColumn` chart or a `BubbleWith3D` chart; these names are members of the [ChartType](https://reference.aspose.com/slides/cpp/aspose.slides.charts/charttype/) enumeration. For other chart appearance settings, see [Chart Formatting](https://docs.aspose.com/slides/cpp/chart-formatting/).
## **Adjust the Gap Between Series**
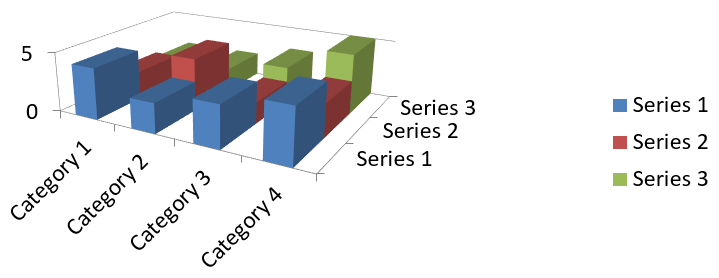
Use [IChartSeriesGroup::set_GapDepth](https://reference.aspose.com/slides/cpp/aspose.slides.charts/ichartseriesgroup/set_gapdepth/) to control the distance between data series along the depth axis of a 3D chart, expressed as a percentage of the marker width. Use values from **0 to 500**, inclusive: `0` removes the gap, while larger values increase the spacing. With a fixed chart depth, increasing the gap makes the markers thinner along the depth axis.
Access the group through [IChartSeries::get_ParentSeriesGroup](https://reference.aspose.com/slides/cpp/aspose.slides.charts/ichartseries/get_parentseriesgroup/). The setting applies to every series in that group, not just the series used to access it. [IChartSeries::get_GapDepth](https://reference.aspose.com/slides/cpp/aspose.slides.charts/ichartseries/get_gapdepth/) returns the parent group's setting.
This setting affects 3D column and bar charts, including their cylinder, cone, and pyramid variants, as well as 3D line and area charts. The appearance depends on whether the series are arranged in depth, clustered, or stacked. For a clear comparison of gaps between separate series, use `ChartType::Column3D` from the [ChartType](https://reference.aspose.com/slides/cpp/aspose.slides.charts/charttype/) enumeration.
These methods control different aspects of the chart:
| Method | Effect |
| --- | --- |
| [IChartSeriesGroup::set_GapDepth](https://reference.aspose.com/slides/cpp/aspose.slides.charts/ichartseriesgroup/set_gapdepth/) | Spacing between series along the depth axis, as a percentage of the marker width. |
| [IChartSeriesGroup::set_GapWidth](https://reference.aspose.com/slides/cpp/aspose.slides.charts/ichartseriesgroup/set_gapwidth/) | Spacing between adjacent bar or column clusters, as a percentage of the bar or column width. |
| [IRotation3D::set_DepthPercents](https://reference.aspose.com/slides/cpp/aspose.slides.charts/irotation3d/set_depthpercents/) | Overall chart depth, as a percentage of the chart width. |
The following self-contained example uses the default chart data, which contains three series and four categories. It saves two presentations with identical data, rotation, gap width, and chart depth; only the gap depth changes.
```cpp
#include
#include
#include
#include
#include
#include
#include
#include
#include
#include
#include
#include
#include
#include
#include
using namespace Aspose::Slides;
using namespace Aspose::Slides::Charts;
using namespace Aspose::Slides::Export;
using namespace System;
auto presentation = MakeObject();
auto slide = presentation->get_Slide(0);
auto chart = slide->get_Shapes()->AddChart(ChartType::Column3D, 40, 30, 620, 230);
chart->get_Rotation3D()->set_RotationX(20);
chart->get_Rotation3D()->set_RotationY(30);
chart->get_Rotation3D()->set_DepthPercents(100);
auto series = chart->get_ChartData()->get_Series()->idx_get(0);
auto group = series->get_ParentSeriesGroup();
group->set_GapWidth(150);
for (uint16_t gapDepth : { 0, 500 })
{
group->set_GapDepth(gapDepth);
auto fileName = String::Format(u"series_gap_depth_{0}.pptx", gapDepth);
presentation->Save(fileName, SaveFormat::Pptx);
}
presentation->Dispose();
```
The following images from the equivalent .NET example were exported using Microsoft PowerPoint and illustrate the same gap depth settings.
| Gap depth: 0% | Gap depth: 500% |
| --- | --- |
|  |  |
## **FAQ**
**Which chart types support 3D mode in Aspose.Slides?**
Aspose.Slides supports 3D variants of column charts, including Column 3D, Clustered Column 3D, Stacked Column 3D, and 100% Stacked Column 3D, along with related 3D types exposed through the [ChartType](https://reference.aspose.com/slides/cpp/aspose.slides.charts/charttype/) enumeration. For an exact, up-to-date list, check the [ChartType](https://reference.aspose.com/slides/cpp/aspose.slides.charts/charttype/) members in the API reference of your installed version.
**Can I get a raster image of a 3D chart for a report or the web?**
Yes. You can export a chart to an image with [Shape::GetImage](https://reference.aspose.com/slides/cpp/aspose.slides/shape/getimage/) or [render the entire slide](https://docs.aspose.com/slides/cpp/convert-powerpoint-to-png/) to formats like PNG or JPEG. This is useful when you need a raster preview or want to embed the chart into documents, dashboards, or web pages without requiring PowerPoint.
**How performant is building and rendering large 3D charts?**
Performance depends on data volume and visual complexity. For best results, keep 3D effects minimal, avoid heavy textures on walls and plot areas, limit the number of data points per series when possible, and render to an appropriately sized output (resolution and dimensions) to match the target display or print needs.
# Create 3D Effects in Presentations Using C++
> Apply and render 3D effects for PowerPoint shapes and text in C++ with Aspose.Slides. Configure camera, lighting, material, extrusion, fills, and 3D text.
Source: https://docs.aspose.com/slides/cpp/3d-presentation/
Updated: 2026-09-25
## **Overview**
Aspose.Slides for C++ can create, edit, preserve, and render PowerPoint-style 3D formatting for shapes and text. This article covers 3D effects such as rotation, extrusion, bevels, lighting, material, gradient or picture fills, and 3D text.
This article is about 3D formatting effects on PowerPoint shapes and text. It is not about inserting or editing standalone 3D model files. When you export a slide to an image, PDF, or HTML, Aspose.Slides renders those 3D effects into the exported 2D output.
## **3D Formatting Concepts**
Use the [IShape::get_ThreeDFormat](https://reference.aspose.com/slides/cpp/aspose.slides/ishape/get_threedformat/) method to apply 3D formatting to a shape. The method returns [IThreeDFormat](https://reference.aspose.com/slides/cpp/aspose.slides/ithreedformat/), which controls the 3D scene for that shape.
For text, use the [ITextFrameFormat::get_ThreeDFormat](https://reference.aspose.com/slides/cpp/aspose.slides/itextframeformat/get_threedformat/) method. This applies 3D formatting to the text frame instead of the shape body.
The most important methods are:
| Method | What it controls | When to use it |
|---|---|---|
| [get_Camera](https://reference.aspose.com/slides/cpp/aspose.slides/ithreedformat/get_camera/) | Viewpoint, preset camera type, rotation, zoom, and perspective. | Rotate the object in 3D space or match a PowerPoint 3D rotation preset. |
| [get_LightRig](https://reference.aspose.com/slides/cpp/aspose.slides/ithreedformat/get_lightrig/) | Light preset, direction, and light rotation. | Change how highlights and shadows appear on the 3D surface. |
| [set_Material](https://reference.aspose.com/slides/cpp/aspose.slides/ithreedformat/set_material/) | Surface material, such as flat, matte, plastic, or metal. | Make the same geometry look flatter, softer, glossy, or metallic. |
| [set_ExtrusionHeight](https://reference.aspose.com/slides/cpp/aspose.slides/ithreedformat/set_extrusionheight/) | How far the shape extends backward from its front face. | Turn a flat shape into a visibly thick 3D object. |
| [get_ExtrusionColor](https://reference.aspose.com/slides/cpp/aspose.slides/ithreedformat/get_extrusioncolor/) | Color of the extruded sides. | Make depth visible or coordinate the side color with the front fill. |
| [set_Depth](https://reference.aspose.com/slides/cpp/aspose.slides/ithreedformat/set_depth/) | Additional 3D depth used by PowerPoint 3D formatting. | Fine-tune depth for shapes or text, especially together with bevel and material settings. |
| [get_BevelTop](https://reference.aspose.com/slides/cpp/aspose.slides/ithreedformat/get_beveltop/) and [get_BevelBottom](https://reference.aspose.com/slides/cpp/aspose.slides/ithreedformat/get_bevelbottom/) | Raised or rounded edges on the front and back faces. | Add a softened or molded edge instead of a sharp flat face. |
| [get_ContourColor](https://reference.aspose.com/slides/cpp/aspose.slides/ithreedformat/get_contourcolor/) and [set_ContourWidth](https://reference.aspose.com/slides/cpp/aspose.slides/ithreedformat/set_contourwidth/) | Outline around the 3D object. | Emphasize the object boundary in rendered output. |
## **Create a 3D Shape**
A shape usually needs four kinds of settings before it looks convincingly 3D:
- Camera settings, because the default front view may hide the extrusion.
- Light settings, because lighting makes the faces and sides readable.
- Material settings, because the surface affects how light is rendered.
- Extrusion or depth settings, because a flat shape needs thickness.
The following example creates a rectangle, adds text to its front face, and applies 3D formatting. The camera rotation values are in degrees, and the extrusion height is 100 points. The example renders the slide to a PNG image at twice its default dimensions and saves the presentation as PPTX.
```cpp
#include
#include
#include
#include
#include
#include
#include
#include
#include
#include
#include
#include
#include
#include
#include
#include
#include
#include
#include
#include
#include
#include
using namespace Aspose::Slides;
using namespace Aspose::Slides::Export;
using namespace System::Drawing;
const auto imageScale = 2.0f;
auto presentation = System::MakeObject();
auto slide = presentation->get_Slide(0);
auto shape = slide->get_Shapes()->AddAutoShape(ShapeType::Rectangle, 200.0f, 150.0f, 200.0f, 200.0f);
shape->get_TextFrame()->set_Text(u"3D");
shape->get_TextFrame()->get_Paragraph(0)->get_ParagraphFormat()->get_DefaultPortionFormat()->set_FontHeight(64.0f);
auto frontColor = Color::get_CornflowerBlue();
shape->get_FillFormat()->set_FillType(FillType::Solid);
shape->get_FillFormat()->get_SolidFillColor()->set_Color(frontColor);
auto extrusionColor = Color::get_Blue();
shape->get_ThreeDFormat()->get_Camera()->set_CameraType(CameraPresetType::OrthographicFront);
shape->get_ThreeDFormat()->get_Camera()->SetRotation(20.0f, 30.0f, 40.0f);
shape->get_ThreeDFormat()->get_LightRig()->set_LightType(LightRigPresetType::Flat);
shape->get_ThreeDFormat()->get_LightRig()->set_Direction(LightingDirection::Top);
shape->get_ThreeDFormat()->set_Material(MaterialPresetType::Flat);
shape->get_ThreeDFormat()->set_ExtrusionHeight(100.0);
shape->get_ThreeDFormat()->get_ExtrusionColor()->set_Color(extrusionColor);
auto thumbnail = slide->GetImage(imageScale, imageScale);
thumbnail->Save(u"shape_3d.png");
thumbnail->Dispose();
presentation->Save(u"shape_3d.pptx", SaveFormat::Pptx);
presentation->Dispose();
```
The rendered slide image shows the rectangle as a thick 3D block:

## **Rotate a Shape with the Camera**
In PowerPoint, 3D rotation is configured from the 3-D Rotation pane. The X, Y, and Z rotation values correspond to the rotation you set through the camera API.

In Aspose.Slides, access the camera through [IThreeDFormat::get_Camera](https://reference.aspose.com/slides/cpp/aspose.slides/ithreedformat/get_camera/). This example creates a rectangle, selects an orthographic front view, and sets its X, Y, and Z rotations to 20, 30, and 40 degrees, respectively. It configures the shape in memory without saving a file:
```cpp
#include
#include
#include
#include
#include
#include
#include
#include
using namespace Aspose::Slides;
auto presentation = System::MakeObject();
auto slide = presentation->get_Slide(0);
auto shape = slide->get_Shapes()->AddAutoShape(ShapeType::Rectangle, 200.0f, 150.0f, 200.0f, 200.0f);
shape->get_ThreeDFormat()->get_Camera()->set_CameraType(CameraPresetType::OrthographicFront);
shape->get_ThreeDFormat()->get_Camera()->SetRotation(20.0f, 30.0f, 40.0f);
presentation->Dispose();
```
Use the camera when you need to change how the viewer sees the object. It does not change the 2D shape geometry on the slide. It changes the 3D viewpoint used by PowerPoint and by Aspose.Slides when rendering.
## **Add Extrusion and Depth**
Extrusion makes a shape look thick by extending it behind the front face. In PowerPoint, the depth control sets this visible thickness, and the color control sets the color of the side faces.

Set [IThreeDFormat::set_ExtrusionHeight](https://reference.aspose.com/slides/cpp/aspose.slides/ithreedformat/set_extrusionheight/) for the thickness and [IThreeDFormat::get_ExtrusionColor](https://reference.aspose.com/slides/cpp/aspose.slides/ithreedformat/get_extrusioncolor/) for the side color. This example gives a rectangle a 100-point extrusion with purple sides and rotates the camera to reveal its thickness. It configures the shape in memory without saving a file:
```cpp
#include
#include
#include
#include
#include
#include
#include
#include
#include
#include
#include
#include
#include
#include
using namespace Aspose::Slides;
using namespace System::Drawing;
auto presentation = System::MakeObject();
auto slide = presentation->get_Slide(0);
auto shape = slide->get_Shapes()->AddAutoShape(ShapeType::Rectangle, 200.0f, 150.0f, 200.0f, 200.0f);
shape->get_ThreeDFormat()->get_Camera()->set_CameraType(CameraPresetType::OrthographicFront);
shape->get_ThreeDFormat()->get_Camera()->SetRotation(20.0f, 30.0f, 40.0f);
shape->get_ThreeDFormat()->get_LightRig()->set_LightType(LightRigPresetType::Flat);
shape->get_ThreeDFormat()->get_LightRig()->set_Direction(LightingDirection::Top);
shape->get_ThreeDFormat()->set_Material(MaterialPresetType::Flat);
shape->get_ThreeDFormat()->set_ExtrusionHeight(100.0);
auto extrusionColor = Color::get_Purple();
shape->get_ThreeDFormat()->get_ExtrusionColor()->set_Color(extrusionColor);
presentation->Dispose();
```
The [IThreeDFormat::set_Depth](https://reference.aspose.com/slides/cpp/aspose.slides/ithreedformat/set_depth/) method sets the depth of a 3D shape. The [set_ExtrusionHeight](https://reference.aspose.com/slides/cpp/aspose.slides/ithreedformat/set_extrusionheight/) method controls the height of the extrusion effect, as shown in this example.
## **Use Gradient or Picture Fills with 3D Effects**
3D formatting is independent of the shape fill. You can apply a solid color, gradient, pattern, or picture fill to the front face and still use the same camera, light, material, and extrusion settings.
This example applies a blue-to-orange gradient to the front face and a dark orange color to the 150-point extrusion. The gradient stops at 0 and 100 mark the start and end of the gradient. The camera rotation values are in degrees. The slide is rendered to a PNG image at twice its default dimensions:
```cpp
#include
#include
#include
#include
#include
#include
#include
#include
#include
#include
#include
#include
#include
#include
#include
#include
#include
#include
#include
#include
#include
#include
#include
using namespace Aspose::Slides;
using namespace System::Drawing;
const auto imageScale = 2.0f;
auto presentation = System::MakeObject();
auto slide = presentation->get_Slide(0);
auto shape = slide->get_Shapes()->AddAutoShape(ShapeType::Rectangle, 200.0f, 150.0f, 250.0f, 250.0f);
shape->get_TextFrame()->set_Text(u"3D Gradient");
shape->get_TextFrame()->get_Paragraph(0)->get_ParagraphFormat()->get_DefaultPortionFormat()->set_FontHeight(64.0f);
auto firstGradientColor = Color::get_Blue();
auto secondGradientColor = Color::get_Orange();
shape->get_FillFormat()->set_FillType(FillType::Gradient);
shape->get_FillFormat()->get_GradientFormat()->get_GradientStops()->Add(0.0f, firstGradientColor);
shape->get_FillFormat()->get_GradientFormat()->get_GradientStops()->Add(100.0f, secondGradientColor);
auto extrusionColor = Color::get_DarkOrange();
shape->get_ThreeDFormat()->get_Camera()->set_CameraType(CameraPresetType::OrthographicFront);
shape->get_ThreeDFormat()->get_Camera()->SetRotation(10.0f, 20.0f, 30.0f);
shape->get_ThreeDFormat()->get_LightRig()->set_LightType(LightRigPresetType::Flat);
shape->get_ThreeDFormat()->get_LightRig()->set_Direction(LightingDirection::Top);
shape->get_ThreeDFormat()->set_Material(MaterialPresetType::Flat);
shape->get_ThreeDFormat()->set_ExtrusionHeight(150.0);
shape->get_ThreeDFormat()->get_ExtrusionColor()->set_Color(extrusionColor);
auto thumbnail = slide->GetImage(imageScale, imageScale);
thumbnail->Save(u"gradient_3d.png");
thumbnail->Dispose();
presentation->Dispose();
```
The rendered output keeps the gradient on the front face and renders the extrusion separately:

To use a picture fill instead, add the image to the presentation and assign it to the shape fill. This example requires an existing file named "image.jpg" in the working directory. It stretches the picture to fill the rectangle, applies a 150-point extrusion, and sets the camera rotation in degrees. It configures the shape in memory without saving or rendering a file:
```cpp
#include
#include
#include
#include
#include
#include
#include
#include
#include
#include
#include
#include
#include
#include
#include
#include
#include
#include
#include
#include
#include
using namespace Aspose::Slides;
using namespace System::Drawing;
using namespace System::IO;
auto presentation = System::MakeObject();
auto slide = presentation->get_Slide(0);
auto shape = slide->get_Shapes()->AddAutoShape(ShapeType::Rectangle, 200.0f, 150.0f, 250.0f, 250.0f);
auto imageData = File::ReadAllBytes(u"image.jpg");
auto image = presentation->get_Images()->AddImage(imageData);
shape->get_FillFormat()->set_FillType(FillType::Picture);
shape->get_FillFormat()->get_PictureFillFormat()->get_Picture()->set_Image(image);
shape->get_FillFormat()->get_PictureFillFormat()->set_PictureFillMode(PictureFillMode::Stretch);
auto extrusionColor = Color::get_DarkOrange();
shape->get_ThreeDFormat()->get_Camera()->set_CameraType(CameraPresetType::OrthographicFront);
shape->get_ThreeDFormat()->get_Camera()->SetRotation(10.0f, 20.0f, 30.0f);
shape->get_ThreeDFormat()->get_LightRig()->set_LightType(LightRigPresetType::Flat);
shape->get_ThreeDFormat()->get_LightRig()->set_Direction(LightingDirection::Top);
shape->get_ThreeDFormat()->set_Material(MaterialPresetType::Flat);
shape->get_ThreeDFormat()->set_ExtrusionHeight(150.0);
shape->get_ThreeDFormat()->get_ExtrusionColor()->set_Color(extrusionColor);
presentation->Dispose();
```
The picture is rendered on the front face, while the extrusion is rendered as the 3D side surface:

## **Apply 3D Formatting to Text**
Shape 3D formatting affects the shape body. Text 3D formatting affects the text frame. This is useful for WordArt-like effects where the letters themselves need extrusion, material, lighting, and camera settings.
The following example creates text with an orange-and-white grid pattern, applies an upward arch, and configures 3D settings through [ITextFrameFormat::get_ThreeDFormat](https://reference.aspose.com/slides/cpp/aspose.slides/itextframeformat/get_threedformat/). The extrusion height and depth are in points, and the light rotation is in degrees. The shape fill and outline are hidden so that only the text is visible. The example renders a PNG image at twice the default slide dimensions and saves the presentation as PPTX:
```cpp
#include
#include
#include
#include
#include
#include
#include
#include
#include
#include
#include
#include
#include
#include
#include
#include
#include
#include
#include
#include
#include
#include
#include
#include
#include
#include
#include
#include
#include
using namespace Aspose::Slides;
using namespace Aspose::Slides::Export;
using namespace System::Drawing;
const auto imageScale = 2.0f;
auto presentation = System::MakeObject();
auto slide = presentation->get_Slide(0);
auto shape = slide->get_Shapes()->AddAutoShape(ShapeType::Rectangle, 200.0f, 150.0f, 250.0f, 250.0f);
shape->get_FillFormat()->set_FillType(FillType::NoFill);
shape->get_LineFormat()->get_FillFormat()->set_FillType(FillType::NoFill);
shape->get_TextFrame()->set_Text(u"3D Text");
auto portion = shape->get_TextFrame()->get_Paragraph(0)->get_Portion(0);
portion->get_PortionFormat()->get_FillFormat()->set_FillType(FillType::Pattern);
auto foregroundColor = Color::get_DarkOrange();
auto backgroundColor = Color::get_White();
portion->get_PortionFormat()->get_FillFormat()->get_PatternFormat()->get_ForeColor()->set_Color(foregroundColor);
portion->get_PortionFormat()->get_FillFormat()->get_PatternFormat()->get_BackColor()->set_Color(backgroundColor);
portion->get_PortionFormat()->get_FillFormat()->get_PatternFormat()->set_PatternStyle(PatternStyle::LargeGrid);
shape->get_TextFrame()->get_Paragraph(0)->get_ParagraphFormat()->get_DefaultPortionFormat()->set_FontHeight(128.0f);
auto textFrameFormat = shape->get_TextFrame()->get_TextFrameFormat();
textFrameFormat->set_Transform(TextShapeType::ArchUp);
textFrameFormat->get_ThreeDFormat()->set_ExtrusionHeight(3.5);
textFrameFormat->get_ThreeDFormat()->set_Depth(3.0);
textFrameFormat->get_ThreeDFormat()->set_Material(MaterialPresetType::Plastic);
textFrameFormat->get_ThreeDFormat()->get_LightRig()->set_Direction(LightingDirection::Top);
textFrameFormat->get_ThreeDFormat()->get_LightRig()->set_LightType(LightRigPresetType::Balanced);
textFrameFormat->get_ThreeDFormat()->get_LightRig()->SetRotation(0.0f, 0.0f, 40.0f);
textFrameFormat->get_ThreeDFormat()->get_Camera()->set_CameraType(CameraPresetType::PerspectiveContrastingRightFacing);
auto thumbnail = slide->GetImage(imageScale, imageScale);
thumbnail->Save(u"text_3d.png");
thumbnail->Dispose();
presentation->Save(u"text_3d.pptx", SaveFormat::Pptx);
presentation->Dispose();
```
The text is rendered as curved, extruded 3D lettering:

## **Keep Text Flat on a 3D Shape**
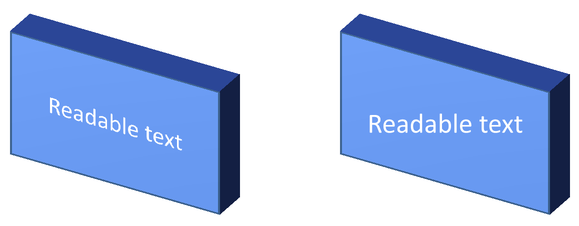
To keep text readable while preserving a shape's 3D appearance, call [ITextFrameFormat::set_KeepTextFlat](https://reference.aspose.com/slides/cpp/aspose.slides/itextframeformat/set_keeptextflat/) through [ITextFrame::get_TextFrameFormat](https://reference.aspose.com/slides/cpp/aspose.slides/itextframe/get_textframeformat/). When the value is `true`, the text stays out of the 3D scene. When it is `false`, the text participates in the scene and follows its 3D orientation.
This setting does not remove the shape's 3D formatting: its camera, lighting, material, and extrusion remain configured through [IShape::get_ThreeDFormat](https://reference.aspose.com/slides/cpp/aspose.slides/ishape/get_threedformat/). It is also different from ordinary rotation. [IShape::set_Rotation](https://reference.aspose.com/slides/cpp/aspose.slides/ishape/set_rotation/) rotates the shape in the slide plane, while [ITextFrameFormat::set_RotationAngle](https://reference.aspose.com/slides/cpp/aspose.slides/itextframeformat/set_rotationangle/) controls the text's custom rotation within its bounding box. Keeping text out of the 3D scene does not reset either of those angles.
The following self-contained example creates a blue rectangle with text and clones it beside the original. Both shapes have the same 3D formatting; only the text setting differs: `false` on the left and `true` on the right. The camera angles are in degrees, and the extrusion height is 40 points. The example saves the presentation as PPTX and renders the comparison slide to PNG at twice its default dimensions.
```cpp
#include
#include
#include
#include
#include
#include
#include
#include
#include
#include
#include
#include
#include
#include
#include
#include
#include
#include
#include
#include
#include
#include
#include
#include
#include
using namespace Aspose::Slides;
using namespace Aspose::Slides::Export;
using namespace System::Drawing;
auto presentation = System::MakeObject();
auto slide = presentation->get_Slide(0);
auto shape = slide->get_Shapes()->AddAutoShape(ShapeType::Rectangle, 70.0f, 160.0f, 240.0f, 140.0f);
shape->get_TextFrame()->set_Text(u"Readable text");
shape->get_TextFrame()->get_Paragraph(0)->get_ParagraphFormat()->get_DefaultPortionFormat()->set_FontHeight(28.0f);
shape->get_TextFrame()->get_Paragraph(0)->get_ParagraphFormat()->set_Alignment(TextAlignment::Center);
shape->get_TextFrame()->get_TextFrameFormat()->set_AnchoringType(TextAnchorType::Center);
shape->get_FillFormat()->set_FillType(FillType::Solid);
shape->get_FillFormat()->get_SolidFillColor()->set_Color(Color::get_CornflowerBlue());
shape->get_ThreeDFormat()->get_Camera()->set_CameraType(CameraPresetType::OrthographicFront);
shape->get_ThreeDFormat()->get_Camera()->SetRotation(30.0f, 30.0f, 0.0f);
shape->get_ThreeDFormat()->get_LightRig()->set_LightType(LightRigPresetType::Flat);
shape->get_ThreeDFormat()->get_LightRig()->set_Direction(LightingDirection::Top);
shape->get_ThreeDFormat()->set_Material(MaterialPresetType::Flat);
shape->get_ThreeDFormat()->set_ExtrusionHeight(40.0);
shape->get_ThreeDFormat()->get_ExtrusionColor()->set_Color(Color::get_RoyalBlue());
shape->get_TextFrame()->get_TextFrameFormat()->set_KeepTextFlat(false);
auto clonedShape = slide->get_Shapes()->AddClone(shape, 400.0f, 160.0f);
auto flatTextShape = System::ExplicitCast(clonedShape);
flatTextShape->get_TextFrame()->get_TextFrameFormat()->set_KeepTextFlat(true);
presentation->Save(u"keep_text_flat.pptx", SaveFormat::Pptx);
auto image = slide->GetImage(2.0f, 2.0f);
image->Save(u"keep_text_flat.png");
image->Dispose();
presentation->Dispose();
```
On the left, the text follows the 3D orientation. On the right, it stays flat and easier to read. Both rectangles retain the same visible extrusion and 3D orientation.
## **Export and Rendering Behavior**
Aspose.Slides preserves 3D formatting when saving to PowerPoint formats such as PPTX. When rendering or exporting to fixed-layout formats, the 3D scene is rasterized or drawn into the output as a 2D result. This applies when you render slides to [PNG](https://docs.aspose.com/slides/cpp/convert-powerpoint-to-png/), export to [PDF](https://docs.aspose.com/slides/cpp/convert-powerpoint-to-pdf/), export to [HTML](https://docs.aspose.com/slides/cpp/convert-powerpoint-to-html/), or generate frames for [video conversion](https://docs.aspose.com/slides/cpp/convert-powerpoint-to-video/).
Keep these points in mind:
- Exported images and PDFs are not interactive. The object cannot be rotated by the viewer after export.
- The final appearance depends on the combination of camera, light rig, material, extrusion, fill, and slide scaling.
- If you need to inspect inherited or theme-based formatting values, read the [effective shape properties](https://docs.aspose.com/slides/cpp/shape-effective-properties/).
- Some output formats cannot store editable PowerPoint 3D formatting. In those formats, the visual result is rendered rather than preserved as editable 3D settings.
## **FAQ**
**Can Aspose.Slides create interactive 3D presentations?**
Aspose.Slides creates and renders PowerPoint 3D effects for shapes and text. It does not make exported images, PDFs, or HTML pages interactive 3D scenes that a viewer can rotate. In PPTX, the 3D formatting remains editable in PowerPoint where the format supports it.
**What is the difference between a 3D model and a 3D effect?**
A 3D model is a separate 3D object inserted into a presentation. A 3D effect is formatting applied to a regular PowerPoint shape or text, such as rotation, extrusion, bevel, lighting, and material. This article covers 3D effects.
**Which settings are required for a visible 3D shape?**
At minimum, set a camera rotation and either extrusion or depth. In practice, also set a light rig and material so the rendered faces have clear highlights and shadows.
**Can I apply 3D effects to both shapes and text?**
Yes. Use [IShape::get_ThreeDFormat](https://reference.aspose.com/slides/cpp/aspose.slides/ishape/get_threedformat/) for the shape body and [ITextFrameFormat::get_ThreeDFormat](https://reference.aspose.com/slides/cpp/aspose.slides/itextframeformat/get_threedformat/) for text.
**Will 3D effects appear when exporting to images, PDF, HTML, or video frames?**
Yes. Aspose.Slides renders 3D effects when producing slide images, PDF output, HTML output, and frames used for video conversion. The exported output contains the rendered appearance, not an editable 3D object.
**Can I read the final 3D values after inheritance and theme settings are applied?**
Yes. Use the effective formatting APIs described in [Shape Effective Properties](https://docs.aspose.com/slides/cpp/shape-effective-properties/) to read final camera, light rig, bevel, and related 3D values.
# Access Presentation Slides in C++
> Learn how to access and manage slides in PowerPoint and OpenDocument presentations with Aspose.Slides for C++. Boost productivity with code examples.
Source: https://docs.aspose.com/slides/cpp/access-slide-in-presentation/
Updated: 2026-08-05
## **Overview**
This article explains how to access and manage slides in a presentation using Aspose.Slides. It shows how to retrieve slides by their zero-based index from the slides collection and how to access a slide by its unique ID using the `GetSlideById` method.
You will also learn how to change a slide’s position by using the `set_SlideNumber` method and how to define the starting slide number for a presentation with the `set_FirstSlideNumber` method. The examples demonstrate loading a presentation, getting slide references, updating slide order or numbering, and saving the modified presentation.
## **Access a Slide by Index**
All slides in a presentation are arranged numerically based on the slide position starting from 0. The first slide is accessible through index 0; the second slide is accessed through index 1; etc.
The Presentation class, representing a presentation file, exposes all slides as an [ISlideCollection](https://reference.aspose.com/slides/cpp/aspose.slides/islidecollection/) collection (collection of [ISlide](https://reference.aspose.com/slides/cpp/aspose.slides/islide/) objects). This C++ code shows you how to access a slide through its index:
```c++
#include
#include
#include
#include
using namespace Aspose::Slides;
using namespace System;
// The path to the documents directory.
const String templatePath = u"../templates/AddSlides.pptx";
// Instantiates the Presentation class
SharedPtr pres = MakeObject(templatePath);
// Get a slide's reference through its index
SharedPtr slide = pres->get_Slides()->idx_get(0);
```
## **Access a Slide by ID**
Each slide in a presentation has a unique ID associated with it. You can use the [GetSlideById()](https://reference.aspose.com/slides/cpp/aspose.slides/presentation/getslidebyid/) method (exposed by the [Presentation](https://reference.aspose.com/slides/cpp/aspose.slides/presentation/) class) to target that ID. This C++ code shows you how to provide a valid slide ID and access that slide through the [GetSlideById()](https://reference.aspose.com/slides/cpp/aspose.slides/presentation/getslidebyid/) method:
```c++
#include
#include
#include
#include
#include
using namespace Aspose::Slides;
using namespace System;
// The path to the documents directory.
const String templatePath = u"../templates/AddSlides.pptx";
// Instantiates the Presentation class
SharedPtr pres = MakeObject(templatePath);
// Gets a slide ID
int id = pres->get_Slides()->idx_get(0)->get_SlideId();
// Accesses the slide through its ID
SharedPtr slide = pres->GetSlideById(id);
```
## **Change Slide Position**
Aspose.Slides allow you to change a slide position. For example, you can specify that the first slide should become the second slide.
1. Create an instance of the [Presentation](https://reference.aspose.com/slides/cpp/aspose.slides/presentation/) class.
1. Get the slide's reference (whose position you want to change) through its index
1. Set a new position for the slide through the [set_SlideNumber()](https://reference.aspose.com/slides/cpp/aspose.slides/islide/set_slidenumber/) property.
1. Save the modified presentation.
This C++ code demonstrates an operation in which the slide in position 1 is moved to position 2:
```c++
#include
#include
#include
#include
#include
using namespace Aspose::Slides;
using namespace Aspose::Slides::Export;
using namespace System;
// The path to the documents directory.
const String templatePath = u"../templates/AddSlides.pptx";
const String outPath = u"../out/ChangeSlidePosition.pptx";
// Instantiates the Presentation class
SharedPtr pres = MakeObject(templatePath);
// Gets the slide whose position will be changed
SharedPtr slide = pres->get_Slides()->idx_get(0);
// Sets the new position for the slide
slide->set_SlideNumber(2);
// Saves the modified presentation
pres->Save(outPath, Aspose::Slides::Export::SaveFormat::Pptx);
```
The first slide became the second; the second slide became the first. When you change a slide's position, other slides are automatically adjusted.
## **Set the Slide Number**
Using the [set_FirstSlideNumber()](https://reference.aspose.com/slides/cpp/aspose.slides/presentation/set_firstslidenumber/) property (exposed by the [Presentation](https://reference.aspose.com/slides/cpp/aspose.slides/presentation/) class), you can specify a new number for the first slide in a presentation. This operation causes other slide numbers to be recalculated.
1. Create an instance of the [Presentation](https://reference.aspose.com/slides/cpp/aspose.slides/presentation/) class.
1. Get the slide number.
1. Set the slide number.
1. Save the modified presentation.
This C++ code demonstrates an operation where the first slide number is set to 10:
```c++
#include
#include
#include
using namespace Aspose::Slides;
using namespace Aspose::Slides::Export;
using namespace System;
// The path to the documents directory.
const String outPath = u"../out/SetSlideNumber_out.pptx";
const String templatePath = u"../templates/AccessSlides.pptx";
//Instantiates the Presentation class
SharedPtr pres = MakeObject(templatePath);
// Gets the slide number
int firstSlideNumber = pres->get_FirstSlideNumber();
// Sets the slide number
pres->set_FirstSlideNumber(2);
// Saves the modified presentation
pres->Save(outPath, Aspose::Slides::Export::SaveFormat::Pptx);
```
If you prefer to skip the first slide, you can start the numbering from the second slide (and hide the numbering for the first slide) this way:
```c++
#include
#include
#include
#include
#include
#include
#include
#include
using namespace Aspose::Slides;
using namespace Aspose::Slides::Export;
auto presentation = System::MakeObject();
auto layoutSlide = presentation->get_LayoutSlides()->GetByType(SlideLayoutType::Blank);
auto slides = presentation->get_Slides();
slides->AddEmptySlide(layoutSlide);
slides->AddEmptySlide(layoutSlide);
slides->AddEmptySlide(layoutSlide);
// Sets the number for the first presentation slide
presentation->set_FirstSlideNumber(0);
// Shows slide numbers for all slides
presentation->get_HeaderFooterManager()->SetAllSlideNumbersVisibility(true);
// Hides the slide number for the first slide
slides->idx_get(0)->get_HeaderFooterManager()->SetSlideNumberVisibility(false);
// Saves the modified presentation
presentation->Save(u"output.pptx", SaveFormat::Pptx);
```
## **FAQ**
### Does the slide number a user sees match the collection’s zero-based index?
The number shown on a slide can start from an arbitrary value (e.g., 10) and does not have to match the index; the relationship is controlled by the presentation’s [first slide number](https://reference.aspose.com/slides/cpp/aspose.slides/presentation/set_firstslidenumber/) setting.
### Do hidden slides affect indexing?
Yes. A hidden slide remains in the collection and is counted in indexing; "hidden" refers to display, not its position in the collection.
### Does a slide’s index change when other slides are added or removed?
Yes. Indexes always reflect the current order in slides and are recalculated upon insert, delete, and move operations.
# Manage ActiveX Controls in Presentations Using C++
> Learn how Aspose.Slides for C++ leverages ActiveX to automate and enhance PowerPoint presentations, giving developers powerful control over slides.
Source: https://docs.aspose.com/slides/cpp/activex/
Updated: 2026-08-05
## **Introduction**
ActiveX control are used in presentations. Aspose.Slides for C++ lets you manage ActiveX controls, but managing them is bit trickier and different from normal presentation shapes. From Aspose.Slides for C++ 18.1, the component supports managing ActiveX controls. At the moment, you can access already added ActiveX control in your presentation and modify or delete it by using its various properties. Remember, ActiveX controls are not shapes and are not part of the presentation's IShapeCollection but the separate IControlCollection. This article shows how to work with them.
## **Modify an ActiveX Control**
To manage a simple ActiveX control like a text box and simple command button on a slide:
1. Create an instance of the Presentation class and load the presentation with ActiveX controls in it.
1. Obtain a slide reference by its index.
1. Access the ActiveX controls in the slide by accessing the IControlCollection.
1. Access the TextBox1 ActiveX control using the ControlEx object.
1. Change the different properties of the TextBox1 ActiveX control including text, font, font height and frame position.
1. Access the second access control called CommandButton1.
1. Change the button caption, font and position.
1. Shift the position of the ActiveX controls frames.
1. Write the modified presentation to a PPTX file.
The code snippet below updates the ActiveX controls on the presentation slides to the slide as shown below.
``` cpp
#include
#include
#include
#include
#include
#include
#include
#include