C++ を使用してプレゼンテーションに 3D 効果を作成
概要
Aspose.Slides for C++ は、図形やテキストに対して PowerPoint スタイルの 3D 書式設定を作成、編集、保持、レンダリングできます。本記事では、回転、押し出し、ベベル、照明、材質、グラデーションまたは画像の塗りつぶし、3D テキストなどの 3D 効果について説明します。
3D 書式設定の概念
形状に 3D 書式設定を適用するには、IShape インターフェイスの get_ThreeDFormat メソッドを使用します。このメソッドは IThreeDFormat を返し、その形状の 3D シーンを制御します。
テキストの場合は、ITextFrameFormat インターフェイスの get_ThreeDFormat メソッドを使用します。これにより、形状本体ではなくテキストフレームに 3D 書式設定が適用されます。
最も重要なメソッドは次のとおりです:
| メソッド | 制御内容 | 使用タイミング |
|---|---|---|
| get_Camera | 視点、プリセットカメラタイプ、回転、ズーム、遠近感。 | 3D 空間でオブジェクトを回転させたり、PowerPoint の 3D 回転プリセットと合わせるとき。 |
| get_LightRig | ライトのプリセット、方向、回転。 | 3D 表面のハイライトや影の表示方法を変更するとき。 |
| set_Material | 表面材料(フラット、マット、プラスチック、メタルなど)。 | 同じ形状をより平坦に、柔らかく、光沢あり、金属的に見せるとき。 |
| set_ExtrusionHeight | 形状が前面からどれだけ後方に伸びるか。 | 平面形状を厚みのある 3D オブジェクトに変えるとき。 |
| get_ExtrusionColor | 押し出し側面の色。 | 奥行きを見せたり、側面の色を前面の塗りつぶしと合わせるとき。 |
| set_Depth | PowerPoint の 3D 書式設定で使用される追加の奥行き。 | ベベルや材質設定と組み合わせて、形状やテキストの奥行きを微調整するとき。 |
| get_BevelTop と get_BevelBottom | 前面と背面の隆起または丸みを帯びたエッジ。 | 鋭い平面ではなく、柔らかく成形されたエッジを追加するとき。 |
| get_ContourColor と set_ContourWidth | 3D オブジェクトの輪郭。 | レンダリング出力でオブジェクトの境界を強調するとき。 |
3D 形状の作成
形状が説得力のある 3D に見えるためには、通常次の 4 種類の設定が必要です:
- カメラ設定:デフォルトの正面ビューでは押し出しが隠れる可能性があるため。
- ライト設定:照明により面と側面が見やすくなるため。
- 材質設定:表面が光の描画方法に影響するため。
- 押し出しまたは奥行き設定:平面形状に厚みが必要なため。
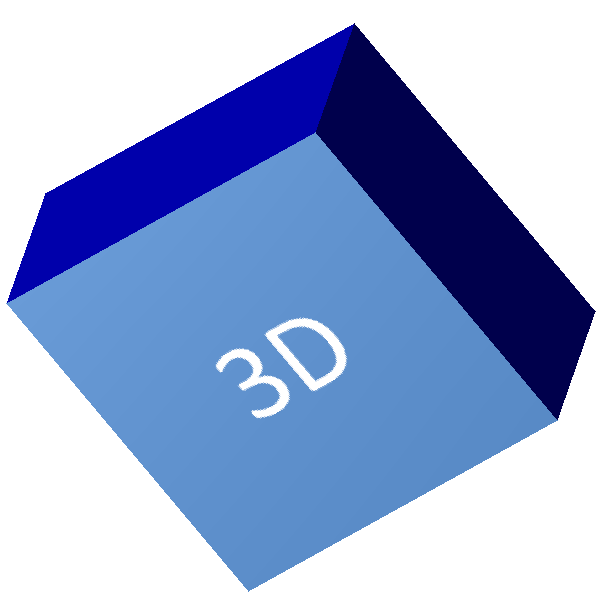
次の例は矩形を作成し、前面にテキストを追加し、3D 書式設定を適用し、プレゼンテーションを PPTX として保存し、スライドを PNG 画像にレンダリングします。
const float imageScale = 2.0f;

auto presentation = System::MakeObject<Presentation>();

auto slide = presentation->get_Slide(0);
auto shape = slide->get_Shapes()->AddAutoShape(ShapeType::Rectangle, 200.0f, 150.0f, 200.0f, 200.0f);
shape->get_TextFrame()->set_Text(u"3D");
shape->get_TextFrame()->get_Paragraph(0)->get_ParagraphFormat()->get_DefaultPortionFormat()->set_FontHeight(64.0f);

auto frontColor = System::Drawing::Color::get_CornflowerBlue();
shape->get_FillFormat()->set_FillType(FillType::Solid);
shape->get_FillFormat()->get_SolidFillColor()->set_Color(frontColor);

auto extrusionColor = System::Drawing::Color::get_Blue();
shape->get_ThreeDFormat()->get_Camera()->set_CameraType(CameraPresetType::OrthographicFront);
shape->get_ThreeDFormat()->get_Camera()->SetRotation(20.0f, 30.0f, 40.0f);
shape->get_ThreeDFormat()->get_LightRig()->set_LightType(LightRigPresetType::Flat);
shape->get_ThreeDFormat()->get_LightRig()->set_Direction(LightingDirection::Top);
shape->get_ThreeDFormat()->set_Material(MaterialPresetType::Flat);
shape->get_ThreeDFormat()->set_ExtrusionHeight(100.0);
shape->get_ThreeDFormat()->get_ExtrusionColor()->set_Color(extrusionColor);

auto thumbnail = slide->GetImage(imageScale, imageScale);
thumbnail->Save(u"shape_3d.png");
thumbnail->Dispose();

presentation->Save(u"shape_3d.pptx", SaveFormat::Pptx);
presentation->Dispose();
レンダリングされたスライド画像は、矩形が厚みのある 3D ブロックとして表示されます:
カメラで形状を回転させる
PowerPoint では、3D 回転は「3‑D Rotation」ペインで設定します。X、Y、Z の回転値はカメラ API で設定する回転と対応しています。
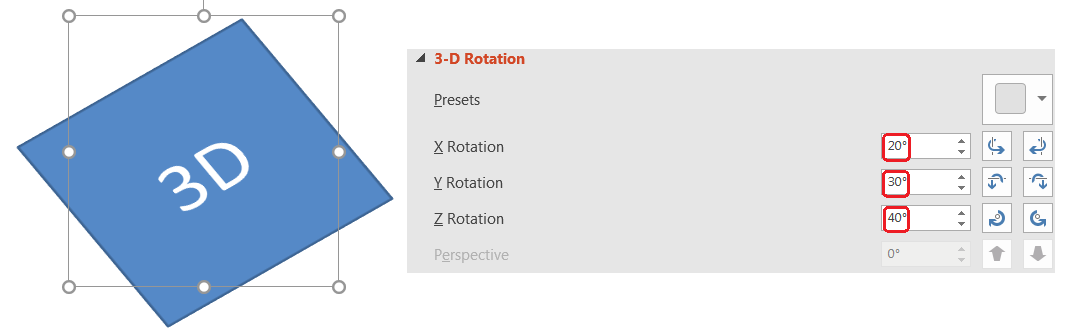
Aspose.Slides では、IThreeDFormat を使ってカメラの種類と回転を設定します:
shape->get_ThreeDFormat()->get_Camera()->set_CameraType(CameraPresetType::OrthographicFront);
shape->get_ThreeDFormat()->get_Camera()->SetRotation(20.0f, 30.0f, 40.0f);
ビューアがオブジェクトを見る方法を変える必要があるときにカメラを使用します。スライド上の 2D 図形ジオメトリは変更されず、PowerPoint および Aspose.Slides がレンダリング時に使用する 3D 視点が変わります。
押し出しと奥行きの追加
押し出しは前面から後方へ形状を伸ばすことで厚みを表現します。PowerPoint では、奥行きコントロールがこの見た目の厚さを設定し、色コントロールが側面の色を決めます。
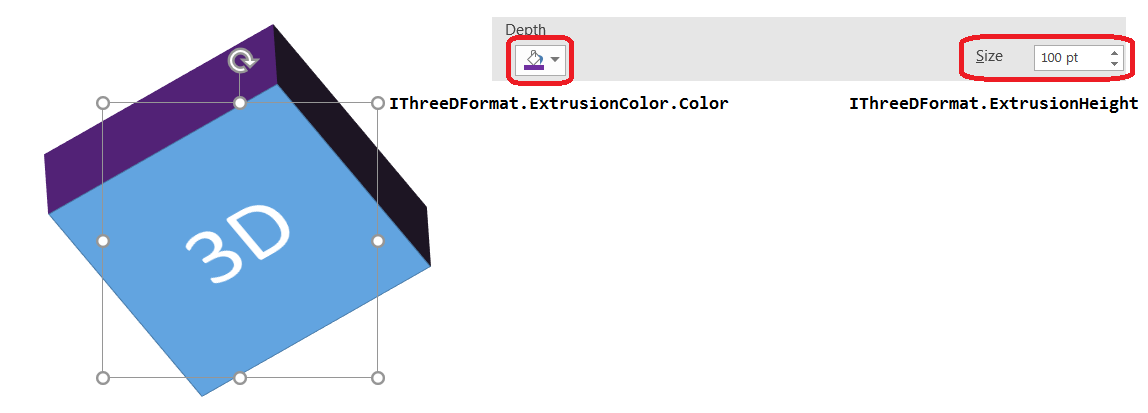
厚みには set_ExtrusionHeight を、側面の色には get_ExtrusionColor を設定します:
shape->get_ThreeDFormat()->get_Camera()->SetRotation(20.0f, 30.0f, 40.0f);
shape->get_ThreeDFormat()->set_ExtrusionHeight(100.0);

auto extrusionColor = System::Drawing::Color::get_Purple();
shape->get_ThreeDFormat()->get_ExtrusionColor()->set_Color(extrusionColor);
PowerPoint の奥行き値を直接操作したり、奥行きをベベル、材質、テキスト効果と組み合わせる必要があるときは set_Depth を使用します。多くのシナリオでは、可視的な押し出しを直接示す set_ExtrusionHeight の方が分かりやすいです。
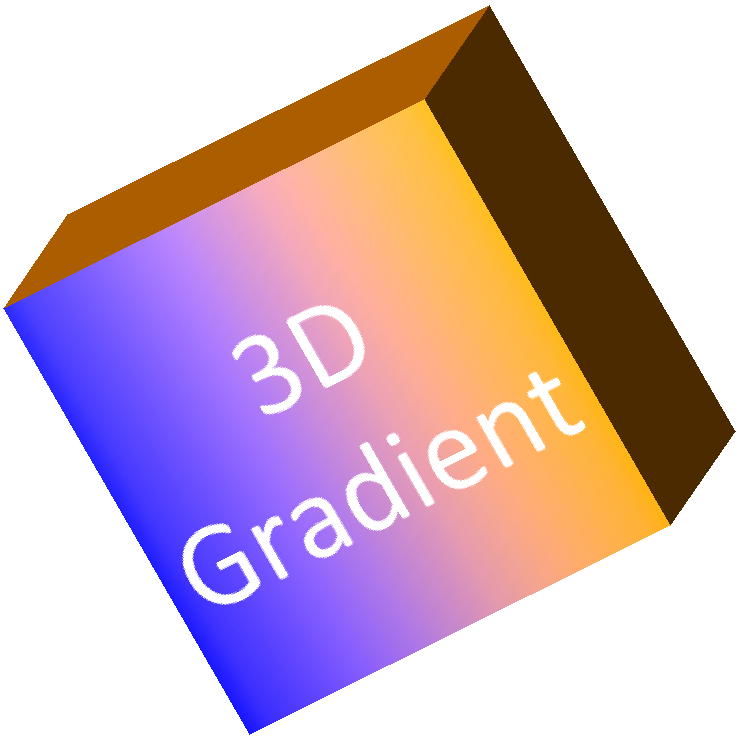
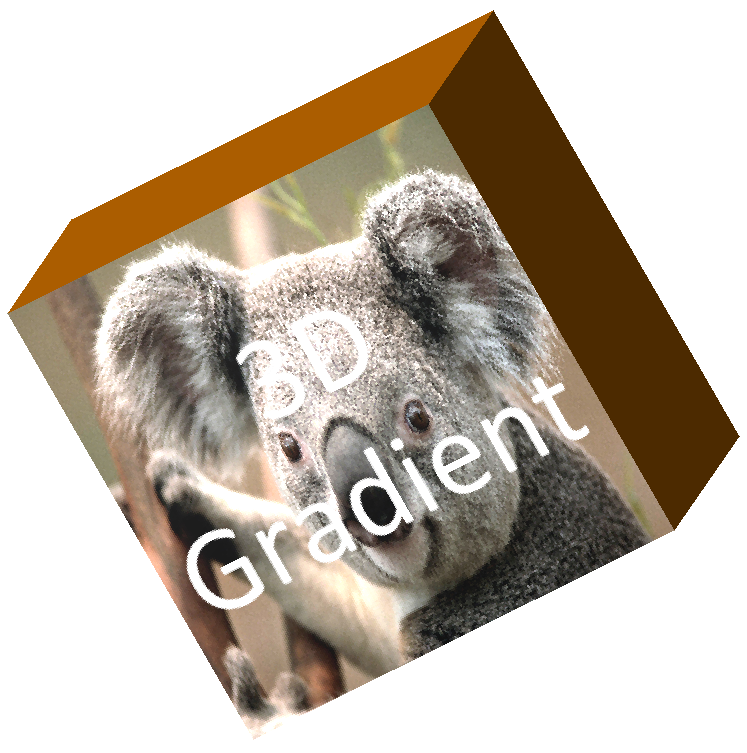
3D 効果とともにグラデーションまたは画像塗りを使用する
3D 書式設定は図形の塗りつぶしとは独立しています。前面に単色、グラデーション、パターン、または画像塗りを適用しつつ、同じカメラ、ライト、材質、押し出し設定を使用できます。
次の例は図形にグラデーション塗りを適用し、側面に暗めの押し出し色を設定します:
const float imageScale = 2.0f;

auto presentation = System::MakeObject<Presentation>();

auto slide = presentation->get_Slide(0);
auto shape = slide->get_Shapes()->AddAutoShape(ShapeType::Rectangle, 200.0f, 150.0f, 250.0f, 250.0f);
shape->get_TextFrame()->set_Text(u"3D Gradient");
shape->get_TextFrame()->get_Paragraph(0)->get_ParagraphFormat()->get_DefaultPortionFormat()->set_FontHeight(64.0f);

auto firstGradientColor = System::Drawing::Color::get_Blue();
auto secondGradientColor = System::Drawing::Color::get_Orange();
shape->get_FillFormat()->set_FillType(FillType::Gradient);
shape->get_FillFormat()->get_GradientFormat()->get_GradientStops()->Add(0.0f, firstGradientColor);
shape->get_FillFormat()->get_GradientFormat()->get_GradientStops()->Add(100.0f, secondGradientColor);

auto extrusionColor = System::Drawing::Color::get_DarkOrange();
shape->get_ThreeDFormat()->get_Camera()->set_CameraType(CameraPresetType::OrthographicFront);
shape->get_ThreeDFormat()->get_Camera()->SetRotation(10.0f, 20.0f, 30.0f);
shape->get_ThreeDFormat()->get_LightRig()->set_LightType(LightRigPresetType::Flat);
shape->get_ThreeDFormat()->get_LightRig()->set_Direction(LightingDirection::Top);
shape->get_ThreeDFormat()->set_Material(MaterialPresetType::Flat);
shape->get_ThreeDFormat()->set_ExtrusionHeight(150.0);
shape->get_ThreeDFormat()->get_ExtrusionColor()->set_Color(extrusionColor);

auto thumbnail = slide->GetImage(imageScale, imageScale);
thumbnail->Save(u"gradient_3d.png");
thumbnail->Dispose();

presentation->Dispose();
画像塗りを使用する場合は、画像をプレゼンテーションに追加し、図形の塗りつぶしに割り当てます:
auto imageData = System::IO::File::ReadAllBytes(u"image.jpg");
auto image = presentation->get_Images()->AddImage(imageData);

shape->get_FillFormat()->set_FillType(FillType::Picture);
shape->get_FillFormat()->get_PictureFillFormat()->get_Picture()->set_Image(image);
shape->get_FillFormat()->get_PictureFillFormat()->set_PictureFillMode(PictureFillMode::Stretch);

auto extrusionColor = System::Drawing::Color::get_DarkOrange();
shape->get_ThreeDFormat()->get_Camera()->SetRotation(10.0f, 20.0f, 30.0f);
shape->get_ThreeDFormat()->set_ExtrusionHeight(150.0);
shape->get_ThreeDFormat()->get_ExtrusionColor()->set_Color(extrusionColor);
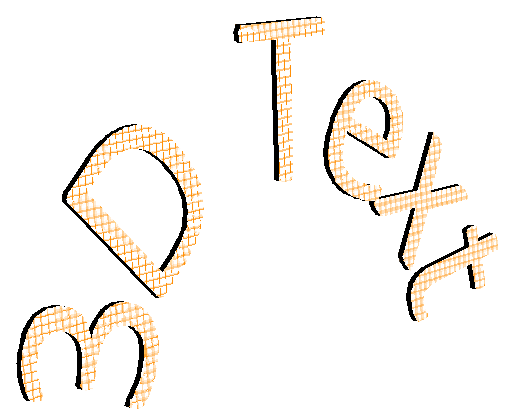
テキストへの 3D 書式設定の適用
図形の 3D 書式設定は形状本体に影響します。テキストの 3D 書式設定はテキストフレームに影響します。文字自体に押し出し、材質、照明、カメラ設定が必要な WordArt のような効果に便利です。
次の例はパターン塗りのテキストを作成し、WordArt 変形を適用し、ITextFrameFormat で 3D 設定を構成します:
const float imageScale = 2.0f;

auto presentation = System::MakeObject<Presentation>();

auto slide = presentation->get_Slide(0);
auto shape = slide->get_Shapes()->AddAutoShape(ShapeType::Rectangle, 200.0f, 150.0f, 250.0f, 250.0f);
shape->get_FillFormat()->set_FillType(FillType::NoFill);
shape->get_LineFormat()->get_FillFormat()->set_FillType(FillType::NoFill);
shape->get_TextFrame()->set_Text(u"3D Text");

auto portion = shape->get_TextFrame()->get_Paragraph(0)->get_Portion(0);
portion->get_PortionFormat()->get_FillFormat()->set_FillType(FillType::Pattern);

auto foregroundColor = System::Drawing::Color::get_DarkOrange();
auto backgroundColor = System::Drawing::Color::get_White();
portion->get_PortionFormat()->get_FillFormat()->get_PatternFormat()->get_ForeColor()->set_Color(foregroundColor);
portion->get_PortionFormat()->get_FillFormat()->get_PatternFormat()->get_BackColor()->set_Color(backgroundColor);
portion->get_PortionFormat()->get_FillFormat()->get_PatternFormat()->set_PatternStyle(PatternStyle::LargeGrid);

shape->get_TextFrame()->get_Paragraph(0)->get_ParagraphFormat()->get_DefaultPortionFormat()->set_FontHeight(128.0f);

auto textFrameFormat = shape->get_TextFrame()->get_TextFrameFormat();
textFrameFormat->set_Transform(TextShapeType::ArchUp);
textFrameFormat->get_ThreeDFormat()->set_ExtrusionHeight(3.5);
textFrameFormat->get_ThreeDFormat()->set_Depth(3.0);
textFrameFormat->get_ThreeDFormat()->set_Material(MaterialPresetType::Plastic);
textFrameFormat->get_ThreeDFormat()->get_LightRig()->set_Direction(LightingDirection::Top);
textFrameFormat->get_ThreeDFormat()->get_LightRig()->set_LightType(LightRigPresetType::Balanced);
textFrameFormat->get_ThreeDFormat()->get_LightRig()->SetRotation(0.0f, 0.0f, 40.0f);
textFrameFormat->get_ThreeDFormat()->get_Camera()->set_CameraType(CameraPresetType::PerspectiveContrastingRightFacing);

auto thumbnail = slide->GetImage(imageScale, imageScale);
thumbnail->Save(u"text_3d.png");
thumbnail->Dispose();

presentation->Save(u"text_3d.pptx", SaveFormat::Pptx);
presentation->Dispose();
エクスポートとレンダリングの動作
Aspose.Slides は PPTX などの PowerPoint 形式で保存する際に 3D 書式設定を保持します。固定レイアウト形式へレンダリングまたはエクスポートする場合、3D シーンはラスタライズされ、2D 結果として出力に描画されます。これはスライドを PNG にレンダリングする場合、PDF にエクスポートする場合、HTML にエクスポートする場合、または video conversion 用のフレームを生成する場合にも適用されます。
以下の点に注意してください:
- エクスポートされた画像や PDF はインタラクティブではありません。エクスポート後にビューアがオブジェクトを回転させることはできません。
- 最終的な外観はカメラ、ライトリグ、材質、押し出し、塗りつぶし、スライドのスケーリングの組み合わせに依存します。
- 継承されたまたはテーマベースの書式設定値を確認する必要がある場合は、形状の実効プロパティ を参照してください。
- 一部の出力形式では、編集可能な PowerPoint 3D 書式設定を保存できません。そのような形式では、視覚的な結果がレンダリングされ、編集可能な 3D 設定としては保持されません。
FAQ
Aspose.Slides はインタラクティブな 3D プレゼンテーションを作成できますか?
Aspose.Slides は図形とテキストに対する PowerPoint の 3D 効果を作成およびレンダリングしますが、エクスポートされた画像、PDF、HTML ページを回転可能なインタラクティブ 3D シーンにすることはできません。PPTX では、フォーマットがサポートしている限り 3D 書式設定は PowerPoint で編集可能なまま残ります。
3D モデルと 3D 効果の違いは何ですか?
3D モデルはプレゼンテーションに挿入する別個の 3D オブジェクトです。3D 効果は、回転、押し出し、ベベル、照明、材質など、通常の PowerPoint 図形やテキストに適用される書式設定です。本記事は 3D 効果について扱っています。
可視的な 3D 形状を作るために必要な設定は何ですか?
最低限、カメラ回転と押し出しまたは奥行きを設定します。実務では、ライトリグと材質も設定して、レンダリングされた面に明確なハイライトと影が出るようにします。
形状とテキストの両方に 3D 効果を適用できますか?
はい。形状本体には IShape を、テキストには ITextFrameFormat を使用します。
画像、PDF、HTML、または動画フレームにエクスポートしたときに 3D 効果は表示されますか?
はい。Aspose.Slides はスライド画像、PDF、HTML、動画変換用フレームを生成するときに 3D 効果をレンダリングします。エクスポートされた出力にはレンダリングされた外観が含まれ、編集可能な 3D オブジェクトは含まれません。
継承やテーマ設定が適用された後の最終的な 3D 値を取得できますか?
はい。形状の実効プロパティ で提供されている実効書式設定 API を使用して、最終的なカメラ、ライトリグ、ベベル、その他の 3D 値を取得できます。