Analyzing your prompt, please hold on...
An error occurred while retrieving the results. Please refresh the page and try again.
Aspose.SVG for Python via .NET 允许您轻松编辑 SVG 文件并更改其内容。文档对象模型 (DOM) API 完全遵循官方 SVG 规范,提供对 SVG 节点及其属性的完全控制。这允许您添加新节点、删除现有节点或编辑当前节点的内容。
本文将向您展示如何使用 Aspose.SVG for Python via .NET 编辑 SVG 文件。我们将探索详细的 Python 代码示例,说明如何向 SVG 文档添加和编辑元素。
Aspose.SVG for Python via .NET 允许您向文档添加各种元素。首先,您将创建一个新元素或节点;然后,您可以将元素添加到文档中。
<svg>元素<svg> 元素是一个容器,它用作 SVG 文档的最外层元素。要指向 <svg> 元素,您可以应用几种方法:
document_element 属性可以直接访问文档的 <svg> 元素。在下面的代码片段中,我们使用这种方式。1# Create a new SVG document
2document = SVGDocument()
3
4# Get root <svg> element of the document
5svg_element = document.document_elementroot_element 属性返回文档层次结构中的根 <svg> 元素。要指示<svg>元素,您可以应用以下代码:1# Create a new SVG document
2document = SVGDocument()
3
4# Get root <svg> element of the document
5svg_element = document.root_element您可以使用
SVGDocument 类的
create_element_ns(namespace_uri, qualified_name) 方法创建
Element 类的实例 – 给定限定名称所需的元素和命名空间 URI。 namespace_uri 设置对
W3C SVG 规范的引用。 qualified_name 必须包含元素的字符串标签名称。
1# Create a new SVG document
2document = SVGDocument()
3svg_element = document.document_element
4
5# Create a new SVG <circle> element
6circle = document.create_element_ns("http://www.w3.org/2000/svg", "circle")
您可以使用相同的代码创建任何新的 SVG 元素;仅更改“qualified_name”。例如,要创建基本的 SVG 形状,对于 SVG 圆形,应使用qualified_name = “circle”、椭圆形 – qualified_name = “ellipse”、矩形 – qualified_name = “rect”、线条 – qualified_name = “line”、折线 – qualified_name = “polyline”、多边形 – qualified_name = “polygon” 和贝塞尔曲线 – qualified_name = “path”。
您可以使用
set_attribute(name, value)、
get_attribute(qualified_name)、
has_attribute(qualified_name) 来管理元素属性及其值
remove_attribute(qualified_name)
Element 类的方法。例如,如果您创建一个<circle>元素,则可以设置属性:
1# Set attributes for the <circle> element
2circle.set_attribute("cx", "50")
3circle.set_attribute("cy", "50")
4circle.set_attribute("r", "40")
5circle.set_attribute("fill", "red")您可以使用
append_child(node) 方法将新子节点添加到节点子节点列表的末尾。
要向 SVG 文档添加元素,Python API 提供了
Node 类的
insert_before(node, child) 方法。此方法将node插入到现有子节点之前,或者如果child为空,则插入到子节点列表的末尾。
以下代码片段说明了如何使用insert_before() mrthod 创建并添加<g>元素作为 SVG 文档中的第一个子元素。
 1from aspose.svg import SVGDocument
 2
 3# Create a new SVG document
 4document = SVGDocument()
 5svg_element = document.root_element
 6
 7# Add <g> element and set "fill" attribute
 8g_element = document.create_element_ns("http://www.w3.org/2000/svg", "g")
 9g_element.set_attribute("fill", "red")
10svg_element.insert_before(g_element, svg_element.first_child)
11
12# Save the document
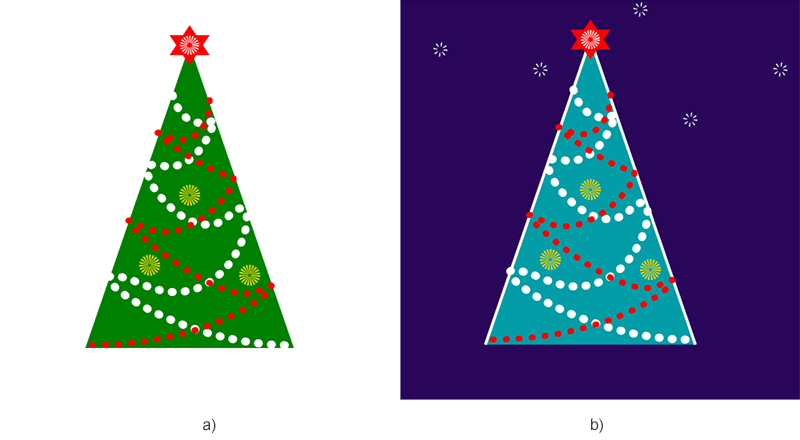
13document.save("add-g-element.svg")考虑编辑现有 SVG 文件 сhristmas-tree.svg 的示例。我们将获取一个包含圣诞树图画的文件并对其进行编辑,以夜空为背景制作圣诞树图画。为此,我们将添加代表星星的背景和圆圈并更改树的颜色。
下面的代码片段显示:
 1from aspose.svg import SVGDocument
 2
 3# Create a new SVG document
 4document = SVGDocument("сhristmas-tree.svg")
 5svg_element = document.root_element
 6
 7# Add a <rect> element as a background
 8rect = document.create_element_ns("http://www.w3.org/2000/svg", "rect")
 9rect.set_attribute("x", "10")
10rect.set_attribute("y", "10")
11rect.set_attribute("width", "400")
12rect.set_attribute("height", "400")
13rect.set_attribute("fill", "#2a065b")
14svg_element.insert_before(rect, svg_element.first_child)
15
16# Add a circle element stylized as a star
17circle = document.create_element_ns("http://www.w3.org/2000/svg", "circle")
18circle.set_attribute("id", "star")
19circle.set_attribute("cx", "60")
20circle.set_attribute("cy", "50")
21circle.set_attribute("r", "5")
22circle.set_attribute("stroke", "white")
23circle.set_attribute("stroke-width", "4")
24circle.set_attribute("stroke-dasharray", "1 3")
25circle.set_attribute("fill", "none")
26svg_element.append_child(circle)
27
28# Create and add new stars
29use = document.create_element_ns("http://www.w3.org/2000/svg", "use")
30use.set_attribute("href", "#star")
31use.set_attribute("transform", "translate(40, 70)")
32svg_element.append_child(use)
33
34# You can add as many stars as you wish
35
36# Get polyline element to change tree color
37polyline_element = svg_element.query_selector("polyline")
38
39# Set a new "fill" attribute value for the polyline element
40polyline_element.set_attribute("fill", "#039da7")
41polyline_element.set_attribute("stroke", "white")
42polyline_element.set_attribute("stroke-width", "3")
43
44# Save the SVG document to a file
45document.save("сhristmas-tree-edited.svg")
该图显示了原始 SVG 文件 сhristmas-tree.svg 和编辑后的文件的可视化。

Analyzing your prompt, please hold on...
An error occurred while retrieving the results. Please refresh the page and try again.