Analyzing your prompt, please hold on...
An error occurred while retrieving the results. Please refresh the page and try again.
テーブルの各要素には、異なる書式設定を適用できます。たとえば、表の書式設定は表全体に適用され、行の書式設定は特定の行のみに、セルの書式設定は特定のセルのみに適用されます。
Aspose.Words は、テーブルの書式設定を取得して適用するための豊富な API を提供します。 Table、RowFormat、および CellFormat ノードを使用して書式設定を設定できます。
この記事では、さまざまなテーブル ノードに書式設定を適用する方法と、Aspose.Words がサポートするテーブルの書式設定について説明します。
このセクションでは、さまざまなテーブル ノードに書式設定を適用する方法を見ていきます。
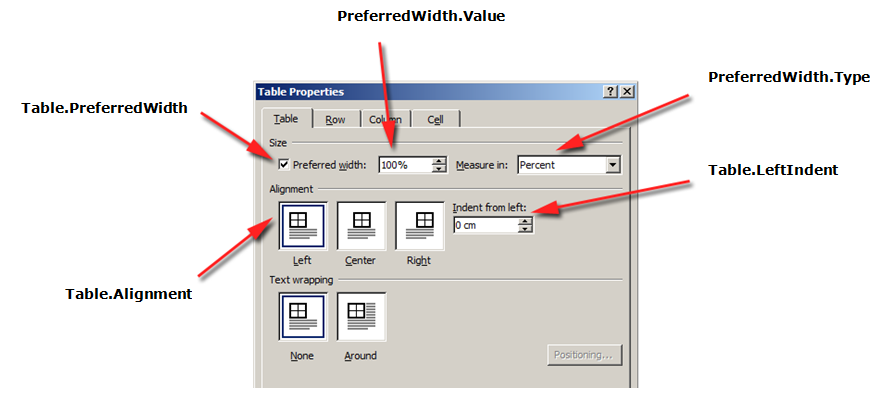
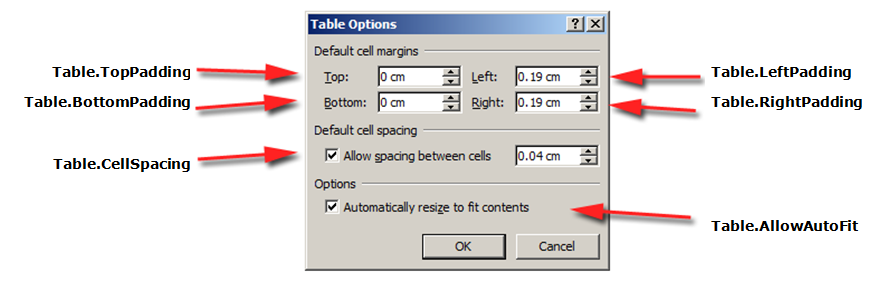
テーブルに書式設定を適用するには、Table、PreferredWidth、および TableCollection クラスを使用して、対応する Table ノードで使用可能なプロパティを使用できます。
以下の図は、Microsoft Word での Table フォーマット機能と、Aspose.Words での対応するプロパティの表現を示しています。
次のコード例は、表にアウトラインの境界線を適用する方法を示しています。
次のコード例は、すべての枠線を有効にしたテーブル (グリッド) を作成する方法を示しています。
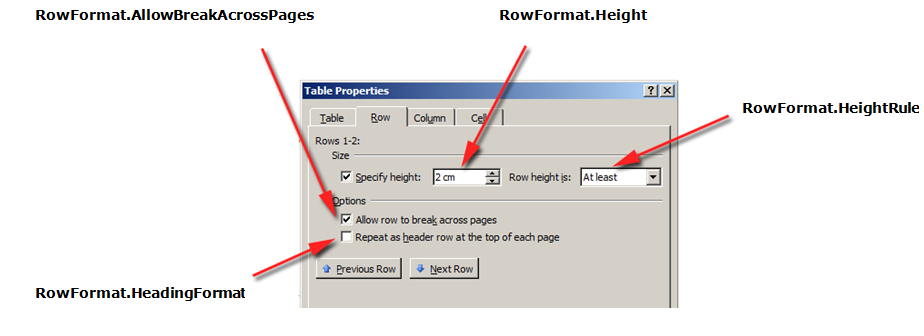
行レベル フォーマットは、Row、RowFormat、および RowCollection クラスを使用して制御できます。
以下の図は、Microsoft Word での Row フォーマット機能と、Aspose.Words での対応するプロパティの表現を示しています。
次のコード例は、テーブルの行の書式設定を変更する方法を示しています。
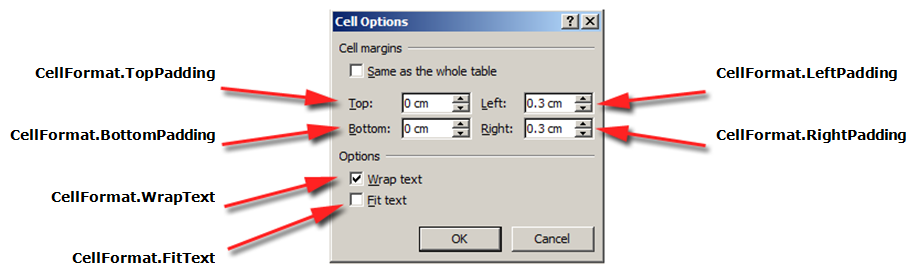
セルレベルの書式設定は、Cell、CellFormat、および CellCollection クラスによって制御されます。
Cell は Row の子ノードのみになれることに注意してください。同時に、書式設定を適用できるように、Cell 内に少なくとも 1 つの Paragraph が存在する必要があります。
Paragraph に加えて、Table を Cell に挿入することもできます。
以下の図は、Microsoft Word での Cell フォーマット機能と、Aspose.Words での対応するプロパティの表現を示しています。
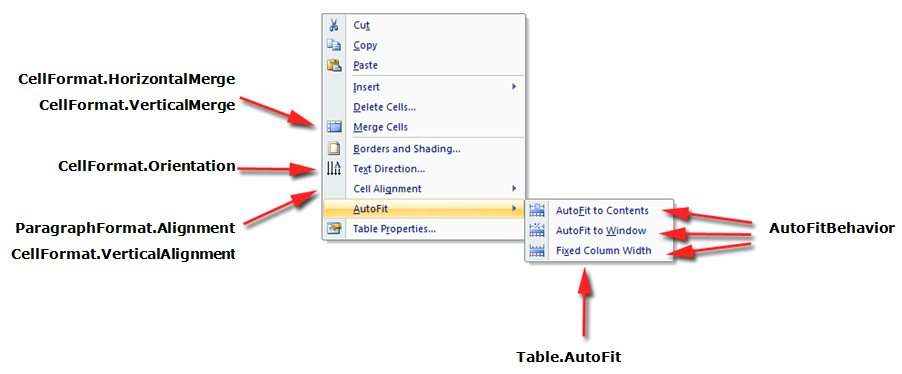
次のコード例は、表のセルの書式設定を変更する方法を示しています。
次のコード例は、セルの内容の左/上/右/下に追加するスペースの量 (ポイント単位) を設定する方法を示しています。
行の高さを設定する最も簡単な方法は、DocumentBuilder を使用することです。適切な RowFormat プロパティを使用すると、デフォルトの高さ設定を設定したり、テーブル内の各行に異なる高さを適用したりできます。
Aspose.Words では、テーブルの行の高さは次によって制御されます。
同時に、各行に異なる高さを設定できるため、テーブル設定を幅広く制御できます。
次のコード例は、単一のセルを含むテーブルを作成し、行の書式設定を適用する方法を示しています。
Microsoft Word ドキュメントのテーブルには、テーブルと個々のセルのサイズを変更するためのいくつかの異なる方法が用意されています。これらのプロパティを使用すると、テーブルの外観と動作を大幅に制御できるため、Aspose.Words は Microsoft Word と同様にテーブルの動作をサポートします。
テーブル要素には、個々のセルだけでなくテーブル全体の幅の計算方法に影響を与える可能性があるいくつかの異なるプロパティがあることを理解しておくことが重要です。
この記事では、さまざまなテーブル幅計算プロパティの仕組みと、テーブル幅計算を完全に制御する方法について詳しく説明します。これは テーブル レイアウトが期待どおりに表示されない場合に知っておくと特に役立ちます。
ほとんどの場合、テーブル幅よりも優先セルの方が推奨されます。推奨されるセル幅は、Aspose.Words モデルだけでなく DOCX フォーマット仕様にもより準拠しています。
セル幅は実際には DOCX 形式の計算値です。実際のセル幅はさまざまな要因によって決まります。たとえば、ページの余白や優先される表の幅を変更すると、実際のセルの幅に影響を与える可能性があります。
推奨されるセル幅は、ドキュメントに保存されているセルのプロパティです。これは何にも依存せず、テーブルやセルの他のプロパティを変更しても変わりません。
テーブルまたは個々のセルの希望の幅は、要素が適合しようとするサイズである優先幅プロパティを通じて定義されます。つまり、テーブル全体または個々のセルに対して優先幅を指定できます。状況によっては、この幅を正確に合わせることができない場合がありますが、ほとんどの場合、実際の幅はこの値に近くなります。
適切な優先幅のタイプと値は、PreferredWidth クラスのメソッドを使用して設定されます。
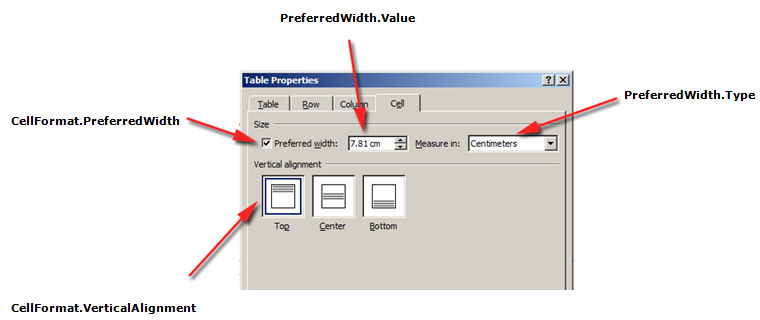
以下の図は、Microsoft Word の 優先幅設定機能 と、Aspose.Words の対応するプロパティを示しています。
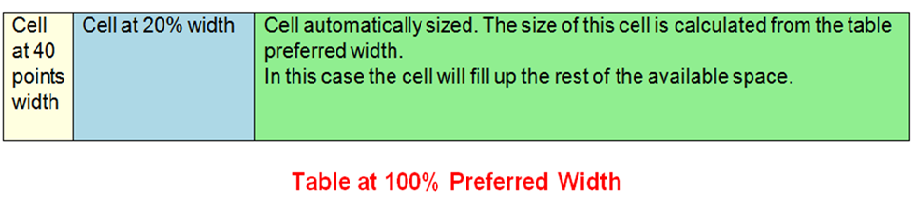
これらのオプションがドキュメント内の実際のテーブルにどのように適用されるかの例を以下の図に示します。
Aspose.Words では、テーブルとセルの幅は Table.PreferredWidth プロパティと CellFormat.PreferredWidth プロパティを使用して設定されます。PreferredWidthType 列挙で使用できるオプションは次のとおりです。
Table.PreferredWidth プロパティを使用すると、そのコンテナー (ネストされたテーブルの場合はページ、テキスト列、または外部テーブルのセル) に応じて優先幅が調整されます。
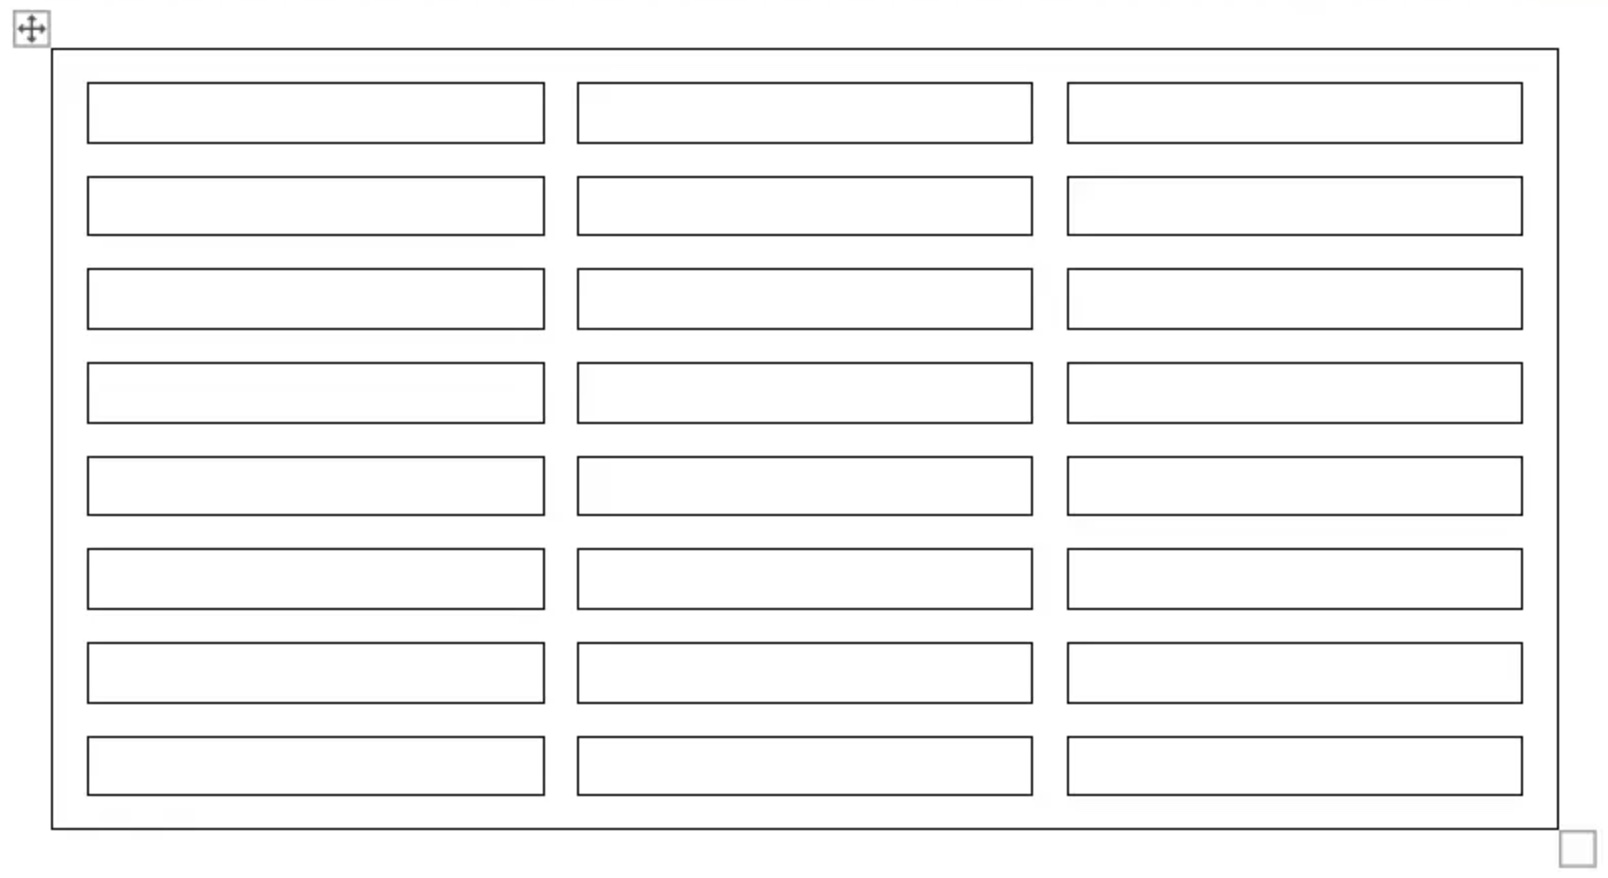
次のコード例は、表をページ幅の 50% に自動調整するように設定する方法を示しています。
特定のセルで CellFormat.PreferredWidth プロパティを使用すると、そのセルの優先幅が調整されます。
次のコード例は、さまざまな優先幅設定を設定する方法を示しています。
Type プロパティと Value プロパティを使用して、目的のテーブルまたはセルの適切な幅の詳細を見つけることができます。
次のコード例は、表のセルの推奨幅タイプを取得する方法を示しています。
AllowAutoFit プロパティを使用すると、選択した基準に従ってテーブル内のセルを拡大および縮小できます。たとえば、ウィンドウに自動フィット オプションを使用して表をページの幅に合わせたり、コンテンツに自動フィット オプションを使用して各セルを内容に応じて拡大または縮小したりできます。
デフォルトでは、Aspose.Words は ウィンドウに自動フィット を使用して新しいテーブルを挿入します。テーブルのサイズは、使用可能なページ幅に応じて調整されます。テーブルのサイズを変更するには、AutoFit メソッドを呼び出すことができます。このメソッドは、テーブルに適用される自動調整のタイプを指定する AutoFitBehavior 列挙を受け入れます。
autofit メソッドは実際には、テーブルにさまざまなプロパティを同時に適用するショートカットであることを知っておくことが重要です。これらは、観察された動作をテーブルに実際に与えるプロパティです。各自動調整オプションのこれらのプロパティについて説明します。
次のコード例は、内容に応じて各セルを縮小または拡大するようにテーブルを設定する方法を示しています。
ウィンドウへの自動調整がテーブルに適用されると、実際には次の操作がバックグラウンドで実行されます。
次のコード例は、表をページ幅に自動調整する方法を示しています。
テーブルの内容が自動調整されると、実際には次の手順がバックグラウンドで実行されます。
Table.AllowAutoFit プロパティが有効になり、内容に応じて各セルのサイズが自動的に変更されます。
優先テーブル幅が Table.PreferredWidth から削除され、CellFormat.PreferredWidth が各テーブル セルから削除されます。
現在のテーブルの内容に合わせて列の幅が再計算されます。最終的には、ユーザーがテキストを編集すると、列の幅とテーブル全体の幅がコンテンツに最適になるように自動的にサイズ変更されるテーブルが作成されます。
次のコード例は、テーブルをそのコンテンツに自動調整する方法を示しています。
テーブルの自動調整が無効になっており、代わりに固定列幅が使用されている場合は、次の手順が実行されます。
次のコード例は、指定したテーブルの自動調整を無効にし、固定幅を有効にする方法を示しています。
Aspose.Words を使用すると、ユーザーは CellFormat を含む複数のオブジェクトを通じてテーブルまたはセルの幅を定義できます。その Width プロパティはほとんどが以前のバージョンから残されていますが、セル幅の設定を簡素化するのに依然として役立ちます。
CellFormat.Width プロパティの動作は、テーブル内に既に存在する他の幅プロパティに応じて異なることを理解しておくことが重要です。
Aspose.Words は、セル幅の計算に次の順序を使用します。
| 注文 | 財産 | 説明 |
|---|---|---|
| 1 | AllowAutoFitが決定 | AutoFit が有効な場合: - テーブルは、コンテンツを収容するために優先幅を超えて拡大する場合があります。通常、優先幅よりも縮小することはありません - CellFormat.Width 値への変更は無視され、セルはその内容に合わせて表示されます。 |
| 2 | Points または Percent の値を持つ PreferredWidthType | CellFormat.Widthは無視されます |
| 3 | 値がAutoのPreferredWidthType | CellFormat.Width からの値がコピーされ、セルの優先幅 (ポイント単位) になります。 |
Microsoft Word の「セル間隔」オプションと同様に、表のセル間の追加のスペースを取得または設定できます。これは、AllowCellSpacing プロパティを使用して実行できます。
これらのオプションがドキュメント内の実際のテーブルにどのように適用されるかの例を以下の図に示します。
次のコード例は、セル間の間隔を設定する方法を示しています。
枠線とシェーディングは、Table.SetBorder、Table.SetBorders、Table.SetShading を使用してテーブル全体に適用することも、CellFormat.Borders と CellFormat.Shading を使用して特定のセルにのみ適用することもできます。さらに、RowFormat.Borders を使用して行の境界線を設定できますが、この方法ではシェーディングを適用できません。
以下の図は、Microsoft Word の境界線と影の設定と、Aspose.Words の対応するプロパティを示しています。
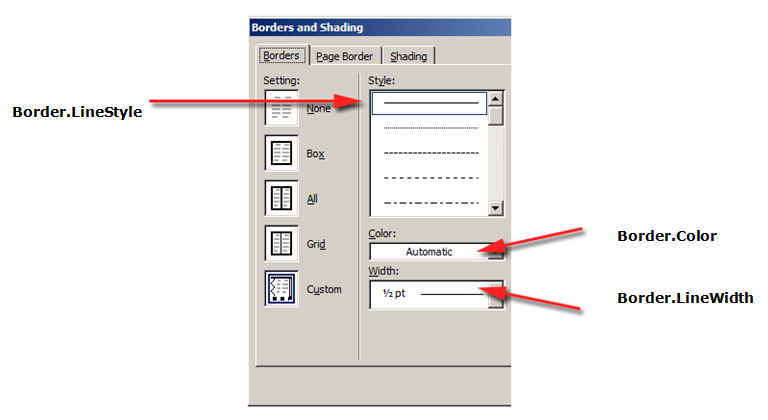
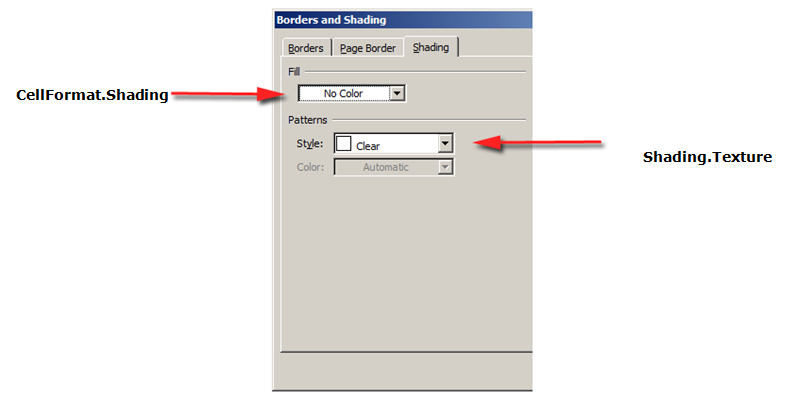
次のコード例は、異なる枠線と網掛けを使用してテーブルとセルを書式設定する方法を示しています。
Analyzing your prompt, please hold on...
An error occurred while retrieving the results. Please refresh the page and try again.