ใช้การจัดรูปแบบ

Contents
[ ]

แต่ละองค์ประกอบของตารางสามารถใช้กับการจัดรูปแบบที่แตกต่างกันได้ ตัวอย่างเช่น การจัดรูปแบบตารางจะมีผลกับทั้งตาราง การจัดรูปแบบแถวเฉพาะบางแถว การจัดรูปแบบเซลล์เฉพาะบางเซลล์

Aspose.Words มี API ที่หลากหลายเพื่อดึงข้อมูลและใช้การจัดรูปแบบกับตาราง คุณสามารถใช้โหนด Table, RowFormat และ CellFormat เพื่อตั้งค่าการจัดรูปแบบได้

ในบทความนี้ เราจะพูดถึงวิธีนำการจัดรูปแบบไปใช้กับโหนดตารางต่างๆ และการตั้งค่าการจัดรูปแบบตารางที่ Aspose.Words รองรับ

ใช้การจัดรูปแบบกับโหนดต่างๆ

ในส่วนนี้ เราจะดูการนำการจัดรูปแบบไปใช้กับโหนดตารางต่างๆ

การจัดรูปแบบระดับตาราง

หากต้องการใช้การจัดรูปแบบกับตาราง คุณสามารถใช้คุณสมบัติที่มีอยู่ในโหนด Table ที่เกี่ยวข้องได้โดยใช้คลาส Table, PreferredWidth และ TableCollection

รูปภาพด้านล่างแสดงคุณลักษณะการจัดรูปแบบ Table ใน Microsoft Word และคุณสมบัติที่เกี่ยวข้องใน Aspose.Words
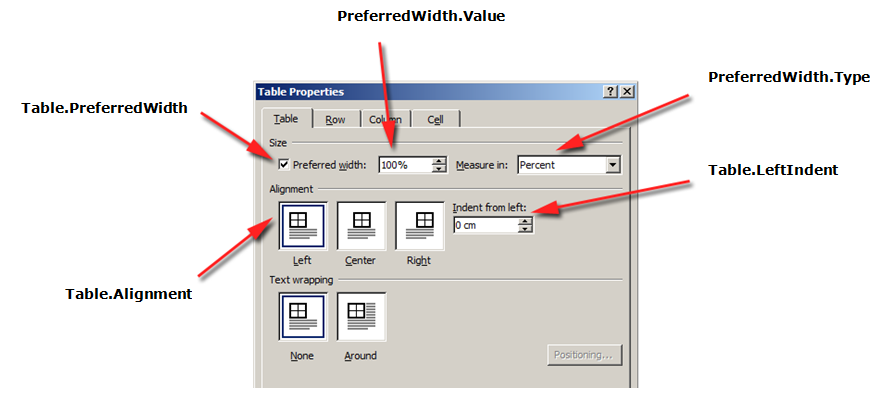
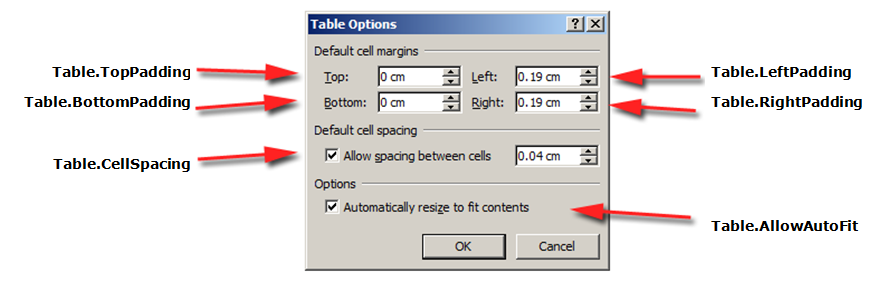
formattin-features-table-level-aspose-words-python

formatting-table-options-aspose-words-python

ตัวอย่างโค้ดต่อไปนี้แสดงวิธีการใช้เส้นขอบเค้าร่างกับตาราง:

# For complete examples and data files, please go to https://github.com/aspose-words/Aspose.Words-for-Python-via-.NET.git.
doc = aw.Document(MY_DIR + "Tables.docx")
table = doc.get_child(aw.NodeType.TABLE, 0, True).as_table()
# Align the table to the center of the page.
table.alignment = aw.tables.TableAlignment.CENTER
# Clear any existing borders from the table.
table.clear_borders()
# Set a green border around the table but not inside.
table.set_border(aw.BorderType.LEFT, aw.LineStyle.SINGLE, 1.5, drawing.Color.green, True)
table.set_border(aw.BorderType.RIGHT, aw.LineStyle.SINGLE, 1.5, drawing.Color.green, True)
table.set_border(aw.BorderType.TOP, aw.LineStyle.SINGLE, 1.5, drawing.Color.green, True)
table.set_border(aw.BorderType.BOTTOM, aw.LineStyle.SINGLE, 1.5, drawing.Color.green, True)
# Fill the cells with a light green solid color.
table.set_shading(aw.TextureIndex.TEXTURE_SOLID, drawing.Color.light_green, drawing.Color.empty())
doc.save(ARTIFACTS_DIR + "WorkingWithTableStylesAndFormatting.apply_outline_border.docx")

ตัวอย่างโค้ดต่อไปนี้แสดงวิธีการสร้างตารางโดยเปิดใช้งานเส้นขอบทั้งหมด (กริด):

# For complete examples and data files, please go to https://github.com/aspose-words/Aspose.Words-for-Python-via-.NET.git.
doc = aw.Document(MY_DIR + "Tables.docx")
table = doc.get_child(aw.NodeType.TABLE, 0, True).as_table()
# Clear any existing borders from the table.
table.clear_borders()
# Set a green border around and inside the table.
table.set_borders(aw.LineStyle.SINGLE, 1.5, drawing.Color.green)
doc.save(ARTIFACTS_DIR + "WorkingWithTableStylesAndFormatting.build_table_with_borders.docx")

การจัดรูปแบบระดับแถว

การจัดรูปแบบ ระดับแถว สามารถควบคุมได้โดยใช้คลาส Row, RowFormat และ RowCollection

รูปภาพด้านล่างแสดงคุณลักษณะการจัดรูปแบบ Row ใน Microsoft Word และคุณสมบัติที่เกี่ยวข้องใน Aspose.Words
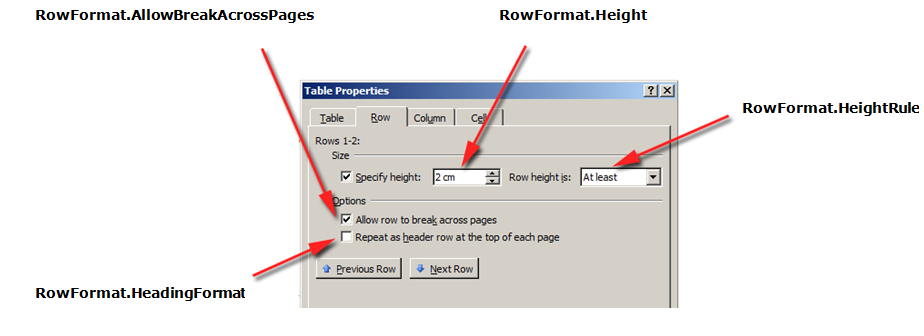
formatting-row-level-aspose-words-python

ตัวอย่างโค้ดต่อไปนี้แสดงวิธีการแก้ไขการจัดรูปแบบแถวของตาราง:

# For complete examples and data files, please go to https://github.com/aspose-words/Aspose.Words-for-Python-via-.NET.git.
doc = aw.Document(MY_DIR + "Tables.docx")
table = doc.get_child(aw.NodeType.TABLE, 0, True).as_table()
# Retrieve the first row in the table.
first_row = table.first_row
first_row.row_format.borders.line_style = aw.LineStyle.NONE
first_row.row_format.height_rule = aw.HeightRule.AUTO
first_row.row_format.allow_break_across_pages = True

การจัดรูปแบบระดับเซลล์

การจัดรูปแบบระดับเซลล์ถูกควบคุมโดยคลาส Cell, CellFormat และ CellCollection

รูปภาพด้านล่างแสดงคุณลักษณะการจัดรูปแบบ Cell ใน Microsoft Word และคุณสมบัติที่เกี่ยวข้องใน Aspose.Words

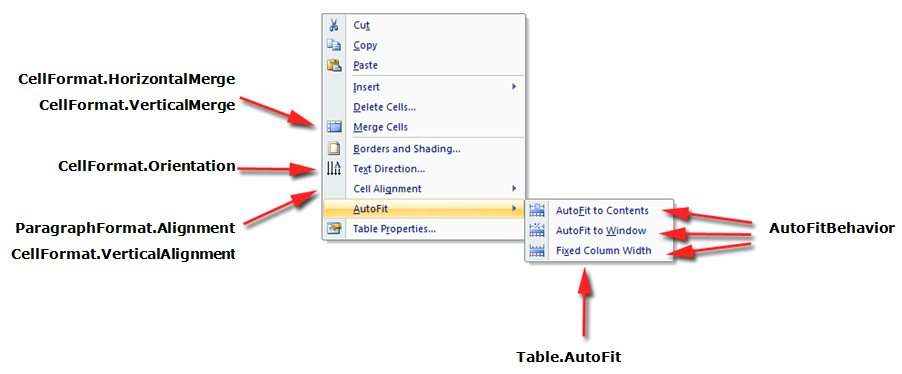
formatting-cell-level-aspose-words-python

auto-formatting-cell-level-aspose-words-python

ตัวอย่างโค้ดต่อไปนี้แสดงวิธีการปรับเปลี่ยนการจัดรูปแบบของเซลล์ตาราง:

# For complete examples and data files, please go to https://github.com/aspose-words/Aspose.Words-for-Python-via-.NET.git.
doc = aw.Document(MY_DIR + "Tables.docx")
table = doc.get_child(aw.NodeType.TABLE, 0, True).as_table()
first_cell = table.first_row.first_cell
first_cell.cell_format.width = 30
first_cell.cell_format.orientation = aw.TextOrientation.DOWNWARD
first_cell.cell_format.shading.foreground_pattern_color = drawing.Color.light_green

ตัวอย่างโค้ดต่อไปนี้แสดงวิธีการตั้งค่าจำนวนช่องว่าง (เป็นจุด) เพื่อเพิ่มไปทางซ้าย/บน/ขวา/ล่างของเนื้อหาในเซลล์:

# For complete examples and data files, please go to https://github.com/aspose-words/Aspose.Words-for-Python-via-.NET.git.
doc = aw.Document()
builder = aw.DocumentBuilder(doc)
builder.start_table()
builder.insert_cell()
# Sets the amount of space (in points) to add to the left/top/right/bottom of the cell's contents.
builder.cell_format.set_paddings(30, 50, 30, 50)
builder.writeln("I'm a wonderful formatted cell.")
builder.end_row()
builder.end_table()
doc.save(ARTIFACTS_DIR + "WorkingWithTableStylesAndFormatting.cell_padding.docx")
view raw cell-padding.py hosted with ❤ by GitHub

ระบุความสูงของแถว

วิธีที่ง่ายที่สุดในการตั้งค่าความสูงของแถวคือการใช้ DocumentBuilder เมื่อใช้คุณสมบัติ RowFormat ที่เหมาะสม คุณสามารถตั้งค่าความสูงเริ่มต้นหรือใช้ความสูงที่แตกต่างกันสำหรับแต่ละแถวในตารางได้

ใน Aspose.Words ความสูงของแถวตารางจะถูกควบคุมโดย:

  • คุณสมบัติความสูงของแถว - Height
  • คุณสมบัติกฎความสูงสำหรับแถวที่กำหนด – HeightRule

ในเวลาเดียวกัน คุณสามารถตั้งค่าความสูงที่แตกต่างกันสำหรับแต่ละแถวได้ ซึ่งช่วยให้คุณควบคุมการตั้งค่าตารางได้อย่างกว้างขวาง

ตัวอย่างโค้ดต่อไปนี้แสดงวิธีสร้างตารางที่มีเซลล์เดียวและใช้การจัดรูปแบบแถว:

# For complete examples and data files, please go to https://github.com/aspose-words/Aspose.Words-for-Python-via-.NET.git.
doc = aw.Document()
builder = aw.DocumentBuilder(doc)
table = builder.start_table()
builder.insert_cell()
row_format = builder.row_format
row_format.height = 100
row_format.height_rule = aw.HeightRule.EXACTLY
# These formatting properties are set on the table and are applied to all rows in the table.
table.left_padding = 30
table.right_padding = 30
table.top_padding = 30
table.bottom_padding = 30
builder.writeln("I'm a wonderful formatted row.")
builder.end_row()
builder.end_table()
doc.save(ARTIFACTS_DIR + "WorkingWithTableStylesAndFormatting.apply_row_formatting.docx")

การระบุความกว้างของตารางและเซลล์

ตารางในเอกสาร Microsoft Word มีวิธีปรับขนาดตารางและเซลล์แต่ละเซลล์หลายวิธี คุณสมบัติเหล่านี้ช่วยให้สามารถควบคุมลักษณะที่ปรากฏและการทำงานของตารางได้อย่างมาก ดังนั้น Aspose.Words จึงสนับสนุนลักษณะการทำงานของตาราง เช่นเดียวกับใน Microsoft Word

สิ่งสำคัญคือต้องทราบว่าองค์ประกอบตารางมีคุณสมบัติที่แตกต่างกันหลายประการ ซึ่งอาจส่งผลต่อวิธีคำนวณความกว้างของตารางโดยรวม รวมถึงแต่ละเซลล์:

  • ความกว้างที่ต้องการบนโต๊ะ
  • ความกว้างที่ต้องการในแต่ละเซลล์
  • อนุญาตให้ปรับอัตโนมัติบนโต๊ะ

บทความนี้ให้รายละเอียดเกี่ยวกับวิธีการทำงานของคุณสมบัติการคำนวณความกว้างของตารางต่างๆ และวิธีการควบคุมการคำนวณความกว้างของตารางอย่างสมบูรณ์ นี่คือ มีประโยชน์อย่างยิ่งที่จะทราบในกรณีที่เค้าโครงตารางไม่ปรากฏตามที่คาดไว้

วิธีใช้ความกว้างที่ต้องการ

ความกว้างที่ต้องการของตารางหรือแต่ละเซลล์ถูกกำหนดผ่านคุณสมบัติความกว้างที่ต้องการ ซึ่งเป็นขนาดที่องค์ประกอบพยายามทำให้พอดี นั่นคือสามารถระบุความกว้างที่ต้องการสำหรับทั้งตารางหรือสำหรับแต่ละเซลล์ได้ ในบางสถานการณ์ อาจไม่สามารถปรับให้พอดีกับความกว้างนี้ได้ แต่ความกว้างจริงจะใกล้เคียงกับค่านี้ในกรณีส่วนใหญ่

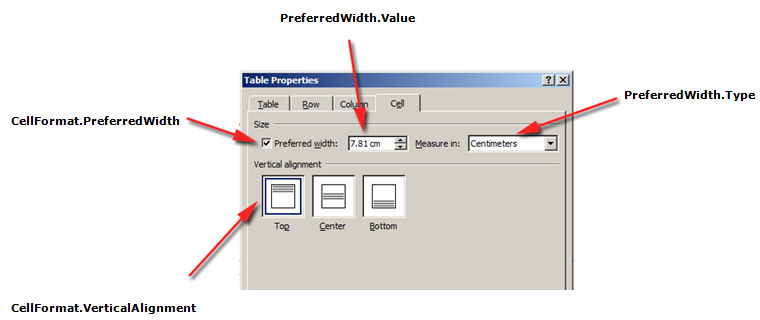
ประเภทความกว้างที่ต้องการและค่าที่เหมาะสมได้รับการตั้งค่าโดยใช้วิธีการของคลาส PreferredWidth:

  • วิธี Auto เพื่อระบุอัตโนมัติหรือ “ไม่มีความกว้างที่ต้องการ”
  • วิธี FromPercent เพื่อระบุความกว้างเป็นเปอร์เซ็นต์
  • วิธีการ FromPoints เพื่อระบุความกว้างเป็นจุด

รูปภาพด้านล่างแสดง คุณลักษณะการตั้งค่าความกว้างที่ต้องการ ใน Microsoft Word และคุณสมบัติที่เกี่ยวข้องใน Aspose.Words
formatting-table-properties-aspose-words-python

ตัวอย่างการใช้ตัวเลือกเหล่านี้กับตารางจริงในเอกสารสามารถดูได้จากภาพด้านล่าง

tables-applying-options-python

ระบุตารางที่ต้องการหรือความกว้างของเซลล์

ใน Aspose.Words ความกว้างของตารางและเซลล์จะถูกตั้งค่าโดยใช้คุณสมบัติ Table.PreferredWidth และคุณสมบัติ CellFormat.PreferredWidth โดยมีตัวเลือกในการแจงนับ PreferredWidthType:

  • Auto ซึ่งเทียบเท่ากับชุดความกว้างที่ต้องการ
  • Percent ซึ่งปรับองค์ประกอบให้สัมพันธ์กับพื้นที่ว่างในหน้าต่างหรือขนาดคอนเทนเนอร์ และคำนวณค่าใหม่เมื่อความกว้างที่มีอยู่เปลี่ยนไป
  • Points ซึ่งสอดคล้องกับองค์ประกอบของความกว้างที่ระบุเป็นจุด

การใช้คุณสมบัติ Table.PreferredWidth จะปรับความกว้างที่ต้องการโดยสัมพันธ์กับคอนเทนเนอร์: หน้า คอลัมน์ข้อความ หรือเซลล์ตารางด้านนอก หากเป็นตารางที่ซ้อนกัน

ตัวอย่างโค้ดต่อไปนี้แสดงวิธีการตั้งค่าตารางให้พอดีอัตโนมัติถึง 50% ของความกว้างของหน้า:

# For complete examples and data files, please go to https://github.com/aspose-words/Aspose.Words-for-Python-via-.NET.git.
doc = aw.Document(MY_DIR + "Tables.docx")
table = doc.get_child(aw.NodeType.TABLE, 0, True).as_table()
# Autofit the first table to the page width.
table.auto_fit(aw.tables.AutoFitBehavior.AUTO_FIT_TO_WINDOW)
doc.save(ARTIFACTS_DIR + "WorkingWithTables.auto_fit_table_to_window.docx")

การใช้คุณสมบัติ CellFormat.PreferredWidth บนเซลล์ที่กำหนดจะปรับความกว้างที่ต้องการ

ตัวอย่างโค้ดต่อไปนี้แสดงวิธีการตั้งค่าความกว้างที่ต้องการ:

# For complete examples and data files, please go to https://github.com/aspose-words/Aspose.Words-for-Python-via-.NET.git.
doc = aw.Document()
builder = aw.DocumentBuilder(doc)
# Insert a table row made up of three cells which have different preferred widths.
builder.start_table()
# Insert an absolute sized cell.
builder.insert_cell()
builder.cell_format.preferred_width = aw.tables.PreferredWidth.from_points(40)
builder.cell_format.shading.background_pattern_color = drawing.Color.light_yellow
builder.writeln("Cell at 40 points width")
# Insert a relative (percent) sized cell.
builder.insert_cell()
builder.cell_format.preferred_width = aw.tables.PreferredWidth.from_percent(20)
builder.cell_format.shading.background_pattern_color = drawing.Color.light_blue
builder.writeln("Cell at 20% width")
# Insert a auto sized cell.
builder.insert_cell()
builder.cell_format.preferred_width = aw.tables.PreferredWidth.AUTO
builder.cell_format.shading.background_pattern_color = drawing.Color.light_green
builder.writeln(
"Cell automatically sized. The size of this cell is calculated from the table preferred width.")
builder.writeln("In this case the cell will fill up the rest of the available space.")
doc.save(ARTIFACTS_DIR + "WorkingWithTables.preferred_width_settings.docx")

การค้นหาประเภทและค่าความกว้างที่ต้องการ

คุณสามารถใช้คุณสมบัติ Type และ Value เพื่อค้นหารายละเอียดความกว้างที่ต้องการของตารางหรือเซลล์ที่ต้องการ

ตัวอย่างโค้ดต่อไปนี้แสดงวิธีการดึงข้อมูลประเภทความกว้างที่ต้องการของเซลล์ตาราง:

# For complete examples and data files, please go to https://github.com/aspose-words/Aspose.Words-for-Python-via-.NET.git.
doc = aw.Document(MY_DIR + "Tables.docx")
table = doc.get_child(aw.NodeType.TABLE, 0, True).as_table()
table.allow_auto_fit = True
first_cell = table.first_row.first_cell
type_ = first_cell.cell_format.preferred_width.type
value = first_cell.cell_format.preferred_width.value

วิธีการตั้งค่าการปรับพอดีอัตโนมัติ

คุณสมบัติ AllowAutoFit ช่วยให้เซลล์ในตารางขยายและลดขนาดตามเกณฑ์ที่เลือก ตัวอย่างเช่น คุณสามารถใช้ตัวเลือก ปรับให้พอดีอัตโนมัติกับหน้าต่าง เพื่อปรับตารางให้พอดีกับความกว้างของหน้า และใช้ตัวเลือก ปรับให้พอดีอัตโนมัติกับเนื้อหา เพื่อให้แต่ละเซลล์ขยายหรือย่อตามเนื้อหาได้

ตามค่าเริ่มต้น Aspose.Words จะแทรกตารางใหม่โดยใช้ ปรับให้พอดีอัตโนมัติกับหน้าต่าง ตารางจะมีขนาดตามความกว้างของหน้าที่มีอยู่ หากต้องการปรับขนาดตาราง คุณสามารถเรียกใช้เมธอด AutoFit ได้ เมธอดนี้ยอมรับการแจงนับ AutoFitBehavior ที่ระบุประเภทของการปรับพอดีอัตโนมัติที่จะใช้กับตาราง

สิ่งสำคัญคือต้องรู้ว่าจริงๆ แล้ววิธีการปรับให้พอดีอัตโนมัตินั้นเป็นทางลัดที่ใช้คุณสมบัติที่แตกต่างกันกับตารางในเวลาเดียวกัน สิ่งเหล่านี้เป็นคุณสมบัติที่ทำให้ตารางมีพฤติกรรมที่สังเกตได้จริง เราจะพูดถึงคุณสมบัติเหล่านี้สำหรับตัวเลือกการปรับอัตโนมัติแต่ละรายการ

ตัวอย่างโค้ดต่อไปนี้แสดงวิธีการตั้งค่าตารางให้ย่อหรือขยายแต่ละเซลล์ตามเนื้อหา:

# For complete examples and data files, please go to https://github.com/aspose-words/Aspose.Words-for-Python-via-.NET.git.
table.allow_auto_fit = True

ปรับตารางให้พอดีอัตโนมัติกับหน้าต่าง

เมื่อปรับใช้การปรับหน้าต่างอัตโนมัติกับตาราง การดำเนินการต่อไปนี้จะดำเนินการเบื้องหลังจริง:

  1. คุณสมบัติ Table.AllowAutoFit ถูกเปิดใช้งานเพื่อปรับขนาดคอลัมน์โดยอัตโนมัติเพื่อให้พอดีกับเนื้อหาที่มีอยู่ โดยใช้ค่า Table.PreferredWidth 100%
  2. CellFormat.PreferredWidth จะถูกลบออกจากเซลล์ตารางทั้งหมด
  3. ความกว้างของคอลัมน์จะถูกคำนวณใหม่สำหรับเนื้อหาตารางปัจจุบัน – ผลลัพธ์สุดท้ายคือตารางที่ใช้ความกว้างที่มีอยู่ทั้งหมด
  4. ความกว้างของคอลัมน์ในตารางจะเปลี่ยนโดยอัตโนมัติเมื่อผู้ใช้แก้ไขข้อความ

ตัวอย่างโค้ดต่อไปนี้แสดงวิธีการปรับตารางให้พอดีกับความกว้างของหน้าโดยอัตโนมัติ:

# For complete examples and data files, please go to https://github.com/aspose-words/Aspose.Words-for-Python-via-.NET.git.
doc = aw.Document(MY_DIR + "Tables.docx")
table = doc.get_child(aw.NodeType.TABLE, 0, True).as_table()
# Autofit the first table to the page width.
table.auto_fit(aw.tables.AutoFitBehavior.AUTO_FIT_TO_WINDOW)
doc.save(ARTIFACTS_DIR + "WorkingWithTables.auto_fit_table_to_window.docx")

ปรับตารางให้พอดีอัตโนมัติกับเนื้อหา

เมื่อตารางถูกปรับเนื้อหาให้เหมาะสมโดยอัตโนมัติ ขั้นตอนต่อไปนี้จะดำเนินการเบื้องหลังจริง:

  1. คุณสมบัติ Table.AllowAutoFit ถูกเปิดใช้งานเพื่อปรับขนาดแต่ละเซลล์โดยอัตโนมัติตามเนื้อหา

  2. ความกว้างของตารางที่ต้องการจะถูกลบออกจาก Table.PreferredWidth, CellFormat.PreferredWidth จะถูกลบสำหรับแต่ละเซลล์ของตาราง

  3. ความกว้างของคอลัมน์จะถูกคำนวณใหม่สำหรับเนื้อหาตารางปัจจุบัน ผลลัพธ์สุดท้ายคือตารางที่ความกว้างของคอลัมน์และความกว้างของทั้งตารางจะถูกปรับขนาดโดยอัตโนมัติเพื่อให้พอดีกับเนื้อหามากที่สุดเมื่อผู้ใช้แก้ไขข้อความ

ตัวอย่างโค้ดต่อไปนี้แสดงวิธีการปรับตารางให้พอดีกับเนื้อหาโดยอัตโนมัติ:

# For complete examples and data files, please go to https://github.com/aspose-words/Aspose.Words-for-Python-via-.NET.git.
doc = aw.Document(MY_DIR + "Tables.docx")
table = doc.get_child(aw.NodeType.TABLE, 0, True).as_table()
table.auto_fit(aw.tables.AutoFitBehavior.AUTO_FIT_TO_CONTENTS)
doc.save(ARTIFACTS_DIR + "WorkingWithTables.auto_fit_table_to_contents.docx")

ปิดใช้งานการปรับพอดีอัตโนมัติในตารางและใช้ความกว้างของคอลัมน์คงที่

หากตารางปิดใช้งานการปรับพอดีอัตโนมัติและใช้ความกว้างของคอลัมน์คงที่แทน ให้ดำเนินการตามขั้นตอนต่อไปนี้:

  1. คุณสมบัติ Table.AllowAutoFit ถูกปิดใช้งาน ดังนั้นคอลัมน์จะไม่ขยายหรือย่อขนาดให้กับเนื้อหา
  2. ความกว้างที่ต้องการของทั้งตารางจะถูกลบออกจาก Table.PreferredWidth, CellFormat.PreferredWidth จะถูกลบออกจากเซลล์ตารางทั้งหมด
  3. ผลลัพธ์สุดท้ายคือตารางที่มีความกว้างของคอลัมน์ถูกกำหนดโดยคุณสมบัติ CellFormat.Width และคอลัมน์จะไม่ถูกปรับขนาดโดยอัตโนมัติเมื่อผู้ใช้ป้อนข้อความหรือเมื่อปรับขนาดหน้า

ตัวอย่างโค้ดต่อไปนี้แสดงวิธีการปิดใช้งานการปรับพอดีอัตโนมัติและเปิดใช้งานความกว้างคงที่สำหรับตารางที่ระบุ:

# For complete examples and data files, please go to https://github.com/aspose-words/Aspose.Words-for-Python-via-.NET.git.
doc = aw.Document(MY_DIR + "Tables.docx")
table = doc.get_child(aw.NodeType.TABLE, 0, True).as_table()
# Disable autofitting on this table.
table.auto_fit(aw.tables.AutoFitBehavior.FIXED_COLUMN_WIDTHS)
doc.save(ARTIFACTS_DIR + "WorkingWithTables.auto_fit_table_to_fixed_column_widths.docx")

ลำดับความสำคัญเมื่อคำนวณความกว้างของเซลล์

Aspose.Words ช่วยให้ผู้ใช้สามารถกำหนดความกว้างของตารางหรือเซลล์ผ่านวัตถุหลายชิ้น รวมถึง CellFormat ด้วย คุณสมบัติ Width ส่วนใหญ่จะเหลือจากเวอร์ชันก่อนหน้า อย่างไรก็ตาม ยังคงมีประโยชน์ในการตั้งค่าความกว้างของเซลล์ให้ง่ายขึ้น

สิ่งสำคัญคือต้องทราบว่าคุณสมบัติ CellFormat.Width ทำงานแตกต่างกัน ขึ้นอยู่กับคุณสมบัติความกว้างอื่นๆ ที่มีอยู่แล้วในตาราง

Aspose.Words ใช้ลำดับต่อไปนี้ในการคำนวณความกว้างของเซลล์:

คำสั่ง คุณสมบัติ คำอธิบาย
1 AllowAutoFit ถูกกำหนดแล้ว หากเปิดใช้งาน AutoFit:
- ตารางอาจขยายเกินความกว้างที่ต้องการเพื่อรองรับเนื้อหา โดยปกติแล้วจะไม่หดตัวต่ำกว่าความกว้างที่ต้องการ
- การเปลี่ยนแปลงใดๆ ที่เกิดขึ้นกับค่า CellFormat.Width จะถูกละเว้น และเซลล์จะพอดีกับเนื้อหาแทน
2 PreferredWidthType ที่มีค่า Points หรือ Percent CellFormat.Width จะถูกละเว้น
3 PreferredWidthType ที่มีค่าเป็น Auto คัดลอกค่าจาก CellFormat.Width และกลายเป็นความกว้างที่ต้องการของเซลล์ (เป็นพอยต์)

อนุญาตให้มีระยะห่างระหว่างเซลล์

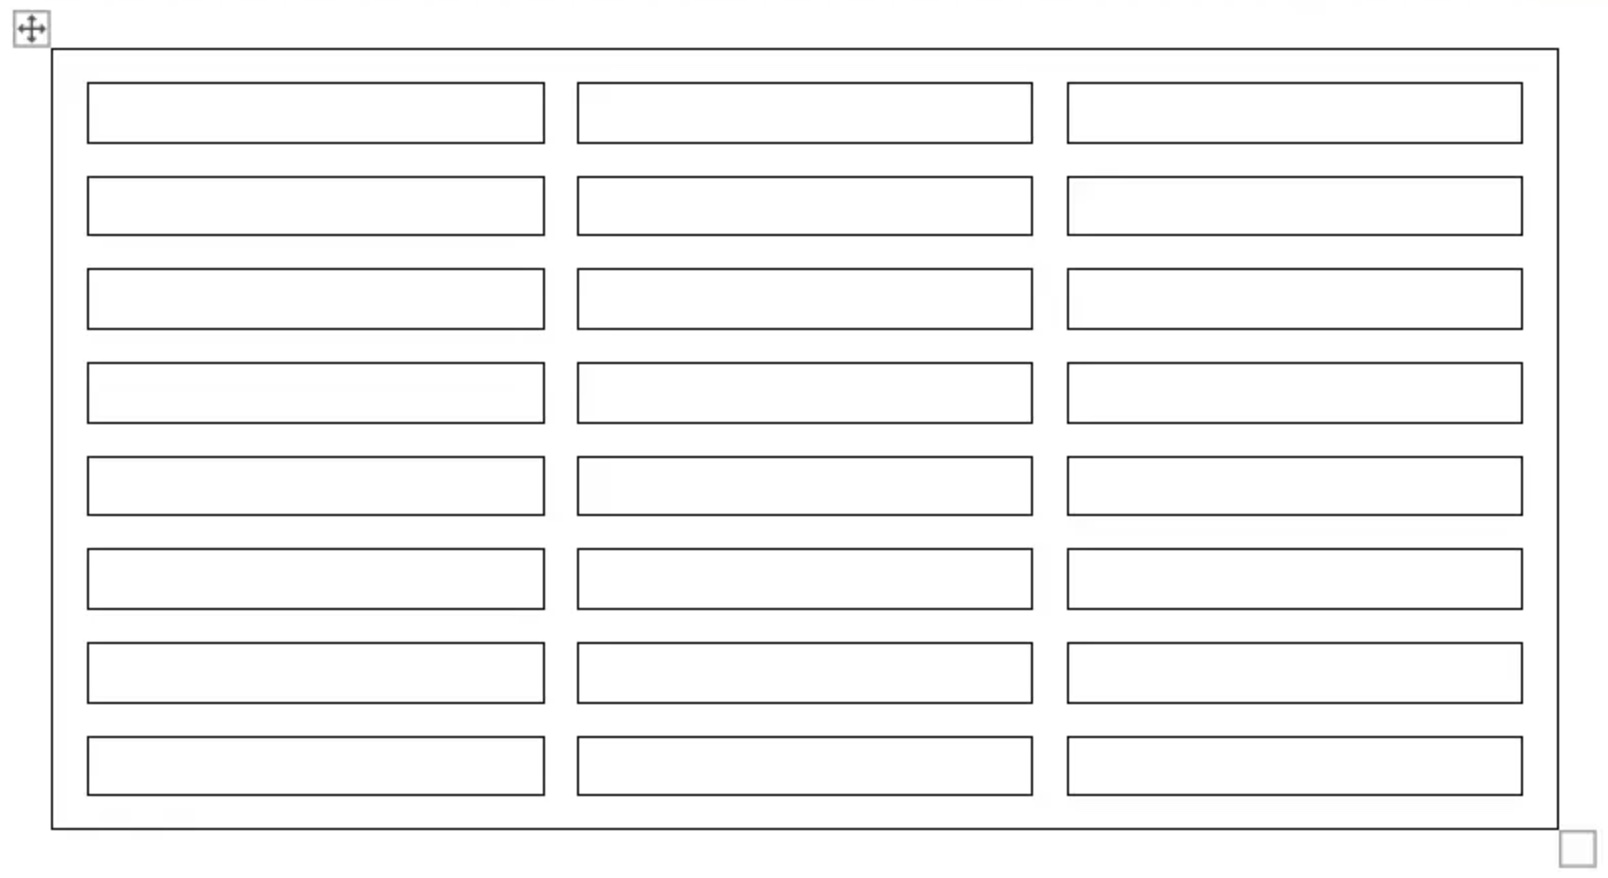
คุณสามารถรับหรือตั้งค่าช่องว่างเพิ่มเติมระหว่างเซลล์ตารางได้คล้ายกับตัวเลือก “ระยะห่างเซลล์” ใน Microsoft Word ซึ่งสามารถทำได้โดยใช้คุณสมบัติ AllowCellSpacing

ตัวอย่างการใช้ตัวเลือกเหล่านี้กับตารางจริงในเอกสารสามารถดูได้จากภาพด้านล่าง
เกี่ยวกับรูปแบบระยะห่างระหว่างเซลล์ aspose คำหลาม

ตัวอย่างโค้ดต่อไปนี้แสดงวิธีการตั้งค่าระยะห่างระหว่างเซลล์:

# For complete examples and data files, please go to https://github.com/aspose-words/Aspose.Words-for-Python-via-.NET.git.
doc = aw.Document(MY_DIR + "Tables.docx")
table = doc.get_child(aw.NodeType.TABLE, 0, True).as_table()
table.allow_cell_spacing = True
table.cell_spacing = 2
doc.save(ARTIFACTS_DIR + "WorkingWithTableStylesAndFormatting.allow_cell_spacing.docx")

การใช้เส้นขอบและการแรเงา

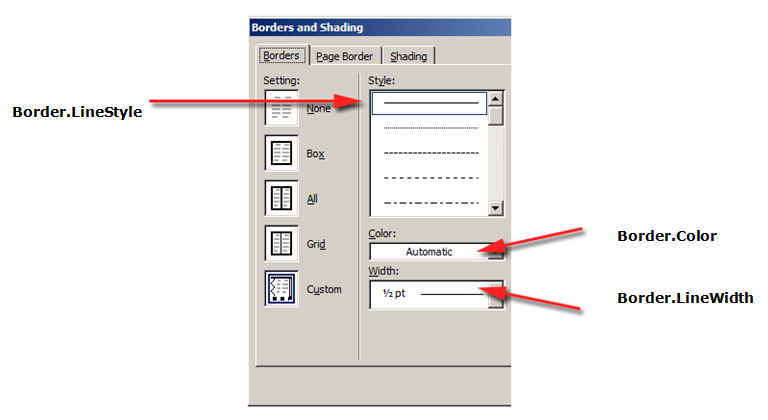
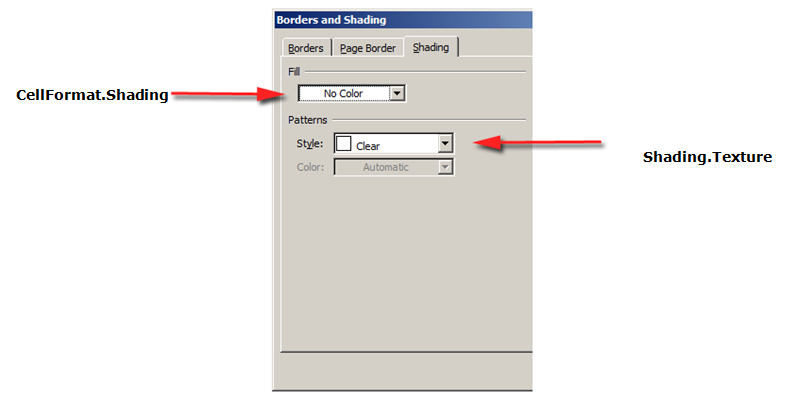
เส้นขอบและการแรเงาสามารถนำไปใช้กับทั้งตารางโดยใช้ Table.SetBorder, Table.SetBorders และ Table.SetShading หรือเฉพาะกับเซลล์ที่ระบุโดยใช้ CellFormat.Borders และ CellFormat.Shading นอกจากนี้ คุณสามารถตั้งค่าเส้นขอบแถวได้โดยใช้ RowFormat.Borders แต่ไม่สามารถใช้การแรเงาในลักษณะนี้ได้

รูปภาพด้านล่างแสดงการตั้งค่าเส้นขอบและเงาใน Microsoft Word และคุณสมบัติที่เกี่ยวข้องใน Aspose.Words
formatting-border-line-aspose-words-python

formatting-cell-color-aspose-words-python

ตัวอย่างโค้ดต่อไปนี้แสดงวิธีจัดรูปแบบตารางและเซลล์ที่มีเส้นขอบและแรเงาต่างกัน:

# For complete examples and data files, please go to https://github.com/aspose-words/Aspose.Words-for-Python-via-.NET.git.
doc = aw.Document()
builder = aw.DocumentBuilder(doc)
table = builder.start_table()
builder.insert_cell()
# Set the borders for the entire table.
table.set_borders(aw.LineStyle.SINGLE, 2.0, drawing.Color.black)
# Set the cell shading for this cell.
builder.cell_format.shading.background_pattern_color = drawing.Color.red
builder.writeln("Cell #1")
builder.insert_cell()
# Specify a different cell shading for the second cell.
builder.cell_format.shading.background_pattern_color = drawing.Color.green
builder.writeln("Cell #2")
builder.end_row()
# Clear the cell formatting from previous operations.
builder.cell_format.clear_formatting()
builder.insert_cell()
# Create larger borders for the first cell of this row. This will be different
# compared to the borders set for the table.
builder.cell_format.borders.left.line_width = 4.0
builder.cell_format.borders.right.line_width = 4.0
builder.cell_format.borders.top.line_width = 4.0
builder.cell_format.borders.bottom.line_width = 4.0
builder.writeln("Cell #3")
builder.insert_cell()
builder.cell_format.clear_formatting()
builder.writeln("Cell #4")
doc.save(ARTIFACTS_DIR + "WorkingWithTableStylesAndFormatting.format_table_and_cell_with_different_borders.docx")