
การส่งและส่งต่อข้อความ - ส่งข้อความ Outlook ด้วยโปรแกรม Java
นี้ SmtpClient คลาสทำให้แอปพลิเคชันสามารถส่งอีเมลโดยใช้ Simple Mail Transfer Protocol (SMTP)
- นี้ SmtpClient คลาสเป็นจุดเข้าหลักเดียวที่นักพัฒนาใช้เพื่อส่งข้อความเมล
- นี้ SmtpClient คลาสยังให้วิธีการส่งอีเมลทั่วไปอื่น ๆ เช่น การเขียนข้อความอีเมลไปยังระบบไฟล์, คิวข้อความ เป็นต้น
- นี้ SmtpClient คลาสสนับสนุนแนวคิดการเขียนโปรแกรมสองแบบนี้อย่างเต็มที่:
- นี้ SmtpClient คลาสยังรองรับ การส่งข้อความในรูปแบบ TNEF
เพื่อส่งข้อความอีเมลและบล็อกขณะรอให้ข้อความถูกส่งไปยังเซิร์ฟเวอร์ SMTP ให้ใช้หนึ่งในเมธอด Send แบบซิงโครนัส เพื่อให้เธรดหลักของโปรแกรมของคุณทำงานต่อได้ขณะข้อความกำลังส่ง ให้ใช้ beginSend เมธอด.
ส่งอีเมลแบบซิงโครนัส
ข้อความอีเมลสามารถส่งแบบซิงโครนัสโดยใช้ SmtpClient คลาส send เมธอด ส่งข้อความอีเมลที่ระบุผ่านเซิร์ฟเวอร์ SMTP เพื่อการจัดส่ง ผู้ส่ง, ผู้รับ, เรื่อง, และเนื้อหาข้อความจะระบุด้วยออบเจ็กต์ String เพื่อส่งอีเมลอย่างซิงโครนัสให้ทำตามขั้นตอนต่อไปนี้:
- สร้างอินสแตนซ์ของ MailMessage คลาสและตั้งค่าคุณสมบัติต่าง ๆ ของมัน
- สร้างอินสแตนซ์ของ SmtpClient คลาสและระบุโฮสต์, พอร์ต, ชื่อผู้ใช้ & รหัสผ่าน
- ส่งข้อความโดยใช้ SmtpClient คลาส send เมธอดและส่งค่า MailMessage อินสแตนซ์
โค้ดตัวอย่าง Java ต่อไปนี้แสดงวิธีการส่งอีเมล Outlook อย่างซิงโครนัส
// For complete examples and data files, please go to https://github.com/aspose-email/Aspose.Email-for-Java

// Declare msg as MailMessage instance
MailMessage msg = new MailMessage();

// Create an instance of SmtpClient class
SmtpClient client = new SmtpClient();

// Specify your mailing host server, Username, Password, Port # and Security option
client.setHost("mail.server.com");
client.setUsername("username");
client.setPassword("password");
client.setPort(587);
client.setSecurityOptions(SecurityOptions.SSLExplicit);

try {
    // Client.Send will send this message
    client.send(msg);
    System.out.println("Message sent");
} catch (Exception ex) {
    System.err.println(ex);
}
ส่งอีเมลแบบอะซิงโครนัส
บางครั้งคุณอาจต้องการส่งเมลแบบอะซิงโครนัส ตัวอย่างเช่น หากคุณส่งเมลจำนวนมากผ่านแอปพลิเคชันของคุณ วิธีการซิงโครนัสอาจใช้ไม่ได้ ในกรณีเช่นนี้คุณสามารถใช้ beginSend. ส่วน beginSend เมธอดของ SmtpClient คลาสส่งข้อความอีเมลไปยังเซิร์ฟเวอร์ SMTP เพื่อการจัดส่ง เมธอดนี้ไม่บล็อกเธรดที่เรียกใช้และทำให้ผู้เรียกสามารถส่งออบเจ็กต์ไปยังเมธอดที่ถูกเรียกเมื่อการดำเนินการเสร็จสิ้น เพื่อส่งอีเมล Outlook อย่างอะซิงโครนัสใน Java ให้ทำตามขั้นตอนต่อไปนี้:
- สร้างอินสแตนซ์ของ MailMessage คลาสและใช้คุณสมบัติต่าง ๆ ของมัน
- สร้างอินสแตนซ์ของ SmtpClient คลาสและระบุโฮสต์, พอร์ต, ชื่อผู้ใช้, และรหัสผ่าน
- สร้างอินสแตนซ์ที่กำหนดโดยผู้ใช้ที่จะถูกส่งไปยังเมธอดและเรียกใช้เมื่อการทำงานแบบอะซิงโครนัสเสร็จสิ้น
- ส่งข้อความโดยใช้ beginSend เมธอดของ SmtpClient คลาสและส่งผ่าน MailMessage อินสแตนซ์และอินสแตนซ์ที่กำหนดโดยผู้ใช้ในนั้นพร้อมกับฟังก์ชัน callback ที่จะถูกเรียกเมื่อการดำเนินการเสร็จสมบูรณ์
เพื่อรับการแจ้งเตือนเมื่ออีเมลถูกส่งหรือการดำเนินการถูกยกเลิก ฟังก์ชัน callback ที่ส่งไปยัง beginSend เมธอดถูกเรียกใช้ หลังจากเรียก SmtpClient คลาส beginSend วิธีการไม่จำเป็นต้องรอให้ข้อความอีเมลถูกส่งสำเร็จเต็มที่ เราสามารถเรียกวิธีการอื่นได้ beginSend พร้อมกัน. เมื่ออีเมลถูกส่งโดยใช้ beginSend เมธอด, โค้ดตัวอย่างพิมพ์ข้อความ ("Message Sent"). โปรแกรม Java หรือโค้ดตัวอย่างต่อไปนี้แสดงวิธีส่งอีเมลแบบอะซิงโครนัส.
// For complete examples and data files, please go to https://github.com/aspose-email/Aspose.Email-for-Java

public static void run() {
    sendMail();
}

static SmtpClient getSmtpClient() {
    SmtpClient client = new SmtpClient();
    client.setHost("mail.server.com");
    // Specify your mail Username, Password, Port # and security option
    client.setUsername("username");
    client.setPassword("password");
    client.setPort(587);
    client.setSecurityOptions(SecurityOptions.SSLExplicit);
    return client;
}

static void sendMail() {
    try {

        // Declare msg as MailMessage instance
        MailMessage msg = new MailMessage("sender@gmail.com", "receiver@gmail.com", "Test subject", "Test body");
        SmtpClient client = getSmtpClient();
        Object state = new Object();
        IAsyncResult ar = client.beginSend(msg, callback, state);
        // If the user canceled the send, and mail hasn't been sent yet,
        client.cancelAsyncOperation(ar);

        msg.dispose();
        System.out.println("Goodbye.");
    } catch (Exception ex) {
        System.err.println(ex);
    }
}

static AsyncCallback callback = new AsyncCallback() {
    public void invoke(IAsyncResult ar) {
        IAsyncResultExt task = null;
        if (ar instanceof IAsyncResult)
            task = (IAsyncResultExt) ar;

        if (task != null && task.isCanceled()) {
            System.out.println("Send canceled.");
        }

        if (task != null && task.getErrorInfo() != null) {
            System.out.println(task.getErrorInfo());
        } else {
            System.out.println("Message Sent.");
        }
    }
};
ส่งข้อความที่เก็บไว้จากดิสก์
ไฟล์ EML (ไฟล์อีเมลของ Outlook Express) มีส่วนหัวอีเมล, เนื้อความข้อความ, และไฟล์แนบ. Aspose.Email ช่วยให้นักพัฒนาสามารถทำงานกับไฟล์ EML ได้หลายวิธี. บทความนี้แสดงวิธีโหลดไฟล์ EML จากดิสก์และส่งเป็นอีเมลด้วย SMTP. คุณสามารถโหลดไฟล์ .eml จากดิสก์หรือสตรีมเข้าสู่ MailMessage คลาสและส่งข้อความอีเมลโดยใช้ SmtpClient คลาส. เมธอด MailMessage คลาสเป็นคลาสหลักสำหรับสร้างข้อความอีเมลใหม่, โหลดไฟล์ข้อความอีเมลจากดิสก์หรือสตรีมและบันทึกข้อความ. โค้ดตัวอย่าง Java ต่อไปนี้แสดงวิธีส่งข้อความที่เก็บไว้จากดิสก์.
// For complete examples and data files, please go to https://github.com/aspose-email/Aspose.Email-for-Java

// Load an EML file in MailMessage class
MailMessage message = MailMessage.load(dataDir + "test.eml");

// Send this message using SmtpClient
SmtpClient client = new SmtpClient("host", "username", "password");

try {
    client.send(message);
} catch (Exception ex) {
    System.out.println(ex.getMessage());
}
การส่งอีเมลข้อความธรรมดา
ตัวอย่างโปรแกรมด้านล่างแสดงวิธีส่งอีเมลข้อความธรรมดา. Body คุณสมบัติ, เป็นคุณสมบัติของ MailMessage คลาส, ใช้ระบุเนื้อหาข้อความธรรมดของส่วนข้อความ. เพื่อส่งอีเมลข้อความธรรมดา, ปฏิบัตตามขั้นตอนต่อไปนี้:
- สร้างอินสแตนซ์ของ MailMessage คลาส.
- ระบุที่อยู่อีเมลผู้ส่งและผู้รับใน MailMessage อินสแตนซ์
- ระบุ Body เนื้อหา, ใช้สำหรับข้อความแบบข้อความธรรมดา.
- สร้างอินสแตนซ์ของ SmtpClient คลาสและส่งอีเมล.
โค้ดตัวอย่างต่อไปนี้แสดงวิธีการส่งอีเมลข้อความธรรมดา.
// For complete examples and data files, please go to https://github.com/aspose-email/Aspose.Email-for-Java

// Create an instance of the MailMessage class
MailMessage message = new MailMessage();

// Set From field, To field and Plain text body
message.setFrom(MailAddress.to_MailAddress("sender@sender.com"));
message.getTo().add("receiver@receiver.com");
message.setBody("This is Plain Text Body");

// Create an instance of the SmtpClient class
SmtpClient client = new SmtpClient();

// And Specify your mailing host server, Username, Password and Port
client.setHost("smtp.server.com");
client.setUsername("Username");
client.setPassword("Password");
client.setPort(25);

try {
    // Client.Send will send this message
    client.send(message);
    System.out.println("Message sent");
} catch (Exception ex) {
    System.err.println(ex);
}
การส่งอีเมลด้วยเนื้อหา HTML
ตัวอย่างโปรแกรมด้านล่างแสดงวิธีการส่งอีเมล HTML อย่างง่าย. HtmlBody, เป็นคุณสมบัติของ MailMessage คลาส, ใช้ระบุเนื้อหา HTML ของส่วนข้อความ. เพื่อส่งอีเมล HTML อย่างง่าย, ปฏิบัตตามขั้นตอนต่อไปนี้:
- สร้างอินสแตนซ์ของ MailMessage คลาส.
- ระบุที่อยู่อีเมลผู้ส่งและผู้รับใน MailMessage อินสแตนซ์
- ระบุ HtmlBody เนื้อหา.
- สร้างอินสแตนซ์ของ SmtpClient คลาสและส่งอีเมลโดยใช้ send เมธอด.
สำหรับบทความนี้, เนื้อหา HTML ของอีเมลเป็นพื้นฐาน:
This is the HTML body อีเมล HTML ส่วนใหญ่จะซับซ้อนมากกว่า. โค้ดตัวอย่างโปรแกรม Java ต่อไปนี้แสดงวิธีส่งอีเมลพร้อมส่วนเนื้อหา HTML.public static void run() {
// Declare msg as MailMessage instance
MailMessage msg = new MailMessage();
// Use MailMessage properties like specify sender, recipient, message and HtmlBody
msg.setFrom(MailAddress.to_MailAddress("newcustomeronnet@gmail.com"));
msg.setTo(MailAddressCollection.to_MailAddressCollection("asposetest123@gmail.com"));
msg.setSubject("Test subject");
msg.setHtmlBody("<html><body>This is the HTML body</body></html>");
SmtpClient client = getSmtpClient();
try {
// Client will send this message
client.send(msg);
System.out.println("Message sent");
} catch (Exception ex) {
System.err.println(ex);
}
System.out.println("Email sent with HTML body.");
}
private static SmtpClient getSmtpClient() {
SmtpClient client = new SmtpClient("smtp.gmail.com", 587, "your.email@gmail.com", "your.password");
client.setSecurityOptions(SecurityOptions.Auto);
return client;
}
การส่งอีเมลพร้อมข้อความสำรอง
ตัวอย่างโปรแกรมด้านล่างแสดงวิธีส่งอีเมล HTML อย่างง่ายพร้อมเนื้อหาแบบสำรอง. ใช้ AlternateView คลาสเพื่อระบุสำเนาข้อความอีเมลในรูปแบบต่างๆ. ตัวอย่างเช่น หากคุณส่งข้อความเป็น HTML, คุณอาจต้องการให้เวอร์ชันข้อความธรรมดาสำหรับผู้รับที่ใช้โปรแกรมอ่านอีเมลที่ไม่รองรับ HTML. หรือหากคุณส่งจดหมายข่าว, คุณอาจต้องการให้สำเนาข้อความธรรมดาสำหรับผู้รับที่เลือกรับเวอร์ชันข้อความธรรมดา. เพื่อส่งอีเมลพร้อมข้อความสำรอง, ปฏิบัติตามขั้นตอนต่อไปนี้:
- สร้างอินสแตนซ์ของ MailMessage คลาส.
- ระบุที่อยู่อีเมลผู้ส่งและผู้รับใน MailMessage อินสแตนซ์
- สร้างอินสแตนซ์ของ AlternateView คลาส.
นี่จะสร้างมุมมองสำรองสำหรับข้อความอีเมลโดยใช้เนื้อหาที่ระบุในสตริง.
- เพิ่มอินสแตนซ์ของ AlternateView คลาสไปยัง MailMessage อ็อบเจ็กต์.
- สร้างอินสแตนซ์ของ SmtpClient คลาสและส่งอีเมลโดยใช้ send เมธอด.
โค้ดตัวอย่างต่อไปนี้แสดงวิธีการส่งอีเมลพร้อมข้อความสำรอง.
// For complete examples and data files, please go to https://github.com/aspose-email/Aspose.Email-for-Java

// Declare message as MailMessage instance
MailMessage message = new MailMessage();

// Creates AlternateView to view an email message using the content specified in the //String
AlternateView alternate = AlternateView.createAlternateViewFromString("Alternate Text");

// Adding alternate text
message.getAlternateViews().addItem(alternate);
การส่งอีเมลเป็นกลุ่ม
การส่งอีเมลเป็นกลุ่มหมายถึงการส่งชุดอีเมลในข้อความเดียว. เราสามารถส่งชุดอีเมลโดยใช้ของ SmtpClient คลาส send เมธอดโอเวอร์โหลดที่รับ MailMessageCollection คลาส:
- สร้างอินสแตนซ์ของ SmtpClient คลาส.
- ระบุ SmtpClient คุณสมบัติของคลาส.
- สร้างอินสแตนซ์ของ MailMessage คลาส.
- ระบุผู้ส่ง, ผู้รับ, เรื่องอีเมลและข้อความในอินสแตนซ์ของ MailMessage คลาส.
- ทำซ้ำสองขั้นตอนข้างต้นอีกครั้ง หากคุณต้องการส่งอีเมลไปยังคนอื่น.
- สร้างอินสแตนซ์ของ MailMessageCollection คลาส.
- เพิ่มอินสแตนซ์ของ MailMessage คลาสในออบเจกต์ของ MailMessageCollection คลาส.
- ตอนนี้ส่งอีเมลของคุณโดยใช้ SmtpClient คลาส send เมธอดโดยส่งออบเจกต์ instance ของ MailMessageCollection คลาสในนั้น.
โค้ดตัวอย่างต่อไปนี้แสดงวิธีส่งอีเมลเป็นกลุ่ม.
// For complete examples and data files, please go to https://github.com/aspose-email/Aspose.Email-for-Java

// Create SmtpClient as client and specify server, port, user name and password
SmtpClient client = new SmtpClient("mail.server.com", 25, "Username", "Password");

// Create instances of MailMessage class and Specify To, From, Subject and Message
MailMessage message1 = new MailMessage("msg1@from.com", "msg1@to.com", "Subject1", "message1, how are you?");
MailMessage message2 = new MailMessage("msg1@from.com", "msg2@to.com", "Subject2", "message2, how are you?");
MailMessage message3 = new MailMessage("msg1@from.com", "msg3@to.com", "Subject3", "message3, how are you?");

// Create an instance of MailMessageCollection class
MailMessageCollection manyMsg = new MailMessageCollection();
manyMsg.addItem(message1);
manyMsg.addItem(message2);
manyMsg.addItem(message3);

// Use client.BulkSend function to complete the bulk send task
try {
    // Send Message using BulkSend method
    client.send(manyMsg);
    System.out.println("Message sent");
} catch (Exception ex) {
    System.err.println(ex);
}
รับข้อมูลเกี่ยวกับข้อความที่ส่งเป็นกลุ่ม
เมื่อคุณส่งข้อความเป็นกลุ่ม, คุณสามารถรับข้อมูลเกี่ยวกับจำนวนข้อความที่ส่งสำเร็จและรายการของข้อความเหล่านั้น. SucceededSending เหตุการณ์นี้ใช้เพื่อวัตถุประสงค์นี้.
ตัวอย่างโค้ดด้านล่างแสดงวิธีรับข้อมูลเกี่ยวกับจำนวนข้อความที่ส่งสำเร็จ:
try (SmtpClient client = new SmtpClient(host, SecurityOptions.Auto)) {
    final AtomicInteger messageCount = new AtomicInteger(0);

    client.setSucceededSending(new EventHandler<MailMessageEventArgs>() {
        public void invoke(Object sender, MailMessageEventArgs eventArgs) {
            System.out.println("The message " + eventArgs.getMessage().getSubject() + " was successfully sent.");
            messageCount.incrementAndGet();
        }
    });

    client.send(messages);

    System.out.println(messageCount + " messages were successfully sent.");
}
การส่งอีเมลด้วย MultiConnection
SmtpClient ให้การ UseMultiConnection คุณสมบัติที่สามารถใช้สร้างการเชื่อมต่อหลาย ๆ ครั้งสำหรับงานที่มีภาระหนัก. คุณยังสามารถตั้งค่าจำนวนการเชื่อมต่อที่จะใช้ในโหมดหลายการเชื่อมต่อโดยใช้ SmtpClient.ConnectionsQuantity. โค้ดตัวอย่างต่อไปนี้สาธิตการใช้โหมดหลายการเชื่อมต่อสำหรับการส่งหลายข้อความ.
// For complete examples and data files, please go to https://github.com/aspose-email/Aspose.Email-for-Java

SmtpClient smtpClient = new SmtpClient();
smtpClient.setHost("<HOST>");
smtpClient.setUsername("<USERNAME>");
smtpClient.setPassword("<PASSWORD>");
smtpClient.setPort(587);
smtpClient.setSupportedEncryption(EncryptionProtocols.Tls);
smtpClient.setSecurityOptions(SecurityOptions.SSLExplicit);

List<MailMessage> messages = new ArrayList<MailMessage>();
for (int i = 0; i < 20; i++) {
    MailMessage message = new MailMessage("<EMAIL ADDRESS>", "<EMAIL ADDRESS>", "Test Message - " + UUID.randomUUID().toString(),
            "SMTP Send Messages with MultiConnection");
    messages.add(message);
}

smtpClient.setConnectionsQuantity(5);
smtpClient.setUseMultiConnection(MultiConnectionMode.Enable);
smtpClient.send(messages);
การส่งข้อความเป็น TNEF
อีเมล TNEF มีรูปแบบพิเศษที่อาจสูญหายหากส่งด้วย API มาตรฐาน Aspose.Email ให้ความสามารถในการส่งอีเมลเป็น TNEF เพื่อรักษารูปแบบไว้ ส่วนที่ SmtpClient คลาส UseTnef คุณสมบัติสามารถตั้งค่าเพื่อส่งอีเมลในรูปแบบ TNEF ตัวอย่างโค้ดต่อไปนี้แสดงวิธีการส่งข้อความเป็น TNEF
// For complete examples and data files, please go to https://github.com/aspose-email/Aspose.Email-for-Java

String emlFileName = dataDir + "Message.eml"; // A TNEF Email

// Load from eml
MailMessage eml1 = MailMessage.load(emlFileName, new EmlLoadOptions());
eml1.setFrom(MailAddress.to_MailAddress("somename@gmail.com"));
eml1.getTo().clear();
eml1.getTo().addItem(new MailAddress("first.last@test.com"));
eml1.setSubject("With PreserveTnef flag during loading");
eml1.setDate(new Date());
SmtpClient client = new SmtpClient("smtp.gmail.com", 587, "somename", "password");
client.setSecurityOptions(SecurityOptions.Auto);
client.setUseTnef(true); // Use this flag to send as TNEF
client.send(eml1);
การส่งคำขอประชุม
Microsoft Outlook มีฟังก์ชันปฏิทินรวมถึงการจัดการอีเมล เมื่อผู้ใช้เปิดอีเมลที่มีคำเชิญเข้าร่วมกิจกรรม Outlook จะถามให้ผู้ใช้ยอมรับหรือปฏิเสธคำเชิญ Aspose.Email ให้ผู้พัฒนาสามารถเพิ่มฟังก์ชันปฏิทินเข้าในอีเมลของคุณ
ส่งคำขอผ่านอีเมล
เพื่อส่งคำขอการประชุมผ่านอีเมล ให้ทำตามขั้นตอนต่อไปนี้:
- สร้างอินสแตนซ์ของ MailMessage คลาส.
- ระบุที่อยู่ผู้ส่งและผู้รับโดยใช้อินสแตนซ์ของ MailMessage คลาส.
- เริ่มต้นอินสแตนซ์ของ Appointment คลาสและส่งค่าของมัน
- ระบุสรุปและรายละเอียดใน Calendar อินสแตนซ์
- เพิ่ม Calendar) ให้กับ MailMessage อินสแตนซ์และส่งค่าให้ Appointment อินสแตนซ์
|คำขอประชุม iCalendar ส่งทางอีเมล| | :- | |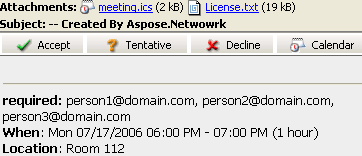 | ตัวอย่างโค้ดต่อไปนี้แสดงวิธีส่งคำขอผ่านอีเมล
// For complete examples and data files, please go to https://github.com/aspose-email/Aspose.Email-for-Java

// Create an instance of the MailMessage class
MailMessage msg = new MailMessage();

// Set the sender, recipient, who will receive the meeting request. Basically, the recipient is the same as the meeting attendees
msg.setFrom(MailAddress.to_MailAddress("newcustomeronnet@gmail.com"));
msg.setTo(MailAddressCollection.to_MailAddressCollection("person1@domain.com, person2@domain.com, person3@domain.com, asposetest123@gmail.com"));

// Create Appointment instance
Calendar cal = Calendar.getInstance();
cal.set(2015, Calendar.JULY, 17, 13, 0, 0);
Date startDate = cal.getTime();
cal.set(2015, Calendar.JULY, 17, 14, 0, 0);
Date endDate = cal.getTime();
Appointment app = new Appointment("Room 112", startDate, endDate, msg.getFrom(), msg.getTo());
app.setSummary("Release Meetting");
app.setDescription("Discuss for the next release");

// Add appointment to the message and Create an instance of SmtpClient class
msg.addAlternateView(app.requestApointment());
SmtpClient client = getSmtpClient();

try {
    // Client.Send will send this message
    client.send(msg);
    System.out.println("Message sent");
} catch (Exception ex) {
    System.err.println(ex);
}
การสนับสนุน iCalendar สำหรับ IBM Lotus Notes
ฟีเจอร์ปฏิทินของ Aspose.Email อิงตามมาตรฐาน iCalendar ซึ่งเป็นมาตรฐานการแลกเปลี่ยนข้อมูลปฏิทิน (RFC 2445 หรือ RFC2445 Syntax Reference) ดังนั้นจึงรองรับไม่เพียง Microsoft Outlook แต่รวมถึง IBM Lotus Notes ด้วย เพื่อส่งคำขอการประชุมใน Lotus Notes ให้ทำตามขั้นตอนเดียวกันตามที่กล่าวข้างต้น
ส่งต่ออีเมลโดยใช้ SMTP Client
การส่งต่ออีเมลด้วย SMTP client
การส่งต่ออีเมลเป็นแนวปฏิบัติปกติในการสื่อสารดิจิทัลประจำวัน อีเมลที่ได้รับสามารถส่งต่อไปยังผู้รับเฉพาะได้โดยไม่ต้องแชร์กับผู้ส่งต้นฉบับ Aspose.Email API SmtpClient ให้ความสามารถในการส่งต่ออีเมลไปยังผู้รับเฉพาะของมัน ส่งต่อ เมธอดสามารถใช้เพื่อส่งต่ออีเมลที่ได้รับหรือบันทึกไปยังผู้รับที่ต้องการตามที่แสดงในบทความนี้ ตัวอย่างโค้ดต่อไปนี้แสดงวิธีส่งต่ออีเมลโดยใช้ SMTP Client
// For complete examples and data files, please go to https://github.com/aspose-email/Aspose.Email-for-Java

// Create an instance of SmtpClient class
SmtpClient client = new SmtpClient();

// Specify your mailing host server, Username, Password, Port and SecurityOptions
client.setHost("mail.server.com");
client.setUsername("username");
client.setPassword("password");
client.setPort(587);
client.setSecurityOptions(SecurityOptions.SSLExplicit);
MailMessage message = MailMessage.load(dataDir + "Message.eml");
client.forward("Recipient1@domain.com", "Recipient2@domain.com", message);
การส่งต่ออีเมลโดยไม่ใช้ MailMessage
API ยังรองรับการส่งต่อข้อความ EML โดยไม่ต้องโหลดเข้าก่อน MailMessage. สิ่งนี้มีประโยชน์ในกรณีที่ทรัพยากรระบบโดยเฉพาะหน่วยความจำมีจำกัด
// For complete examples and data files, please go to https://github.com/aspose-email/Aspose.Email-for-Java

String host = "mail.server.com";
String username = "username";
String password = "password";
int smtpPort = 587;
String sender = "Sender@domain.com";
MailAddressCollection recipients = new MailAddressCollection();
recipients.add("recepient1@domain.com, recepient2@domain.com");

try (SmtpClient client = new SmtpClient(host, smtpPort, username, password, SecurityOptions.Auto)) {
    String fileName = "test.eml";
    try (FileInputStream fs = new FileInputStream(new File(dataDir + fileName))) {
        client.forward(sender, recipients, fs);
    }
}
การทำ Mail Merge
Mail merge ช่วยให้คุณสร้างและส่งอีเมลหลายฉบับที่คล้ายกัน เนื้อหาหลักของอีเมลจะเหมือนกัน แต่เนื้อหาสามารถปรับให้เป็นส่วนบุคคลได้ โดยทั่วไปรายละเอียดติดต่อของผู้รับ (ชื่อ, นามสกุล, บริษัท ฯลฯ) จะใช้เพื่อปรับเนื้อหาอีเมล
|ภาพอธิบายการทำงานของ mail merge:| | :- | |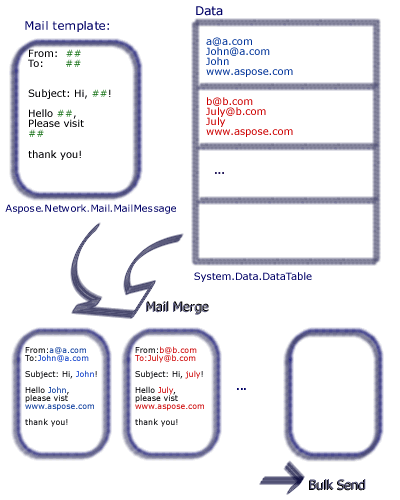 | Aspose.Email ให้ผู้พัฒนาตั้งค่า mail merge ที่รวมข้อมูลจากแหล่งข้อมูลหลายรูปแบบ
เพื่อทำการรวมจดหมายด้วย Aspose.Email ให้ทำตามขั้นตอนต่อไปนี้:
- สร้างฟังก์ชันด้วยลายเซ็นชื่อ
- สร้างอินสแตนซ์ของ MailMessage คลาส.
- ระบุผู้ส่ง, ผู้รับ, เรื่อง, และเนื้อหา
- สร้างลายเซ็นสำหรับส่วนท้ายของอีเมล
- สร้างอินสแตนซ์ของ TemplateEngine คลาสและส่งต่อให้ MailMessage อินสแตนซ์
- รับลายเซ็นใน TemplateEngine อินสแตนซ์
- สร้างอินสแตนซ์ของ DataTable คลาส.
- เพิ่มคอลัมน์ Receipt, FirstName และ LastName เป็นแหล่งข้อมูลใน DataTable คลาส.
- สร้างอินสแตนซ์ของ DataRow คลาส.
- ระบุที่อยู่ผู้รับ, ชื่อและนามสกุลใน DataRow อ็อบเจ็กต์.
- สร้างอินสแตนซ์ของ MailMessageCollection คลาส
- ระบุ TemplateEngine และ DataTable อินสแตนซ์ใน MailMessageCollection อินสแตนซ์
- สร้างอินสแตนซ์ของ SmtpClient คลาสและระบุเซิร์ฟเวอร์, พอร์ต, ชื่อผู้ใช้, และรหัสผ่าน
- ส่งอีเมลโดยใช้ SmtpClient คลาส send เมธอด.
ในตัวอย่างด้านล่าง #FirstName# หมายถึง DataTable คอลัมน์ที่ค่าถูกตั้งโดยผู้ใช้ ตัวอย่างโค้ดต่อไปนี้แสดงวิธีการทำ Mail Merge
// For complete examples and data files, please go to https://github.com/aspose-email/Aspose.Email-for-Java
public static void run() {
// The path to the File directory.
String dstEmail = dataDir + "EmbeddedImage.msg";
// Create a new MailMessage instance
MailMessage msg = new MailMessage();
// Add subject and from address
msg.setSubject("Hello, #FirstName#");
msg.setFrom(MailAddress.to_MailAddress("sender@sender.com"));
// Add email address to send email also Add mesage field to HTML body
msg.getTo().add("your.email@gmail.com");
String htmlBody = "Your message here/r/n" + "Thank you for your interest in <STRONG>Aspose.Email</STRONG>.";
// Use GetSignment as the template routine, which will provide the same signature
htmlBody += "<br><br>Have fun with it.<br><br>#GetSignature()#";
msg.setHtmlBody(htmlBody);
// Create a new TemplateEngine with the MSG message, Register GetSignature routine. It will be used in MSG.
TemplateEngine engine = new TemplateEngine(msg);
engine.registerRoutine("GetSignature", new TemplateRoutine() {
public Object invoke(Object[] args) {
return getSignature(args);
}
});
// Create an instance of DataTable and Fill a DataTable as data source
DataTable dt = new DataTable();
dt.getColumns().add("Receipt");
dt.getColumns().add("FirstName");
dt.getColumns().add("LastName");
DataRow dr;
dr = dt.newRow();
dr.set("Receipt", "Nancy<Nancy@somedomain.com>");
dr.set("FirstName", "Nancy");
dr.set("LastName", "Doe");
dt.getRows().add(dr);
dr = dt.newRow();
dr.set("Receipt", "Andrew<Andrew@somedomain.com>");
dr.set("FirstName", "Andrew");
dr.set("LastName", "Doe");
dt.getRows().add(dr);
dr = dt.newRow();
dr.set("Receipt", "Janet<Janet@somedomain.com>");
dr.set("FirstName", "Janet");
dr.set("LastName", "Doe");
dt.getRows().add(dr);
MailMessageCollection messages;
try {
// Create messages from the message and datasource.
messages = engine.instantiate(dt);
// Create an instance of SmtpClient and specify server, port, username and password
SmtpClient client = new SmtpClient("smtp.gmail.com", 587, "your.email@gmail.com", "your.password");
client.setSecurityOptions(SecurityOptions.Auto);
// Send messages in bulk
client.send(messages);
} catch (MailException ex) {
System.err.println(ex);
}
catch (SmtpException ex) {
System.err.println(ex);
}
System.out.println("Message sent after performing mail merge.");
}
// Template routine to provide signature
static Object getSignature(Object[] args) {
return "Aspose.Email Team<br>Aspose Ltd.<br>" + new Date().toString();
}
การทำ Mail Merge แบบแถวต่อแถว
ผู้ใช้สามารถรวมแถวข้อมูลแต่ละแถวเพื่อให้ได้ข้อมูลที่สมบูรณ์และพร้อมใช้งาน MailMessage อ็อบเจ็กต์. TemplateEngine.merge เมธอดสามารถใช้เพื่อทำการรวมเมลแบบแถวต่อแถว
// Create message from the data in current row.
MailMessage message = engine.merge(currentRow);