Using XPS graphic utilities | Java
How to easily produce basic shapes in XPS
The XPS specification defines graphic primitive elements that can be used to compose any complex shapes. Aspose.Page for Java provides classes encapsulating these elements. However, creating even relatively simple shapes, such as a circular sector or segment, or a regular n-gon inscribed in or circumscribed around a circle, can be a bit tedious. Even drawing a circle or an ellipse is not as straightforward as it could be. That is why Aspose.Page also offers a set of utility methods to help save time when working on these tasks.
In the example below, we use all available shape utilities. It is important to note that each of these utility methods returns an object of XpsPathGeometry, which can then be used to create XPS paths. And for these paths, you can specify appearance properties - brushes, stroke pattern, opacity, etc.
 1// Using shape utilities for adding shapes to XPS document.
 2
 3String outputFileName = "UseShapeUtilsXPS_out.xps";
 4
 5// Create new XPS Document
 6XpsDocument doc = new XpsDocument();
 7try {
 8    // Set first page's size.
 9    doc.getPage().setWidth(650f);
10    doc.getPage().setHeight(240f);
11
12    // Draw a circle with center (120, 120) and radius 100.
13    XpsPath path = doc.createPath(doc.getUtils().createCircle(new java.awt.geom.Point2D.Float(120f, 120f), 100f));
14    path.setFill(doc.createSolidColorBrush(doc.createColor(0, 255, 0)));
15    doc.add(path);
16
17    // Inscribe a regular pentagon in the circle.
18    path = doc.createPath(doc.getUtils().createRegularInscribedNGon(5, new java.awt.geom.Point2D.Float(120f, 120f), 100f));
19    path.setFill(doc.createSolidColorBrush(doc.createColor(255, 0, 0)));
20    doc.add(path);
21
22    // Circumscribe a regular hexagon around the circle.
23    path = doc.createPath(doc.getUtils().createRegularCircumscribedNGon(6, new java.awt.geom.Point2D.Float(120f, 120f), 100f));
24    path.setStroke(doc.createSolidColorBrush(doc.createColor(255, 0, 255)));
25    path.setStrokeThickness(3f);
26    doc.add(path);
27
28    // Draw a sector of the circle centered at (340, 120), starting at -45 degrees and ending at +45 degrees.
29    path = doc.createPath(doc.getUtils().createPieSlice(new java.awt.geom.Point2D.Float(340f, 120f), 100f, -45f, 45f));
30    path.setStroke(doc.createSolidColorBrush(doc.createColor(255, 0, 0)));
31    path.setStrokeThickness(5f);
32    doc.add(path);
33
34    // Draw a segment of the circle centered at (340, 120), starting at -45 degrees and ending at +45 degrees.
35    path = doc.createPath(doc.getUtils().createCircularSegment(new java.awt.geom.Point2D.Float(340f, 120f), 100f, -45f, 45f));
36    path.setFill(doc.createSolidColorBrush(doc.createColor(0, 0, 0)));
37    doc.add(path);
38
39    // Draw a rectangle with the top left vertex (530, 20), width 100 units and height 200 units.
40    path = doc.createPath(doc.getUtils().createRectangle(new Rectangle2D.Float(530f, 20f, 100f, 200f)));
41    path.setStroke(doc.createSolidColorBrush(doc.createColor(255, 0, 0)));
42    doc.add(path);
43
44    // Draw an ellipse with center (580, 120) and radii 50 and 100.
45    path = doc.createPath(doc.getUtils().createEllipse(new java.awt.geom.Point2D.Float(580f, 120f), 50f, 100f));
46    path.setFill(doc.createSolidColorBrush(doc.createColor(255, 255, 0)));
47    doc.add(path);
48
49    doc.save(getOutputDir() + outputFileName);
50} finally {
51    // nothing to dispose explicitly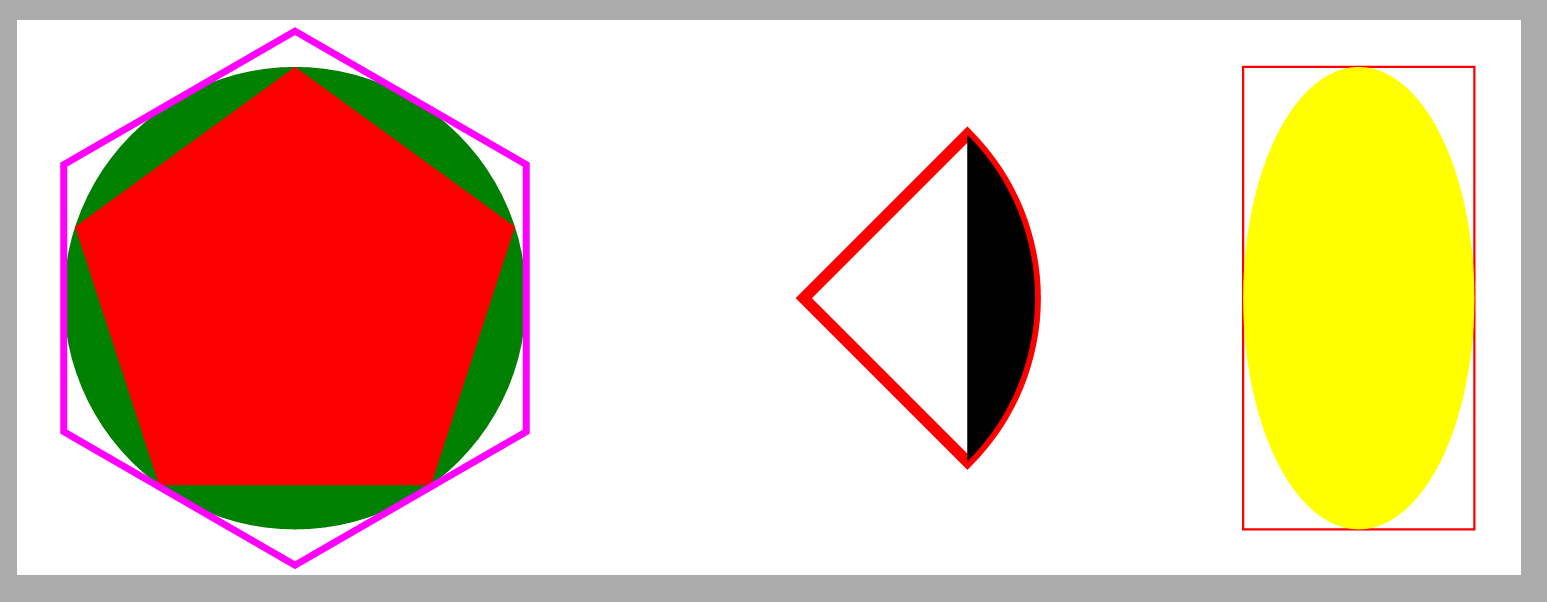
52}We start by creating a new XPS document and then adjusting the size of the first page. The first shape we add to the page is a solid green circle specified by its center and radius. Next, we draw an unfilled red regular pentagon inscribed in that circle. Then comes a regular hexagon stroked with magenta and circumscribed around the circle.
To the right, we draw a red circular sector (or a “pie slice”) between -45 and +45 degrees, followed by a black circular segment with the same parameters on top of the sector.
The last part of the drawing includes a red rectangle (specified by its top left corner and dimensions) and a yellow ellipse (specified by its center and radii) inscribed in the rectangle. In this case, we handle the inscription “by hand”.
Here is the intended output in the saved XPS file:
How to easily place an image on an XPS page
When using primitives defined by the XPS specification, placing an image on a page involves two steps:
- Adding a rectangular path (image box) to fill with the image;
- Applying an image brush to the image box, where you need to specify a view box and a viewport. Typically, you will need to know the resolution and the size in pixels of your image to accurately provide these parameters.
But fortunately, there is a convenient method among XPS graphic utilities in the Aspose.Page API for Java that can handle most of the work for you. It also offers you common fit modes. Let’s look at the following example:
 1// Using image utilities for adding images to XPS document.
 2
 3String outputFileName = "UseImageUtilsXPS_out.xps";
 4
 5// Create new XPS Document
 6XpsDocument doc = new XpsDocument();
 7try {
 8    // Set first page's size.
 9    doc.getPage().setWidth(540f);
10    doc.getPage().setHeight(220f);
11
12    // Draw the image box.
13    java.awt.geom.Rectangle2D.Float imageBox = new java.awt.geom.Rectangle2D.Float(10f, 10f, 200f, 200f);
14    XpsPath path = doc.addPath(doc.getUtils().createRectangle(imageBox));
15    path.setStroke(doc.createSolidColorBrush(doc.createColor(0, 0, 0)));
16    // Add an image to fit width.
17    path = doc.getUtils().createImage(getDataDir() + "R08LN_NN.jpg", imageBox, com.aspose.xps.ImageMode.FitToWidth);
18    // Prevent tiling.
19    ((XpsImageBrush)path.getFill()).setTileMode(com.aspose.xps.XpsTileMode.None);
20    doc.add(path);
21
22    // Add other images using utils
23    doc.add(doc.getUtils().createImage(getDataDir() + "R08LN_NN.jpg", new Rectangle2D.Float(220f, 10f, 200f, 100f), com.aspose.xps.ImageMode.FitToHeight));
24    doc.add(doc.getUtils().createImage(getDataDir() + "R08LN_NN.jpg", new Rectangle2D.Float(430f, 10f, 100f, 200f), com.aspose.xps.ImageMode.FitToBox));
25
26    // Save resultant XPS document
27    doc.save(getOutputDir() + outputFileName);
28} finally {
29    // nothing to dispose explicitly here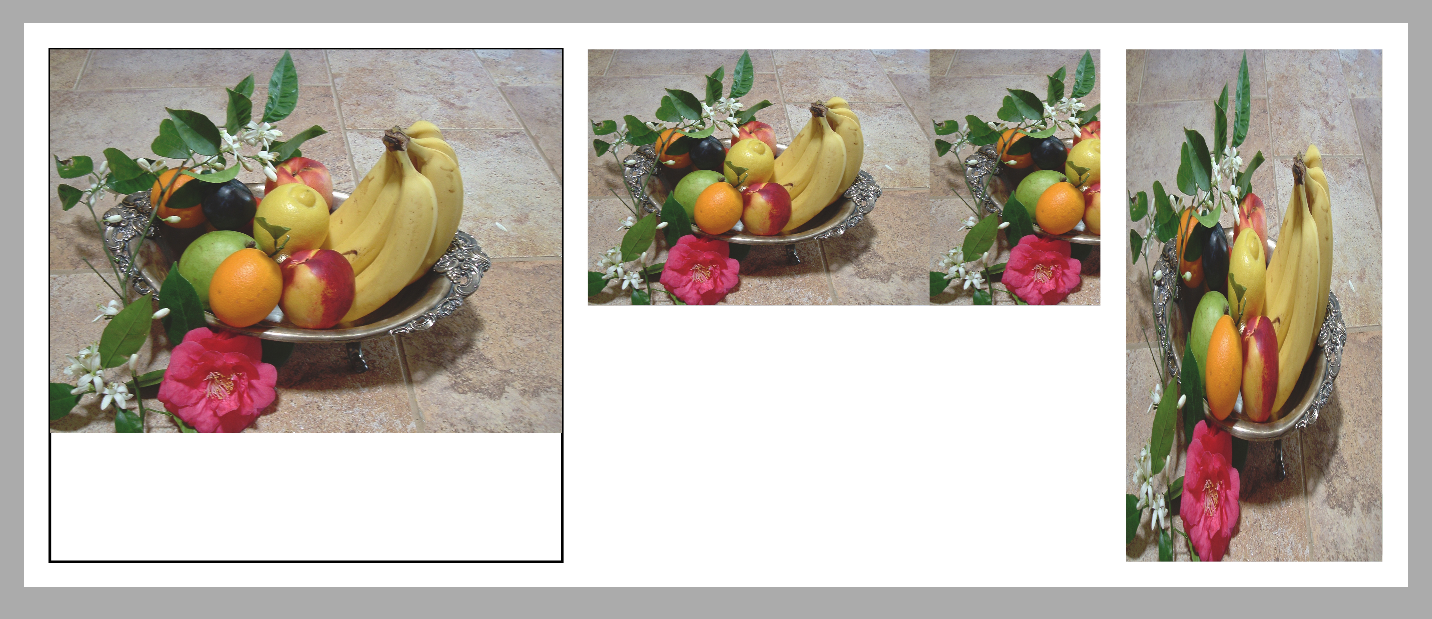
30}Again, we begin with a new XPS document and resize the first page. It is worth mentioning here that by default your image being used as a brush will tile across the image box in the same way as if it was used in XpsTileMode.Tile mode. However, in the first part of the example, we show how to prevent this tiling.
So, we first want the image to be displayed at coordinates (10, 10) and to fit the width of the rectangular box, which is 200 units wide and 200 units high. To better visualize the result, we first draw the box itself. Then, we proceed to create the image (which is essentially a filled path). Finally, after getting the path’s fill and casting it to
XpsImageBrush, we set the TileMode property to XpsTileMode.None.
To the right, we place the same image fitting the height of the image box. Notice the tiling effect.
Finally, we place the same image to the right once more and adjust it to fit both the height and width of the image box, resulting in some distortion of the image.
And here is the result in the saved XPS file: