创建或添加表格到PDF
创建表格
Aspose.PDF 命名空间包含名为 Table、Cell 和 Row 的类,这些类提供了在从头生成PDF文档时创建表格的功能。
可以通过创建 Table 类的对象来创建表格。
Aspose.Pdf.Table table = new Aspose.Pdf.Table();
在现有PDF文档中添加表格
要在现有PDF文件中添加表格,使用 Aspose.PDF for Java,请执行以下步骤:
-
加载源文件。
-
初始化一个表格并设置其列和行。
-
设置表格设置(我们已设置边框)。
-
填充表格。
-
将表格添加到页面。
-
保存文件。
以下代码片段展示了如何在现有的PDF文件中添加文本。
package com.aspose.pdf.examples;

import com.aspose.pdf.*;

public class ExampleAddTable {

    private static String _dataDir = "/home/admin1/pdf-examples/Samples/";

    public static void CreateTable() {
        Document doc = new Document(_dataDir + "input.pdf");
        // 初始化一个新的表格实例
        Table table = new Table();
        // 设置表格边框颜色为浅灰色
        table.setBorder(new BorderInfo(BorderSide.All, .5f, Color.getLightGray()));
        // 设置表格单元格的边框
        table.setDefaultCellBorder(new BorderInfo(BorderSide.All, .5f, Color.getLightGray()));
        // 创建一个循环来添加10行
        for (int row_count = 1; row_count < 10; row_count++) {
            // 向表格添加行
            Row row = table.getRows().add();
            // 添加表格单元格
            row.getCells().add("Column (" + row_count + ", 1)");
            row.getCells().add("Column (" + row_count + ", 2)");
            row.getCells().add("Column (" + row_count + ", 3)");
        }
        // 将表格对象添加到输入文档的第一页
        doc.getPages().get_Item(1).getParagraphs().add(table);
        // 保存包含表格对象的更新文档
        doc.save(_dataDir + "document_with_table.pdf");
    }
Aspose.PDF 表格中的 ColSpan 和 RowSpan 使用 Java
Aspose.PDF for Java 提供了 setColSpan 方法来合并表格中的列,以及 setRowSpan 方法来合并行。
我们在创建表格单元格的 Cell 对象上使用 setColSpan 或 setRowSpan 方法。应用所需属性后,创建的单元格可以添加到表格中。
public static void AddTable_RowColSpan() {
        // 加载源 PDF 文档
        Document pdfDocument = new Document();
        Page page = pdfDocument.getPages().add();

        // 初始化 Table 的新实例
        Table table = new Table();
        // 将表格边框颜色设置为 LightGray
        table.setBorder(new BorderInfo(BorderSide.All, .5f, Color.getBlack()));
        // 设置表格单元格的边框
        table.setDefaultCellBorder(new BorderInfo(BorderSide.All, .5f, Color.getBlack()));
        // 向表格添加第一行
        Row row1 = table.getRows().add();
        for (int cellCount = 1; cellCount < 5; cellCount++) {
            // 添加表格单元格
            row1.getCells().add("Test 1 " + cellCount);
        }

        // 向表格添加第二行
        Row row2 = table.getRows().add();
        row2.getCells().add("Test 2 1");
        Cell cell = row2.getCells().add("Test 2 2");
        cell.setColSpan(2);
        row2.getCells().add("Test 2 4");

        // 向表格添加第三行
        Row row3 = table.getRows().add();
        row3.getCells().add("Test 3 1");
        row3.getCells().add("Test 3 2");
        row3.getCells().add("Test 3 3");
        row3.getCells().add("Test 3 4");

        // 向表格添加第四行
        Row row4 = table.getRows().add();
        row3.getCells().add("Test 4 1");
        cell = row3.getCells().add("Test 4 2");
        cell.setRowSpan(2);
        row3.getCells().add("Test 4 3");
        row3.getCells().add("Test 4 4");

        // 向表格添加第五行
        row4 = table.getRows().add();
        row4.getCells().add("Test 5 1");
        row4.getCells().add("Test 5 3");
        row4.getCells().add("Test 5 4");

        // 将表格对象添加到输入文档的第一页
        page.getParagraphs().add(table);

        // 保存包含表格对象的更新文档
        pdfDocument.save(_dataDir + "document_with_table_out.pdf");
    }
执行以下代码的结果是下图所示的表格:

处理边框、边距和内边距
Aspose.PDF for Java 允许开发人员在 PDF 文档中创建表格。根据 Aspose.PDF 的文档对象模型,表格是段落级别的元素。
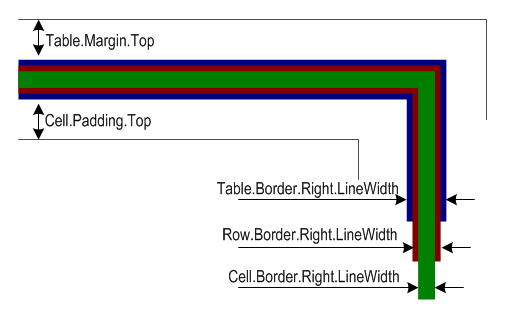
请注意,它还支持为表格设置边框样式、边距和单元格内边距的功能。在深入技术细节之前,了解边框、边距和内边距的概念非常重要,这些概念在下面的图中展示:

在上图中,您可以看到表格、行和单元格的边框重叠。使用 Aspose.PDF,可以为表格设置边距,并为单元格设置内边距。要设置单元格边距,我们必须设置单元格内边距。
边框
要设置 Table、Row 和 Cell 对象的边框,请使用 Table.setBorder、Row.setBorder 和 Cell.setBorder 方法。 Cell borders can also be set using the Table or Row class DefaultCellBorder method. All border related properties discussed above are assigned an instance of the Row class, which is created by calling its constructor. The Row class has many overloads that take almost all the parameters required to customize the border.
单元格边框也可以使用 Table 或 Row 类的 DefaultCellBorder 方法进行设置。上面讨论的所有边框相关属性都分配给 Row 类的一个实例,该实例是通过调用其构造函数创建的。Row 类有许多重载,几乎可以接受自定义边框所需的所有参数。
Margins or Padding
边距或填充
Cell padding can be managed using the Table class DefaultCellPadding method.
单元格填充可以使用 Table 类的 DefaultCellPadding 方法进行管理。 所有与填充相关的属性都分配给 MarginInfo 类的一个实例,该类接受关于 Left、Right、Top 和 Bottom 参数的信息来创建自定义边距。
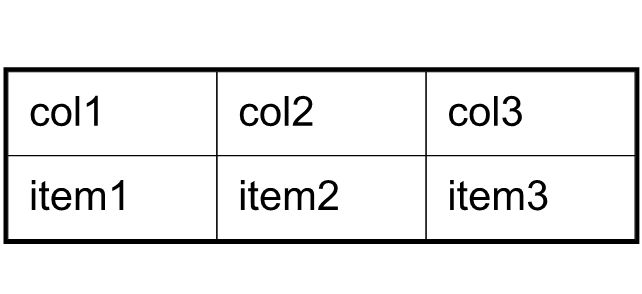
在以下示例中,单元格边框的宽度设置为 0.1 点,表格边框的宽度设置为 1 点,单元格填充设置为 5 点。

public static void MargingPadding() {
        // 通过调用其空构造函数实例化 Document 对象
        Document doc = new Document();
        Page page = doc.getPages().add();
        // 实例化一个表对象
        Table tab1 = new Table();
        // 在所需部分的段落集合中添加表
        page.getParagraphs().add(tab1);
        // 设置表格的列宽
        tab1.setColumnWidths ("50 50 50");
        // 使用 BorderInfo 对象设置默认单元格边框
        tab1.setDefaultCellBorder(new BorderInfo(BorderSide.All, 0.1F));
        // 使用另一个定制的 BorderInfo 对象设置表格边框
        tab1.setBorder (new BorderInfo(BorderSide.All, 1F));

        // 创建 MarginInfo 对象并设置其左、下、右和上边距
        MarginInfo margin = new MarginInfo();
        margin.setTop (5f);
        margin.setLeft (5f);
        margin.setRight (5f);
        margin.setBottom (5f);

        // 将默认单元格填充设置为 MarginInfo 对象
        tab1.setDefaultCellPadding(margin);

        // 在表中创建行,然后在行中创建单元格
        Row row1 = tab1.getRows().add();
        row1.getCells().add("col1");
        row1.getCells().add("col2");
        row1.getCells().add();

        TextFragment mytext = new TextFragment("col3 with large text string");

        row1.getCells().get_Item(2).getParagraphs().add(mytext);
        row1.getCells().get_Item(2).setWordWrapped(false);

        Row row2 = tab1.getRows().add();
        row2.getCells().add("item1");
        row2.getCells().add("item2");
        row2.getCells().add("item3");

        // 保存 PDF
        doc.save(_dataDir + "MarginsOrPadding_out.pdf");
    }
}
要创建带有圆角的表格,请使用 BorderInfo 类的 RoundedBorderRadius 值,并将表格角样式设置为圆角。
    public static void RoundedBorderRadius() {
        Document doc = new Document();
        Page page = doc.getPages().add();

        // 实例化一个表对象
        Table tab1 = new Table();

        // 在所需部分的段落集合中添加表
        page.getParagraphs().add(tab1);

        GraphInfo graph = new GraphInfo();
        graph.setColor(Color.getRed());
        // 创建一个空的 BorderInfo 对象
        BorderInfo bInfo = new BorderInfo(BorderSide.All, graph);
        // 设置圆角边框,圆角半径为 15
        bInfo.setRoundedBorderRadius(15);
        // 将表格角样式设置为圆角。
        tab1.setCornerStyle(BorderCornerStyle.Round);
        // 设置表格边框信息
        tab1.setBorder(bInfo);
        // 在表中创建行,然后在行中创建单元格
        Row row1 = tab1.getRows().add();
        row1.getCells().add("col1");
        row1.getCells().add("col2");
        row1.getCells().add();

        TextFragment mytext = new TextFragment("col3 with large text string");

        row1.getCells().get_Item(2).getParagraphs().add(mytext);
        row1.getCells().get_Item(2).setWordWrapped(false);

        Row row2 = tab1.getRows().add();
        row2.getCells().add("item1");
        row2.getCells().add("item2");
        row2.getCells().add("item3");

        // 保存 PDF
        doc.save(_dataDir + "BorderRadius_out.pdf");
    }
ColumnAdjustmentType 枚举中的 AutoFitToWindow 属性
 public static void AutoFitToWindowProperty() {
        // 通过调用空构造函数实例化 Pdf 对象
        Document doc = new Document();
        // 在 Pdf 对象中创建章节
        Page sec1 = doc.getPages().add();

        // 实例化一个表对象
        Table tab1 = new Table();
        // 将表添加到所需章节的段落集合中
        sec1.getParagraphs().add(tab1);

        // 设置表格的列宽
        tab1.setColumnWidths("50 50 50");
        tab1.setColumnAdjustment(ColumnAdjustment.AutoFitToWindow);

        // 使用 BorderInfo 对象设置默认单元格边框
        tab1.setDefaultCellBorder(new BorderInfo(BorderSide.All, 0.1F));

        // 使用另一个自定义 BorderInfo 对象设置表格边框
        tab1.setBorder(new BorderInfo(BorderSide.All, 1F));

        // 创建 MarginInfo 对象并设置其左、下、右和上边距
        MarginInfo margin = new MarginInfo();
        margin.setTop(5f);
        margin.setLeft(5f);
        margin.setRight(5f);
        margin.setBottom(5f);

        // 将默认单元格填充设置为 MarginInfo 对象
        tab1.setDefaultCellPadding(margin);

        // 在表格中创建行,然后在行中创建单元格
        Row row1 = tab1.getRows().add();
        row1.getCells().add("col1");
        row1.getCells().add("col2");
        row1.getCells().add("col3");
        Row row2 = tab1.getRows().add();
        row2.getCells().add("item1");
        row2.getCells().add("item2");
        row2.getCells().add("item3");

        // 保存更新后的包含表对象的文档
        doc.save(_dataDir + "AutoFitToWindow_out.pdf");
    }
获取表格宽度
有时,需要动态获取表格宽度。Aspose.PDF.Table 类有一个方法 GetWidth 用于此目的。例如,你没有显式设置表格列宽,并将 ColumnAdjustment 设置为 AutoFitToContent。在这种情况下,你可以通过以下方式获取表格宽度。
public static void GetTableWidth() {
        // 创建一个新文档
        Document doc = new Document();
        // 在文档中添加页面
        Page page = doc.getPages().add();

        // 初始化新表格
        Table table = new Table();

        // 在所需部分的段落集合中添加表格
        page.getParagraphs().add(table);
        table.setColumnAdjustment(ColumnAdjustment.AutoFitToContent);

        // 在表格中添加行
        Row row = table.getRows().add();
        // 在表格中添加单元格
        row.getCells().add("单元格 1 文本");
        row.getCells().add("单元格 2 文本");
        // 获取表格宽度
        System.out.println(table.getWidth());
    }
将 SVG 对象添加到表格单元格
Aspose.PDF for Java 支持将表格单元格添加到 PDF 文件中。在创建表格时,可以在单元格中添加文本或图像。此外,该 API 还提供了将 SVG 文件转换为 PDF 格式的功能。使用这些功能的组合,可以加载 SVG 图像并将其添加到表格单元格中。
以下代码片段展示了创建表格实例和在表格单元格中添加 SVG 图像的步骤。
 public static void AddSVGObjectToTableCell() {
        // 实例化 Document 对象
        Document doc = new Document();
        // 创建图像实例
        com.aspose.pdf.Image img = new com.aspose.pdf.Image();
        // 将图像类型设置为 SVG
        img.setFileType (com.aspose.pdf.ImageFileType.Svg);
        // 源文件的路径
        img.setFile (_dataDir + "SVGToPDF.svg");
        // 设置图像实例的宽度
        img.setFixWidth (50);
        // 设置图像实例的高度
        img.setFixHeight (50);
        // 创建表格实例
        com.aspose.pdf.Table table = new com.aspose.pdf.Table();
        // 设置表格单元格的宽度
        table.setColumnWidths ("100 100");
        // 创建行对象并将其添加到表格实例
        com.aspose.pdf.Row row = table.getRows().add();
        // 创建单元格对象并将其添加到行实例
        com.aspose.pdf.Cell cell = row.getCells().add();
        // 将文本片段添加到单元格对象的段落集合中
        cell.getParagraphs().add(new TextFragment("First cell"));
        // 将另一个单元格添加到行对象
        cell = row.getCells().add();
        // 将 SVG 图像添加到最近添加的单元格实例的段落集合中
        cell.getParagraphs().add(img);
        // 创建页面对象并将其添加到文档实例的页面集合中
        Page page = doc.getPages().add();
        // 将表格添加到页面对象的段落集合中
        page.getParagraphs().add(table);
        // 保存 PDF 文件
        doc.save(_dataDir + "AddSVGObject_out.pdf");
    }
在表格中添加HTML标签
Aspose.PDF for Java允许在PDF文件的段落中添加新的HTML片段。
  public static void AddHTMLFragmentToTableCell() {
        Document doc = new Document(_dataDir + "input.pdf");
        // 初始化一个新的表实例
        Table table = new Table();
        // 将表格边框颜色设置为浅灰色
        table.setBorder(new BorderInfo(BorderSide.All, .5f, Color.getLightGray()));
        // 设置表格单元格的边框
        table.setDefaultCellBorder(new BorderInfo(BorderSide.All, .5f, Color.getLightGray()));
        // 创建一个循环以添加10行
        for (int row_count = 1; row_count < 10; row_count++) {
            Cell cell;
            // 向表格添加行
            Row row = table.getRows().add();
            // 添加表格单元格
            cell = row.getCells().add();
            cell.getParagraphs().add(new HtmlFragment("列 <strong>(" + row_count + ", 1)</strong>"));

            cell = row.getCells().add();
            cell.getParagraphs().add(new HtmlFragment("列 <span style='color:red'>(" + row_count + ", 2)</span>"));

            cell = row.getCells().add();
            cell.getParagraphs().add(new HtmlFragment("列 <span style='text-decoration: underline'>(" + row_count + ", 3)</span>"));
        }
        // 将表格对象添加到输入文档的第一页
        doc.getPages().get_Item(1).getParagraphs().add(table);
        // 保存包含表格对象的更新文档
        doc.save(_dataDir + "AddHTMLObject_out.pdf");
    }

}
在表格行之间插入分页符
默认情况下,当在 PDF 文件中创建表格时,表格会在达到表格的底部边距时流向后续页面。然而,我们可能需要在为表格添加一定数量的行后强制插入分页符。以下代码片段展示了在表格添加 10 行时插入分页符的步骤。
    public static void InsertPageBreak() {
        // 实例化 Document 对象
        Document doc = new Document();
        // 向 PDF 文件的页面集合中添加页面
        Page page = doc.getPages().add();
        // 创建表格实例
        Table tab = new Table();
        // 设置表格的边框样式
        tab.setBorder (new BorderInfo(BorderSide.All, Color.getRed()));
        // 设置默认边框样式,边框颜色为红色
        tab.setDefaultCellBorder (new BorderInfo(BorderSide.All, Color.getRed()));
        // 指定表格列宽
        tab.setColumnWidths ("100 100");
        // 创建循环以添加 200 行到表格
        for (int counter = 0; counter <= 200; counter++) {
            Row row = new Row();
            tab.getRows().add(row);
            Cell cell1 = new Cell();
            cell1.getParagraphs().add(new TextFragment("Cell " + counter + ", 0"));
            row.getCells().add(cell1);
            Cell cell2 = new Cell();
            cell2.getParagraphs().add(new TextFragment("Cell " + counter + ", 1"));
            row.getCells().add(cell2);
            // 当添加了 10 行时,在新页面中渲染新行
            if (counter % 10 == 0 && counter != 0)
                row.setInNewPage(true);
        }
        // 将表格添加到 PDF 文件的段落集合中
        page.getParagraphs().add(tab);

        // 保存 PDF 文档
        doc.save(_dataDir + "InsertPageBreak_out.pdf");
    }
隐藏跨单元格边框
在向表格中添加单元格时,跨单元格的边框在拆分到另一行时可能会显示出来。可以通过以下代码示例隐藏这些跨单元格的边框。
Document doc = new Document();
com.aspose.pdf.Page page = doc.getPages().add();

//实例化一个表对象,该对象将嵌套在将在同一页面内拆分的外部表中
com.aspose.pdf.Table mytable = new com.aspose.pdf.Table();
mytable.setBroken(TableBroken.Vertical);
mytable.setDefaultCellBorder(new BorderInfo(BorderSide.All));
mytable.setRepeatingColumnsCount(2);
page.getParagraphs().add(mytable);

//添加标题行
com.aspose.pdf.Row row = mytable.getRows().add();
Cell cell = row.getCells().add("header 1");
cell.setColSpan(2);
cell.setBackgroundColor(Color.getLightGray());
Cell header3 = row.getCells().add("header 3");
Cell cell2 = row.getCells().add("header 4");
cell2.setColSpan(2);
cell2.setBackgroundColor(Color.getLightBlue());
row.getCells().add("header 6");
Cell cell3 = row.getCells().add("header 7");
cell3.setColSpan(2);
cell3.setBackgroundColor(Color.getLightGreen());
Cell cell4 = row.getCells().add("header 9");
cell4.setColSpan(3);
cell4.setBackgroundColor(Color.getLightCoral());
row.getCells().add("header 12");
row.getCells().add("header 13");
row.getCells().add("header 14");
row.getCells().add("header 15");
row.getCells().add("header 16");
row.getCells().add("header 17");

for (int rowCounter = 0; rowCounter < 1; rowCounter++)
{
  //在表格中创建行,然后在行中创建单元格
  com.aspose.pdf.Row row1 = mytable.getRows().add();
  row1.getCells().add("col "+rowCounter+", 1");
  row1.getCells().add("col "+rowCounter+", 2");
  row1.getCells().add("col "+rowCounter+", 3");
  row1.getCells().add("col "+rowCounter+", 4");
  row1.getCells().add("col "+rowCounter+", 5");
  row1.getCells().add("col "+rowCounter+", 6");
  row1.getCells().add("col "+rowCounter+", 7");
  row1.getCells().add("col "+rowCounter+", 8");
  row1.getCells().add("col "+rowCounter+", 9");
  row1.getCells().add("col "+rowCounter+", 10");
  row1.getCells().add("col "+rowCounter+", 11");
  row1.getCells().add("col "+rowCounter+", 12");
  row1.getCells().add("col "+rowCounter+", 13");
  row1.getCells().add("col "+rowCounter+", 14");
  row1.getCells().add("col "+rowCounter+", 15");
  row1.getCells().add("col "+rowCounter+", 16");
  row1.getCells().add("col "+rowCounter+", 17");
}
doc.save(dataDir + "3_out.pdf");