Curves Adjustment Layer
Working with Photoshop Curves adjustment layer in Java
The goal of this article is to demonstrate capabilities of the library Aspose.PSD for Java while working with Curves adjustment layers in Adobe® Photoshop® documents. The library is fully autonomous. Therefore, it works without installing Photoshop photo editor. The full list of features could be found in our knowledge base. Well, now back to Curves.
API overview
The Curves tool can be represented as a diagonal line (curve) on a graph with highlights in the top right-hand corner and shadows in the bottom right-hand corner.
The library provides API to work with the curve, namely, the CurvesLayer class. However, this class has two completely different approaches to work with the curve. Therefore, it can be edited in one of two modes at a time:
- Continuous (the curve represented as a path with points in places of bending)
- Discrete (the curve represented as a dotted line)
So, the library has two ways to modify thecurve using continuous and discrete manager respectively. Next, we will explain how to use each of them on a specific example.
Adjust color and tone using the Curves Continuous Manager
The Curves Continuous Manager configures points of bending of a continuous curve for the composite channel (RGB) as well as for each particular color channels. For demonstration purposes, some Curves adjustment (a) will be applied to a darkened image of orchestra (b) to get a brightened image with more warm colors (c):
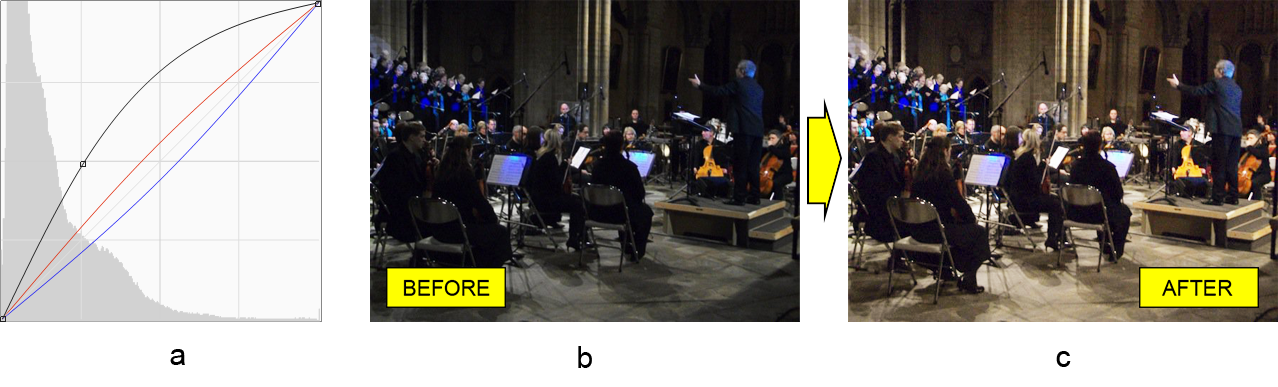
Since there are two managers, it is necessary to explicitly select one (continuous manager in this case), before obtaining it. After, we can directly add curve points at certain coordinates for desired color channels (composite RGB, red and blue respectively) to recreate the shape of the curve:
CurvesLayer curvesLayer = psdImage.addCurvesAdjustmentLayer();

curvesLayer.setContinuousManagerUsed(true);
CurvesContinuousManager curvesContinuousManager = (CurvesContinuousManager)curvesLayer.getCurvesManager();

curvesContinuousManager.addCurvePoint(0, (byte)65, (byte)125);
curvesContinuousManager.addCurvePoint(1, (byte)120, (byte)135);
curvesContinuousManager.addCurvePoint(3, (byte)135, (byte)120);
The origin of coordinates is in the bottom left-hand corner. The maximum coordinate value of a point is limited to the data type (byte) and is equal to 255 (127 for signed type).
There are also a few other methods you can use.
Adjust tone using the Curves Discrete Manager
The Curves Discrete Manager also allows to position curve points (change color and tone actually), but the difference is that they do it differently. First, the curve consists of points or dots (not a solid line). Second, this manager does not place a point anywhere on the graph. Instead, it moves the point up or down with the range of values between 255 and 0 respectively. By default, values of curve points are increasing incrementally to shape a curve that is at an angle of 45 degrees.
So, with that in mind, it's easy to recreate the "Negative (RBG)" Photoshop preset (a) and apply it to a grayscale image of a valley (b) to get in the end a negative representation of the valley (c).
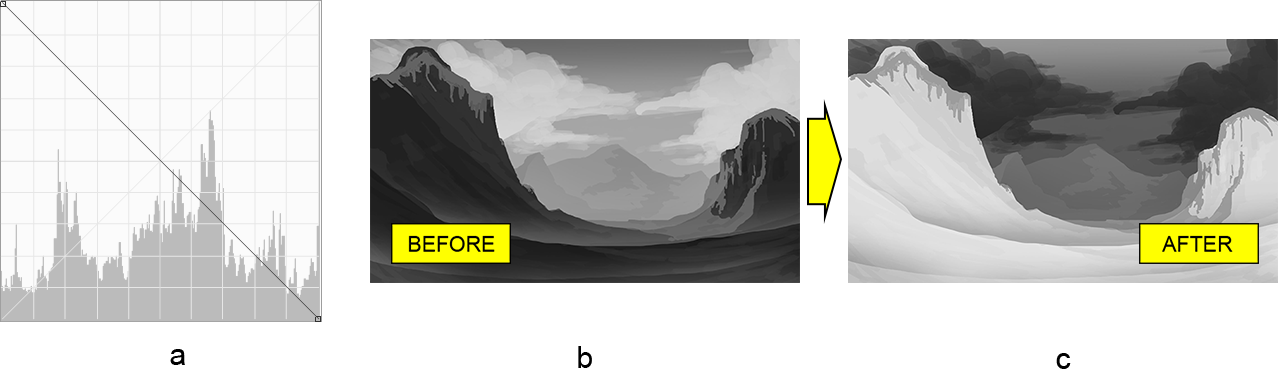 First of all, do not forget to select the corresponding manager to be able to use it and then set point values of the curve in descending order starting from 255 down to 0 for each curve point (255 in total):
CurvesLayer curvesLayer = psdImage.addCurvesAdjustmentLayer();

curvesLayer.setDiscreteManagerUsed(true);
CurvesDiscreteManager curvesDiscreteManager = (CurvesDiscreteManager)curvesLayer.getCurvesManager();

for (int i = 0; i < 255; i++)
{
    curvesDiscreteManager.setValueInPosition(0, (byte)i, (byte)-i);
}
The manager also provides a few other methods for managing the curve.
Conclusion
In this article we have learnt how to work with Curves adjustment layers in Photoshop documents using Aspose.PSD for Java in two completely different ways (continuous and discrete managers).