
Android पर प्रस्तुतियों में 3D इफ़ेक्ट्स बनाएँ
परिचय
Aspose.Slides for Android via Java आकृतियों और टेक्स्ट के लिए PowerPoint‑शैली 3D फ़ॉर्मेटिंग बना, संपादित, संरक्षित और रेंडर कर सकता है। इस लेख में घुमाव, एक्सट्रूज़न, बिवेल, लाइटिंग, सामग्री, ग्रेडिएंट या पिक्चर फ़िल, और 3D टेक्स्ट जैसे 3D इफ़ेक्ट्स को कवर किया गया है।
Note
यह लेख PowerPoint आकृतियों और टेक्स्ट पर 3D फ़ॉर्मेटिंग इफ़ेक्ट्स के बारे में है। यह अलग‑अलग 3D मॉडल फ़ाइलों को सम्मिलित या संपादित करने के बारे में नहीं है। जब आप स्लाइड को इमेज, PDF, या HTML में निर्यात करते हैं, Aspose.Slides उन 3D इफ़ेक्ट्स को निर्यातित 2D आउटपुट में रेंडर करता है।3D फ़ॉर्मेटिंग अवधारणाएँ
IShape.getThreeDFormat विधि का उपयोग करके आप किसी आकृति पर 3D फ़ॉर्मेटिंग लागू कर सकते हैं। यह विधि IThreeDFormat लौटाती है, जो उस आकृति के लिए 3D सीन को नियंत्रित करता है।
टेक्स्ट के लिए, ITextFrameFormat.getThreeDFormat विधि का उपयोग करें। यह आकृति बॉडी की बजाय टेक्स्ट फ्रेम पर 3D फ़ॉर्मेटिंग लागू करता है।
सबसे महत्वपूर्ण API सदस्य निम्नलिखित हैं:
| API सदस्य | यह क्या नियंत्रित करता है | कब उपयोग करें |
|---|---|---|
| getCamera | व्यूपॉइंट, प्रीसेट कैमरा प्रकार, घुमाव, ज़ूम, और पर्सपेक्टिव। | 3D स्पेस में ऑब्जेक्ट को घुमाने या PowerPoint के 3D घुमाव प्रीसेट से मिलाने के लिए। |
| getLightRig | लाइट प्रीसेट, दिशा, और लाइट घुमाव। | 3D सतह पर हाइलाइट और शैडो के दिखावे को बदलने के लिए। |
| getMaterial और setMaterial | सतह सामग्री, जैसे फ्लैट, मैट, प्लास्टिक, या मेटल। | समान ज्यामिति को अधिक फ्लैट, सॉफ़्ट, ग्लॉसी, या मेटैलिक दिखाने के लिए। |
| getExtrusionHeight और setExtrusionHeight | आकृति की सामने की सतह से पीछे तक कितनी दूरी तक एक्सट्रूड होती है। | एक फ्लैट आकृति को स्पष्ट रूप से मोटी 3D वस्तु में बदलने के लिए। |
| getExtrusionColor | एक्सट्रूडेड पक्षों का रंग। | गहराई को दिखाने या साइड रंग को सामने के फ़िल के साथ संगत करने के लिए। |
| getDepth और setDepth | PowerPoint 3D फ़ॉर्मेटिंग द्वारा उपयोग की जाने वाली अतिरिक्त 3D गहराई। | आकृति या टेक्स्ट की गहराई को बिवेल और सामग्री सेटिंग्स के साथ सूक्ष्म रूप से समायोजित करने के लिए। |
| getBevelTop और getBevelBottom | सामने और पीछे के फेसेज़ पर उठे या गोल किनारे। | तेज़ सपाट फेस के बजाय मुलायम या साँचा बनाया गया किनारा जोड़ने के लिए। |
| getContourColor और getContourWidth और setContourWidth | 3D ऑब्जेक्ट के चारों ओर का आउटलाइन। | रेंडर किए गए आउटपुट में ऑब्जेक्ट की सीमा को उजागर करने के लिए। |
3D आकृति बनाना
एक आकृति को विश्वसनीय 3D दिखावे के लिए आमतौर पर चार प्रकार की सेटिंग्स की आवश्यकता होती है:
- कैमरा सेटिंग्स, क्योंकि डिफ़ॉल्ट फ्रंट व्यू एक्सट्रूज़न को छिपा सकता है।
- लाइट सेटिंग्स, क्योंकि लाइटिंग से चेहरे और पक्ष पढ़ने योग्य बनते हैं।
- सामग्री सेटिंग्स, क्योंकि सतह निर्धारित करती है कि लाइट कैसे रेंडर होती है।
- एक्सट्रूज़न या गहराई सेटिंग्स, क्योंकि फ्लैट आकृति को मोटाई चाहिए।
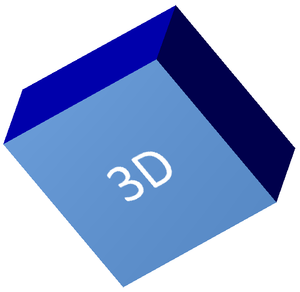
निम्न उदाहरण एक आयत बनाता है, उसके सामने के फेस पर टेक्स्ट जोड़ता है, और 3D फ़ॉर्मेटिंग लागू करता है। कैमरा घुमाव मान डिग्री में हैं, और एक्सट्रूज़न ऊँचाई 100 पॉइंट है। उदाहरण स्लाइड को दो गुना डिफ़ॉल्ट आकार में PNG इमेज में रेंडर करता है और प्रस्तुति को PPTX के रूप में सहेजता है।
import com.aspose.slides.*;
import android.graphics.Color;

final float imageScale = 2;

Presentation presentation = new Presentation();
try {
    ISlide slide = presentation.getSlides().get_Item(0);

    IAutoShape shape = slide.getShapes().addAutoShape(ShapeType.Rectangle, 200, 150, 200, 200);

    shape.getTextFrame().setText("3D");
    shape.getTextFrame().getParagraphs().get_Item(0).getParagraphFormat().getDefaultPortionFormat().setFontHeight(64);

    shape.getFillFormat().setFillType(FillType.Solid);
    shape.getFillFormat().getSolidFillColor().setColor(Color.rgb(100, 149, 237));

    shape.getThreeDFormat().getCamera().setCameraType(CameraPresetType.OrthographicFront);
    shape.getThreeDFormat().getCamera().setRotation(20, 30, 40);
    shape.getThreeDFormat().getLightRig().setLightType(LightRigPresetType.Flat);
    shape.getThreeDFormat().getLightRig().setDirection(LightingDirection.Top);
    shape.getThreeDFormat().setMaterial(MaterialPresetType.Flat);
    shape.getThreeDFormat().setExtrusionHeight(100);
    shape.getThreeDFormat().getExtrusionColor().setColor(Color.BLUE);

    IImage thumbnail = slide.getImage(imageScale, imageScale);
    try {
        thumbnail.save("shape_3d.png", ImageFormat.Png);
    } finally {
        thumbnail.dispose();
    }

    presentation.save("shape_3d.pptx", SaveFormat.Pptx);
} finally {
    presentation.dispose();
}
रेंडर किया गया स्लाइड इमेज आयत को मोटी 3D ब्लॉक के रूप में दिखाता है:
कैमरा के साथ आकृति घुमाएँ
PowerPoint में, 3D घुमाव को 3‑D Rotation पेन से कॉन्फ़िगर किया जाता है। X, Y, और Z घुमाव मान उस घुमाव से मेल खाते हैं जो आप कैमरा API के माध्यम से सेट करते हैं।
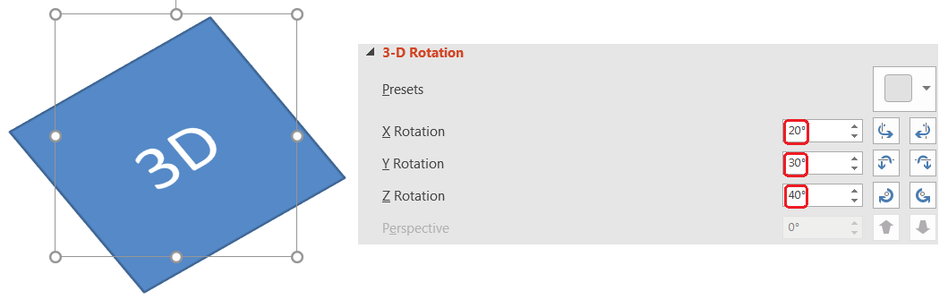
Aspose.Slides में, कैमरा तक पहुँचने के लिए IThreeDFormat.getCamera का उपयोग करें। यह उदाहरण एक आयत बनाता है, ऑर्थोग्राफ़िक फ्रंट व्यू चुनता है, और उसके X, Y, Z घुमाव को क्रमशः 20, 30, 40 डिग्री पर सेट करता है। यह फ़ाइल सहेजे बिना मेमोरी में आकृति को कॉन्फ़िगर करता है:
import com.aspose.slides.*;

Presentation presentation = new Presentation();
try {
    ISlide slide = presentation.getSlides().get_Item(0);

    IAutoShape shape = slide.getShapes().addAutoShape(ShapeType.Rectangle, 200, 150, 200, 200);

    shape.getThreeDFormat().getCamera().setCameraType(CameraPresetType.OrthographicFront);
    shape.getThreeDFormat().getCamera().setRotation(20, 30, 40);
} finally {
    presentation.dispose();
}
कैमरा का उपयोग तब करें जब आप दर्शक को ऑब्जेक्ट देखने के तरीके को बदलना चाहते हों। यह स्लाइड पर 2D आकृति ज्योमेट्री को नहीं बदलता; यह PowerPoint और Aspose.Slides द्वारा रेंडरिंग के समय उपयोग किए जाने वाले 3D व्यूपॉइंट को बदलता है।
एक्सट्रूज़न और गहराई जोड़ें
एक्सट्रूज़न आकृति को पीछे की ओर बढ़ाकर मोटा दिखाता है। PowerPoint में, गहराई नियंत्रण इस दृश्यमान मोटाई को निर्धारित करता है, और रंग नियंत्रण साइड फ़ेसेज़ के रंग को सेट करता है।
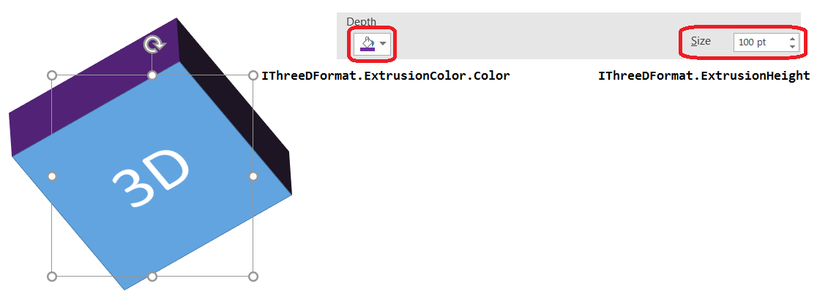
IThreeDFormat.setExtrusionHeight का उपयोग करके मोटाई सेट करें और IThreeDFormat.getExtrusionColor का उपयोग करके साइड का रंग प्राप्त करें। यह उदाहरण आयत को 100‑पॉइंट एक्सट्रूज़न के साथ बैंगनी पक्ष देता है और कैमरा घुमाता है ताकि उसकी मोटाई दिखे। यह फ़ाइल सहेजे बिना मेमोरी में आकृति को कॉन्फ़िगर करता है:
import com.aspose.slides.*;
import android.graphics.Color;

Presentation presentation = new Presentation();
try {
    ISlide slide = presentation.getSlides().get_Item(0);

    IAutoShape shape = slide.getShapes().addAutoShape(ShapeType.Rectangle, 200, 150, 200, 200);

    int extrusionColor = Color.rgb(128, 0, 128);

    shape.getThreeDFormat().getCamera().setCameraType(CameraPresetType.OrthographicFront);
    shape.getThreeDFormat().getCamera().setRotation(20, 30, 40);
    shape.getThreeDFormat().getLightRig().setLightType(LightRigPresetType.Flat);
    shape.getThreeDFormat().getLightRig().setDirection(LightingDirection.Top);
    shape.getThreeDFormat().setMaterial(MaterialPresetType.Flat);
    shape.getThreeDFormat().setExtrusionHeight(100);
    shape.getThreeDFormat().getExtrusionColor().setColor(extrusionColor);
} finally {
    presentation.dispose();
}
IThreeDFormat.setDepth विधि 3D आकृति की गहराई सेट करती है। setExtrusionHeight विधि एक्सट्रूज़न प्रभाव की ऊँचाई को नियंत्रित करती है, जैसा कि इस उदाहरण में दिखाया गया है।
ग्रेडिएंट या पिक्चर फ़िल के साथ 3D इफ़ेक्ट्स उपयोग करें
3D फ़ॉर्मेटिंग आकृति फ़िल से स्वतंत्र है। आप सामने के फेस पर ठोस रंग, ग्रेडिएंट, पैटर्न या पिक्चर फ़िल लागू कर सकते हैं और फिर भी वही कैमरा, लाइट, सामग्री, और एक्सट्रूज़न सेटिंग्स रख सकते हैं।
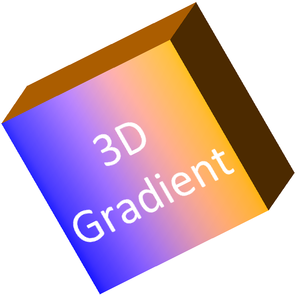
यह उदाहरण सामने के फेस पर नीले‑से‑नारंगी ग्रेडिएंट और 150‑पॉइंट एक्सट्रूज़न पर गहरा नारंगी रंग लागू करता है। ग्रेडिएंट स्टॉप 0 और 100 पर क्रमशः ग्रेडिएंट की शुरुआत और समाप्ति को चिन्हित करते हैं। कैमरा घुमाव मान डिग्री में हैं। स्लाइड को दो गुना डिफ़ॉल्ट आकार में PNG इमेज में रेंडर किया गया है:
import com.aspose.slides.*;
import android.graphics.Color;

final float imageScale = 2;

Presentation presentation = new Presentation();
try {
    ISlide slide = presentation.getSlides().get_Item(0);

    IAutoShape shape = slide.getShapes().addAutoShape(ShapeType.Rectangle, 200, 150, 250, 250);

    shape.getTextFrame().setText("3D Gradient");
    shape.getTextFrame().getParagraphs().get_Item(0).getParagraphFormat().getDefaultPortionFormat().setFontHeight(64);

    shape.getFillFormat().setFillType(FillType.Gradient);
    shape.getFillFormat().getGradientFormat().getGradientStops().add(0, Color.BLUE);
    shape.getFillFormat().getGradientFormat().getGradientStops().add(100, Color.rgb(255, 165, 0));

    shape.getThreeDFormat().getCamera().setCameraType(CameraPresetType.OrthographicFront);
    shape.getThreeDFormat().getCamera().setRotation(10, 20, 30);
    shape.getThreeDFormat().getLightRig().setLightType(LightRigPresetType.Flat);
    shape.getThreeDFormat().getLightRig().setDirection(LightingDirection.Top);
    shape.getThreeDFormat().setMaterial(MaterialPresetType.Flat);
    int extrusionColor = Color.rgb(255, 140, 0);
    shape.getThreeDFormat().setExtrusionHeight(150);
    shape.getThreeDFormat().getExtrusionColor().setColor(extrusionColor);

    IImage thumbnail = slide.getImage(imageScale, imageScale);
    try {
        thumbnail.save("gradient_3d.png", ImageFormat.Png);
    } finally {
        thumbnail.dispose();
    }
} finally {
    presentation.dispose();
}
रेंडर किया गया आउटपुट सामने के फेस पर ग्रेडिएंट को बरकरार रखता है और एक्सट्रूज़न को अलग से रेंडर करता है:
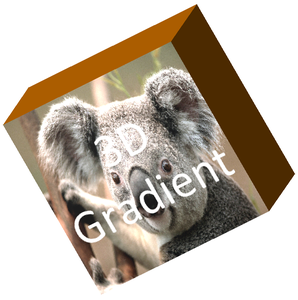
पिक्चर फ़िल उपयोग करने के लिए, इमेज को प्रस्तुति में जोड़ें और उसे आकृति फ़िल को असाइन करें। यह उदाहरण कार्य निर्देशिका में मौज़ूद “image.jpg” फ़ाइल मानता है। यह पिक्चर को आयत में भरता है, 150‑पॉइंट एक्सट्रूज़न लागू करता है, और कैमरा घुमाव को डिग्री में सेट करता है। यह फ़ाइल सहेजे या रेंडर किए बिना मेमोरी में आकृति को कॉन्फ़िगर करता है:
import com.aspose.slides.*;
import android.graphics.Color;
import java.io.FileInputStream;

Presentation presentation = new Presentation();
try {
    ISlide slide = presentation.getSlides().get_Item(0);

    IAutoShape shape = slide.getShapes().addAutoShape(ShapeType.Rectangle, 200, 150, 250, 250);

    IPPImage image;
    try (FileInputStream imageStream = new FileInputStream("image.jpg")) {
        image = presentation.getImages().addImage(imageStream);
    }

    shape.getFillFormat().setFillType(FillType.Picture);
    shape.getFillFormat().getPictureFillFormat().getPicture().setImage(image);
    shape.getFillFormat().getPictureFillFormat().setPictureFillMode(PictureFillMode.Stretch);

    int extrusionColor = Color.rgb(255, 140, 0);
    shape.getThreeDFormat().getCamera().setCameraType(CameraPresetType.OrthographicFront);
    shape.getThreeDFormat().getCamera().setRotation(10, 20, 30);
    shape.getThreeDFormat().getLightRig().setLightType(LightRigPresetType.Flat);
    shape.getThreeDFormat().getLightRig().setDirection(LightingDirection.Top);
    shape.getThreeDFormat().setMaterial(MaterialPresetType.Flat);
    shape.getThreeDFormat().setExtrusionHeight(150);
    shape.getThreeDFormat().getExtrusionColor().setColor(extrusionColor);
} finally {
    presentation.dispose();
}
पिक्चर सामने के फेस पर रेंडर होता है, जबकि एक्सट्रूज़न 3D साइड सतह के रूप में रेंडर होता है:
टेक्स्ट पर 3D फ़ॉर्मेटिंग लागू करें
आकृति 3D फ़ॉर्मेटिंग आकृति बॉडी को प्रभावित करती है। टेक्स्ट 3D फ़ॉर्मेटिंग टेक्स्ट फ्रेम को प्रभावित करती है। यह WordArt‑समान इफ़ेक्ट्स के लिए उपयोगी है जहाँ अक्षरों को स्वयं एक्सट्रूज़न, सामग्री, लाइटिंग, और कैमरा सेटिंग्स की ज़रूरत होती है।
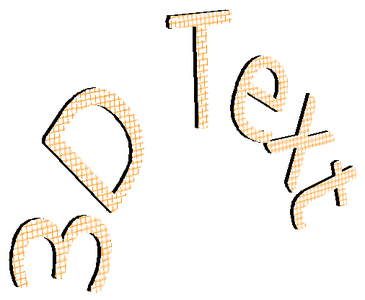
निम्न उदाहरण एक टेक्स्ट बनाता है जिसमें नारंगी‑और‑सफ़ेद ग्रिड पैटर्न है, ऊपर की ओर एक आर्च लागू करता है, और ITextFrameFormat.getThreeDFormat के माध्यम से 3D सेटिंग्स कॉन्फ़िगर करता है। एक्सट्रूज़न ऊँचाई और गहराई पॉइंट में हैं, और लाइट घुमाव डिग्री में है। आकृति फ़िल और आउटलाइन छिपाए गए हैं ताकि केवल टेक्स्ट दिखाई दे। उदाहरण PNG इमेज को दो गुना डिफ़ॉल्ट स्लाइड आकार में रेंडर करता है और प्रस्तुति को PPTX के रूप में सहेजता है:
import com.aspose.slides.*;
import android.graphics.Color;

final float imageScale = 2;

Presentation presentation = new Presentation();
try {
    ISlide slide = presentation.getSlides().get_Item(0);

    IAutoShape shape = slide.getShapes().addAutoShape(ShapeType.Rectangle, 200, 150, 250, 250);

    shape.getFillFormat().setFillType(FillType.NoFill);
    shape.getLineFormat().getFillFormat().setFillType(FillType.NoFill);
    shape.getTextFrame().setText("3D Text");

    IPortion portion = shape.getTextFrame().getParagraphs().get_Item(0).getPortions().get_Item(0);
    portion.getPortionFormat().getFillFormat().setFillType(FillType.Pattern);
    int patternColor = Color.rgb(255, 140, 0);
    portion.getPortionFormat().getFillFormat().getPatternFormat().getForeColor().setColor(patternColor);
    portion.getPortionFormat().getFillFormat().getPatternFormat().getBackColor().setColor(Color.WHITE);
    portion.getPortionFormat().getFillFormat().getPatternFormat().setPatternStyle(PatternStyle.LargeGrid);

    shape.getTextFrame().getParagraphs().get_Item(0).getParagraphFormat().getDefaultPortionFormat().setFontHeight(128);

    ITextFrameFormat textFrameFormat = shape.getTextFrame().getTextFrameFormat();
    textFrameFormat.setTransform(TextShapeType.ArchUp);
    textFrameFormat.getThreeDFormat().setExtrusionHeight(3.5f);
    textFrameFormat.getThreeDFormat().setDepth(3);
    textFrameFormat.getThreeDFormat().setMaterial(MaterialPresetType.Plastic);
    textFrameFormat.getThreeDFormat().getLightRig().setDirection(LightingDirection.Top);
    textFrameFormat.getThreeDFormat().getLightRig().setLightType(LightRigPresetType.Balanced);
    textFrameFormat.getThreeDFormat().getLightRig().setRotation(0, 0, 40);
    textFrameFormat.getThreeDFormat().getCamera().setCameraType(CameraPresetType.PerspectiveContrastingRightFacing);

    IImage thumbnail = slide.getImage(imageScale, imageScale);
    try {
        thumbnail.save("text_3d.png", ImageFormat.Png);
    } finally {
        thumbnail.dispose();
    }

    presentation.save("text_3d.pptx", SaveFormat.Pptx);
} finally {
    presentation.dispose();
}
टेक्स्ट को घुमा हुआ, एक्सट्रूडेड 3D लेटरिंग के रूप में रेंडर किया गया है:
3D आकृति पर टेक्स्ट को फ़्लैट रखें
टेक्स्ट को पढ़ने योग्य रखने और आकृति के 3D लुक को बनाए रखने के लिए, ITextFrameFormat.setKeepTextFlat को ITextFrame.getTextFrameFormat के माध्यम से कॉल करें। जब मान true हो, तो टेक्स्ट 3D सीन से बाहर रहता है। जब false हो, तो टेक्स्ट सीन में भाग लेता है और उसकी 3D अभिविन्यास का अनुसरण करता है।
यह सेटिंग आकृति की 3D फ़ॉर्मेटिंग—कैमरा, लाइटिंग, सामग्री, और एक्सट्रूज़न—को नहीं हटाती; ये सभी IShape.getThreeDFormat के माध्यम से कॉन्फ़िगर रहेगी। यह साधारण घुमाव से भी अलग है। IShape.setRotation स्लाइड प्लेन में आकृति को घुमाता है, जबकि ITextFrameFormat.setRotationAngle टेक्स्ट के बाउंडिंग बॉक्स के भीतर कस्टम घुमाव को नियंत्रित करता है। टेक्स्ट को 3D सीन से बाहर रखने से इन कोणों में से कोई भी रीसेट नहीं होता।
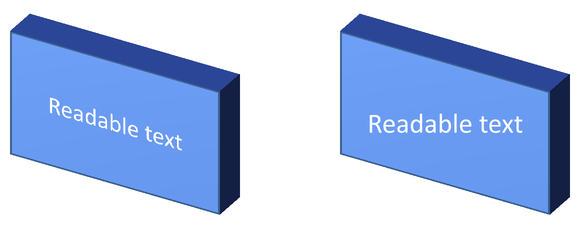
निम्न स्वतंत्र उदाहरण एक नीली आयत के साथ टेक्स्ट बनाता है और उसे मूल के बगल में क्लोन करता है। दोनों आकृतियों का 3D फ़ॉर्मेटिंग समान है; केवल टेक्स्ट सेटिंग अलग है: बाएं पर false और दाएं पर true। कैमरा कोण डिग्री में हैं, और एक्सट्रूज़न ऊँचाई 40 पॉइंट है। उदाहरण प्रस्तुति को PPTX के रूप में सहेजता है और तुलना स्लाइड को दो गुना डिफ़ॉल्ट आकार में PNG में रेंडर करता है:
import com.aspose.slides.*;
import android.graphics.Color;

Presentation presentation = new Presentation();
try {
    ISlide slide = presentation.getSlides().get_Item(0);

    IAutoShape shape = slide.getShapes().addAutoShape(ShapeType.Rectangle, 70, 160, 240, 140);

    shape.getTextFrame().setText("Readable text");
    shape.getTextFrame().getParagraphs().get_Item(0).getParagraphFormat().getDefaultPortionFormat().setFontHeight(28);
    shape.getTextFrame().getParagraphs().get_Item(0).getParagraphFormat().setAlignment(TextAlignment.Center);
    shape.getTextFrame().getTextFrameFormat().setAnchoringType(TextAnchorType.Center);
    shape.getFillFormat().setFillType(FillType.Solid);
    shape.getFillFormat().getSolidFillColor().setColor(Color.rgb(100, 149, 237));

    shape.getThreeDFormat().getCamera().setCameraType(CameraPresetType.OrthographicFront);
    shape.getThreeDFormat().getCamera().setRotation(30, 30, 0);
    shape.getThreeDFormat().getLightRig().setLightType(LightRigPresetType.Flat);
    shape.getThreeDFormat().getLightRig().setDirection(LightingDirection.Top);
    shape.getThreeDFormat().setMaterial(MaterialPresetType.Flat);
    shape.getThreeDFormat().setExtrusionHeight(40);
    shape.getThreeDFormat().getExtrusionColor().setColor(Color.rgb(65, 105, 225));
    shape.getTextFrame().getTextFrameFormat().setKeepTextFlat(false);

    IAutoShape flatTextShape = (IAutoShape) slide.getShapes().addClone(shape, 400, 160);
    flatTextShape.getTextFrame().getTextFrameFormat().setKeepTextFlat(true);

    presentation.save("keep_text_flat.pptx", SaveFormat.Pptx);
    IImage image = slide.getImage(2, 2);
    try {
        image.save("keep_text_flat.png", ImageFormat.Png);
    } finally {
        image.dispose();
    }
} finally {
    presentation.dispose();
}
बाएँ पर टेक्स्ट 3D अभिविन्यास का अनुसरण करता है। दाएँ पर यह फ़्लैट रहता है और पढ़ने में आसान होता है। दोनों आयतें समान दृश्यमान एक्सट्रूज़न और 3D अभिविन्यास बनाए रखती हैं।
निर्यात और रेंडरिंग व्यवहार
Aspose.Slides PowerPoint फ़ॉर्मेट जैसे PPTX में 3D फ़ॉर्मेटिंग को संरक्षित रखता है। जब स्थिर‑लेआउट फ़ॉर्मेट में रेंडर या निर्यात किया जाता है, तो 3D सीन को रास्टराइज़ किया जाता है या आउटपुट में 2D परिणाम के रूप में चित्रित किया जाता है। यह तब लागू होता है जब आप स्लाइड को PNG, PDF, HTML में रेंडर करते हैं, या वीडियो रूपांतरण के लिए फ़्रेम उत्पन्न करते हैं।
इन बातों का ध्यान रखें:
- निर्यातित इमेज और PDF इंटरैक्टिव नहीं होते। निर्यात के बाद दर्शक ऑब्जेक्ट को घुमा नहीं सकता।
- अंतिम दिखावट कैमरा, लाइट रिग, सामग्री, एक्सट्रूज़न, फ़िल, और स्लाइड स्केलिंग के संयोजन पर निर्भर करती है।
- यदि आपको विरासत में मिली या थीम‑आधारित फ़ॉर्मेटिंग मानों की जांच करनी है, तो effective shape properties पढ़ें।
- कुछ आउटपुट फ़ॉर्मेट संपादनीय PowerPoint 3D फ़ॉर्मेटिंग को संग्रहीत नहीं कर सकते। उन फ़ॉर्मेट में दृश्य परिणाम रेंडर किया जाता है, न कि संपादनीय 3D सेटिंग्स के रूप में संरक्षित।
अक्सर पूछे जाने वाले प्रश्न
क्या Aspose.Slides इंटरैक्टिव 3D प्रस्तुतियों बना सकता है?
Aspose.Slides आकृतियों और टेक्स्ट के लिए PowerPoint 3D इफ़ेक्ट्स बनाता और रेंडर करता है। यह निर्यातित इमेज, PDF, या HTML पेज को इंटरैक्टिव 3D सीन नहीं बनाता जिसे दर्शक घुमा सके। PPTX में, जहाँ फ़ॉर्मेट समर्थन करता है, 3D फ़ॉर्मेटिंग PowerPoint में संपादनीय रहती है।
3D मॉडल और 3D इफ़ेक्ट में क्या अंतर है?
3D मॉडल वह अलग 3D ऑब्जेक्ट है जिसे प्रस्तुति में सम्मिलित किया जाता है। 3D इफ़ेक्ट सामान्य PowerPoint आकृति या टेक्स्ट पर लागू फ़ॉर्मेटिंग है, जैसे घुमाव, एक्सट्रूज़न, बिवेल, लाइटिंग, और सामग्री। यह लेख केवल 3D इफ़ेक्ट्स को कवर करता है।
दिखने योग्य 3D आकृति के लिए कौन‑सी सेटिंग्स आवश्यक हैं?
न्यूनतम रूप से, एक कैमरा घुमाव और या तो एक्सट्रूज़न या गहराई सेट करें। व्यावहारिक रूप से, लाइट रिग और सामग्री भी सेट करें ताकि रेंडर की गई सतहों पर स्पष्ट हाइलाइट और शैडो दिखें।
क्या मैं दोनों आकृतियों और टेक्स्ट पर 3D इफ़ेक्ट्स लागू कर सकता हूँ?
हां। आकृति बॉडी के लिए IShape.getThreeDFormat और टेक्स्ट के लिए ITextFrameFormat.getThreeDFormat उपयोग करें।
क्या 3D इफ़ेक्ट्स इमेज, PDF, HTML, या वीडियो फ़्रेम में निर्यात करने पर दिखेंगे?
हां। Aspose.Slides स्लाइड इमेज, PDF आउटपुट, HTML आउटपुट, और वीडियो रूपांतरण के लिए उपयोग किए जाने वाले फ़्रेम बनाते समय 3D इफ़ेक्ट्स को रेंडर करता है। निर्यातित आउटपुट में रेंडर किया हुआ रूप दिखता है, न कि संपादनीय 3D ऑब्जेक्ट।
क्या मैं विरासत और थीम सेटिंग्स लागू होने के बाद अंतिम 3D मान पढ़ सकता हूँ?
हां। Shape Effective Properties में वर्णित प्रभावी फ़ॉर्मेटिंग API का उपयोग करके अंतिम कैमरा, लाइट रिग, बिवेल, और संबंधित 3D मान पढ़ें।