
สร้างเอฟเฟกต์ 3D ในการนำเสนอบน Android
ภาพรวม
Aspose.Slides for Android via Java สามารถสร้าง, แก้ไข, รักษาและเรนเดอร์การจัดรูปแบบ 3D ในสไตล์ PowerPoint สำหรับรูปทรงและข้อความได้ บทความนี้ครอบคลุมเอฟเฟกต์ 3D เช่น การหมุน, การดันออก, bevels, แสง, วัสดุ, การไล่สีหรือการเติมภาพ, และข้อความ 3D
Note
บทความนี้เกี่ยวกับเอฟเฟกต์การจัดรูปแบบ 3D บนรูปทรงและข้อความของ PowerPoint ไม่ได้เกี่ยวกับการแทรกหรือแก้ไขไฟล์โมเดล 3D แบบเดี่ยว เมื่อคุณส่งออกสไลด์เป็นภาพ, PDF หรือ HTML, Aspose.Slides จะเรนเดอร์เอฟเฟกต์ 3D เหล่านั้นลงในผลลัพธ์ 2D ที่ส่งออกแนวคิดการจัดรูปแบบ 3D
ใช้เมธอด IShape.getThreeDFormat เพื่อนำการจัดรูปแบบ 3D ไปใช้กับรูปทรง เมธอดนี้จะคืนค่า IThreeDFormat ซึ่งควบคุมฉาก 3D สำหรับรูปทรงนั้น
สำหรับข้อความ ใช้เมธอด ITextFrameFormat.getThreeDFormat ซึ่งจะนำการจัดรูปแบบ 3D ไปใช้กับกรอบข้อความแทนส่วนเนื้อหาของรูปทรง
สมาชิก API ที่สำคัญที่สุดคือ:
| สมาชิก API | สิ่งที่ควบคุม | เมื่อควรใช้ |
|---|---|---|
| getCamera | มุมมอง, ประเภทกล้องที่กำหนดไว้ล่วงหน้า, การหมุน, การซูม, และการมองในเชิงลึก | หมุนวัตถุในพื้นที่ 3 มิติ หรือให้ตรงกับค่าการหมุน 3D ที่กำหนดไว้ล่วงหน้าใน PowerPoint |
| getLightRig | ตั้งค่าตำแสง, ทิศทาง, และการหมุนแสง | ปรับเปลี่ยนวิธีที่ไฮไลต์และเงาปรากฏบนพื้นผิว 3 มิติ |
| getMaterial และ setMaterial | วัสดุปผิว, เช่น แบน, มัน, พลาสติก, หรือโลหะ | ทำให้รูปทรงเดียวกันดูแบนกว่า, นุ่มกว่า, มีความเงามากขึ้น หรือเป็นโลหะ |
| getExtrusionHeight และ setExtrusionHeight | ระยะที่รูปทรงขยายออกไปด้านหลังจากหน้าแนวหน้า | เปลี่ยนรูปทรงแบนให้กลายเป็นวัตถุ 3 มิติที่มีความหนาเห็นได้ชัด |
| getExtrusionColor | สีของด้านข้างที่ถูกดันออก | ทำให้ความลึกมองเห็นได้หรือประสานสีด้านข้างกับสีเติมหน้า |
| getDepth และ setDepth | ความลึก 3 มิติเพิ่มเติมที่ PowerPoint ใช้ในการจัดรูปแบบ 3D | ปรับความลึกให้ละเอียดสำหรับรูปทรงหรือข้อความ, โดยเฉพาะเมื่อใช้ร่วมกับการตั้งค่า bevel และ material |
| getBevelTop และ getBevelBottom | ขอบที่ยกขึ้นหรือโค้งบนหน้าและหลังของรูปทรง | เพิ่มขอบที่นุ่มหรือเป็นรูปแบบแทนที่จะเป็นพื้นแบนที่คม |
| getContourColor และ getContourWidth และ setContourWidth | เส้นขอบรอบวัตถุ 3 มิติ | เน้นขอบของวัตถุในผลลัพธ์ที่เรนเดอร์ |
สร้างรูปทรง 3D
รูปทรงมักต้องการการตั้งค่าสี่ประเภทก่อนที่จะดูเหมือน 3D อย่างสมจริง:
- การตั้งค่ากล้อง, เนื่องจากมุมมองหน้าเริ่มต้นอาจซ่อนการดันออก
- การตั้งค่าแสง, เนื่องจากแสงทำให้หน้าตาและด้านข้างอ่านได้
- การตั้งค่าวัสดุ, เนื่องจากพื้นผิวส่งผลต่อการเรนเดอร์แสง
- การตั้งค่าการดันออกหรือความลึก, เนื่องจากรูปทรงแบนต้องการความหนา
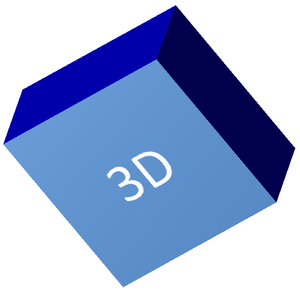
ตัวอย่างต่อไปนี้สร้างสี่เหลี่ยม, เพิ่มข้อความบนหน้าแนวหน้า, และนำการจัดรูปแบบ 3D ไปใช้ ค่า rotation ของกล้องเป็นองศา และความสูงการดันออกเป็น 100 จุด ตัวอย่างจะเรนเดอร์สไลด์เป็นภาพ PNG ขนาดสองเท่าของขนาดเริ่มต้นและบันทึกงานนำเสนอเป็น PPTX
import com.aspose.slides.*;
import android.graphics.Color;

final float imageScale = 2;

Presentation presentation = new Presentation();
try {
    ISlide slide = presentation.getSlides().get_Item(0);

    IAutoShape shape = slide.getShapes().addAutoShape(ShapeType.Rectangle, 200, 150, 200, 200);

    shape.getTextFrame().setText("3D");
    shape.getTextFrame().getParagraphs().get_Item(0).getParagraphFormat().getDefaultPortionFormat().setFontHeight(64);

    shape.getFillFormat().setFillType(FillType.Solid);
    shape.getFillFormat().getSolidFillColor().setColor(Color.rgb(100, 149, 237));

    shape.getThreeDFormat().getCamera().setCameraType(CameraPresetType.OrthographicFront);
    shape.getThreeDFormat().getCamera().setRotation(20, 30, 40);
    shape.getThreeDFormat().getLightRig().setLightType(LightRigPresetType.Flat);
    shape.getThreeDFormat().getLightRig().setDirection(LightingDirection.Top);
    shape.getThreeDFormat().setMaterial(MaterialPresetType.Flat);
    shape.getThreeDFormat().setExtrusionHeight(100);
    shape.getThreeDFormat().getExtrusionColor().setColor(Color.BLUE);

    IImage thumbnail = slide.getImage(imageScale, imageScale);
    try {
        thumbnail.save("shape_3d.png", ImageFormat.Png);
    } finally {
        thumbnail.dispose();
    }

    presentation.save("shape_3d.pptx", SaveFormat.Pptx);
} finally {
    presentation.dispose();
}
ภาพสไลด์ที่เรนเดอร์แสดงสี่เหลี่ยมเป็นบล็อก 3D หนา:
หมุนรูปทรงด้วยกล้อง
ใน PowerPoint การหมุน 3D ถูกตั้งค่าจากหน้าต่าง 3‑D Rotation ค่า rotation ของ X, Y, และ Z สอดคล้องกับการตั้งค่าที่คุณทำผ่าน API ของกล้อง
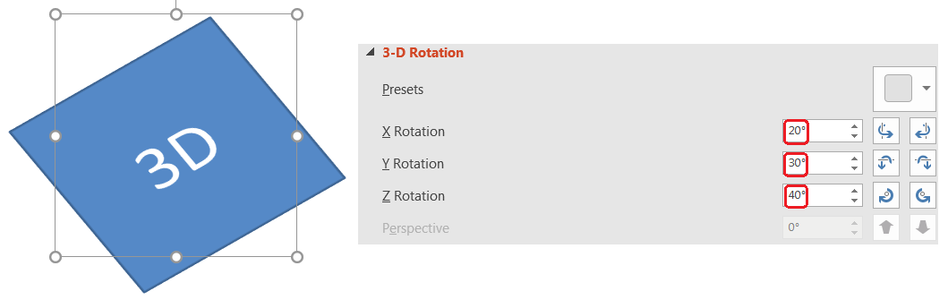
ใน Aspose.Slides เข้าถึงกล้องผ่าน IThreeDFormat.getCamera. ตัวอย่างนี้สร้างสี่เหลี่ยม, เลือกมุมมองหน้าแบบ orthographic, และตั้งค่า rotation ของ X, Y, Z เป็น 20°, 30°, 40° ตามลำดับ โดยกำหนดค่าในหน่วยความจำโดยไม่บันทึกไฟล์:
import com.aspose.slides.*;

Presentation presentation = new Presentation();
try {
    ISlide slide = presentation.getSlides().get_Item(0);

    IAutoShape shape = slide.getShapes().addAutoShape(ShapeType.Rectangle, 200, 150, 200, 200);

    shape.getThreeDFormat().getCamera().setCameraType(CameraPresetType.OrthographicFront);
    shape.getThreeDFormat().getCamera().setRotation(20, 30, 40);
} finally {
    presentation.dispose();
}
ใช้กล้องเมื่อคุณต้องการเปลี่ยนวิธีที่ผู้ชมมองวัตถุ ไม่ได้เปลี่ยนรูปทรง 2D บนสไลด์ แต่เปลี่ยนมุมมอง 3D ที่ PowerPoint และ Aspose.Slides ใช้ในการเรนเดอร์
เพิ่มการดันออกและความลึก
การดันออกทำให้รูปทรงดูหนาผ่านการขยายไปด้านหลังจากหน้าแนวหน้า ใน PowerPoint ตัวควบคุมความลึกกำหนดความหนาแบบมองเห็น, ส่วนตัวควบคุมสีกำหนดสีของด้านข้าง
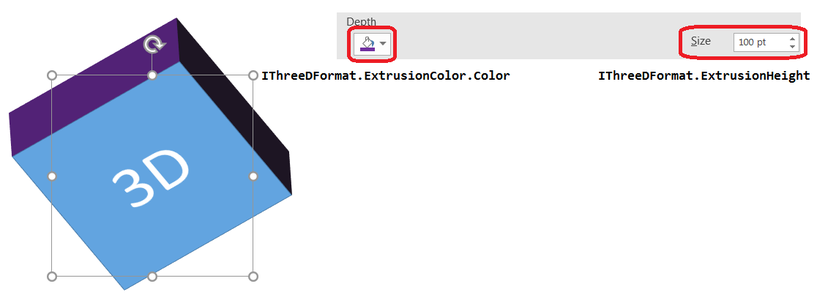
ใช้เมธอด IThreeDFormat.setExtrusionHeight เพื่อตั้งความหนาและ IThreeDFormat.getExtrusionColor เพื่อเข้าถึงสีด้านข้าง ตัวอย่างนี้ให้สี่เหลี่ยมดันออก 100 จุดด้วยด้านสีม่วงและหมุนกล้องเพื่อแสดงความหนา โดยกำหนดค่าในหน่วยความจำโดยไม่บันทึกไฟล์:
import com.aspose.slides.*;
import android.graphics.Color;

Presentation presentation = new Presentation();
try {
    ISlide slide = presentation.getSlides().get_Item(0);

    IAutoShape shape = slide.getShapes().addAutoShape(ShapeType.Rectangle, 200, 150, 200, 200);

    int extrusionColor = Color.rgb(128, 0, 128);

    shape.getThreeDFormat().getCamera().setCameraType(CameraPresetType.OrthographicFront);
    shape.getThreeDFormat().getCamera().setRotation(20, 30, 40);
    shape.getThreeDFormat().getLightRig().setLightType(LightRigPresetType.Flat);
    shape.getThreeDFormat().getLightRig().setDirection(LightingDirection.Top);
    shape.getThreeDFormat().setMaterial(MaterialPresetType.Flat);
    shape.getThreeDFormat().setExtrusionHeight(100);
    shape.getThreeDFormat().getExtrusionColor().setColor(extrusionColor);
} finally {
    presentation.dispose();
}
เมธอด IThreeDFormat.setDepth กำหนดความลึกของรูปทรง 3D ส่วนเมธอด setExtrusionHeight ควบคุมความสูงของเอฟเฟกต์ดันออก ดังแสดงในตัวอย่างนี้
ใช้การไล่สีหรือเติมรูปภาพกับเอฟเฟกต์ 3D
การจัดรูปแบบ 3D ทำงานอิสระจากการเติมรูปทรง คุณสามารถเติมสีทึบ, การไล่สี, แพทเทิร์น หรือภาพลงบนหน้าแนวหน้าและยังคงใช้กล้อง, แสง, วัสดุและการดันออกเดียวกันได้
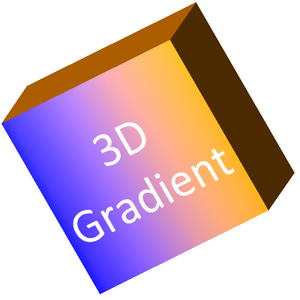
ตัวอย่างนี้ใช้การไล่สีจากสีฟ้าไปสีส้มบนหน้าแนวหน้าและสีส้มเข้มบนดันออก 150 จุด การหยุดไล่สีที่ 0 และ 100 ระบุจุดเริ่มต้นและสิ้นสุดของการไล่สี ค่า rotation ของกล้องเป็นองศา สไลด์จะเรนเดอร์เป็นภาพ PNG ขนาดสองเท่าของขนาดเริ่มต้น:
import com.aspose.slides.*;
import android.graphics.Color;

final float imageScale = 2;

Presentation presentation = new Presentation();
try {
    ISlide slide = presentation.getSlides().get_Item(0);

    IAutoShape shape = slide.getShapes().addAutoShape(ShapeType.Rectangle, 200, 150, 250, 250);

    shape.getTextFrame().setText("3D Gradient");
    shape.getTextFrame().getParagraphs().get_Item(0).getParagraphFormat().getDefaultPortionFormat().setFontHeight(64);

    shape.getFillFormat().setFillType(FillType.Gradient);
    shape.getFillFormat().getGradientFormat().getGradientStops().add(0, Color.BLUE);
    shape.getFillFormat().getGradientFormat().getGradientStops().add(100, Color.rgb(255, 165, 0));

    shape.getThreeDFormat().getCamera().setCameraType(CameraPresetType.OrthographicFront);
    shape.getThreeDFormat().getCamera().setRotation(10, 20, 30);
    shape.getThreeDFormat().getLightRig().setLightType(LightRigPresetType.Flat);
    shape.getThreeDFormat().getLightRig().setDirection(LightingDirection.Top);
    shape.getThreeDFormat().setMaterial(MaterialPresetType.Flat);
    int extrusionColor = Color.rgb(255, 140, 0);
    shape.getThreeDFormat().setExtrusionHeight(150);
    shape.getThreeDFormat().getExtrusionColor().setColor(extrusionColor);

    IImage thumbnail = slide.getImage(imageScale, imageScale);
    try {
        thumbnail.save("gradient_3d.png", ImageFormat.Png);
    } finally {
        thumbnail.dispose();
    }
} finally {
    presentation.dispose();
}
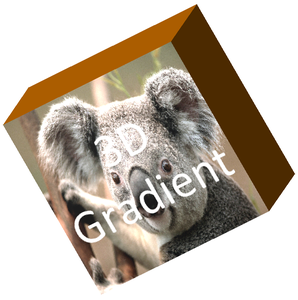
ผลลัพธ์ที่เรนเดอร์ยังคงรักษาการไล่สีบนหน้าแนวหน้าและเรนเดอร์ดันออกแยกจากกัน:
หากต้องการใช้การเติมภาพให้เพิ่มภาพลงในงานนำเสนอและกำหนดให้เป็นการเติมรูปทรง ตัวอย่างนี้ต้องมีไฟล์ชื่อ “image.jpg” อยู่ในไดเรกทอรีทำงาน มันจะขยายภาพให้เต็มสี่เหลี่ยม, ดันออก 150 จุด, และตั้งค่า rotation ของกล้องเป็นองศา โดยกำหนดค่าในหน่วยความจำโดยไม่บันทึกหรือเรนเดอร์ไฟล์:
import com.aspose.slides.*;
import android.graphics.Color;
import java.io.FileInputStream;

Presentation presentation = new Presentation();
try {
    ISlide slide = presentation.getSlides().get_Item(0);

    IAutoShape shape = slide.getShapes().addAutoShape(ShapeType.Rectangle, 200, 150, 250, 250);

    IPPImage image;
    try (FileInputStream imageStream = new FileInputStream("image.jpg")) {
        image = presentation.getImages().addImage(imageStream);
    }

    shape.getFillFormat().setFillType(FillType.Picture);
    shape.getFillFormat().getPictureFillFormat().getPicture().setImage(image);
    shape.getFillFormat().getPictureFillFormat().setPictureFillMode(PictureFillMode.Stretch);

    int extrusionColor = Color.rgb(255, 140, 0);
    shape.getThreeDFormat().getCamera().setCameraType(CameraPresetType.OrthographicFront);
    shape.getThreeDFormat().getCamera().setRotation(10, 20, 30);
    shape.getThreeDFormat().getLightRig().setLightType(LightRigPresetType.Flat);
    shape.getThreeDFormat().getLightRig().setDirection(LightingDirection.Top);
    shape.getThreeDFormat().setMaterial(MaterialPresetType.Flat);
    shape.getThreeDFormat().setExtrusionHeight(150);
    shape.getThreeDFormat().getExtrusionColor().setColor(extrusionColor);
} finally {
    presentation.dispose();
}
ภาพแสดงที่หน้าแนวหน้าเป็นรูปถ่าย, ส่วนดันออกแสดงเป็นพื้นผิวด้านข้าง 3D:
ใช้การจัดรูปแบบ 3D กับข้อความ
การจัดรูปแบบ 3D ของรูปทรงส่งผลต่อเนื้อหารูปทรง ส่วนการจัดรูปแบบ 3D ของข้อความส่งผลต่อกรอบข้อความ ซึ่งเหมาะกับเอฟเฟกต์แบบ WordArt ที่ต้องการให้ตัวอักษรเองมีการดันออก, วัสดุ, แสงและการตั้งค่ากล้อง
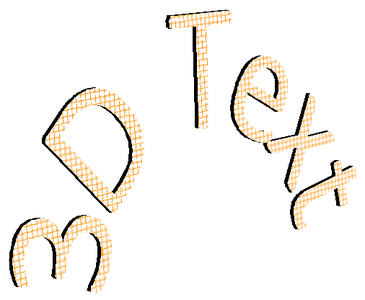
ตัวอย่างต่อไปนี้สร้างข้อความด้วยแพทเทิร์นตารางสีส้ม‑ขาว, ทำให้ข้อความโค้งขึ้นและกำหนดค่า 3D ผ่าน ITextFrameFormat.getThreeDFormat. ความสูงและความลึกของการดันออกเป็นจุด, การหมุนแสงเป็นองศา การเติมสีและเส้นขอบของรูปทรงถูกซ่อนเพื่อให้เห็นเฉพาะข้อความ ตัวอย่างเรนเดอร์เป็นภาพ PNG ขนาดสองเท่าของสไลด์เริ่มต้นและบันทึกเป็น PPTX:
import com.aspose.slides.*;
import android.graphics.Color;

final float imageScale = 2;

Presentation presentation = new Presentation();
try {
    ISlide slide = presentation.getSlides().get_Item(0);

    IAutoShape shape = slide.getShapes().addAutoShape(ShapeType.Rectangle, 200, 150, 250, 250);

    shape.getFillFormat().setFillType(FillType.NoFill);
    shape.getLineFormat().getFillFormat().setFillType(FillType.NoFill);
    shape.getTextFrame().setText("3D Text");

    IPortion portion = shape.getTextFrame().getParagraphs().get_Item(0).getPortions().get_Item(0);
    portion.getPortionFormat().getFillFormat().setFillType(FillType.Pattern);
    int patternColor = Color.rgb(255, 140, 0);
    portion.getPortionFormat().getFillFormat().getPatternFormat().getForeColor().setColor(patternColor);
    portion.getPortionFormat().getFillFormat().getPatternFormat().getBackColor().setColor(Color.WHITE);
    portion.getPortionFormat().getFillFormat().getPatternFormat().setPatternStyle(PatternStyle.LargeGrid);

    shape.getTextFrame().getParagraphs().get_Item(0).getParagraphFormat().getDefaultPortionFormat().setFontHeight(128);

    ITextFrameFormat textFrameFormat = shape.getTextFrame().getTextFrameFormat();
    textFrameFormat.setTransform(TextShapeType.ArchUp);
    textFrameFormat.getThreeDFormat().setExtrusionHeight(3.5f);
    textFrameFormat.getThreeDFormat().setDepth(3);
    textFrameFormat.getThreeDFormat().setMaterial(MaterialPresetType.Plastic);
    textFrameFormat.getThreeDFormat().getLightRig().setDirection(LightingDirection.Top);
    textFrameFormat.getThreeDFormat().getLightRig().setLightType(LightRigPresetType.Balanced);
    textFrameFormat.getThreeDFormat().getLightRig().setRotation(0, 0, 40);
    textFrameFormat.getThreeDFormat().getCamera().setCameraType(CameraPresetType.PerspectiveContrastingRightFacing);

    IImage thumbnail = slide.getImage(imageScale, imageScale);
    try {
        thumbnail.save("text_3d.png", ImageFormat.Png);
    } finally {
        thumbnail.dispose();
    }

    presentation.save("text_3d.pptx", SaveFormat.Pptx);
} finally {
    presentation.dispose();
}
ข้อความถูกเรนเดอร์เป็นตัวอักษร 3D ที่โค้ง, ดันออกและมีแพทเทิร์นสีส้ม:
คงข้อความให้แบนบนรูปทรง 3D
เพื่อให้ข้อความอ่านง่ายพร้อมคงลักษณะ 3D ของรูปทรง ให้เรียก ITextFrameFormat.setKeepTextFlat ผ่าน ITextFrame.getTextFrameFormat. เมื่อค่าเป็น true ข้อความจะอยู่นอกฉาก 3D; เมื่อเป็น false ข้อความจะเข้าร่วมในฉากและตามแนว 3D
การตั้งค่านี้ไม่ลบการจัดรูปแบบ 3D ของรูปทรง: กล้อง, แสง, วัสดุและการดันออกยังคงถูกกำหนดผ่าน IShape.getThreeDFormat. นอกจากนี้ยังแตกต่างจากการหมุนทั่วไป IShape.setRotation จะหมุนรูปทรงในระนาบสไลด์, ส่วน ITextFrameFormat.setRotationAngle ควบคุมการหมุนแบบกำหนดเองของข้อความภายในกรอบ การคงข้อความให้อยู่ด้านนอกฉาก 3D จะไม่รีเซ็ตมุมใด ๆ เหล่านี้
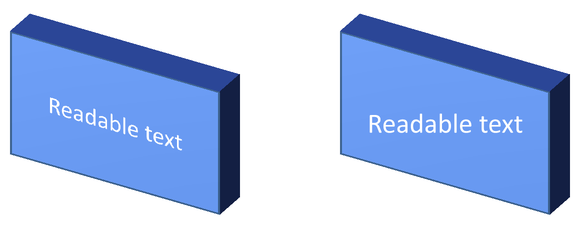
ตัวอย่างต่อไปนี้สร้างสี่เหลี่ยมสีน้ำเงินพร้อมข้อความและทำสำเนาไว้ข้าง ๆ ทั้งสองรูปทรงมีการจัดรูปแบบ 3D เดียวกัน; เพียงแค่การตั้งค่าข้อความต่างกัน: false ทางซ้ายและ true ทางขวา มุมกล้องเป็นองศาและความสูงการดันออกเป็น 40 จุด ตัวอย่างบันทึกงานนำเสนอเป็น PPTX และเรนเดอร์สไลด์เปรียบเทียบเป็น PNG ขนาดสองเท่าของขนาดเริ่มต้น:
import com.aspose.slides.*;
import android.graphics.Color;

Presentation presentation = new Presentation();
try {
    ISlide slide = presentation.getSlides().get_Item(0);

    IAutoShape shape = slide.getShapes().addAutoShape(ShapeType.Rectangle, 70, 160, 240, 140);

    shape.getTextFrame().setText("Readable text");
    shape.getTextFrame().getParagraphs().get_Item(0).getParagraphFormat().getDefaultPortionFormat().setFontHeight(28);
    shape.getTextFrame().getParagraphs().get_Item(0).getParagraphFormat().setAlignment(TextAlignment.Center);
    shape.getTextFrame().getTextFrameFormat().setAnchoringType(TextAnchorType.Center);
    shape.getFillFormat().setFillType(FillType.Solid);
    shape.getFillFormat().getSolidFillColor().setColor(Color.rgb(100, 149, 237));

    shape.getThreeDFormat().getCamera().setCameraType(CameraPresetType.OrthographicFront);
    shape.getThreeDFormat().getCamera().setRotation(30, 30, 0);
    shape.getThreeDFormat().getLightRig().setLightType(LightRigPresetType.Flat);
    shape.getThreeDFormat().getLightRig().setDirection(LightingDirection.Top);
    shape.getThreeDFormat().setMaterial(MaterialPresetType.Flat);
    shape.getThreeDFormat().setExtrusionHeight(40);
    shape.getThreeDFormat().getExtrusionColor().setColor(Color.rgb(65, 105, 225));
    shape.getTextFrame().getTextFrameFormat().setKeepTextFlat(false);

    IAutoShape flatTextShape = (IAutoShape) slide.getShapes().addClone(shape, 400, 160);
    flatTextShape.getTextFrame().getTextFrameFormat().setKeepTextFlat(true);

    presentation.save("keep_text_flat.pptx", SaveFormat.Pptx);
    IImage image = slide.getImage(2, 2);
    try {
        image.save("keep_text_flat.png", ImageFormat.Png);
    } finally {
        image.dispose();
    }
} finally {
    presentation.dispose();
}
ทางซ้ายข้อความตามแนว 3D; ทางขวาข้อความคงแบนและอ่านง่ายขึ้น ทั้งสองสี่เหลี่ยมคงการดันออกและแนว 3D ที่มองเห็นได้เหมือนกัน
พฤติกรรมการส่งออกและการเรนเดอร์
Aspose.Slides รักษาการจัดรูปแบบ 3D เมบันทึกเป็นรูปแบบ PowerPoint เช่น PPTX เมื่อเรนเดอร์หรือส่งออกเป็นรูปแบบแบบคงที่ ฉาก 3D จะถูกแปลงเป็นราสเตอร์หรือวาดลงในผลลัพธ์เป็นผลลัพธ์ 2D นี้ใช้เมื่อคุณเรนเดอร์สไลด์เป็น PNG, ส่งออกเป็น PDF, ส่งออกเป็น HTML, หรือสร้างเฟรมสำหรับ video conversion
จำจุดเหล่านี้ไว้:
- ภาพที่ส่งออกและ PDF ไม่เป็นแบบเชิงโต้ตอบ วัตถุไม่สามารถหมุนได้โดยผู้ชมหลังการส่งออก
- ลุคสุดท้ายขึ้นกับการรวมกันของกล้อง, light rig, material, extrusion, fill และการสเกลสไลด์
- หากต้องการตรวจสอบค่าการจัดรูปแบบที่สืบทอดหรืออิงธีม ให้อ่าน effective shape properties
- รูปแบบผลลัพธ์บางประเภทไม่สามารถเก็บการจัดรูปแบบ 3D ที่แก้ไขได้ใน PowerPoint ในรูปแบบเหล่านั้น ผลลัพธ์ที่เห็นจะถูกเรนเดอร์ให้เป็นภาพแทนการเก็บเป็นการตั้งค่า 3D ที่แก้ไขได้
FAQ
Aspose.Slides สามารถสร้างงานนำเสนอ 3D แบบโต้ตอบได้หรือไม่?
Aspose.Slides สร้างและเรนเดอร์เอฟเฟกต์ 3D ของ PowerPoint สำหรับรูปทรงและข้อความ ไม่ทำให้ภาพที่ส่งออก, PDF หรือหน้า HTML เป็นฉาก 3D ที่ผู้ชมสามารถหมุนได้ ใน PPTX การจัดรูปแบบ 3D ยังคงแก้ไขได้ใน PowerPoint เมอรูปแบบนั้นรองรับ
ความแตกต่างระหว่างโมเดล 3D กับเอฟเฟกต์ 3D คืออะไร?
โมเดล 3D คือวัตถุ 3D แยกที่แทรกลงในงานนำเสนอ ส่วนเอฟเฟกต์ 3D คือการจัดรูปแบบที่ใช้กับรูปทรงหรือข้อความทั่วไปของ PowerPoint เช่น การหมุน, การดันออก, bevel, แสงและวัสดุ บทความนี้ครอบคลุมเอฟเฟกต์ 3D
ต้องตั้งค่าอะไรบ้างเพื่อให้รูปทรง 3D ปรากฏ?
อย่างน้อยต้องตั้งค่า rotation ของกล้องและอย่างใดอย่างหนึ่งระหว่าง extrusion หรือ depth โดยปกติยังควรตั้งค่า light rig และ material เพื่อให้หน้าแสดงเงาและไฮไลต์ที่ชัดเจน
ฉันสามารถใช้เอฟเฟกต์ 3D กับรูปทรงและข้อความได้หรือไม่?
ได้ ใช้ IShape.getThreeDFormat สำหรับเนื้อหารูปทรงและ ITextFrameFormat.getThreeDFormat สำหรับข้อความ
เอฟเฟกต์ 3D จะปรากฏเมื่อส่งออกเป็นภาพ, PDF, HTML หรือเฟรมวิดีโอหรือไม่?
จะปรากฏ Aspose.Slides เรนเดอร์เอฟเฟกต์ 3D เมื่อสร้างภาพสไลด์, PDF, HTML หรือเฟรมที่ใช้สำหรับการแปลงเป็นวิดีโอ ผลลัพธ์ที่ส่งออกจะเป็นรูปลักษณ์ที่เรนเดอร์ ไม่ใช่วัตถุ 3D ที่แก้ไขได้
ฉันสามารถอ่านค่าตัวแปร 3D สุดท้ายหลังจากการสืบทอดและการตั้งค่าธีมได้หรือไม่?
ได้ ใช้ API การจัดรูปแบบแบบ effective ที่อธิบายใน Shape Effective Properties เพื่ออ่านค่า camera, light rig, bevel และค่าที่เกี่ยวข้องกับ 3D สุดท้าย