Apply Shape Animations in Presentations with Python
Introduction
Animations are visual effects that can be applied to texts, images, shapes, or charts. They give life to presentations or its constituents.
Why Use Animations in Presentations?
Using animations, you can
- control the flow of information
- emphasize important points
- increase interest or participation among your audience
- make content easier to read or assimilate or process
- draw your readers or viewers attention to important parts in a presentation
PowerPoint provides many options and tools for animations and animation effects across the entrance, exit, emphasis, and motion paths categories.
Animations in Aspose.Slides
- Aspose.Slides provides the classes and types you need to work with animations under the Aspose.Slides.Animation namespace,
- Aspose.Slides provides over 150 animation effects under the EffectType enumeration. These effects are essentially the same (or equivalent) effects used in PowerPoint.
Apply Animation to TextBox
Aspose.Slides for Python via .NET allows you to apply animation to the text in a shape.
- Create an instance of the Presentation class.
- Get a slide’s reference through its index.
- Add a
rectangleIAutoShape. - Add text to
IAutoShape.TextFrame. - Get a main sequence of effects.
- Add an animation effect to IAutoShape.
- Set the
TextAnimation.BuildTypeproperty to the value fromBuildTypeEnumeration. - Write the presentation to disk as a PPTX file.
This Python code shows you how to apply the Fade effect to AutoShape and set the text animation to the By 1st Level Paragraphs value:
import aspose.slides as slides

# Instantiates a presentation class that represents a presentation file.
with slides.Presentation() as pres:
    sld = pres.slides[0]

    # Adds new AutoShape with text
    autoShape = sld.shapes.add_auto_shape(slides.ShapeType.RECTANGLE, 20, 20, 150, 100)

    textFrame = autoShape.text_frame
    textFrame.text = "First paragraph \nSecond paragraph \n Third paragraph"

    # Gets the main sequence of the slide.
    sequence = sld.timeline.main_sequence

    # Adds Fade animation effect to shape
    effect = sequence.add_effect(autoShape, slides.animation.EffectType.FADE, slides.animation.EffectSubtype.NONE, slides.animation.EffectTriggerType.ON_CLICK)

    # Animates shape text by 1st level paragraphs
    effect.text_animation.build_type = slides.animation.BuildType.BY_LEVEL_PARAGRAPHS1

    # Save the PPTX file to disk
    pres.save("AnimText_out.pptx", slides.export.SaveFormat.PPTX)
Apply Animation to PictureFrame
- Create an instance of the Presentation class.
- Get a slide’s reference through its index.
- Add or get a PictureFrame on the slide.
- Get the main sequence of effects.
- Add an animation effect to PictureFrame.
- Write the presentation to disk as a PPTX file.
This Python code shows you how to apply the Fly effect to a picture frame:
import aspose.slides as slides
import aspose.pydrawing as draw


# Instantiates a presentation class that represents a presentation file.
with slides.Presentation() as pres:
    # Load Image to be added in presentaiton image collection
    img = draw.Bitmap("aspose-logo.jpg")
    image = pres.images.add_image(img)

    # Adds picture frame to slide
    picFrame = pres.slides[0].shapes.add_picture_frame(slides.ShapeType.RECTANGLE, 50, 50, 100, 100, image)

    # Gets the main sequence of the slide.
    sequence = pres.slides[0].timeline.main_sequence

    # Adds Fly from Left animation effect to picture frame
    effect = sequence.add_effect(picFrame, slides.animation.EffectType.FLY,
        slides.animation.EffectSubtype.LEFT,
        slides.animation.EffectTriggerType.ON_CLICK)

    # Save the PPTX file to disk
    pres.save("AnimImage_out.pptx", slides.export.SaveFormat.PPTX)
Apply Animation to Shape
- Create an instance of the Presentation class.
- Get a slide’s reference through its index.
- Add a
rectangleIAutoShape. - Add a
BevelIAutoShape (when this object is clicked, the animation gets played). - Create a sequence of effects on the bevel shape.
- Create a custom
UserPath. - Add commands for moving to the
UserPath. - Write the presentation to disk as a PPTX file.
This Python code shows you how to apply the PathFootball (path football) effect to a shape:
import aspose.slides.animation as anim
import aspose.slides as slides
import aspose.pydrawing as draw

# Instantiates a Prseetation class that represents a PPTX file
with slides.Presentation() as pres:
    sld = pres.slides[0]

    # Creates PathFootball effect for existing shape from scratch.
    ashp = sld.shapes.add_auto_shape(slides.ShapeType.RECTANGLE, 150, 150, 250, 25)

    ashp.add_text_frame("Animated TextBox")

    # Adds the PathFootBall animation effect.
    pres.slides[0].timeline.main_sequence.add_effect(ashp,
        anim.EffectType.PATH_FOOTBALL,
        anim.EffectSubtype.NONE,
        anim.EffectTriggerType.AFTER_PREVIOUS)

    # Creates some kind of "button".
    shapeTrigger = pres.slides[0].shapes.add_auto_shape(slides.ShapeType.BEVEL, 10, 10, 20, 20)

    # Creates a sequence of effects for the button.
    seqInter = pres.slides[0].timeline.interactive_sequences.add(shapeTrigger)

    # Creates a custom user path. Our object will be moved only after the button is clicked.
    fxUserPath = seqInter.add_effect(ashp,
        anim.EffectType.PATH_USER,
        anim.EffectSubtype.NONE,
        anim.EffectTriggerType.ON_CLICK)

    # Adds commands for moving since created path is empty.
    motionBhv = fxUserPath.behaviors[0]

    pts = [draw.PointF(0.076, 0.59)]
    motionBhv.path.add(anim.MotionCommandPathType.LINE_TO, pts, anim.MotionPathPointsType.AUTO, True)
    pts = [draw.PointF(-0.076, -0.59)]
    motionBhv.path.add(anim.MotionCommandPathType.LINE_TO, pts, anim.MotionPathPointsType.AUTO, False)
    motionBhv.path.add(anim.MotionCommandPathType.END, None, anim.MotionPathPointsType.AUTO, False)

    # Writes the PPTX file to disk
    pres.save("AnimExample_out.pptx", slides.export.SaveFormat.PPTX)
Get the Animation Effects Applied to Shape
The following examples show you how to use the get_effects_by_shape method from the Sequence class to get all animation effects applied to a shape.
Example 1: Get animation effects applied to a shape on a normal slide
Previously, you learned how to add animation effects to shapes in PowerPoint presentations. The following sample code shows you how to get the effects applied to the first shape on the first normal slide in the presentation AnimExample_out.pptx.
import aspose.slides as slides

with slides.Presentation("AnimExample_out.pptx") as presentation:
    first_slide = presentation.slides[0]

    # Gets the main animation sequence of the slide.
    sequence = first_slide.timeline.main_sequence

    # Gets the first shape on the first slide.
    shape = first_slide.shapes[0]

    # Gets animation effects applied to the shape.
    shape_effects = sequence.get_effects_by_shape(shape)

    if len(shape_effects) > 0:
        print("The shape", shape.name, "has", len(shape_effects), "animation effects.")
Example 2: Get all animation effects, including those inherited from placeholders
If a shape on a normal slide has placeholders that are on the layout slide and/or master slide, and animation effects have been added to these placeholders, then all effects of the shape will be played during the slide show, including those inherited from the placeholders.
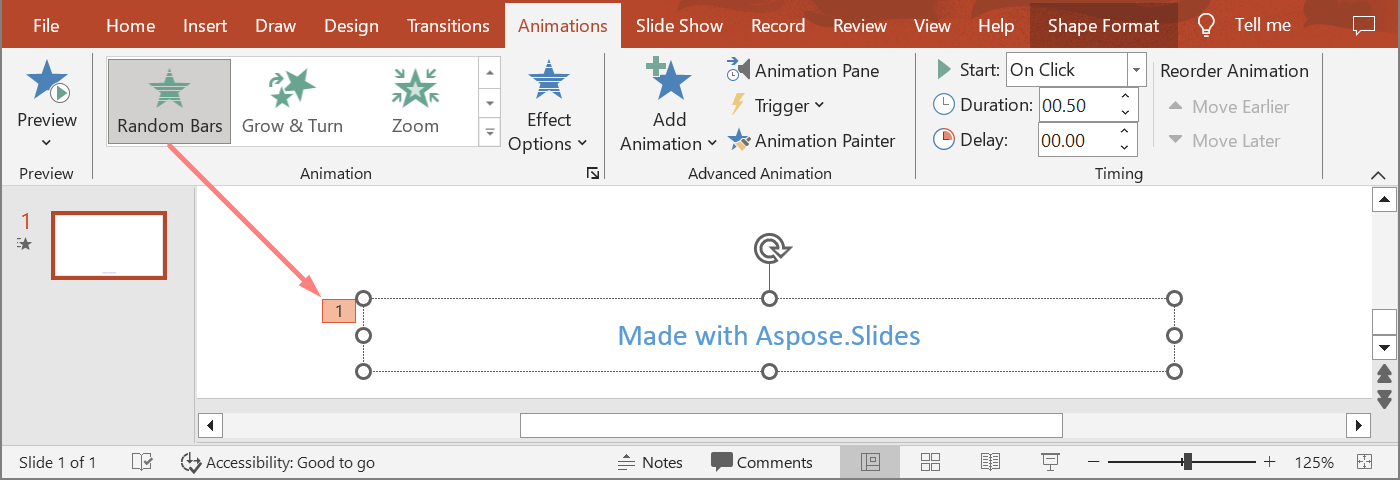
Let’s say we have a PowerPoint presentation file sample.pptx with one slide containg only a footer shape with the text “Made with Aspose.Slides” and the Random Bars effect is applied to the shape.
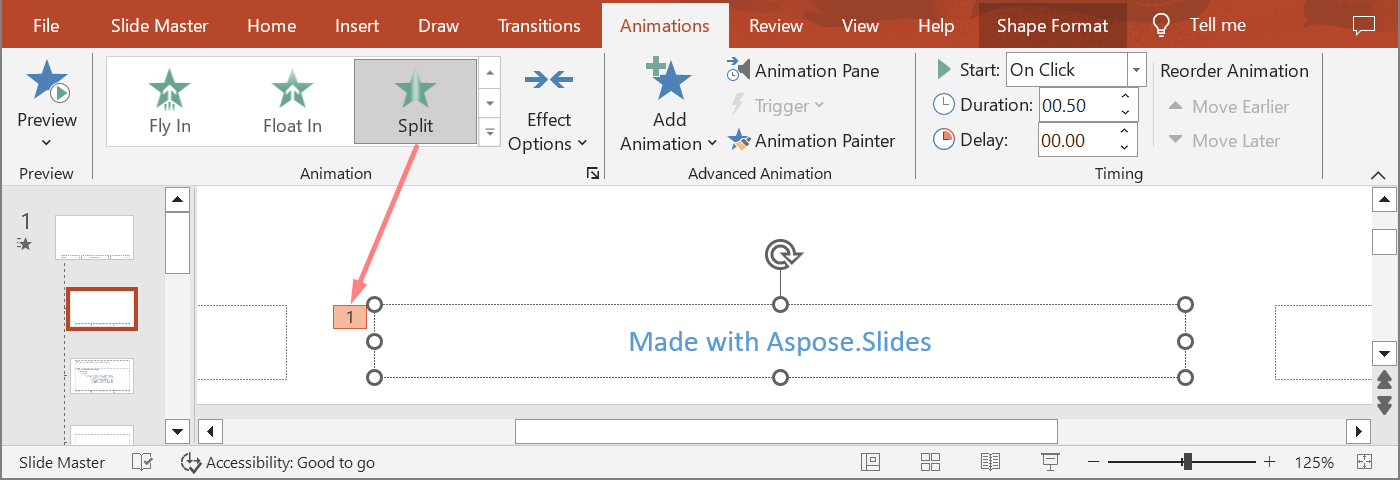
Let’s also assume that the Split effect is applied to the footer placeholder on the layout slide.
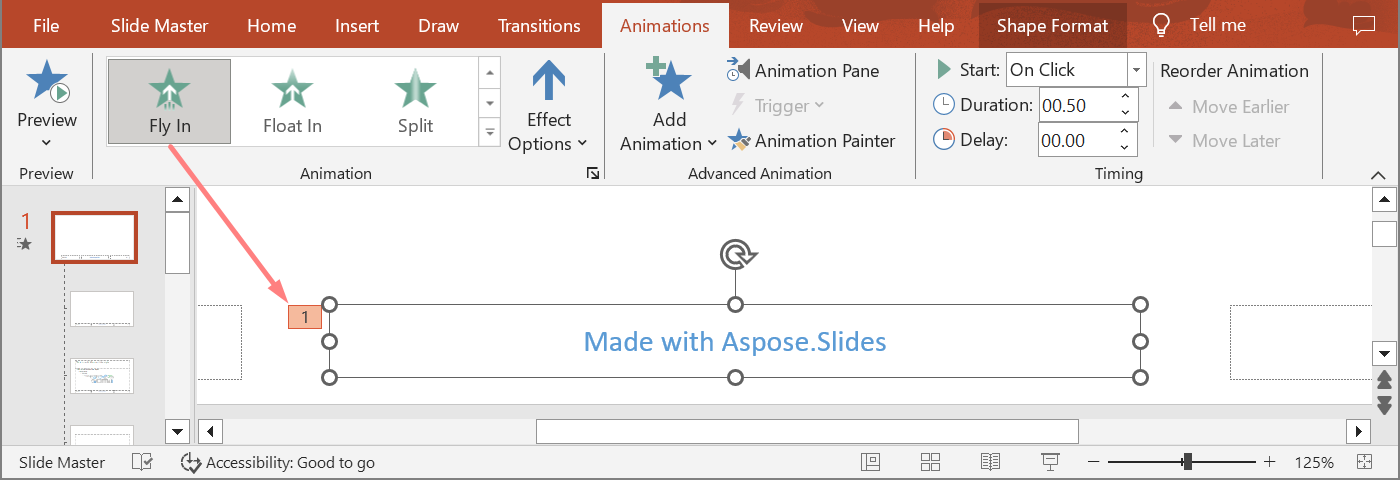
And finally, the Fly In effect is applied to the footer placeholder on the master slide.
The following sample code shows you how to use the get_base_placeholder method from the Shape class to access the shape placeholders and get the animation effects applied to the footer shape, including those inherited from placeholders located on the layout and master slides.
import aspose.slides as slides

def print_effects(effects):
    for effect in effects:
        print(effect.type.name, effect.subtype.name)
with slides.Presentation("sample.pptx") as presentation:
    slide = presentation.slides[0]

    # Get animation effects of the shape on the normal slide.
    shape = slide.shapes[0]
    shape_effects = slide.timeline.main_sequence.get_effects_by_shape(shape)

    # Get animation effects of the placeholder on the layout slide.
    layout_shape = shape.get_base_placeholder()
    layout_shape_effects = slide.layout_slide.timeline.main_sequence.get_effects_by_shape(layout_shape)

    # Get animation effects of the placeholder on the master slide.
    master_shape = layout_shape.get_base_placeholder()
    master_shape_effects = slide.layout_slide.master_slide.timeline.main_sequence.get_effects_by_shape(master_shape)

    print("Main sequence of shape effects:")
    print_effects(master_shape_effects)
    print_effects(layout_shape_effects)
    print_effects(shape_effects)
Output:
Main sequence of shape effects:
FLY BOTTOM
SPLIT VERTICAL_IN
RANDOM_BARS HORIZONTAL
Change Animation Effect Timing Properties
Aspose.Slides for Python via .NET allows you to change the Timing properties of an animation effect.
This is the Animation Timing pane in Microsoft PowerPoint:

These are the correspondences between PowerPoint Timing and Effect.Timing properties:
- PowerPoint Timing Start drop-down list matches the Effect.Timing.TriggerType property.
- PowerPoint Timing Duration matches the
Effect.Timing.Durationproperty. The duration of an animation (in seconds) is the total time it takes the animation to complete one cycle. - PowerPoint Timing Delay matches the
Effect.Timing.TriggerDelayTimeproperty.
This is how you change the Effect Timing properties:
- Apply or get the animation effect.
- Set new values for the
Effect.Timingproperties you need. - Save the modified PPTX file.
This Python code demonstrates the operation:
import aspose.slides as slides

# Instantiates a presentation class that represents a presentation file.
with slides.Presentation("AnimExample_out.pptx") as pres:
    # Gets the main sequence of the slide.
    sequence = pres.slides[0].timeline.main_sequence

    # Gets the first effect of main sequence.
    effect = sequence[0]

    # Changes effect TriggerType to start on click
    effect.timing.trigger_type = slides.animation.EffectTriggerType.ON_CLICK

    # Changes effect Duration
    effect.timing.duration = 3

    # Changes effect TriggerDelayTime
    effect.timing.trigger_delay_time = 0.5

    # Saves the PPTX file to disk
    pres.save("AnimExample_changed.pptx", slides.export.SaveFormat.PPTX)
Animation Effect Sound
Aspose.Slides provides these properties to allow you to work with sounds in animation effects:
soundstop_previous_sound
Add Animation Effect Sound
This Python code shows you how to add an animation effect sound and stop it when the next effect starts:
import aspose.slides as slides

with Presentation("AnimExample_out.pptx") as pres:
    # Adds audio to presentation audio collection
    effect_sound = pres.audios.add_audio(open("sampleaudio.wav", "rb").read())

    first_slide = pres.slides[0]

    # Gets the main sequence of the slide.
    sequence = first_slide.timeline.main_sequence

    # Gets the first effect of the main sequence
    first_effect = sequence[0]

    # Сhecks the effect for "No Sound"
    if not first_effect.stop_previous_sound and first_effect.sound is None:
        # Adds sound for the first effect
        first_effect.sound = effect_sound

    # Gets the first interactive sequence of the slide.
    interactive_sequence = first_slide.timeline.interactive_sequences[0]

    # Sets the effect "Stop previous sound" flag
    interactive_sequence[0].stop_previous_sound = True

    # Writes the PPTX file to disk
    pres.save("AnimExample_Sound_out.pptx", slides.export.SaveFormat.PPTX)
Extract Animation Effect Sound
- Create an instance of the Presentation class.
- Get a slide’s reference through its index.
- Get the main sequence of effects.
- Extract the
soundembedded to each animation effect.
This Python code shows you how to extract the sound embedded in an animation effect:
import aspose.slides as slides

# Instantiates a presentation class that represents a presentation file.
with slides.Presentation("EffectSound.pptx") as presentation:
    slide = presentation.slides[0]

    # Gets the main sequence of the slide.
    sequence = slide.timeline.main_sequence

    for effect in sequence:
        if effect.sound is None:
            continue

        # Extracts the effect sound in byte array
        audio = effect.sound.binary_data
After Animation
Aspose.Slides for .NET allows you to change the After animation property of an animation effect.
This is the Animation Effect pane and extended menu in Microsoft PowerPoint:
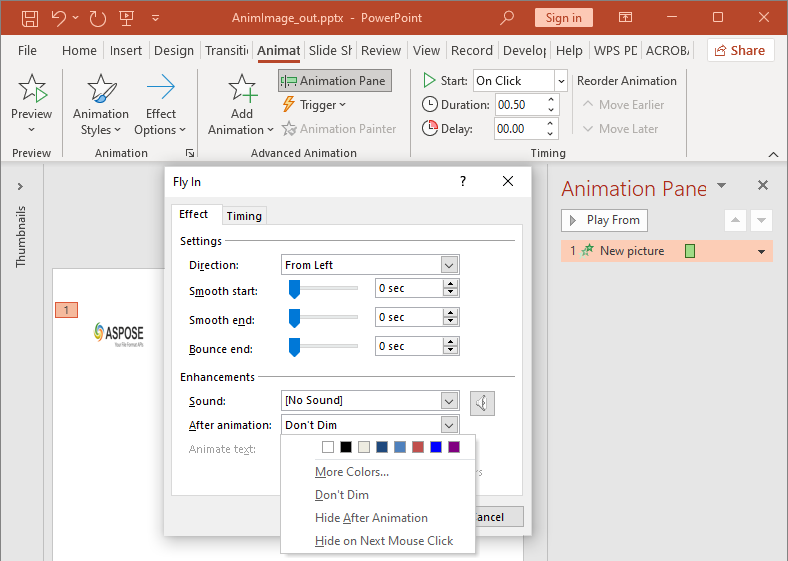
PowerPoint Effect After animation drop-down list matches these properties:
after_animation_typeproperty which describes the After animation type :- PowerPoint More Colors matches the COLOR type;
- PowerPoint Don’t Dim list item matches the DO_NOT_DIM type (default after animation type);
- PowerPoint Hide After Animation item matches the HIDE_AFTER_ANIMATION type;
- PowerPoint Hide on Next Mouse Click item matches the HIDE_ON_NEXT_MOUSE_CLICK type;
after_animation_colorproperty which defines an after animation color format. This property works in conjunction with the COLOR type. If you change the type to another, the after animation color will be cleared.
This Python code shows you how to change an after animation effect:
import aspose.slides as slides

# Instantiates a presentation class that represents a presentation file
with slides.Presentation("AnimImage_out.pptx") as pres:
    first_slide = pres.slides[0]

    # Gets the first effect of the main sequence
    first_effect = first_slide.timeline.main_sequence[0]

    # Changes the after animation type to Color
    first_effect.after_animation_type = AfterAnimationType.COLOR

    # Sets the after animation dim color
    first_effect.after_animation_color.color = Color.alice_blue

    # Writes the PPTX file to disk
    pres.save("AnimImage_AfterAnimation.pptx", slides.export.SaveFormat.PPTX)
Animate Text
Aspose.Slides provides these properties to allow you to work with an animation effect’s Animate text block:
animate_text_typewhich describes an animate text type of the effect. The shape text can be animated:- All at once (ALL_AT_ONCE type)
- By word (BY_WORD type)
- By letter (BY_LETTER type)
delay_between_text_partssets a delay between the animated text parts (words or letters). A positive value specifies the percentage of effect duration. A negative value specifies the delay in seconds.
This is how you can change the Effect Animate text properties:
- Apply or get the animation effect.
- Set the
build_typeproperty to AS_ONE_OBJECT value to turn off the By Paragraphs animation mode. - Set new values for the
animate_text_typeanddelay_between_text_partsproperties. - Save the modified PPTX file.
This Python code demonstrates the operation:
import aspose.slides as slides

with slides.Presentation("AnimTextBox_out.pptx") as pres:
    first_slide = pres.slides[0]

    # Gets the first effect of the main sequence
    first_effect = first_slide.timeline.main_sequence[0]

    # Changes the effect Text animation type to "As One Object"
    first_effect.text_animation.build_type = slides.animation.BuildType.AS_ONE_OBJECT

    # Changes the effect Animate text type to "By word"
    first_effect.animate_text_type = slides.animation.AnimateTextType.BY_WORD

    # Sets the delay between words to 20% of effect duration
    first_effect.delay_between_text_parts = 20

    # Writes the PPTX file to disk
    pres.save("AnimTextBox_AnimateText.pptx", slides.export.SaveFormat.PPTX)
FAQ
How can I ensure animations are preserved when publishing the presentation to the web?
Export to HTML5 and enable the options responsible for shape and transition animations. Plain HTML does not play slide animations, whereas HTML5 does.
How does changing the z-order (layer order) of shapes affect animation?
Animation and drawing order are independent: an effect controls the timing and type of appearing/disappearing, while z-order determines what covers what. The visible result is defined by their combination. (This is the general PowerPoint behavior; the Aspose.Slides effects-and-shapes model follows the same logic.)
Are there limitations when converting animations to video for certain effects?
In general, animations are supported, but rare cases or specific effects may be rendered differently. It is recommended to test with the effects you use and with the library version.