Analyzing your prompt, please hold on...
An error occurred while retrieving the results. Please refresh the page and try again.
Aspose.SVG offers a Free Online Image Vectorizer that is browser-based and works on any platform. Using this App, you may apply a set of options for obtaining the perfect result. Save your time and check this free Image Vectorizer to get all the benefits of vector graphics!

There are two types of images: vector and bitmap. Which type you use will depend on the situation. A bitmap is a two-dimensional array that maps colors to pixels at a particular location. A raster image is a much larger file than a vector one. Raster formats are suitable for photographs or pictures with color gradients. However, one of their main disadvantages is the loss of quality when scaling. Vector graphics allow you to scale images without losing quality and can sometimes significantly reduce their size. The best suited for the vector format are logos, icons, page layouts, maps, graphs, line arts, and illustrations. Image Vectorization is the process of converting a raster image to vector graphics – the Bezier curves, splines and lines.
This article considers a few C# examples that demonstrate the ImageVectorization functionalities and the effect of configuration properties, such as TraceSimplifier, TraceSmoother, and PathBuilder, on the vectorization result.
For the ColorLimit property, 25 colors are available. You can choose the required number of colors depending on the situation. The default value is 25. The ImageSizeLimit property sets the maximal dimension of an image determined by the multiplication of image width and height. The size of the image will be scaled based on this property. The default value is 1800000.
Note: Aspose.Svg.ImageVectorization Namespace aims to implement image vectorization tasks for source bitmaps such as JPG, PNG, BMP, TIFF, GIF, etc. The output image is in vector SVG file format.
The ImageVectorization Namespace includes a set of classes and interfaces that allows implementation of the image vectorization process. The provided classes and methods enable you to work with various options for preprocessing images before saving them to vector format. The processing assumes control of the following vectorization options: TraceSimplifier, TraceSmoother, ColorLimit and LineWidth.
Let’s look at how the TraceSimplifier property affects image vectorization. First of all, need to know that:
tolerance) constructor takes as a parameter the tolerance and initializes an instance of the ImageTraceSimplifier class.tolerance value determines the maximum error tolerance allowed for a point to be eliminated from the trace. It must be in the range of 0 to 4. The default value is 0.3.The following code snippet demonstrates the use of different values of the TraceSimplifier property for image to vector conversion.
1using System.IO;
2using Aspose.Svg.ImageVectorization;
3using Aspose.Svg.Saving; 1// Compare different SplinePathBuilder configurations for image vectorization with varying simplification levels
2
3// Initialize an instance of the ImageVectorizer class and specify configuration properties
4ImageVectorizer vectorizer1 = new ImageVectorizer
5{
6 Configuration =
7 {
8 PathBuilder = new SplinePathBuilder
9 {
10 TraceSimplifier = new ImageTraceSimplifier(0.1f),
11 TraceSmoother = new ImageTraceSmoother(2),
12 },
13 ColorsLimit = 2
14 }
15};
16
17ImageVectorizer vectorizer2 = new ImageVectorizer
18{
19 Configuration =
20 {
21 PathBuilder = new SplinePathBuilder
22 {
23 TraceSimplifier = new ImageTraceSimplifier(1),
24 TraceSmoother = new ImageTraceSmoother(2),
25 },
26 ColorsLimit = 2
27 }
28};
29
30ImageVectorizer vectorizer3 = new ImageVectorizer
31{
32 Configuration =
33 {
34 PathBuilder = new SplinePathBuilder
35 {
36 TraceSimplifier = new ImageTraceSimplifier(2),
37 TraceSmoother = new ImageTraceSmoother(2),
38 },
39 ColorsLimit = 2
40 }
41};
42
43// Prepare a path for a source image file
44string sourcePath = Path.Combine(DataDir, "formats.png");
45
46// Vectorize raster image from the specified file
47using SVGDocument document1 = vectorizer1.Vectorize(sourcePath);
48using SVGDocument document2 = vectorizer2.Vectorize(sourcePath);
49using SVGDocument document3 = vectorizer3.Vectorize(sourcePath);
50
51// Save the vectorized image as an SVG file
52document1.Save(Path.Combine(OutputDir, "formats1.svg"));
53document2.Save(Path.Combine(OutputDir, "formats2.svg"));
54document3.Save(Path.Combine(OutputDir, "formats3.svg"));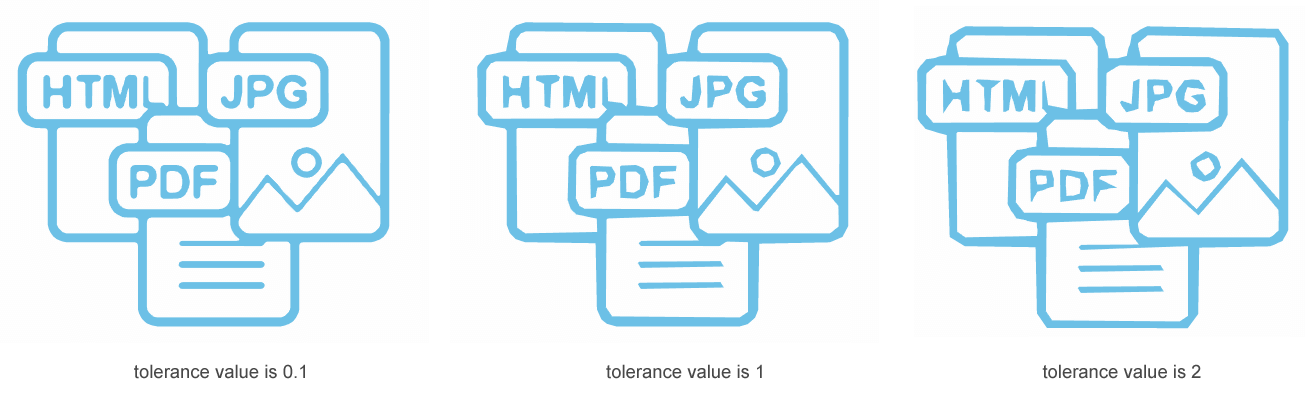
Sometimes fragments of contours look like sawtooth waves. Let’s look at how the TraceSmoother property affects contours’ smoothing. Before you start, know that:
severity) constructor takes as a parameter the severity and initializes an instance of the ImageTraceSmoother class;severity determines the extent of the region considered by query point. It must be in the range of 0 to 20.Let’s look at how the TraceSmoother property affects image vectorization:
1using System.IO;
2using Aspose.Svg.ImageVectorization;
3using Aspose.Svg.Saving; 1// Vectorize PNG to SVG using ImageVectorizer and custom parameters
2
3// Initialize an instance of the ImageVectorizer class
4ImageVectorizer vectorizer = new ImageVectorizer
5{
6 // Optionally set a configuration
7 Configuration =
8 {
9 // Optionally create an instance of the PathBuilder class
10 PathBuilder = new BezierPathBuilder {
11 // Optionally set trace smoother
12 TraceSmoother = new ImageTraceSmoother(0),
13 ErrorThreshold = 30,
14 MaxIterations = 30
15 },
16 ColorsLimit = 10,
17 LineWidth = 1
18 }
19};
20// Vectorize image from the specified file
21using SVGDocument document = vectorizer.Vectorize(Path.Combine(DataDir, "flower.png"));
22
23// Save vectorized Image as an SVG file
24document.Save(Path.Combine(OutputDir, "flower.svg"));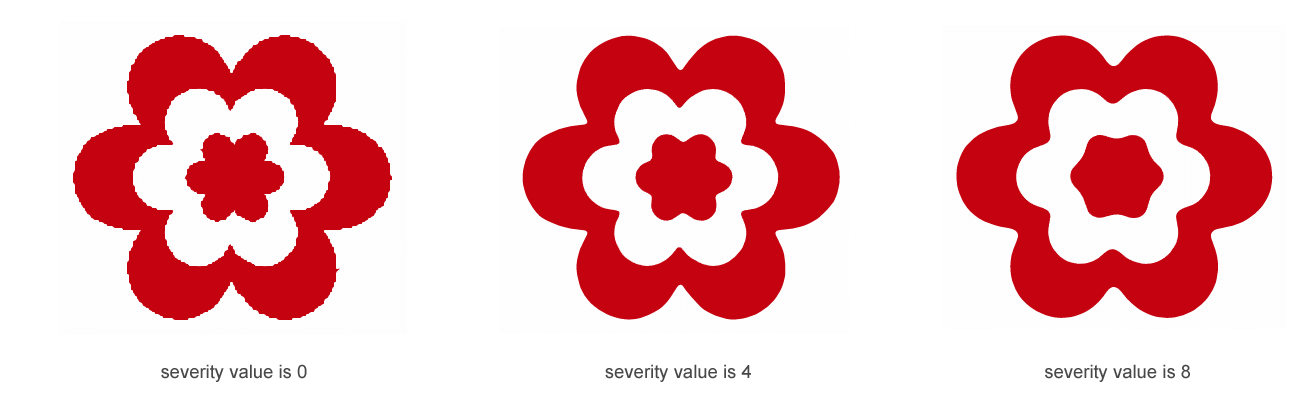
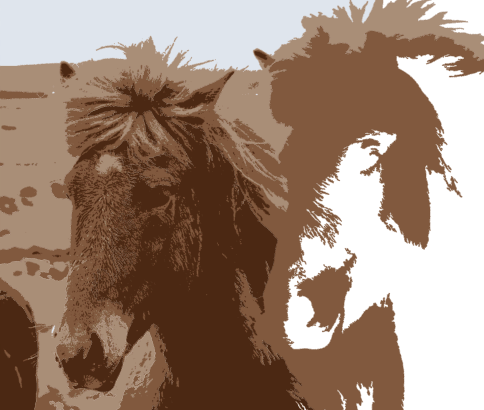
Is it possible to convert a photo in vector format to look identical to the photo?
SVG is not well suited for drawing photorealistic images. Vector pictures do not allow for natural color transitions yet. Vector graphics are the best for creating logos, illustrations, technical drawings. It is not the most suitable format for continuous-tone images with blends of color or to edit photographs. However, vectorizing photos can result in impressive artistic effects that can be interesting and useful.
In this section, we convert a photo to vector format and try to choose vectorization options so that the result looks identical to the photo:
1using System.IO;
2using Aspose.Svg.ImageVectorization;
3using Aspose.Svg.Saving; 1 // Convert JPG to SVG in C#
2
3 // Initialize an instance of the ImageVectorizer class
4 ImageVectorizer vectorizer = new ImageVectorizer
5 {
6 // Optionally set a configuration
7 Configuration =
8{
9 // Optionally create an instance of the PathBuilder class
10 PathBuilder = new SplinePathBuilder
11 {
12 TraceSmoother = new ImageTraceSmoother(1),
13 TraceSimplifier = new ImageTraceSimplifier(0.3f),
14 },
15 ColorsLimit = 25,
16 LineWidth = 1
17}
18 };
19 // Vectorize image from a specified file
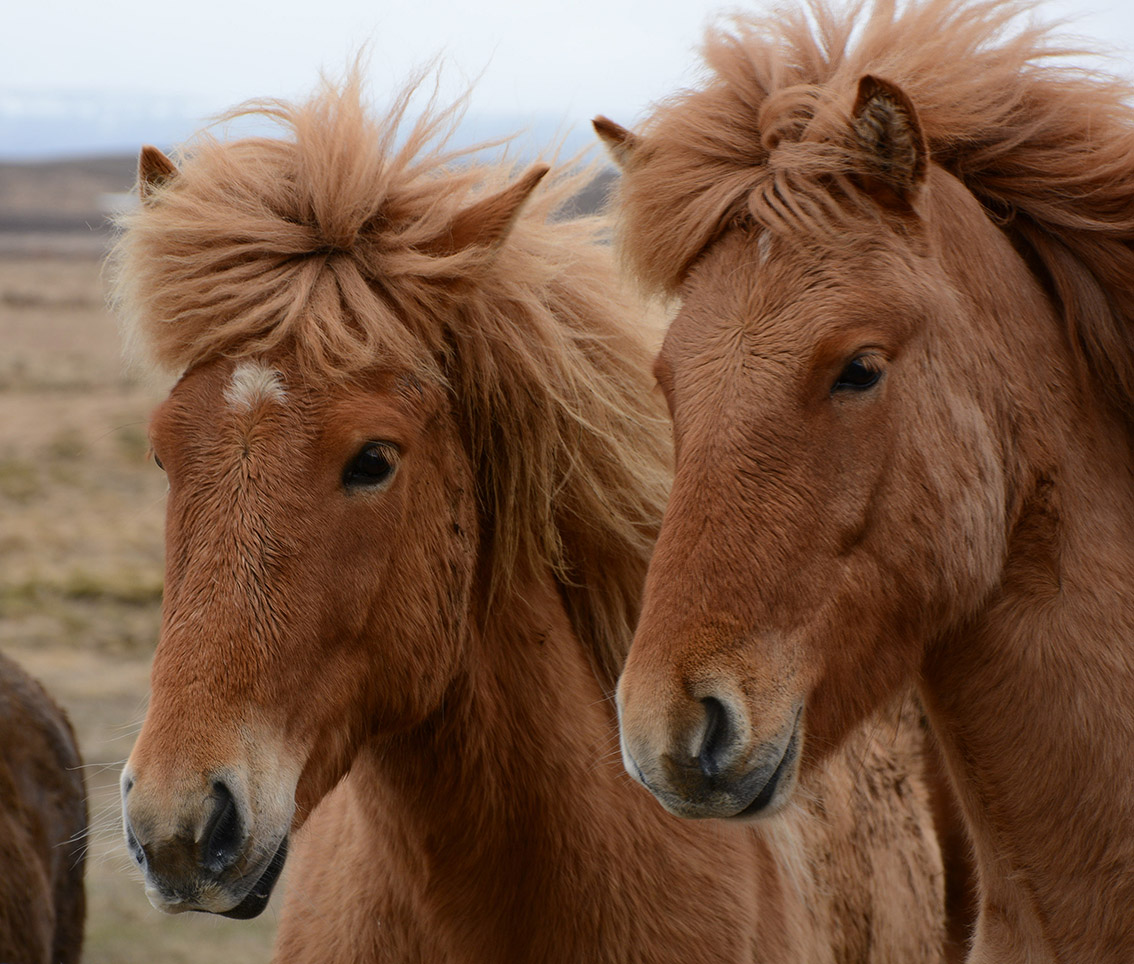
20 using SVGDocument document = vectorizer.Vectorize(Path.Combine(DataDir, "horses.jpg"));
21
22 // Save the vectorized image as SVG
23 document.Save(Path.Combine(OutputDir, "horses-new.svg"));The figure demonstrates the source photo (a), the vectorized image using the code snippet (b) and the manually improved vectorized image (c).
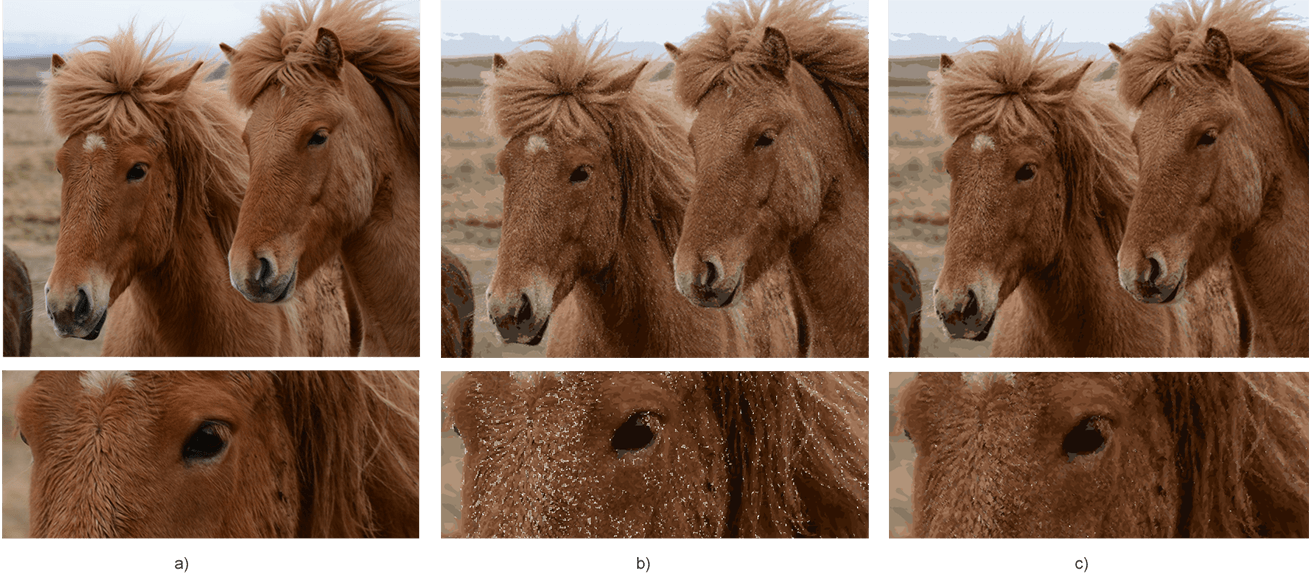
As mentioned above, SVG is not the most suitable format for continuous-tone images with blends of color, etc. The vectorization process uses color image quantization. All small same colored spots or pixels, we replace by geometric shapes or curves. As a result, the borders of such graphic elements do not fit snugly together; gaps appear between them. This is the reason for the form of white spots and dots in the vectorized image.
To fix this problem, you can manually edit the resulting SVG file. We suggest changing the stroke-width="100" value to "150" or another, as you like. Try to get the best result!

The source photo (a) and resulting SVG file (c) you may find and view in details by following the links – horses.jpg, horses.svg.
A free evaluation version of Aspose.SVG for .NET provides all the features for image vectorization except the following:
If you want to try Aspose.SVG for .NET without evaluation limitations request a 30-day temporary license. For more information, please refer to How to get a Temporary License?.
The figure shows the result of the photo to vector conversion without applying a license.
The resulting SVG file you may find and view in details by following the links – horses-license.svg.
You can download the complete C# examples and data files from GitHub. About downloading from GitHub and running examples, you find out from the How to Run the Examples section.
Analyzing your prompt, please hold on...
An error occurred while retrieving the results. Please refresh the page and try again.