Analyzing your prompt, please hold on...
An error occurred while retrieving the results. Please refresh the page and try again.
Aspose.SVG for Python via .NET allows you to edit SVG files and change their content easily. The Document Object Model (DOM) API fully follows the official SVG specifications, providing full control over SVG nodes and their properties. This allows you to add new nodes, delete existing nodes, or edit the contents of current nodes.
This article will show you how to edit SVG files using the Aspose.SVG for Python via .NET. We will explore detailed Python code examples that illustrate how to add and edit elements to an SVG document.
Aspose.SVG for Python via .NET API allows you to add various elements to a document. First, you would create a new element or node; then, you can add the element to the document.
<svg> ElementThe <svg> element is a container, and it is used as the outermost element of SVG documents. To point the <svg> element, you can apply a few ways:
document_element property of the
Document class gives direct access to the <svg> element of the document. In the following code snippet, we use this way.1# Create a new SVG document
2document = SVGDocument()
3
4# Get root <svg> element of the document
5svg_element = document.document_elementroot_element property of the
SVGDocument class returns the root <svg> element in the document hierarchy. To indicate the <svg> element, you can apply the following code:1# Create a new SVG document
2document = SVGDocument()
3
4# Get root <svg> element of the document
5svg_element = document.root_elementYou can use the
create_element_ns(namespace_uri, qualified_name) method of the
SVGDocument class to create an instance of the
Element class – the required element of the given qualified name and namespace URI. The namespace_uri sets the reference to
W3C SVG specification. The qualified_name must contain the string tag name of the element.
1# Create a new SVG document
2document = SVGDocument()
3svg_element = document.document_element
4
5# Create a new SVG <circle> element
6circle = document.create_element_ns("http://www.w3.org/2000/svg", "circle")
You can use the same code to create any new SVG element; only change the qualified_name. For example, to create basic SVG shapes, you should use for SVG circles the qualified_name = “circle”, ellipses – qualified_name = “ellipse”, rectangles – qualified_name = “rect”, lines – qualified_name = “line”, polylines – qualified_name = “polyline”, polygons – qualified_name = “polygon”, and Bezier curves – qualified_name = “path”.
You can manage element attributes and their values using the
set_attribute(name, value),
get_attribute(qualified_name),
has_attribute(qualified_name),
remove_attribute(qualified_name) methods of the
Element class. For example, if you create a <circle> element, you can set attributes:
1# Set attributes for the <circle> element
2circle.set_attribute("cx", "50")
3circle.set_attribute("cy", "50")
4circle.set_attribute("r", "40")
5circle.set_attribute("fill", "red")You can use the
append_child(node) method to add the new child to the end of the list of children of the node.
To add an element to an SVG document, Python API provides the
insert_before(node, child) method of the
Node class. This method inserts the node before the existing child node or at the end of the list of children if the child is null.
The following code snippet illustrates how to create and add <g> element as the first child in the SVG document using insert_before() mrthod.
 1from aspose.svg import SVGDocument
 2
 3# Create a new SVG document
 4document = SVGDocument()
 5svg_element = document.root_element
 6
 7# Add <g> element and set "fill" attribute
 8g_element = document.create_element_ns("http://www.w3.org/2000/svg", "g")
 9g_element.set_attribute("fill", "red")
10svg_element.insert_before(g_element, svg_element.first_child)
11
12# Save the document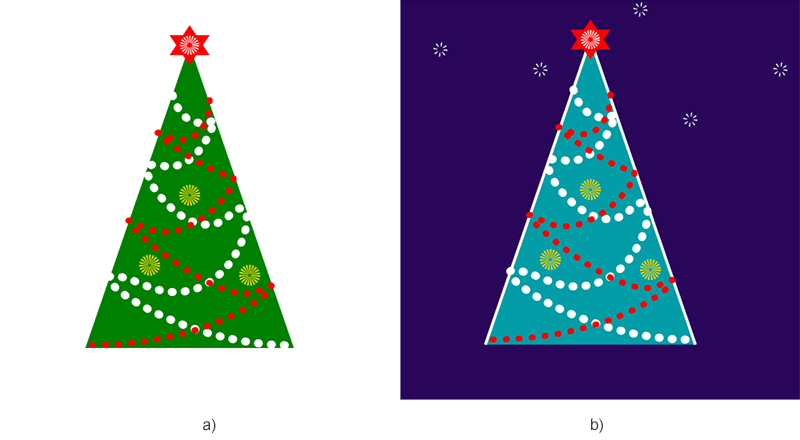
13document.save("add-g-element.svg")Consider an example of editing the existing SVG file сhristmas-tree.svg. We will take a file with a drawing of a Christmas tree and edit it, making a drawing of a Christmas tree against the background of the night sky. To do this, we will add a background and circles that will represent stars and change the color of the tree.
The following code snippet shows:
 1from aspose.svg import SVGDocument
 2
 3# Create a new SVG document
 4document = SVGDocument("сhristmas-tree.svg")
 5svg_element = document.root_element
 6
 7# Add a <rect> element as a background
 8rect = document.create_element_ns("http://www.w3.org/2000/svg", "rect")
 9rect.set_attribute("x", "10")
10rect.set_attribute("y", "10")
11rect.set_attribute("width", "400")
12rect.set_attribute("height", "400")
13rect.set_attribute("fill", "#2a065b")
14svg_element.insert_before(rect, svg_element.first_child)
15
16# Add a circle element stylized as a star
17circle = document.create_element_ns("http://www.w3.org/2000/svg", "circle")
18circle.set_attribute("id", "star")
19circle.set_attribute("cx", "60")
20circle.set_attribute("cy", "50")
21circle.set_attribute("r", "5")
22circle.set_attribute("stroke", "white")
23circle.set_attribute("stroke-width", "4")
24circle.set_attribute("stroke-dasharray", "1 3")
25circle.set_attribute("fill", "none")
26svg_element.append_child(circle)
27
28# Create and add new stars
29use = document.create_element_ns("http://www.w3.org/2000/svg", "use")
30use.set_attribute("href", "#star")
31use.set_attribute("transform", "translate(40, 70)")
32svg_element.append_child(use)
33
34# You can add as many stars as you wish
35
36# Get polyline element to change tree color
37polyline_element = svg_element.query_selector("polyline")
38
39# Set a new "fill" attribute value for the polyline element
40polyline_element.set_attribute("fill", "#039da7")
41polyline_element.set_attribute("stroke", "white")
42polyline_element.set_attribute("stroke-width", "3")
43
44# Save the SVG document to a file
45document.save("сhristmas-tree-edited.svg")
The figure shows the visualization of the original SVG file сhristmas-tree.svg and the file that was edited.
Analyzing your prompt, please hold on...
An error occurred while retrieving the results. Please refresh the page and try again.