Създаване на таблица
Aspose.Words позволява на потребителите да създават таблици в документ от нулата и предоставя няколко различни методи за това. Тази статия представя подробности за това как да добавите форматирани таблици във вашия документ, използвайки всеки метод, както и сравнение на всеки метод в края на статията.
Стилове по подразбиране
На новосъздадената таблица са дадени стойности по подразбиране, подобни на тези, използвани в Microsoft Word:
Имоти в таблицата | По подразбиране Aspose.Words |
---|---|
Border Style |
Single |
Border Width |
1/2 pt |
Border Color |
Black |
Left and Right Padding |
5.4 pts |
AutoFit Mode |
AutoFit to Window |
Allow AutoFit |
True |
Създаване на таблица с DocumentBuilder
В Aspose.Words, Потребителите могат да създават таблица в документ с помощта на DocumentBuilder. Основният алгоритъм за създаване на таблица е следният:
- Започнете таблицата с StartTable
- Добавяне на клетка към таблицата с използване InsertCell Това автоматично започва нов ред
- По избор използвайте CellFormat свойство за определяне на форматирането на клетки
- Вмъкване на съдържанието на клетката с помощта на подходящо DocumentBuilder методи като Writeln, InsertImage, и други
- Повторете стъпки 2-4 докато редът е завършен
- Обаждане EndRow за край на текущия ред
- По избор използвайте RowFormat собственост за определяне на форматирането на реда
- Повторете стъпки 2-7 докато таблицата е завършена
- Обаждане EndTable да завърши изграждането на масата
Важни детайли:
- StartTable може да се нарече и в клетка, в който случай започва създаването на гнездена маса в клетката.
- След обаждане InsertCell, е създадена нова клетка и всяко съдържание, което добавите с помощта на други методи на DocumentBuilder класа ще бъде добавен към текущата клетка. За да създадете нова клетка на същия ред, се обадете InsertCell Отново.
- Ако InsertCell се нарича веднага след EndRow и в края на един ред, масата ще продължи на нов ред.
- На EndTable метод за приключване на таблицата трябва да се нарича само веднъж след обаждане EndRow. Обаждане EndTable Премества курсора от текущата клетка на позицията веднага след таблицата.
Процесът на създаване на таблица може ясно да се види на следната картина:
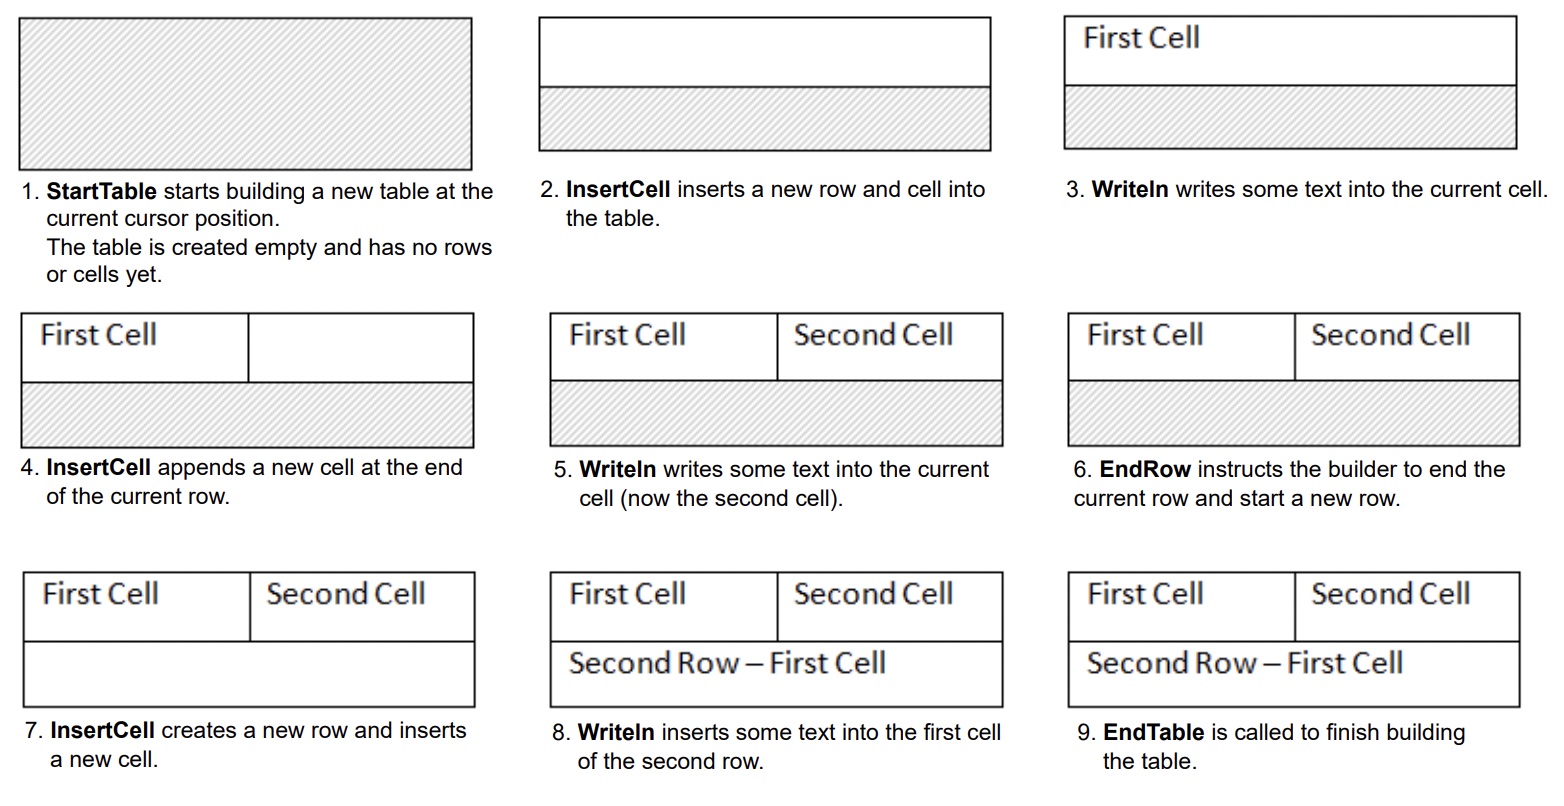
Следният пример за код показва как да се създаде проста таблица с помощта на DocumentBuilder с форматиране по подразбиране:
// For complete examples and data files, please go to https://github.com/aspose-words/Aspose.Words-for-.NET.git. | |
Document doc = new Document(); | |
DocumentBuilder builder = new DocumentBuilder(doc); | |
// Start building the table. | |
builder.StartTable(); | |
builder.InsertCell(); | |
builder.Write("Row 1, Cell 1 Content."); | |
// Build the second cell. | |
builder.InsertCell(); | |
builder.Write("Row 1, Cell 2 Content."); | |
// Call the following method to end the row and start a new row. | |
builder.EndRow(); | |
// Build the first cell of the second row. | |
builder.InsertCell(); | |
builder.Write("Row 2, Cell 1 Content"); | |
// Build the second cell. | |
builder.InsertCell(); | |
builder.Write("Row 2, Cell 2 Content."); | |
builder.EndRow(); | |
// Signal that we have finished building the table. | |
builder.EndTable(); | |
doc.Save(ArtifactsDir + "WorkingWithTables.CreateSimpleTable.docx"); |
Следният пример за код показва как да се създаде форматирана таблица с помощта на DocumentBuilder:
// For complete examples and data files, please go to https://github.com/aspose-words/Aspose.Words-for-.NET.git. | |
Document doc = new Document(); | |
DocumentBuilder builder = new DocumentBuilder(doc); | |
Table table = builder.StartTable(); | |
builder.InsertCell(); | |
// Table wide formatting must be applied after at least one row is present in the table. | |
table.LeftIndent = 20.0; | |
// Set height and define the height rule for the header row. | |
builder.RowFormat.Height = 40.0; | |
builder.RowFormat.HeightRule = HeightRule.AtLeast; | |
builder.CellFormat.Shading.BackgroundPatternColor = Color.FromArgb(198, 217, 241); | |
builder.ParagraphFormat.Alignment = ParagraphAlignment.Center; | |
builder.Font.Size = 16; | |
builder.Font.Name = "Arial"; | |
builder.Font.Bold = true; | |
builder.CellFormat.Width = 100.0; | |
builder.Write("Header Row,\n Cell 1"); | |
// We don't need to specify this cell's width because it's inherited from the previous cell. | |
builder.InsertCell(); | |
builder.Write("Header Row,\n Cell 2"); | |
builder.InsertCell(); | |
builder.CellFormat.Width = 200.0; | |
builder.Write("Header Row,\n Cell 3"); | |
builder.EndRow(); | |
builder.CellFormat.Shading.BackgroundPatternColor = Color.White; | |
builder.CellFormat.Width = 100.0; | |
builder.CellFormat.VerticalAlignment = CellVerticalAlignment.Center; | |
// Reset height and define a different height rule for table body. | |
builder.RowFormat.Height = 30.0; | |
builder.RowFormat.HeightRule = HeightRule.Auto; | |
builder.InsertCell(); | |
// Reset font formatting. | |
builder.Font.Size = 12; | |
builder.Font.Bold = false; | |
builder.Write("Row 1, Cell 1 Content"); | |
builder.InsertCell(); | |
builder.Write("Row 1, Cell 2 Content"); | |
builder.InsertCell(); | |
builder.CellFormat.Width = 200.0; | |
builder.Write("Row 1, Cell 3 Content"); | |
builder.EndRow(); | |
builder.InsertCell(); | |
builder.CellFormat.Width = 100.0; | |
builder.Write("Row 2, Cell 1 Content"); | |
builder.InsertCell(); | |
builder.Write("Row 2, Cell 2 Content"); | |
builder.InsertCell(); | |
builder.CellFormat.Width = 200.0; | |
builder.Write("Row 2, Cell 3 Content."); | |
builder.EndRow(); | |
builder.EndTable(); | |
doc.Save(ArtifactsDir + "WorkingWithTables.FormattedTable.docx"); |
Следният пример с код показва как да се постави гнездяща таблица с използване на DocumentBuilder:
// For complete examples and data files, please go to https://github.com/aspose-words/Aspose.Words-for-.NET.git. | |
Document doc = new Document(); | |
DocumentBuilder builder = new DocumentBuilder(doc); | |
Cell cell = builder.InsertCell(); | |
builder.Writeln("Outer Table Cell 1"); | |
builder.InsertCell(); | |
builder.Writeln("Outer Table Cell 2"); | |
// This call is important to create a nested table within the first table. | |
// Without this call, the cells inserted below will be appended to the outer table. | |
builder.EndTable(); | |
// Move to the first cell of the outer table. | |
builder.MoveTo(cell.FirstParagraph); | |
// Build the inner table. | |
builder.InsertCell(); | |
builder.Writeln("Inner Table Cell 1"); | |
builder.InsertCell(); | |
builder.Writeln("Inner Table Cell 2"); | |
builder.EndTable(); | |
doc.Save(ArtifactsDir + "WorkingWithTables.NestedTable.docx"); |
Създаване на таблица чрез DOM (Document Object Model)
Можете да поставите маси директно в DOM чрез добавяне на нов Table Възел на определена позиция.
Моля, имайте предвид, че веднага след създаването на възела на таблицата самата таблица ще бъде напълно празна, т.е. тя все още не съдържа редове и клетки. За да поставите редове и клетки в таблица, добавете съответната Row както и Cell детски възли на DOM.
Следният пример за код показва как да се изгради нова таблица от нулата чрез добавяне на подходящите детски възли към дървото на документа:
// For complete examples and data files, please go to https://github.com/aspose-words/Aspose.Words-for-.NET.git. | |
Document doc = new Document(); | |
// We start by creating the table object. Note that we must pass the document object | |
// to the constructor of each node. This is because every node we create must belong | |
// to some document. | |
Table table = new Table(doc); | |
doc.FirstSection.Body.AppendChild(table); | |
// Here we could call EnsureMinimum to create the rows and cells for us. This method is used | |
// to ensure that the specified node is valid. In this case, a valid table should have at least one Row and one cell. | |
// Instead, we will handle creating the row and table ourselves. | |
// This would be the best way to do this if we were creating a table inside an algorithm. | |
Row row = new Row(doc); | |
row.RowFormat.AllowBreakAcrossPages = true; | |
table.AppendChild(row); | |
// We can now apply any auto fit settings. | |
table.AutoFit(AutoFitBehavior.FixedColumnWidths); | |
Cell cell = new Cell(doc); | |
cell.CellFormat.Shading.BackgroundPatternColor = Color.LightBlue; | |
cell.CellFormat.Width = 80; | |
cell.AppendChild(new Paragraph(doc)); | |
cell.FirstParagraph.AppendChild(new Run(doc, "Row 1, Cell 1 Text")); | |
row.AppendChild(cell); | |
// We would then repeat the process for the other cells and rows in the table. | |
// We can also speed things up by cloning existing cells and rows. | |
row.AppendChild(cell.Clone(false)); | |
row.LastCell.AppendChild(new Paragraph(doc)); | |
row.LastCell.FirstParagraph.AppendChild(new Run(doc, "Row 1, Cell 2 Text")); | |
doc.Save(ArtifactsDir + "WorkingWithTables.InsertTableDirectly.docx"); |
Създаване на таблица от HTML
Aspose.Words поддържа вмъкването на съдържание в документ от HTML източник с помощта на InsertHtml метод. Входът може да бъде пълна HTML страница или само частичен откъс.
Използване на InsertHtml метод, потребителите могат да вмъкнат таблици в документа чрез тагове като <table>
, <tr>
, <td>
.
Следният пример за код показва как да се постави таблица в документ от низ, съдържащ HTML тагове:
// For complete examples and data files, please go to https://github.com/aspose-words/Aspose.Words-for-.NET.git. | |
Document doc = new Document(); | |
DocumentBuilder builder = new DocumentBuilder(doc); | |
// Note that AutoFitSettings does not apply to tables inserted from HTML. | |
builder.InsertHtml("<table>" + | |
"<tr>" + | |
"<td>Row 1, Cell 1</td>" + | |
"<td>Row 1, Cell 2</td>" + | |
"</tr>" + | |
"<tr>" + | |
"<td>Row 2, Cell 2</td>" + | |
"</tr>" + | |
"</table>"); | |
doc.Save(ArtifactsDir + "WorkingWithTables.InsertTableFromHtml.docx"); |
Вмъкване на копие на съществуваща таблица
Има често пъти, когато трябва да се създаде таблица въз основа на вече съществуваща таблица в документ. Най-лесният начин да дублирате таблица при запазване на всички форматиране е клониране на възела на таблицата с помощта на Clone метод.
Същата техника може да се използва за добавяне на копия на съществуващ ред или клетка към таблица.
Следният пример за код показва как да се дублира таблица с помощта на конструктори на възли:
// For complete examples and data files, please go to https://github.com/aspose-words/Aspose.Words-for-.NET.git. | |
Document doc = new Document(MyDir + "Tables.docx"); | |
Table table = (Table) doc.GetChild(NodeType.Table, 0, true); | |
// Clone the table and insert it into the document after the original. | |
Table tableClone = (Table) table.Clone(true); | |
table.ParentNode.InsertAfter(tableClone, table); | |
// Insert an empty paragraph between the two tables, | |
// or else they will be combined into one upon saving this has to do with document validation. | |
table.ParentNode.InsertAfter(new Paragraph(doc), table); | |
doc.Save(ArtifactsDir + "WorkingWithTables.CloneCompleteTable.docx"); |
Следният пример за код показва как да клонирате последния ред от таблицата и да го добавите към таблицата:
// For complete examples and data files, please go to https://github.com/aspose-words/Aspose.Words-for-.NET.git. | |
Document doc = new Document(MyDir + "Tables.docx"); | |
Table table = (Table) doc.GetChild(NodeType.Table, 0, true); | |
Row clonedRow = (Row) table.LastRow.Clone(true); | |
// Remove all content from the cloned row's cells. This makes the row ready for new content to be inserted into. | |
foreach (Cell cell in clonedRow.Cells) | |
cell.RemoveAllChildren(); | |
table.AppendChild(clonedRow); | |
doc.Save(ArtifactsDir + "WorkingWithTables.CloneLastRow.docx"); |
Ако търсите създаването на таблици в документ, който расте динамично с всеки запис от вашия източник на данни, тогава горният метод не се препоръчва. Вместо това, желаният изход се постига по-лесно чрез използване Mail merge с региони. Можете да научите повече за тази техника в Mail Merge с региони секция.
Сравняване на начините за създаване на таблица
Aspose.Words предоставя няколко метода за създаване на нови таблици в документ. Всеки метод има свои предимства и недостатъци, така че изборът на които да се използва често зависи от конкретната ситуация.
Нека разгледаме по-отблизо тези начини за създаване на таблици и да сравним техните плюсове и минуси:
Метод | Предимства | Недостатъци |
---|---|---|
Via DocumentBuilder |
Стандартен метод за поставяне на таблици и други документи | Понякога е трудно да се създаде много разновидности на масите в същото време с един и същ строител случай |
Via DOM | Пасва по-добре с околния код, който създава и вмъква възли директно в DOM без да се използва DocumentBuilder | Масата е създадена “празна”: преди извършване на повечето операции, трябва да се обадите EnsureMinimum за създаване на липсващи детски възли |
От HTML | Създаване на нова таблица от HTML източник с тагове като <table> , <tr> , <td> |
Не е възможно. Microsoft Word формат на таблицата може да се приложи към HTML |
Клониране на съществуваща таблица | Можете да създадете копие на съществуваща таблица при запазване на формата на всички редове и клетки | Подходящите детски възли трябва да бъдат отстранени преди масата да е готова за употреба |