ใช้การจัดรูปแบบตาราง

องค์ประกอบของตารางแต่ละคนสามารถนำไปใช้กับการจัดรูปแบบที่แตกต่างกัน ตัวอย่างเช่นการจัดรูปแบบตารางจะถูกนำไปใช้กับตารางทั้งหมดการจัดรูปแบบแถวกับแถ.

Aspose.Wordsให้รวยAPIเพื่อดึงและนำไปใช้การจัดรูปแบบกับตาราง คุณสามารถใช้โหนดTable,RowFormatและCellFormatเพื่อตั้งค่าการจัดรูปแบบ.

ในบทความนี้เราจะพูดถึงวิธีใช้การจัดรูปแบบกับโหนดตารางที่แตกต่างกันและการตั้งค่าการจัดรูปแบบตารางAspose.Wordsสนับสนุน.

ใช้การจัดรูปแบบกับโหนดที่แตกต่างกัน

ในส่วนนี้เราจะดูที่การใช้การจัดรูปแบบไปยังโหนดตารางต่างๆ.

การจัดรูปแบบระดับตาราง

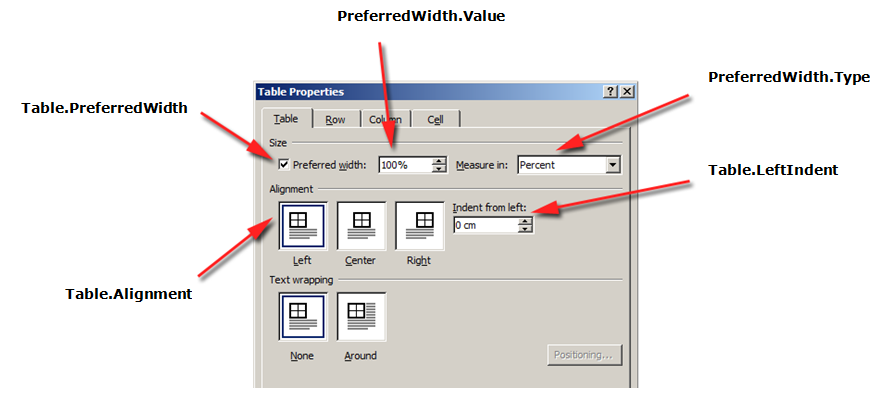
หากต้องการจัดรูปแบบตาราง คุณสามารถใช้คุณสมบัติที่มีอยู่บนโหนด Table ที่สอดคล้องกันโดยใช้คลาส Table, PreferredWidth และ TableCollection.

รูปภาพด้านล่างแสดงคุณลักษณะการจัดรูปแบบTableในMicrosoft Wordและคุณสมบัติที่สอดคล้องกันในAspose.Words.

apply-formatting-to-table-level-aspose-words-java

apply-formatting-to-table-level-aspose-words-java

ตัวอย่างรหัสต่อไปนี้แสดงวิธีการใช้เส้นขอบเค้าร่างกับตาราง:

// For complete examples and data files, please go to https://github.com/aspose-words/Aspose.Words-for-Java.git.
Document doc = new Document(getMyDir() + "Tables.docx");
Table table = (Table) doc.getChild(NodeType.TABLE, 0, true);
// Align the table to the center of the page.
table.setAlignment(TableAlignment.CENTER);
// Clear any existing borders from the table.
table.clearBorders();
// Set a green border around the table but not inside.
table.setBorder(BorderType.LEFT, LineStyle.SINGLE, 1.5, Color.GREEN, true);
table.setBorder(BorderType.RIGHT, LineStyle.SINGLE, 1.5, Color.GREEN, true);
table.setBorder(BorderType.TOP, LineStyle.SINGLE, 1.5, Color.GREEN, true);
table.setBorder(BorderType.BOTTOM, LineStyle.SINGLE, 1.5, Color.GREEN, true);
// Fill the cells with a light green solid color.
table.setShading(TextureIndex.TEXTURE_SOLID, Color.lightGray, new Color(0, true));
doc.save(getArtifactsDir() + "WorkingWithTableStylesAndFormatting.ApplyOutlineBorder.docx");

ตัวอย่างรหัสต่อไปนี้แสดงวิธีการสร้างตารางที่มีเส้นขอบทั้งหมดที่เปิดใช้งาน(ตาราง):

// For complete examples and data files, please go to https://github.com/aspose-words/Aspose.Words-for-Java.git.
Document doc = new Document(getMyDir() + "Tables.docx");
Table table = (Table) doc.getChild(NodeType.TABLE, 0, true);
// Clear any existing borders from the table.
table.clearBorders();
// Set a green border around and inside the table.
table.setBorders(LineStyle.SINGLE, 1.5, Color.GREEN);
doc.save(getArtifactsDir() + "WorkingWithTableStylesAndFormatting.BuildTableWithBorders.docx");

การจัดรูปแบบระดับแถว

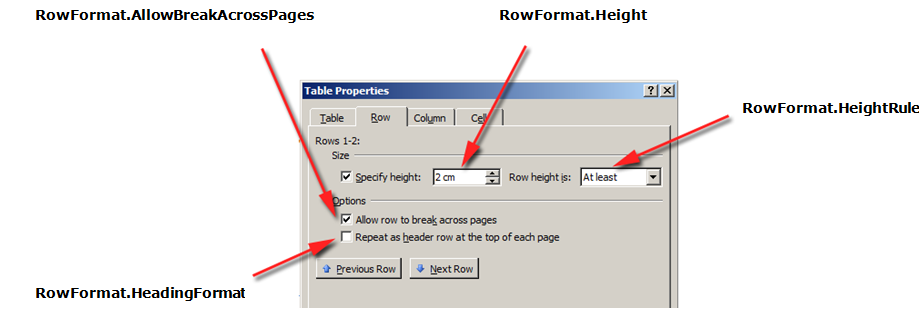
ระดับแถว**การจัดรูปแบบสามารถควบคุมได้โดยใช้Row,RowFormatและRowCollectionคลาส.

รูปภาพด้านล่างแสดงคุณลักษณะการจัดรูปแบบRowในMicrosoft Wordและคุณสมบัติที่สอดคล้องกันในAspose.Words.

apply-formatting-to-row-level-aspose-words-java

ตัวอย่างรหัสต่อไปนี้แสดงวิธีการปรับเปลี่ยนการจัดรูปแบบแถวตาราง:

// For complete examples and data files, please go to https://github.com/aspose-words/Aspose.Words-for-Java.git.
Document doc = new Document(getMyDir() + "Tables.docx");
Table table = (Table) doc.getChild(NodeType.TABLE, 0, true);
// Retrieve the first row in the table.
Row firstRow = table.getFirstRow();
firstRow.getRowFormat().getBorders().setLineStyle(LineStyle.NONE);
firstRow.getRowFormat().setHeightRule(HeightRule.AUTO);
firstRow.getRowFormat().setAllowBreakAcrossPages(true);

การจัดรูปแบบระดับเซลล์

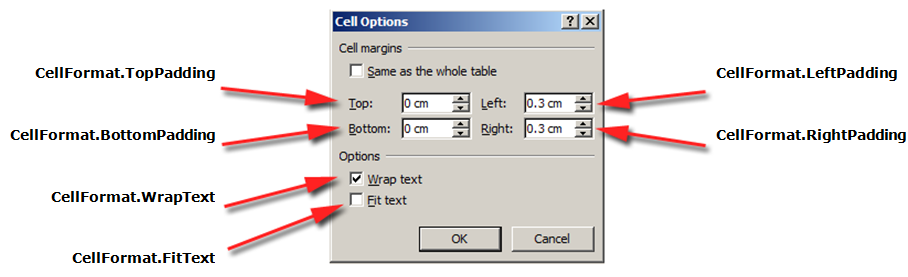
การจัดรูปแบบระดับเซลล์จะถูกควบคุมโดยCell,CellFormatและCellCollectionคลาส.

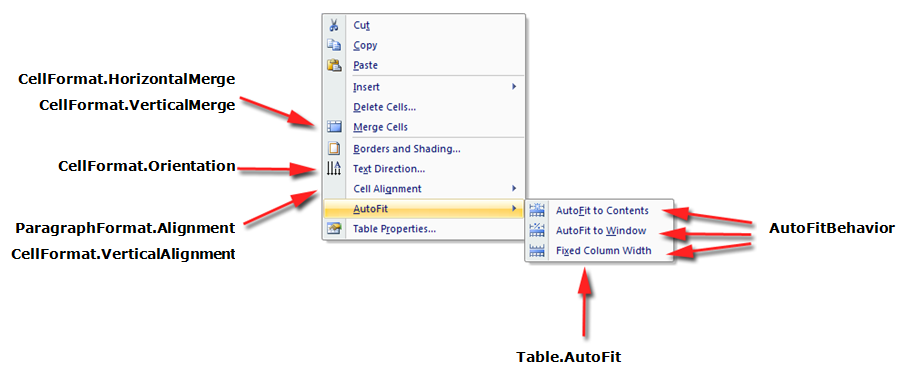
รูปภาพด้านล่างแสดงคุณลักษณะการจัดรูปแบบCellในMicrosoft Wordและคุณสมบัติที่สอดคล้องกันในAspose.Words.

apply-formatting-to-cell-level-aspose-words-java

apply-auto-formatting-to-row-level-aspose-words-java

ตัวอย่างรหัสต่อไปนี้แสดงวิธีการปรับเปลี่ยนการจัดรูปแบบของเซลล์ตาราง:

// For complete examples and data files, please go to https://github.com/aspose-words/Aspose.Words-for-Java.git.
Document doc = new Document(getMyDir() + "Tables.docx");
Table table = (Table) doc.getChild(NodeType.TABLE, 0, true);
Cell firstCell = table.getFirstRow().getFirstCell();
firstCell.getCellFormat().setWidth(30.0);
firstCell.getCellFormat().setOrientation(TextOrientation.DOWNWARD);
firstCell.getCellFormat().getShading().setForegroundPatternColor(Color.GREEN);

ตัวอย่างรหัสต่อไปนี้แสดงวิธีการตั้งค่าจำนวนของพื้นที่(ในจุด)เพื่อเพิ่มไปทางซ้าย/บน/ขวา/ล่างข:

// For complete examples and data files, please go to https://github.com/aspose-words/Aspose.Words-for-Java.git.
Document doc = new Document();
DocumentBuilder builder = new DocumentBuilder(doc);
builder.startTable();
builder.insertCell();
// Sets the amount of space (in points) to add to the left/top/right/bottom of the cell's contents.
builder.getCellFormat().setPaddings(30.0, 50.0, 30.0, 50.0);
builder.writeln("I'm a wonderful formatted cell.");
builder.endRow();
builder.endTable();
doc.save(getArtifactsDir() + "WorkingWithTableStylesAndFormatting.CellPadding.docx");

ระบุความสูงแถว

วิธีที่ง่ายที่สุดในการตั้งค่าความสูงของแถวคือใช้DocumentBuilder การใช้คุณสมบัติที่เหมาะสมRowFormatคุณสามารถตั้งค่าความสูงเริ่มต้นหรือใช้ความสูงที่แตกต่างกัน.

ในAspose.Wordsความสูงของแถวตารางจะถูกควบคุมโดย:

  • คุณสมบัติความสูงของแถว-Height
  • คุณสมบัติกฎความสูงของแถวที่กำหนด-HeightRule

ในเวลาเดียวกันความสูงที่แตกต่างกันสามารถตั้งค่าสำหรับแต่ละแถว-นี้ช่วยให้คุณสามารถ.

ตัวอย่างรหัสต่อไปนี้แสดงวิธีการสร้างตารางที่ประกอบด้วยเซลล์เดียวและใช้การจัดรูปแ:

// For complete examples and data files, please go to https://github.com/aspose-words/Aspose.Words-for-Java.git.
Document doc = new Document();
DocumentBuilder builder = new DocumentBuilder(doc);
Table table = builder.startTable();
builder.insertCell();
RowFormat rowFormat = builder.getRowFormat();
rowFormat.setHeight(100.0);
rowFormat.setHeightRule(HeightRule.EXACTLY);
// These formatting properties are set on the table and are applied to all rows in the table.
table.setLeftPadding(30.0);
table.setRightPadding(30.0);
table.setTopPadding(30.0);
table.setBottomPadding(30.0);
builder.writeln("I'm a wonderful formatted row.");
builder.endRow();
builder.endTable();
doc.save(getArtifactsDir() + "WorkingWithTableStylesAndFormatting.ApplyRowFormatting.docx");

ระบุความกว้างของตารางและเซลล์

ตารางในเอกสารMicrosoft Wordมีหลายวิธีในการปรับขนาดตารางและแต่ละเซลล์ คุณสมบัติเหล่านี้อนุญาตให้ควบคุมลักษณะและพฤติกรรมของตารางดังนั้นAspose.Wordsสนับสนุนพฤติกรรมของตารางเช่นเดียวกับในMicrosoft Word.

มันเป็นสิ่งสำคัญที่จะรู้ว่าองค์ประกอบของตารางมีคุณสมบัติที่แตกต่างกันหลายอย่างที่มีผลต่อวิธีการคำนวณความกว้างของตารางโดยรวมเช่นเดียวกับแต่ละเซลล์มีการคำนวณ:

  • ความกว้างที่ต้องการบนโต๊ะ
  • ความกว้างที่ต้องการในแต่ละเซลล์
  • การอนุญาตให้พอดีอัตโนมัติบนโต๊ะ

บทความนี้อธิบายวิธีการทำงานของคุณสมบัติการคำนวณความกว้างของตารางต่างๆและวิธี นี่มัน ประโยชน์อย่างยิ่งที่จะรู้ว่าในกรณีดังกล่าวที่รูปแบบตารางไม่ปรากฏตามที่คาดไว้.

วิธีการใช้ความกว้างที่ต้องการ

ความกว้างที่ต้องการของตารางหรือแต่ละเซลล์ถูกกำหนดผ่านคุณสมบัติความกว้างที่ต้อง ความกว้างที่ต้องการสามารถระบุได้สำหรับตารางทั้งหมดหรือสำหรับแต่ละเซลล์ ในบางสถานการณ์มันอาจจะไม่สามารถที่จะพอดีกับความกว้างนี้ตรงแต่ความกว้างที่แท้จริ.

ชนิดความกว้างและค่าที่ต้องการที่เหมาะสมจะถูกตั้งค่าโดยใช้วิธีการของคลาสของPreferredWidth:

  • ฟิลด์Autoเพื่อระบุอัตโนมัติหรือ"ไม่มีความกว้างที่ต้องการ"
  • วิธีการFromPercentเพื่อระบุเปอร์เซ็นต์ความกว้าง
  • วิธีการFromPointsเพื่อระบุความกว้างของจุด

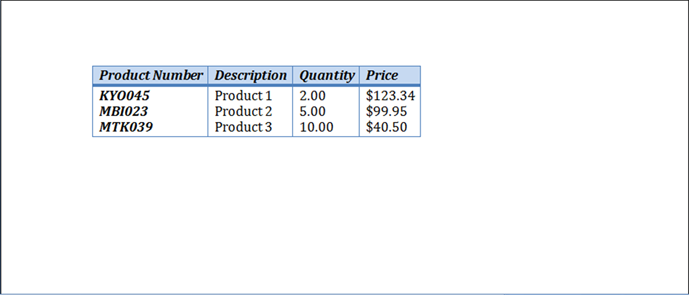
รูปภาพด้านล่างแสดงตัวแทนของpreferred width setting featuresในMicrosoft Wordและคุณสมบัติที่สอดคล้องกันในAspose.Words.

formatting-table-properties-aspose-words-java

ตัวอย่างของวิธีใช้ตัวเลือกเหล่านี้กับตารางจริงในเอกสารสามารถเห็นได้ในภาพด้านล่า.

table-applied-options-java

ระบุตารางที่ต้องการหรือความกว้างของเซลล์

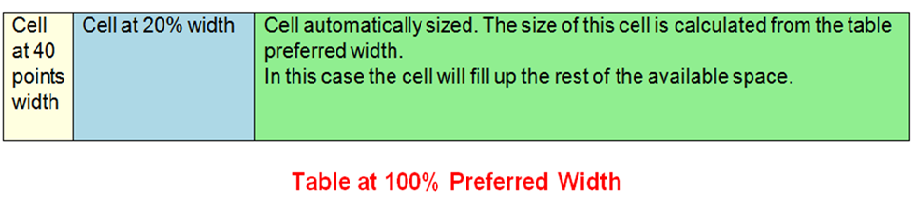
ในAspose.Wordsจะมีการตั้งค่าความกว้างของตารางและเซลล์โดยใช้คุณสมบัติTable.PreferredWidthและคุณสมบัติCellFormat.PreferredWidthพร้อมด้วยตัวเลือกในการแจงนับPreferredWidthType:

  • Autoซึ่งเทียบเท่ากับชุดความกว้างที่ต้องการ
  • Percentซึ่งเหมาะกับองค์ประกอบเมื่อเทียบกับพื้นที่ว่างในหน้าต่างหรือขนาดคอนเทนเนอร์และคำนวณค่าใหม่เมื่อความกว้างที่มีอยู่มีการเปลี่ยนแปลง
  • Pointsซึ่งสอดคล้องกับองค์ประกอบของความกว้างที่ระบุในจุด

การใช้คุณสมบัติTable.PreferredWidthจะปรับความกว้างที่ต้องการเมื่อเทียบกับคอนเทนเนอร์ได้แก่เพจคอลัมน์ข้.

ตัวอย่างรหัสต่อไปนี้แสดงวิธีการตั้งค่าตารางให้พอดีกับอัตโนมัติ 50%ของความกว้างของหน้า:

// For complete examples and data files, please go to https://github.com/aspose-words/Aspose.Words-for-Java.git.
Document doc = new Document();
DocumentBuilder builder = new DocumentBuilder(doc);
// Insert a table with a width that takes up half the page width.
Table table = builder.startTable();
builder.insertCell();
table.setPreferredWidth(PreferredWidth.fromPercent(50.0));
builder.writeln("Cell #1");
builder.insertCell();
builder.writeln("Cell #2");
builder.insertCell();
builder.writeln("Cell #3");
doc.save(getArtifactsDir() + "WorkingWithTables.AutoFitToPageWidth.docx");

การใช้คุณสมบัติCellFormat.PreferredWidthบนเซลล์ที่กำหนดจะปรับความกว้างที่ต้องการ.

ตัวอย่างรหัสต่อไปนี้แสดงวิธีการตั้งค่าการตั้งค่าความกว้างที่ต้องการที่แตกต่างกัน:

// For complete examples and data files, please go to https://github.com/aspose-words/Aspose.Words-for-Java.git.
Document doc = new Document();
DocumentBuilder builder = new DocumentBuilder(doc);
// Insert a table row made up of three cells which have different preferred widths.
builder.startTable();
// Insert an absolute sized cell.
builder.insertCell();
builder.getCellFormat().setPreferredWidth(PreferredWidth.fromPoints(40.0));
builder.getCellFormat().getShading().setBackgroundPatternColor(Color.YELLOW);
builder.writeln("Cell at 40 points width");
// Insert a relative (percent) sized cell.
builder.insertCell();
builder.getCellFormat().setPreferredWidth(PreferredWidth.fromPercent(20.0));
builder.getCellFormat().getShading().setBackgroundPatternColor(Color.BLUE);
builder.writeln("Cell at 20% width");
// Insert a auto sized cell.
builder.insertCell();
builder.getCellFormat().setPreferredWidth(PreferredWidth.AUTO);
builder.getCellFormat().getShading().setBackgroundPatternColor(Color.GREEN);
builder.writeln(
"Cell automatically sized. The size of this cell is calculated from the table preferred width.");
builder.writeln("In this case the cell will fill up the rest of the available space.");
doc.save(getArtifactsDir() + "WorkingWithTables.PreferredWidthSettings.docx");

ค้นหาประเภทความกว้างและค่าที่ต้องการ

คุณสามารถใช้คุณสมบัติTypeและValueเพื่อค้นหารายละเอียดความกว้างที่ต้องการของตารางหรือเซลล์ที่ต้องการ.

ตัวอย่างรหัสต่อไปนี้แสดงวิธีการดึงชนิดความกว้างที่ต้องการของเซลล์ตาราง:

// For complete examples and data files, please go to https://github.com/aspose-words/Aspose.Words-for-Java.git.
Document doc = new Document(getMyDir() + "Tables.docx");
Table table = (Table) doc.getChild(NodeType.TABLE, 0, true);
table.setAllowAutoFit(true);
Cell firstCell = table.getFirstRow().getFirstCell();
/*PreferredWidthType*/int type = firstCell.getCellFormat().getPreferredWidth().getType();
double value = firstCell.getCellFormat().getPreferredWidth().getValue();

วิธีการตั้งค่าพอดีอัตโนมัติ

คุณสมบัติAllowAutoFitช่วยให้เซลล์ในตารางเติบโตและหดตัวตามเกณฑ์ที่เลือก ตัวอย่างเช่นคุณสามารถใช้ตัวเลือกAutoFit to Windowเพื่อให้พอดีกับตารางความกว้างของหน้าและตัวเลือกAutoFit to Contentเพื่ออนุญาตให้แต่ละเซลล์เติบโตหรือหดตัวตามเนื้อหา.

โดยค่าเริ่มต้นAspose.Wordsแทรกตารางใหม่โดยใช้AutoFit to Window ตารางจะมีขนาดตามความกว้างของหน้าเว็บที่มีอยู่ เมื่อต้องการปรับขนาดตารางคุณสามารถเรียกวิธีการAutoFit วิธีนี้ยอมรับการแจงนับAutoFitBehaviorที่ระบุประเภทของการปรับพอดีอัตโนมัติถูกนำไปใช้กับตาราง.

มันเป็นสิ่งสำคัญที่จะรู้ว่าวิธีการพอดีอัตโนมัติเป็นจริงทางลัดที่ใช้คุณสมบัติที่แตกต่างกับตาร เหล่านี้เป็นคุณสมบัติที่จริงให้ตารางลักษณะการทำงานที่สังเกต เราจะหารือเกี่ยวกับคุณสมบัติเหล่านี้สำหรับแต่ละตัวเลือกพอดีอัตโนมัติ.

ตัวอย่างรหัสต่อไปนี้แสดงวิธีการตั้งค่าตารางให้หดตัวหรือเติบโตแต่ละเซลล์ตามเนื้อหา:

// For complete examples and data files, please go to https://github.com/aspose-words/Aspose.Words-for-Java.git.
table.setAllowAutoFit(true);

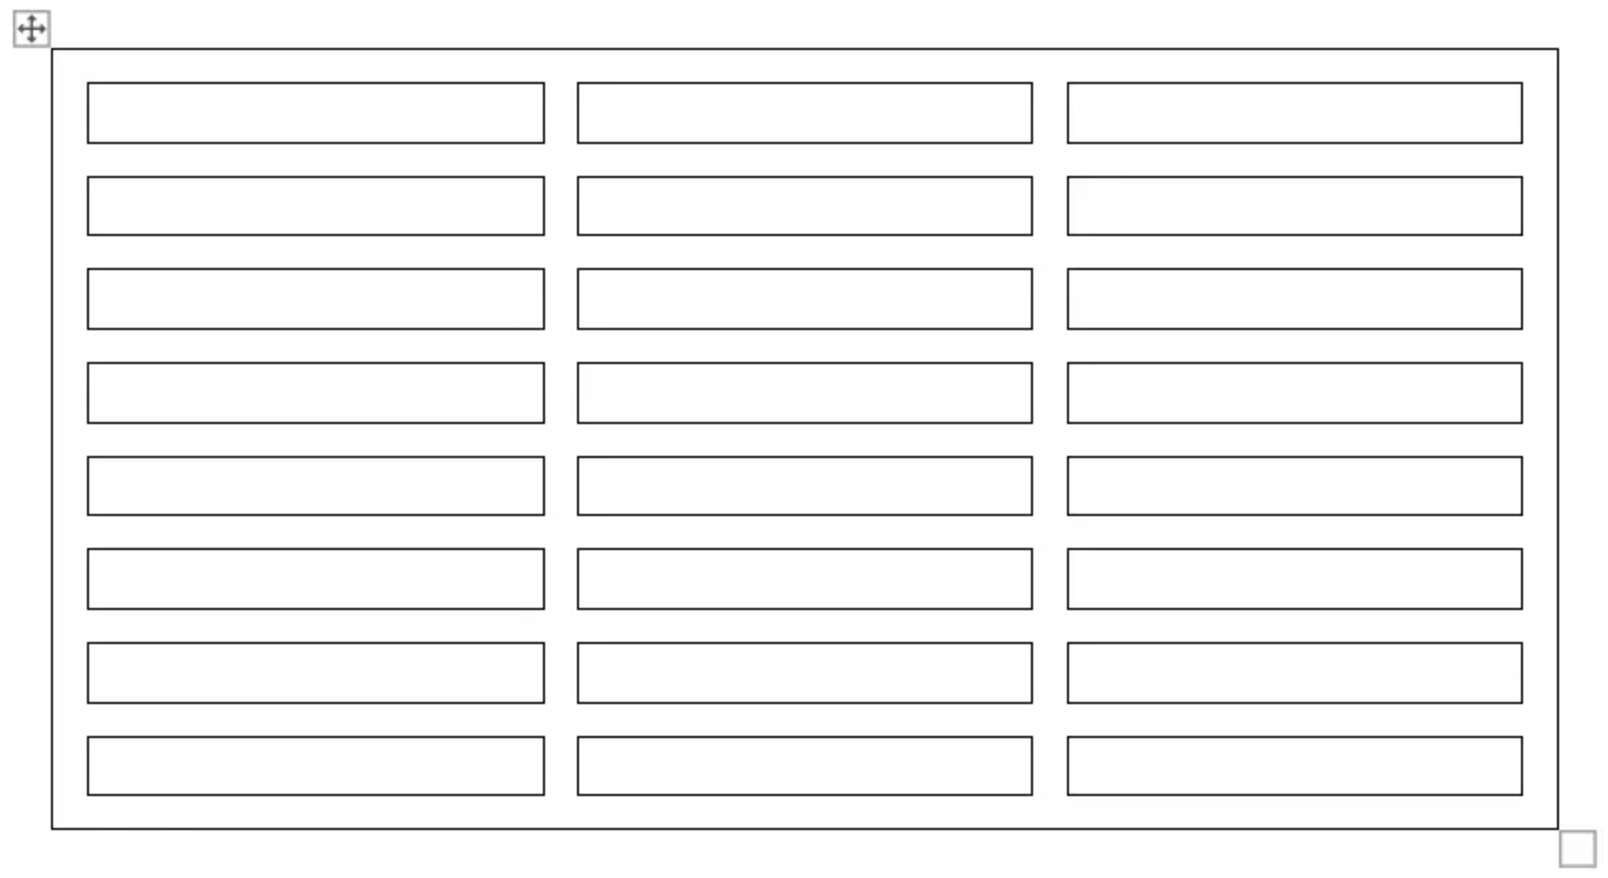
เราจะใช้ตารางต่อไปนี้เพื่อใช้การตั้งค่าพอดีอัตโนมัติต่างๆเป็นการสาธิต.

apply-different-autofit-settings-to-a-table-aspose-words-java

AutoFitตารางไปยังหน้าต่าง

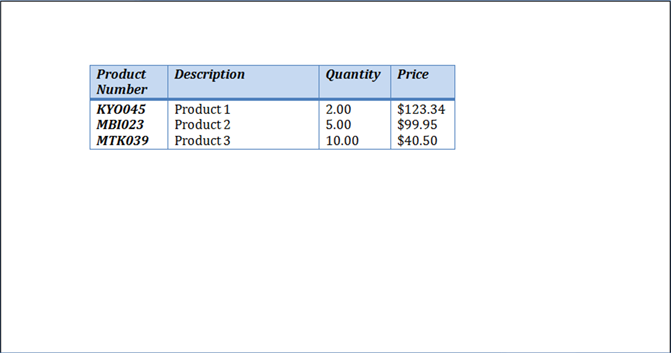
เมื่อปรับอัตโนมัติไปยังหน้าต่างถูกนำไปใช้กับตาราง,การดำเนินการต่อไปนี้จะดำเนินการจริงอยู่เบื้องหลัง:

  1. คุณสมบัติTable.AllowAutoFitถูกเปิดใช้งานเพื่อปรับขนาดคอลัมน์โดยอัตโนมัติเพื่อให้พอดีกับเนื้อหาที่มีอยู่โดยใช้ค่าTable.PreferredWidth100%
  2. CellFormat.PreferredWidthจะถูกลบออกจากเซลล์ทั้งหมดของตาราง
  3. ความกว้างของคอลัมน์จะถูกคำนวณใหม่สำหรับเนื้อหาของตารางปัจจุบัน–ผลลัพธ์ที่ได้คือตาร
  4. ความกว้างของคอลัมน์ในตารางจะเปลี่ยนแปลงโดยอัตโนมัติเมื่อผู้ใช้แก้ไขข้อความ

ตัวอย่างโค้ดต่อไปนี้แสดงวิธีการปรับตารางให้เข้ากับความกว้างของเพจโดยอัตโนมัติ:

// For complete examples and data files, please go to https://github.com/aspose-words/Aspose.Words-for-Java.git.
Document doc = new Document(getMyDir() + "Tables.docx");
Table table = (Table) doc.getChild(NodeType.TABLE, 0, true);
// Autofit the first table to the page width.
table.autoFit(AutoFitBehavior.AUTO_FIT_TO_WINDOW);
doc.save(getArtifactsDir() + "WorkingWithTables.AutoFitTableToWindow.docx");

ตัวอย่างของวิธีการใช้ตัวเลือกเหล่านี้กับตารางข้างต้นสามารถเห็นได้ในภาพด้านล่าง.

autofit-table-aspose-words-java

AutoFitตารางเนื้อหา

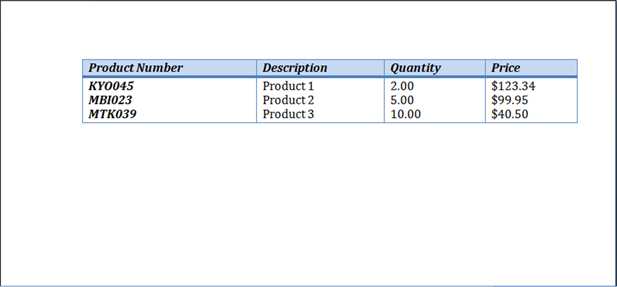
เมื่อตารางถูกติดตั้งโดยอัตโนมัติเนื้อหา,ขั้นตอนต่อไปนี้จะดำเนินการจริงเบื้องหลัง:

  1. คุณสมบัติTable.AllowAutoFitถูกเปิดใช้งานเพื่อปรับขนาดแต่ละเซลล์ตามเนื้อหาโดยอัตโนมัติ

  2. ความกว้างตารางที่ต้องการจะถูกลบออกจากTable.PreferredWidth,CellFormat.PreferredWidthจะถูกลบออกสำหรับแต่ละเซลล์ตาราง

  3. ความกว้างของคอลัมน์จะถูกคำนวณใหม่สำหรับเนื้อหาของตารางปัจจุบัน–ผลลัพธ์สุดท้ายคือต

ตัวอย่างโค้ดต่อไปนี้แสดงวิธีการปรับตารางโดยอัตโนมัติกับเนื้อหา:

// For complete examples and data files, please go to https://github.com/aspose-words/Aspose.Words-for-Java.git.
Document doc = new Document(getMyDir() + "Tables.docx");
Table table = (Table) doc.getChild(NodeType.TABLE, 0, true);
table.autoFit(AutoFitBehavior.AUTO_FIT_TO_CONTENTS);
doc.save(getArtifactsDir() + "WorkingWithTables.AutoFitTableToContents.docx");

ตัวอย่างของวิธีการใช้ตัวเลือกเหล่านี้กับตารางข้างต้นสามารถเห็นได้ในภาพด้านล่าง.

resize-column-autofit-settings-aspose-words-java

ปิดการใช้งานAutoFitในตารางและใช้ความกว้างของคอลัมน์คงที่

ถ้าตารางมีการปิดใช้งานการติดตั้งอัตโนมัติและความกว้างคอลัมน์คงที่ถูกใช้แทนขั้นตอนต่:

  1. Table.AllowAutoFitคุณสมบัติถูกปิดใช้งานดังนั้นคอลัมน์จะไม่เติบโตหรือหดตัวลงในเนื้อหา
  2. ความกว้างที่ต้องการของตารางทั้งหมดจะถูกลบออกจากTable.PreferredWidth,CellFormat.PreferredWidthจะถูกลบออกจากเซลล์ตารางทั้งหมด
  3. ผลลัพธ์สุดท้ายคือตารางที่มีความกว้างของคอลัมน์จะถูกกำหนดโดยคุณสมบัติCellFormat.Widthและคอลัมน์ที่ไ

ตัวอย่างรหัสต่อไปนี้แสดงวิธีการปิดใช้งานการติดตั้งอัตโนมัติและเปิดใช้งานความกว้างคงที่สำหรับตารางที่ระบุ:

// For complete examples and data files, please go to https://github.com/aspose-words/Aspose.Words-for-Java.git.
Document doc = new Document(getMyDir() + "Tables.docx");
Table table = (Table) doc.getChild(NodeType.TABLE, 0, true);
// Disable autofitting on this table.
table.autoFit(AutoFitBehavior.FIXED_COLUMN_WIDTHS);
doc.save(getArtifactsDir() + "WorkingWithTables.AutoFitTableToFixedColumnWidths.docx");

ตัวอย่างของวิธีการใช้ตัวเลือกเหล่านี้กับตารางข้างต้นสามารถเห็นได้ในภาพด้านล่าง.

disable-autofit-settings-to-a-table-aspose-words-java

ลำดับความสำคัญเมื่อคำนวณความกว้างของเซลล์

Aspose.Wordsอนุญาตให้ผู้ใช้กำหนดความกว้างของตารางหรือเซลล์ผ่านหลายออบเจกต์รวมถึงCellFormat–คุณสมบัติWidthส่วนใหญ่จะเหลือจากเวอร์ชันก่อนหน้าแต่ก็ยังมีประโยชน์สำหรับการลดความกว้างของเซลล์.

สิ่งสำคัญคือต้องรู้ว่าคุณสมบัติCellFormat.Widthทำงานแตกต่างกันขึ้นอยู่กับคุณสมบัติความกว้างอื่นที่มีอยู่ในต.

Aspose.Wordsใช้ลำดับต่อไปนี้สำหรับการคำนวณความกว้างของเซลล์:

สั่งซื้อ ทรัพย์สิน การบรรจุ
AllowAutoFitถูกกำหนด ถ้าAutoFitถูกเปิดใช้งาน:
-ตารางอาจเติบโตที่ผ่านมาความกว้างที่ต้องการเพื่อรองรับเนื้อหา-มันมักจะไม่หดตัวต่ำกว่
-การเปลี่ยนแปลงค่าCellFormat.Widthจะถูกละเว้นและเซลล์จะพอดีกับเนื้อหาแทน
PreferredWidthTypeมีค่าPointsหรือPercent CellFormat.Widthถูกละเว้น
PreferredWidthTypeมีค่าAuto ค่าจากCellFormat.Widthถูกคัดลอกและกลายเป็นความกว้างที่ต้องการของเซลล์(ในจุด)

อนุญาตให้ระยะห่างระหว่างเซลล์

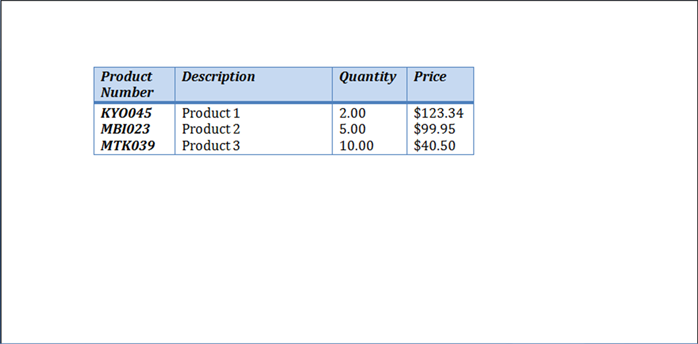
คุณสามารถรับหรือตั้งค่าช่องว่างเพิ่มเติมระหว่างเซลล์ตารางที่คล้ายกับตัวเลือก"ระยะห่างของเซลล์"ในMicrosoft Word นี้สามารถทำได้โดยใช้คุณสมบัติAllowCellSpacing.

ตัวอย่างของวิธีใช้ตัวเลือกเหล่านี้กับตารางจริงในเอกสารสามารถเห็นได้ในภาพด้านล่า.

formatting-spacing-between-cells-aspose-words-java

ตัวอย่างรหัสต่อไปนี้แสดงวิธีการตั้งระยะห่างระหว่างเซลล์:

// For complete examples and data files, please go to https://github.com/aspose-words/Aspose.Words-for-Java.git.
Document doc = new Document(getMyDir() + "Tables.docx");
Table table = (Table) doc.getChild(NodeType.TABLE, 0, true);
table.setAllowCellSpacing(true);
table.setCellSpacing(2.0);
doc.save(getArtifactsDir() + "WorkingWithTableStylesAndFormatting.AllowCellSpacing.docx");

ใช้เส้นขอบและการแรเงา

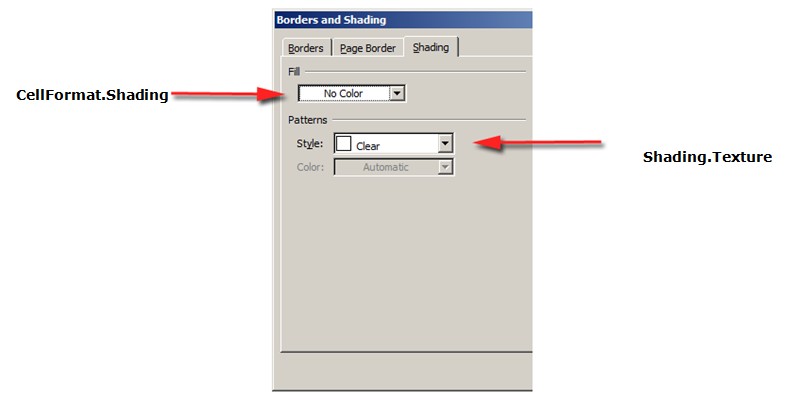
เส้นขอบและการแรเงาสามารถนำไปใช้กับตารางทั้งหมดโดยใช้Table.SetBorder,Table.SetBordersและTable.SetShadingหรือเฉพาะกับเซลล์ที่เฉพาะเจาะจงโดยใช้CellFormat.BordersและCellFormat.Shading นอกจากนี้เส้นขอบแถวสามารถตั้งค่าได้โดยใช้RowFormat.Bordersแต่ไม่สามารถใช้การแรเงาด้วยวิธีนี้ได้.

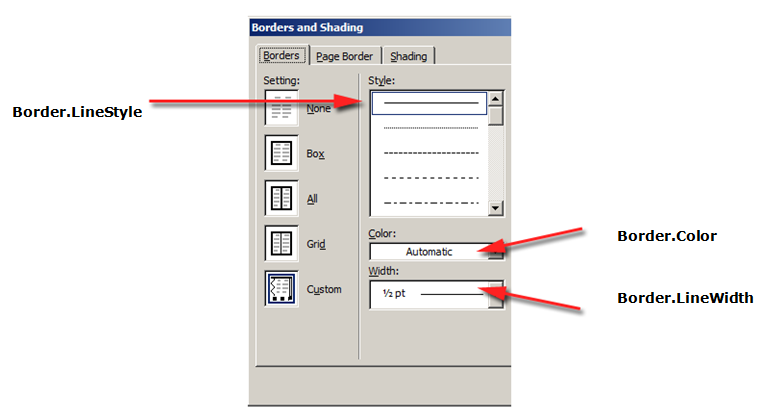
รูปภาพด้านล่างแสดงการตั้งค่าเส้นขอบและเงาในMicrosoft Wordและคุณสมบัติที่สอดคล้องกันในAspose.Words.

apply-borders-shading-aspose-words-java-1

apply-borders-shading-aspose-words-java-2

ตัวอย่างรหัสต่อไปนี้แสดงวิธีการจัดรูปแบบตารางและเซลล์ที่มีเส้นขอบที่แตกต่างกันและ:

// For complete examples and data files, please go to https://github.com/aspose-words/Aspose.Words-for-Java.git.
Document doc = new Document();
DocumentBuilder builder = new DocumentBuilder(doc);
Table table = builder.startTable();
builder.insertCell();
// Set the borders for the entire table.
table.setBorders(LineStyle.SINGLE, 2.0, Color.BLACK);
// Set the cell shading for this cell.
builder.getCellFormat().getShading().setBackgroundPatternColor(Color.RED);
builder.writeln("Cell #1");
builder.insertCell();
// Specify a different cell shading for the second cell.
builder.getCellFormat().getShading().setBackgroundPatternColor(Color.GREEN);
builder.writeln("Cell #2");
builder.endRow();
// Clear the cell formatting from previous operations.
builder.getCellFormat().clearFormatting();
builder.insertCell();
// Create larger borders for the first cell of this row. This will be different
// compared to the borders set for the table.
builder.getCellFormat().getBorders().getLeft().setLineWidth(4.0);
builder.getCellFormat().getBorders().getRight().setLineWidth(4.0);
builder.getCellFormat().getBorders().getTop().setLineWidth(4.0);
builder.getCellFormat().getBorders().getBottom().setLineWidth(4.0);
builder.writeln("Cell #3");
builder.insertCell();
builder.getCellFormat().clearFormatting();
builder.writeln("Cell #4");
doc.save(getArtifactsDir() + "WorkingWithTableStylesAndFormatting.FormatTableAndCellWithDifferentBorders.docx");