ใช้การจัดรูปแบบตาราง

Contents
[ ]

แต่ละองค์ประกอบของตารางสามารถใช้กับการจัดรูปแบบที่แตกต่างกันได้ ตัวอย่างเช่น การจัดรูปแบบตารางจะมีผลกับทั้งตาราง การจัดรูปแบบแถวเฉพาะบางแถว การจัดรูปแบบเซลล์เฉพาะบางเซลล์

Aspose.Words มี API ที่หลากหลายเพื่อดึงข้อมูลและใช้การจัดรูปแบบกับตาราง คุณสามารถใช้โหนด Table, RowFormat และ CellFormat เพื่อตั้งค่าการจัดรูปแบบได้

ในบทความนี้ เราจะพูดถึงวิธีนำการจัดรูปแบบไปใช้กับโหนดตารางต่างๆ และการตั้งค่าการจัดรูปแบบตารางที่ Aspose.Words รองรับ

ใช้การจัดรูปแบบกับโหนดต่างๆ

ในส่วนนี้ เราจะดูการนำการจัดรูปแบบไปใช้กับโหนดตารางต่างๆ

การจัดรูปแบบระดับตาราง

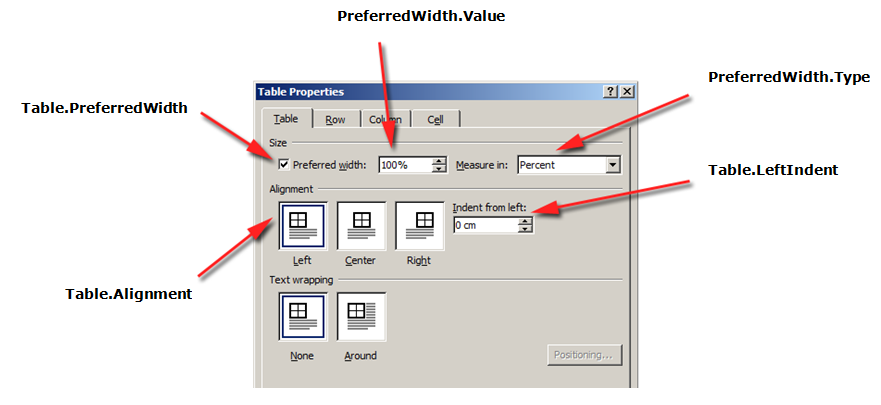
หากต้องการใช้การจัดรูปแบบกับตาราง คุณสามารถใช้คุณสมบัติที่มีอยู่ในโหนด Table ที่เกี่ยวข้องได้โดยใช้คลาส Table, PreferredWidth และ TableCollection

รูปภาพด้านล่างแสดงคุณลักษณะการจัดรูปแบบ Table ใน Microsoft Word และคุณสมบัติที่เกี่ยวข้องใน Aspose.Words

formattin-features-table-level-aspose-words-net

formatting-table-options-aspose-words-net

ตัวอย่างโค้ดต่อไปนี้แสดงวิธีการใช้เส้นขอบเค้าร่างกับตาราง:

// For complete examples and data files, please go to https://github.com/aspose-words/Aspose.Words-for-.NET.git.
Document doc = new Document(MyDir + "Tables.docx");
Table table = (Table) doc.GetChild(NodeType.Table, 0, true);
// Align the table to the center of the page.
table.Alignment = TableAlignment.Center;
// Clear any existing borders from the table.
table.ClearBorders();
// Set a green border around the table but not inside.
table.SetBorder(BorderType.Left, LineStyle.Single, 1.5, Color.Green, true);
table.SetBorder(BorderType.Right, LineStyle.Single, 1.5, Color.Green, true);
table.SetBorder(BorderType.Top, LineStyle.Single, 1.5, Color.Green, true);
table.SetBorder(BorderType.Bottom, LineStyle.Single, 1.5, Color.Green, true);
// Fill the cells with a light green solid color.
table.SetShading(TextureIndex.TextureSolid, Color.LightGreen, Color.Empty);
doc.Save(ArtifactsDir + "WorkingWithTableStylesAndFormatting.ApplyOutlineBorder.docx");

ตัวอย่างโค้ดต่อไปนี้แสดงวิธีการสร้างตารางโดยเปิดใช้งานเส้นขอบทั้งหมด (กริด):

// For complete examples and data files, please go to https://github.com/aspose-words/Aspose.Words-for-.NET.git.
Document doc = new Document(MyDir + "Tables.docx");
Table table = (Table) doc.GetChild(NodeType.Table, 0, true);
// Clear any existing borders from the table.
table.ClearBorders();
// Set a green border around and inside the table.
table.SetBorders(LineStyle.Single, 1.5, Color.Green);
doc.Save(ArtifactsDir + "WorkingWithTableStylesAndFormatting.BuildTableWithBorders.docx");

การจัดรูปแบบระดับแถว

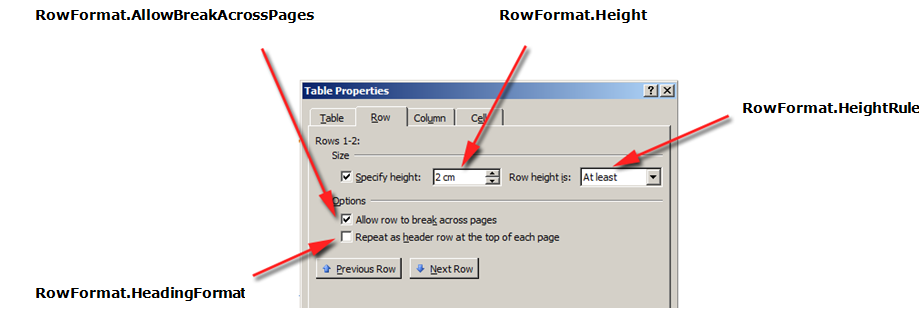
การจัดรูปแบบ ระดับแถว สามารถควบคุมได้โดยใช้คลาส Row, RowFormat และ RowCollection

รูปภาพด้านล่างแสดงคุณลักษณะการจัดรูปแบบ Row ใน Microsoft Word และคุณสมบัติที่เกี่ยวข้องใน Aspose.Words

formatting-row-level-aspose-words-net

ตัวอย่างโค้ดต่อไปนี้แสดงวิธีการแก้ไขการจัดรูปแบบแถวของตาราง:

// For complete examples and data files, please go to https://github.com/aspose-words/Aspose.Words-for-.NET.git.
Document doc = new Document(MyDir + "Tables.docx");
Table table = (Table) doc.GetChild(NodeType.Table, 0, true);
// Retrieve the first row in the table.
Row firstRow = table.FirstRow;
firstRow.RowFormat.Borders.LineStyle = LineStyle.None;
firstRow.RowFormat.HeightRule = HeightRule.Auto;
firstRow.RowFormat.AllowBreakAcrossPages = true;

การจัดรูปแบบระดับเซลล์

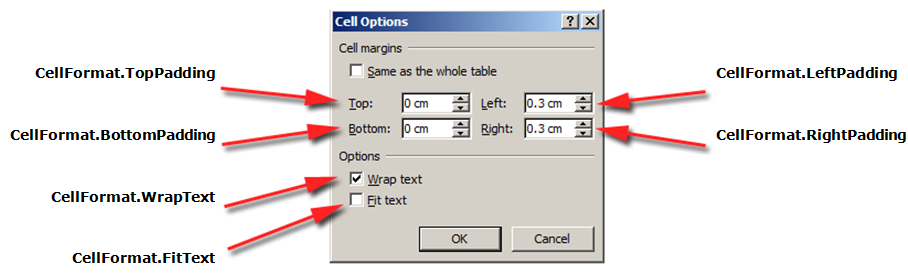
การจัดรูปแบบระดับเซลล์ถูกควบคุมโดยคลาส Cell, CellFormat และ CellCollection

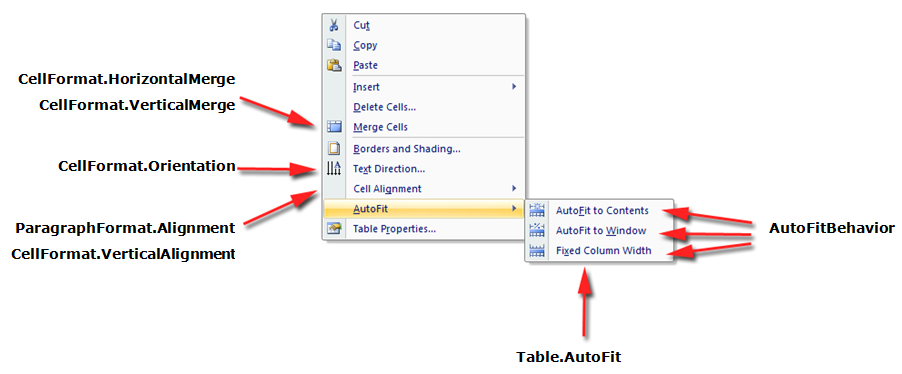
รูปภาพด้านล่างแสดงคุณลักษณะการจัดรูปแบบ Cell ใน Microsoft Word และคุณสมบัติที่เกี่ยวข้องใน Aspose.Words

formatting-cell-level-aspose-words-net

auto-formatting-cell-level-aspose-words-net

ตัวอย่างโค้ดต่อไปนี้แสดงวิธีการปรับเปลี่ยนการจัดรูปแบบของเซลล์ตาราง:

// For complete examples and data files, please go to https://github.com/aspose-words/Aspose.Words-for-.NET.git.
Document doc = new Document(MyDir + "Tables.docx");
Table table = (Table) doc.GetChild(NodeType.Table, 0, true);
Cell firstCell = table.FirstRow.FirstCell;
firstCell.CellFormat.Width = 30;
firstCell.CellFormat.Orientation = TextOrientation.Downward;
firstCell.CellFormat.Shading.ForegroundPatternColor = Color.LightGreen;

ตัวอย่างโค้ดต่อไปนี้แสดงวิธีการตั้งค่าจำนวนช่องว่าง (เป็นจุด) เพื่อเพิ่มไปทางซ้าย/บน/ขวา/ล่างของเนื้อหาในเซลล์:

// For complete examples and data files, please go to https://github.com/aspose-words/Aspose.Words-for-.NET.git.
Document doc = new Document();
DocumentBuilder builder = new DocumentBuilder(doc);
builder.StartTable();
builder.InsertCell();
// Sets the amount of space (in points) to add to the left/top/right/bottom of the cell's contents.
builder.CellFormat.SetPaddings(30, 50, 30, 50);
builder.Writeln("I'm a wonderful formatted cell.");
builder.EndRow();
builder.EndTable();
doc.Save(ArtifactsDir + "WorkingWithTableStylesAndFormatting.CellPadding.docx");
view raw cell-padding.cs hosted with ❤ by GitHub

ระบุความสูงของแถว

วิธีที่ง่ายที่สุดในการตั้งค่าความสูงของแถวคือการใช้ DocumentBuilder เมื่อใช้คุณสมบัติ RowFormat ที่เหมาะสม คุณสามารถตั้งค่าความสูงเริ่มต้นหรือใช้ความสูงที่แตกต่างกันสำหรับแต่ละแถวในตารางได้

ใน Aspose.Words ความสูงของแถวตารางจะถูกควบคุมโดย:

  • คุณสมบัติความสูงของแถว - Height
  • คุณสมบัติกฎความสูงสำหรับแถวที่กำหนด – HeightRule

ในเวลาเดียวกัน คุณสามารถตั้งค่าความสูงที่แตกต่างกันสำหรับแต่ละแถวได้ ซึ่งช่วยให้คุณควบคุมการตั้งค่าตารางได้อย่างกว้างขวาง

ตัวอย่างโค้ดต่อไปนี้แสดงวิธีสร้างตารางที่มีเซลล์เดียวและใช้การจัดรูปแบบแถว:

// For complete examples and data files, please go to https://github.com/aspose-words/Aspose.Words-for-.NET.git.
Document doc = new Document();
DocumentBuilder builder = new DocumentBuilder(doc);
Table table = builder.StartTable();
builder.InsertCell();
RowFormat rowFormat = builder.RowFormat;
rowFormat.Height = 100;
rowFormat.HeightRule = HeightRule.Exactly;
// These formatting properties are set on the table and are applied to all rows in the table.
table.LeftPadding = 30;
table.RightPadding = 30;
table.TopPadding = 30;
table.BottomPadding = 30;
builder.Writeln("I'm a wonderful formatted row.");
builder.EndRow();
builder.EndTable();
doc.Save(ArtifactsDir + "WorkingWithTableStylesAndFormatting.ApplyRowFormatting.docx");

ระบุความกว้างของตารางและเซลล์

ตารางในเอกสาร Microsoft Word มีวิธีปรับขนาดตารางและเซลล์แต่ละเซลล์หลายวิธี คุณสมบัติเหล่านี้ช่วยให้สามารถควบคุมลักษณะที่ปรากฏและการทำงานของตารางได้อย่างมาก ดังนั้น Aspose.Words จึงสนับสนุนลักษณะการทำงานของตาราง เช่นเดียวกับใน Microsoft Word

สิ่งสำคัญคือต้องทราบว่าองค์ประกอบของตารางมีคุณสมบัติที่แตกต่างกันหลายประการ ซึ่งอาจส่งผลต่อวิธีคำนวณความกว้างของตารางโดยรวม รวมถึงแต่ละเซลล์:

  • ความกว้างที่ต้องการบนโต๊ะ
  • ความกว้างที่ต้องการในแต่ละเซลล์
  • อนุญาตให้ปรับอัตโนมัติบนโต๊ะ

บทความนี้ให้รายละเอียดเกี่ยวกับวิธีการทำงานของคุณสมบัติการคำนวณความกว้างของตารางต่างๆ และวิธีการควบคุมการคำนวณความกว้างของตารางอย่างสมบูรณ์ นี่คือ มีประโยชน์อย่างยิ่งที่จะทราบในกรณีที่เค้าโครงตารางไม่ปรากฏตามที่คาดไว้

วิธีใช้ความกว้างที่ต้องการ

ความกว้างที่ต้องการของตารางหรือแต่ละเซลล์ถูกกำหนดผ่านคุณสมบัติความกว้างที่ต้องการ ซึ่งเป็นขนาดที่องค์ประกอบพยายามทำให้พอดี นั่นคือสามารถระบุความกว้างที่ต้องการสำหรับทั้งตารางหรือแต่ละเซลล์ได้ ในบางสถานการณ์ อาจไม่สามารถปรับให้พอดีกับความกว้างนี้ได้ แต่ความกว้างจริงจะใกล้เคียงกับค่านี้ในกรณีส่วนใหญ่

ประเภทความกว้างที่ต้องการและค่าที่เหมาะสมได้รับการตั้งค่าโดยใช้วิธีการของคลาส PreferredWidth:

  • วิธี Auto เพื่อระบุอัตโนมัติหรือ “ไม่มีความกว้างที่ต้องการ”
  • วิธี FromPercent เพื่อระบุความกว้างเป็นเปอร์เซ็นต์
  • วิธี FromPoints เพื่อระบุความกว้างเป็นจุด

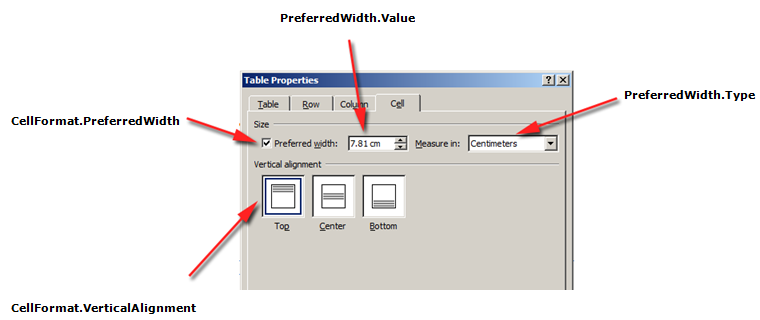
รูปภาพด้านล่างแสดง คุณลักษณะการตั้งค่าความกว้างที่ต้องการ ใน Microsoft Word และคุณสมบัติที่เกี่ยวข้องใน Aspose.Words

formatting-table-properties-aspose-words-net

ตัวอย่างการใช้ตัวเลือกเหล่านี้กับตารางจริงในเอกสารสามารถดูได้จากภาพด้านล่าง

todo:image_alt_text

ระบุตารางที่ต้องการหรือความกว้างของเซลล์

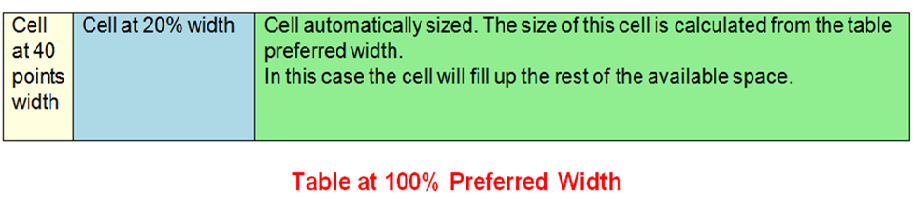
ใน Aspose.Words ความกว้างของตารางและเซลล์จะถูกตั้งค่าโดยใช้คุณสมบัติ Table.PreferredWidth และคุณสมบัติ CellFormat.PreferredWidth โดยมีตัวเลือกในการแจงนับ PreferredWidthType:

  • Auto ซึ่งเทียบเท่ากับชุดความกว้างที่ต้องการ
  • Percent ซึ่งปรับองค์ประกอบให้สัมพันธ์กับพื้นที่ว่างในหน้าต่างหรือขนาดคอนเทนเนอร์ และคำนวณค่าใหม่เมื่อความกว้างที่มีอยู่เปลี่ยนไป
  • Points ซึ่งสอดคล้องกับองค์ประกอบของความกว้างที่ระบุเป็นจุด

การใช้คุณสมบัติ Table.PreferredWidth จะปรับความกว้างที่ต้องการโดยสัมพันธ์กับคอนเทนเนอร์: หน้า คอลัมน์ข้อความ หรือเซลล์ตารางด้านนอก หากเป็นตารางที่ซ้อนกัน

ตัวอย่างโค้ดต่อไปนี้แสดงวิธีการตั้งค่าตารางให้พอดีอัตโนมัติถึง 50% ของความกว้างของหน้า:

// For complete examples and data files, please go to https://github.com/aspose-words/Aspose.Words-for-.NET.git.
Document doc = new Document();
DocumentBuilder builder = new DocumentBuilder(doc);
// Insert a table with a width that takes up half the page width.
Table table = builder.StartTable();
builder.InsertCell();
table.PreferredWidth = PreferredWidth.FromPercent(50);
builder.Writeln("Cell #1");
builder.InsertCell();
builder.Writeln("Cell #2");
builder.InsertCell();
builder.Writeln("Cell #3");
doc.Save(ArtifactsDir + "WorkingWithTables.AutoFitPageWidth.docx");

การใช้คุณสมบัติ CellFormat.PreferredWidth บนเซลล์ที่กำหนดจะปรับความกว้างที่ต้องการ

ตัวอย่างโค้ดต่อไปนี้แสดงวิธีการตั้งค่าความกว้างที่ต้องการ:

// For complete examples and data files, please go to https://github.com/aspose-words/Aspose.Words-for-.NET.git.
Document doc = new Document();
DocumentBuilder builder = new DocumentBuilder(doc);
// Insert a table row made up of three cells which have different preferred widths.
// Insert an absolute sized cell.
builder.InsertCell();
builder.CellFormat.PreferredWidth = PreferredWidth.FromPoints(40);
builder.CellFormat.Shading.BackgroundPatternColor = Color.LightYellow;
builder.Writeln("Cell at 40 points width");
// Insert a relative (percent) sized cell.
builder.InsertCell();
builder.CellFormat.PreferredWidth = PreferredWidth.FromPercent(20);
builder.CellFormat.Shading.BackgroundPatternColor = Color.LightBlue;
builder.Writeln("Cell at 20% width");
// Insert a auto sized cell.
builder.InsertCell();
builder.CellFormat.PreferredWidth = PreferredWidth.Auto;
builder.CellFormat.Shading.BackgroundPatternColor = Color.LightGreen;
builder.Writeln(
"Cell automatically sized. The size of this cell is calculated from the table preferred width.");
builder.Writeln("In this case the cell will fill up the rest of the available space.");
doc.Save(ArtifactsDir + "WorkingWithTables.PreferredWidthSettings.docx");

ค้นหาประเภทและค่าความกว้างที่ต้องการ

คุณสามารถใช้คุณสมบัติ Type และ Value เพื่อค้นหารายละเอียดความกว้างที่ต้องการของตารางหรือเซลล์ที่ต้องการ

ตัวอย่างโค้ดต่อไปนี้แสดงวิธีการดึงข้อมูลประเภทความกว้างที่ต้องการของเซลล์ตาราง:

// For complete examples and data files, please go to https://github.com/aspose-words/Aspose.Words-for-.NET.git.
Document doc = new Document(MyDir + "Tables.docx");
Table table = (Table) doc.GetChild(NodeType.Table, 0, true);
table.AllowAutoFit = true;
Cell firstCell = table.FirstRow.FirstCell;
PreferredWidthType type = firstCell.CellFormat.PreferredWidth.Type;
double value = firstCell.CellFormat.PreferredWidth.Value;

วิธีการตั้งค่าการปรับพอดีอัตโนมัติ

คุณสมบัติ AllowAutoFit ช่วยให้เซลล์ในตารางขยายและลดขนาดตามเกณฑ์ที่เลือก ตัวอย่างเช่น คุณสามารถใช้ตัวเลือก ปรับให้พอดีอัตโนมัติกับหน้าต่าง เพื่อปรับตารางให้พอดีกับความกว้างของหน้า และใช้ตัวเลือก ปรับให้พอดีอัตโนมัติกับเนื้อหา เพื่อให้แต่ละเซลล์ขยายหรือย่อตามเนื้อหาได้

ตามค่าเริ่มต้น Aspose.Words จะแทรกตารางใหม่โดยใช้ ปรับให้พอดีอัตโนมัติกับหน้าต่าง ตารางจะมีขนาดตามความกว้างของหน้าที่มีอยู่ หากต้องการปรับขนาดตาราง คุณสามารถเรียกใช้เมธอด AutoFit ได้ เมธอดนี้ยอมรับการแจงนับ AutoFitBehavior ที่ระบุประเภทของการปรับพอดีอัตโนมัติที่จะใช้กับตาราง

สิ่งสำคัญคือต้องรู้ว่าจริงๆ แล้ววิธีการปรับให้พอดีอัตโนมัตินั้นเป็นทางลัดที่ใช้คุณสมบัติที่แตกต่างกันกับตารางในเวลาเดียวกัน สิ่งเหล่านี้เป็นคุณสมบัติที่ทำให้ตารางมีพฤติกรรมที่สังเกตได้จริง เราจะพูดถึงคุณสมบัติเหล่านี้สำหรับตัวเลือกการปรับอัตโนมัติแต่ละรายการ

ตัวอย่างโค้ดต่อไปนี้แสดงวิธีการตั้งค่าตารางให้ย่อหรือขยายแต่ละเซลล์ตามเนื้อหา:

// For complete examples and data files, please go to https://github.com/aspose-words/Aspose.Words-for-.NET.git.
table.AllowAutoFit = true;

ปรับตารางให้พอดีอัตโนมัติกับหน้าต่าง

เมื่อปรับใช้การปรับหน้าต่างอัตโนมัติกับตาราง การดำเนินการต่อไปนี้จะดำเนินการเบื้องหลังจริง:

  1. คุณสมบัติ Table.AllowAutoFit ถูกเปิดใช้งานเพื่อปรับขนาดคอลัมน์โดยอัตโนมัติเพื่อให้พอดีกับเนื้อหาที่มีอยู่ โดยใช้ค่า Table.PreferredWidth 100%
  2. CellFormat.PreferredWidth จะถูกลบออกจากเซลล์ตารางทั้งหมด
  3. ความกว้างของคอลัมน์จะถูกคำนวณใหม่สำหรับเนื้อหาตารางปัจจุบัน – ผลลัพธ์สุดท้ายคือตารางที่ใช้ความกว้างที่มีอยู่ทั้งหมด
  4. ความกว้างของคอลัมน์ในตารางจะเปลี่ยนโดยอัตโนมัติเมื่อผู้ใช้แก้ไขข้อความ

ตัวอย่างโค้ดต่อไปนี้แสดงวิธีการปรับตารางให้พอดีกับความกว้างของหน้าโดยอัตโนมัติ:

// For complete examples and data files, please go to https://github.com/aspose-words/Aspose.Words-for-.NET.git.
Document doc = new Document(MyDir + "Tables.docx");
Table table = (Table) doc.GetChild(NodeType.Table, 0, true);
// Autofit the first table to the page width.
table.AutoFit(AutoFitBehavior.AutoFitToWindow);
doc.Save(ArtifactsDir + "WorkingWithTables.AutoFitTableToWindow.docx");

ปรับตารางให้พอดีอัตโนมัติกับเนื้อหา

เมื่อตารางถูกปรับเนื้อหาให้เหมาะสมโดยอัตโนมัติ ขั้นตอนต่อไปนี้จะดำเนินการเบื้องหลังจริง:

  1. คุณสมบัติ Table.AllowAutoFit ถูกเปิดใช้งานเพื่อปรับขนาดแต่ละเซลล์โดยอัตโนมัติตามเนื้อหา

  2. ความกว้างของตารางที่ต้องการจะถูกลบออกจาก Table.PreferredWidth, CellFormat.PreferredWidth จะถูกลบสำหรับแต่ละเซลล์ของตาราง

  3. ความกว้างของคอลัมน์จะถูกคำนวณใหม่สำหรับเนื้อหาตารางปัจจุบัน ผลลัพธ์สุดท้ายคือตารางที่ความกว้างของคอลัมน์และความกว้างของทั้งตารางจะถูกปรับขนาดโดยอัตโนมัติเพื่อให้พอดีกับเนื้อหามากที่สุดเมื่อผู้ใช้แก้ไขข้อความ

ตัวอย่างโค้ดต่อไปนี้แสดงวิธีการปรับตารางให้พอดีกับเนื้อหาโดยอัตโนมัติ:

// For complete examples and data files, please go to https://github.com/aspose-words/Aspose.Words-for-.NET.git.
Document doc = new Document(MyDir + "Tables.docx");
Table table = (Table) doc.GetChild(NodeType.Table, 0, true);
table.AutoFit(AutoFitBehavior.AutoFitToContents);
doc.Save(ArtifactsDir + "WorkingWithTables.AutoFitTableToContents.docx");

ปิดใช้งานการปรับพอดีอัตโนมัติในตารางและใช้ความกว้างของคอลัมน์คงที่

หากตารางปิดใช้งานการปรับพอดีอัตโนมัติและใช้ความกว้างของคอลัมน์คงที่แทน ให้ดำเนินการตามขั้นตอนต่อไปนี้:

  1. คุณสมบัติ Table.AllowAutoFit ถูกปิดใช้งาน ดังนั้นคอลัมน์จะไม่ขยายหรือย่อขนาดเนื้อหา

  2. ความกว้างที่ต้องการของทั้งตารางจะถูกลบออกจาก Table.PreferredWidth, CellFormat.PreferredWidth จะถูกลบออกจากเซลล์ตารางทั้งหมด

  3. ผลลัพธ์สุดท้ายคือตารางที่มีความกว้างของคอลัมน์ถูกกำหนดโดยคุณสมบัติ CellFormat.Width และคอลัมน์จะไม่ถูกปรับขนาดโดยอัตโนมัติเมื่อผู้ใช้ป้อนข้อความหรือเมื่อปรับขนาดหน้า

ตัวอย่างโค้ดต่อไปนี้แสดงวิธีการปิดใช้งานการปรับพอดีอัตโนมัติและเปิดใช้งานความกว้างคงที่สำหรับตารางที่ระบุ:

// For complete examples and data files, please go to https://github.com/aspose-words/Aspose.Words-for-.NET.git.
Document doc = new Document(MyDir + "Tables.docx");
Table table = (Table) doc.GetChild(NodeType.Table, 0, true);
// Disable autofitting on this table.
table.AutoFit(AutoFitBehavior.FixedColumnWidths);
doc.Save(ArtifactsDir + "WorkingWithTables.AutoFitTableToFixedColumnWidths.docx");

ลำดับความสำคัญเมื่อคำนวณความกว้างของเซลล์

Aspose.Words ช่วยให้ผู้ใช้สามารถกำหนดความกว้างของตารางหรือเซลล์ผ่านวัตถุหลายชิ้น รวมถึง CellFormat ด้วย คุณสมบัติ Width ส่วนใหญ่จะเหลือจากเวอร์ชันก่อนหน้า อย่างไรก็ตาม ยังคงมีประโยชน์ในการตั้งค่าความกว้างของเซลล์ให้ง่ายขึ้น

สิ่งสำคัญคือต้องทราบว่าคุณสมบัติ CellFormat.Width ทำงานแตกต่างกัน ขึ้นอยู่กับคุณสมบัติความกว้างอื่นๆ ที่มีอยู่แล้วในตาราง

Aspose.Words ใช้ลำดับต่อไปนี้ในการคำนวณความกว้างของเซลล์:

คำสั่ง คุณสมบัติ คำอธิบาย
1 AllowAutoFit ถูกกำหนดแล้ว หากเปิดใช้งาน AutoFit:
- ตารางอาจขยายเกินความกว้างที่ต้องการเพื่อรองรับเนื้อหา โดยปกติแล้วจะไม่หดตัวต่ำกว่าความกว้างที่ต้องการ
- การเปลี่ยนแปลงใดๆ ที่เกิดขึ้นกับค่า CellFormat.Width จะถูกละเว้น และเซลล์จะพอดีกับเนื้อหาแทน
2 PreferredWidthType ที่มีค่า Points หรือ Percent CellFormat.Width จะถูกละเว้น
3 PreferredWidthType ที่มีค่าเป็น Auto คัดลอกค่าจาก CellFormat.Width และกลายเป็นความกว้างที่ต้องการของเซลล์ (เป็นพอยต์)

อนุญาตให้มีระยะห่างระหว่างเซลล์

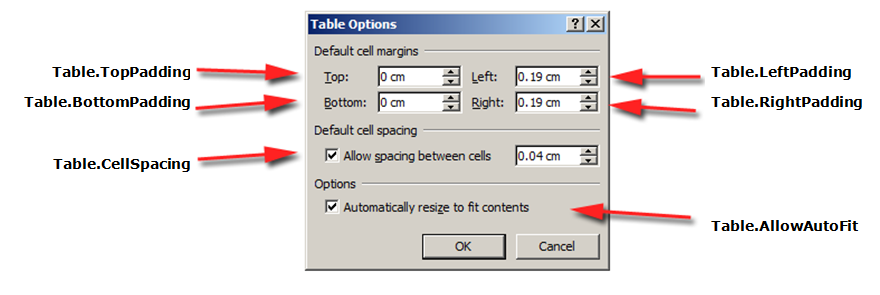
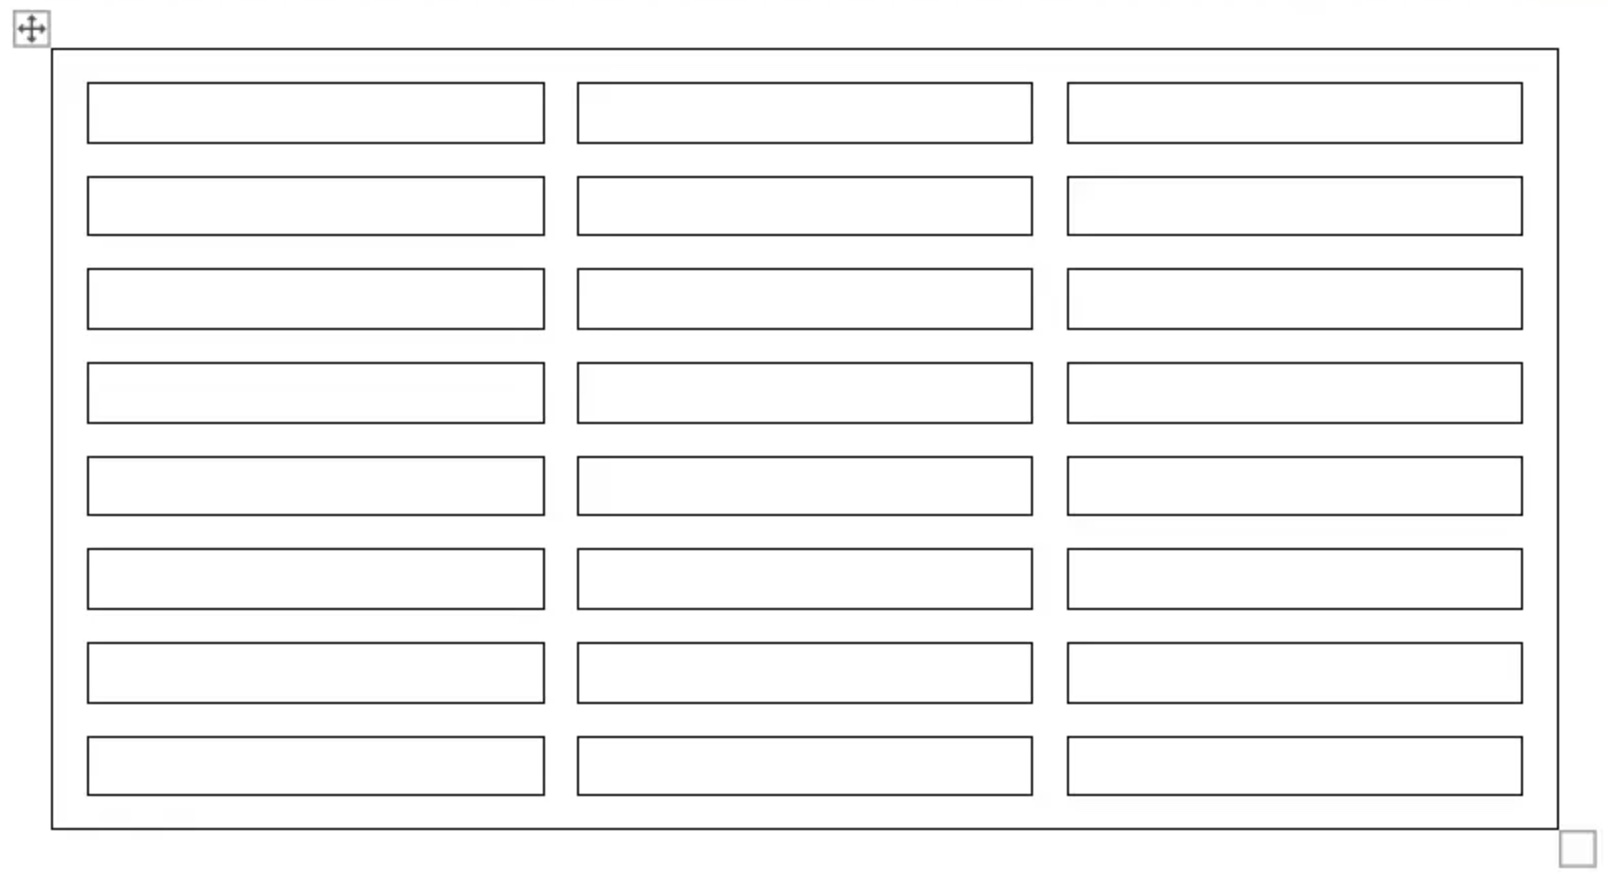
คุณสามารถรับหรือตั้งค่าช่องว่างเพิ่มเติมระหว่างเซลล์ตารางได้คล้ายกับตัวเลือก “ระยะห่างเซลล์” ใน Microsoft Word ซึ่งสามารถทำได้โดยใช้คุณสมบัติ AllowCellSpacing

ตัวอย่างการใช้ตัวเลือกเหล่านี้กับตารางจริงในเอกสารสามารถดูได้จากภาพด้านล่าง

เกี่ยวกับรูปแบบระยะห่างระหว่างเซลล์ aspose-words-net

ตัวอย่างโค้ดต่อไปนี้แสดงวิธีการตั้งค่าระยะห่างระหว่างเซลล์:

// For complete examples and data files, please go to https://github.com/aspose-words/Aspose.Words-for-.NET.git.
Document doc = new Document(MyDir + "Tables.docx");
Table table = (Table) doc.GetChild(NodeType.Table, 0, true);
table.AllowCellSpacing = true;
table.CellSpacing = 2;
doc.Save(ArtifactsDir + "WorkingWithTableStylesAndFormatting.AllowCellSpacing.docx");

ใช้เส้นขอบและการแรเงา

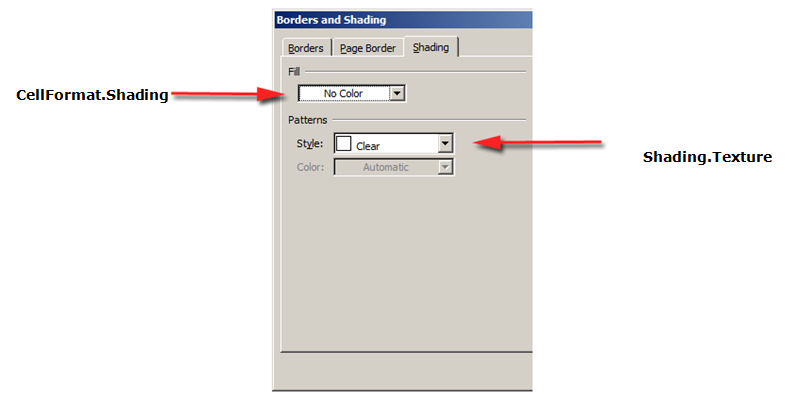
เส้นขอบและการแรเงาสามารถนำไปใช้กับทั้งตารางโดยใช้ Table.SetBorder, Table.SetBorders และ Table.SetShading หรือเฉพาะกับเซลล์ที่ระบุโดยใช้ CellFormat.Borders และ CellFormat.Shading นอกจากนี้ คุณสามารถตั้งค่าเส้นขอบแถวได้โดยใช้ RowFormat.Borders แต่ไม่สามารถใช้การแรเงาในลักษณะนี้ได้

รูปภาพด้านล่างแสดงการตั้งค่าเส้นขอบและเงาใน Microsoft Word และคุณสมบัติที่เกี่ยวข้องใน Aspose.Words

formatting-border-line-aspose-words-net

formatting-cell-color-aspose-words-net

ตัวอย่างโค้ดต่อไปนี้แสดงวิธีจัดรูปแบบตารางและเซลล์ที่มีเส้นขอบและแรเงาต่างกัน:

// For complete examples and data files, please go to https://github.com/aspose-words/Aspose.Words-for-.NET.git.
Document doc = new Document();
DocumentBuilder builder = new DocumentBuilder(doc);
Table table = builder.StartTable();
builder.InsertCell();
// Set the borders for the entire table.
table.SetBorders(LineStyle.Single, 2.0, Color.Black);
// Set the cell shading for this cell.
builder.CellFormat.Shading.BackgroundPatternColor = Color.Red;
builder.Writeln("Cell #1");
builder.InsertCell();
// Specify a different cell shading for the second cell.
builder.CellFormat.Shading.BackgroundPatternColor = Color.Green;
builder.Writeln("Cell #2");
builder.EndRow();
// Clear the cell formatting from previous operations.
builder.CellFormat.ClearFormatting();
builder.InsertCell();
// Create larger borders for the first cell of this row. This will be different
// compared to the borders set for the table.
builder.CellFormat.Borders.Left.LineWidth = 4.0;
builder.CellFormat.Borders.Right.LineWidth = 4.0;
builder.CellFormat.Borders.Top.LineWidth = 4.0;
builder.CellFormat.Borders.Bottom.LineWidth = 4.0;
builder.Writeln("Cell #3");
builder.InsertCell();
builder.CellFormat.ClearFormatting();
builder.Writeln("Cell #4");
doc.Save(ArtifactsDir + "WorkingWithTableStylesAndFormatting.FormatTableAndCellWithDifferentBorders.docx");